
An Interest In:
Web News this Week
- March 19, 2024
- March 18, 2024
- March 17, 2024
- March 16, 2024
- March 15, 2024
- March 14, 2024
- March 13, 2024
Some of Our Sources
- Mashable
- Techcrunch
- The Logo Smith
- Creative Curio
- Inspiredology
- Reencoded
- Wal You
- Freelance Switch
- Android Headlines
- Willems Lab
Help Webnuz
Referal links:
E-commerce App with ReactNative and Amplify - Part 1
Introduction
Hello! & Welcome to this complete guide on AWS Amplify and React Native. In this tutorial, we will build a simple e-commerce app. Users can log in/signup to this app. Users can add their own products, and all the users can view those products added by different users.
Here is a quick demo,

Even though this is not a very complex application, this will be a perfect starter project for you. We will use different AWS Services like S3 Storage, AWS AppSync API, and Amazon Cognito Authentication. Dont worry I will explain these in detail, later.
Prerequisites
- To avoid any disturbances in the future, make sure you have the following prerequisites installed.
- Node.js v10.x or laternpm v5.x or later
- Amplify CLI (version @4.40.1, what Im using in the tutorial)
- Android Studio
- ReactNatice CLI (version 2.0.1)
Architecture Diagram
The following diagram demonstrates our AWS Architecture Diagram.
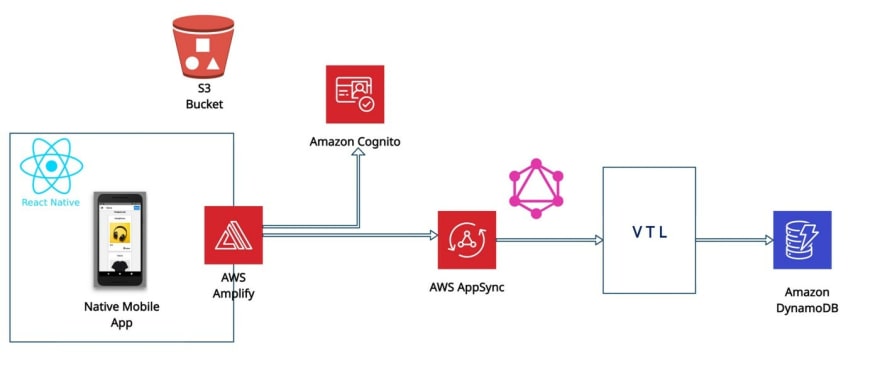
AWS Amplify makes it much easier to work with these different services. As always, our backend resources will be created and managed by Amplify. Let me explain what these services will do.
So, Amplify is the heart of our backend environment. Those arrows pointing from Amplify mean that we will use Amplify to connect those different resources. Every product will have an image. We will store that image in an S3 Bucket. Product details will be saved in Amazon DynamoDB, a NoSQL database provided by AWS. To talk with that Database, we will use a GraphQL API provided by AWS AppSync. Amazon Cognito will handle authentication.
Setting Up the Project
Installing and Configuring Amplify CLI
Through this tutorial, we will work with AWS Amplify CLI. You can install it by running,
npm install -g @aws-amplify/[email protected]
Then you need to run amplify configure. This will set up your Amplify CLI. There you will set up a new IAM User. You will finish setting up your IAM User, by providing the accessKeyId and secretAccessKey for your IAM user.
If you are stuck at some point, you can refer to this original guideline on installing Amplify CLI, https://docs.amplify.aws/cli/start/install
Creating a New ReactNative Application
Hope you have installed and configured Amplify CLI.
To work with ReactNative, you will have to set up the Android development environment. You can refer to this original guide, https://reactnative.dev/docs/environment-setup
Lets create a new React Native app called AmplifyShop.
npx react-native init amplify_shop
If you have already installed react-native-cli, you can use that instead of npx.
Open the newly created React Native Project using Android Studio. Open the Android Emulator using Android Studios AVD Manager. In the project directory, run these two commands.
npx react-native start
npx react-native run-android
Now, the React Native project should run on your Android Emulator. If you are stuck at some point, please refer to the guide that I have suggested earlier.
Initializing Amplify Backend
Lets initialize Amplify for our project. Then we can add services one by one.
In the project directory, run
amplify init
Then you will be prompted for the following information regarding the project you initialize.
When you initialize your Amplify Project,
- It creates a file called aws-exports.js in the src directory. This file will store all the relevant information to identify the AWS resources/services that will allocate in the future.
- It creates a directory called amplify. We will use this directory to store the templates and configuration details of the services that we will use in the future. In this directory, Amplify will hold our backend schema as well.
- It creates a Cloud Project. That project can be viewed using the amplify console command.
Next, we need to install all the necessary dependencies by running the following command.
npm install aws-amplify aws-amplify-react-native amazon-cognito-identity-js @react-native-community/netinfo
You will also need to install the pod dependencies for iOS.
npx pod-install
Configuring Amplify Backend
To complete setting up our Amplify project, we need to configure amplify in a higher-order component. Adding the following lines of code in your App.js or index.js file will do the job.
import Amplify from 'aws-amplify';
import awsconfig from './aws-exports';
Amplify.configure({
  ...awsconfig,
  Analytics: {
    disabled: true,
  },
});
That completes setting up the project. Now lets add those services one by one.
Adding Cognito Authentication
Now, adding Authentication to your React Native App never gets easier than Amplify.
Adding Sign-up and Log-in
Run amplify add auth in your project directory. Submit the following information when configuring Authentication.
Then, run amplify push, to deploy your backend changes. Amplify will take care of the rest by creating your Cognito Userpool.
The authentication UI component, provided by Amplify Framework, will provide the entire authentication flow.
In the App.js file,
- Import withAuthenticator component
import { withAuthenticator } from 'aws-amplify-react-native' - Wrap the main component with withAuthenticator component.
export default withAuthenticator(App)
When you run your app. This login screen will show up. Try logging in as a new user. This will lead you to the home page. The newly created user will be saved in our Cognito User Pool.

Adding ReactNative Navigation
Our App will contain two screens. One Screen to display the list of products and the other to add new products. Lets create these two screens.
Create a new directory called src. In that directory, create a folder called screens. In that folder src/screens, create two new javascript files named add-product-screen.js and home-screen.js I just prefer this naming convention. You can use any convention.
Copy and paste the following sample code. Do change the function name (HomeScreen and AddProductScreen) and the title according to the page.
directory: src/screens/ home.js, add-product-screen.js
import React from 'react';import {SafeAreaView, StatusBar, Text} from 'react-native';const HomeScreen = (props) => { return ( <> <StatusBar barStyle="dark-content" /> <SafeAreaView> <Text>Home</Text> </SafeAreaView> </> );};export default HomeScreen;`There are multiple ways to add navigation into ReactNative Apps. In this tutorial, we will use Stack Navigator Library from React Navigation. First, we should install it using npm.
npm install @react-navigation/native
Install all the additional third-party dependencies as well.
npm install react-native-reanimated react-native-gesture-handler react-native-screens react-native-safe-area-context @react-native-community/masked-view @react-navigation/stack
From React Native 0.60 and higher, linking is automatic. So you dont need to run react-native link.
If youre on a Mac and developing for iOS, you need to install the pods (via Cocoapods) to complete the linking.
npx pod-install ios
To finish installing React Native Navigation, add the following import in your App.js or index.js file.
import 'react-native-gesture-handler';
For the sake of this tutorial, I will use two additional styling libraries. I will use react-native-elements and react-native-vector-icons. Lets install those using npm.
npm install react-native-elements
npm install react-native-vector-icons
In order to view fontawesome icons, we need to add the following line into android/app/build.gradle file.
apply from: "../../node_modules/react-native-vector-icons/fonts.gradle"
With that out of the way, move into the App.js file. We will use the App.js file to set up navigation in our App. Replace the current code with the following.
directory: App.js
import React from 'react';import {StyleSheet, View, TouchableOpacity} from 'react-native';import {createStackNavigator} from '@react-navigation/stack';import {NavigationContainer} from '@react-navigation/native';import AddProductScreen from './src/screens/add-product-screen';import HomeScreen from './src/screens/home-screen';import {Button} from 'react-native-elements';import Icon from 'react-native-vector-icons/FontAwesome';import {withAuthenticator} from 'aws-amplify-react-native';const App: () => React$Node = () => { const Stack = createStackNavigator(); return ( <> <NavigationContainer> <Stack.Navigator initialRouteName="Home"> <Stack.Screen name="Home" component={HomeScreen} options={({navigation}) => ({ title: 'Home', headerStyle: { backgroundColor: '#ff9300', }, headerRight: () => ( <TouchableOpacity style={styles.addButton} onPress={() => navigation.navigate('AddProduct')}> <Icon name={'plus'} size={20} color="#000000" /> </TouchableOpacity> ), })} /> <Stack.Screen name="AddProduct" buttonStyle={styles.addButton} component={AddProductScreen} options={{ title: 'Add Product', headerStyle: { backgroundColor: '#ff9300', }, }} /> </Stack.Navigator> </NavigationContainer> </> );};const styles = StyleSheet.create({ addButton: { marginRight: 20, }, logOutBtn: { marginLeft: 10, },});export default withAuthenticator(App);This is the simplest and easiest way to add navigation. We got Stack.Navigator Component, which we can provide an initial route. Inside that wrapper component, we can define each screen using the Stack.Screen component.
We can use that options prop to define the header for each screen. I just added a navigation button on the right side of our header. It should navigate to our AddProduct Screen.
Since we are using Stack Navigation, the new screen gets loaded on top of the previous screen. Therefore, the back button will be added automatically.
Ok, stop, huge information, you need to understand and apply the knowledge. In the next entry, we are going to continue with the tutorial and amplify integration. See you soon.
Original Link: https://dev.to/gelopfalcon/e-commerce-app-with-reactnative-and-amplify-part-1-18pb
Dev To
More About this Source Visit Dev To