
An Interest In:
Web News this Week
- April 23, 2024
- April 22, 2024
- April 21, 2024
- April 20, 2024
- April 19, 2024
- April 18, 2024
- April 17, 2024
Some of Our Sources
- TutsPlus - Code
- Team Treehouse
- Smashing Magazine
- TutsPlus - Design
- My Ink Blog
- Stylized Web
- Wal You
- Freelance Switch
- Android Headlines
- TechPowerUp
Help Webnuz
Referal links:
Build a physics playground with Kaboom.js
In this tutorial, we will be building a simple physics playground with Kaboom.js. This will be a 2D side-view platformer in which the player can use a gravity gun to pick up and shoot objects in the world, similar to games like Half-Life 2 and Rochard.
By the end of this tutorial, you will:
- Be familiar with advanced usage of the Kaboom JavaScript game development framework.
- Be able to build a simple 2D physics engine.
- Have the basis for a physics-based platformer, which you can extend into a full game.
Getting started
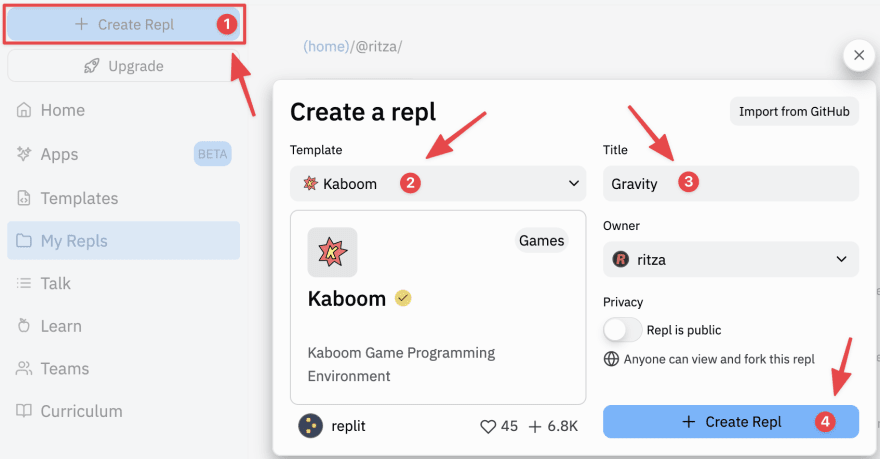
Log into your Replit account and create a new repl. Choose Kaboom as your project type. Give this repl a name, like "gravity".
Kaboom repls are quite different from other kinds of repls you may have seen before: instead of dealing directly with files in folders, you'll be dealing with code, sounds and sprites, the latter of which you can draw directly in Replit's image editor.
Setting the scene
When you first open your new Kaboom repl, you'll be greeted by a file containing the sample code below.
import kaboom from "kaboom";// initialize contextkaboom();// load assetsloadSprite("bean", "sprites/bean.png");// add a character to screenadd([ // list of components sprite("bean"), pos(80, 40), area(),]);This code loads a sprite for Kaboom's mascot Bean, and places Bean near the top of the screen. Before we start coding, we'll remove the code for adding Bean, leaving the following lines:
import kaboom from "kaboom";// initialize contextkaboom();Our edited code initialises Kaboom and gives us a blank canvas to work with. We'll start by defining a level containing walls, movable crates, and the player object. Add the following code beneath kaboom();:
// leveladdLevel([ "========================", "= =", "= =", "= =", "= =", "= @ =", "= ## =", "= ========== =", "= =", "= =", "= =", "= =", "= =", "= =", "= =", "= =", "========================"], { width: 32, height: 32, "=": () => [ // wall rect(32, 32), color(CYAN), area(), solid(), "wall" ], "#": () => [ // crate rect(32, 32), color(RED), z(1), outline(1), origin("center"), area(), body(), "movable" ], "@": () => [ // player circle(32), color(GREEN), z(2), outline(2), area({ width: 64, height: 64}), body(), origin("center"), { speed: 120, jumpspeed: 1000 }, "player" ],});This code uses Kaboom's addLevel() function to visually construct a level. This function takes two arguments: an ASCII art representation of the level, and a JSON object defining the width and height of individual blocks and providing definitions for each of the objects used. Let's take a closer look at each of these definitions, starting with the wall object.
"=": () => [ // wall rect(32, 32), color(CYAN), area(), solid(), "wall" ],A game object definition in Kaboom is a list of components and tags, and optionally custom attributes and functions. Components are a core part of Kaboom they provide different functionality to game objects, from an object's appearance to functionality such as collision detection.
This wall object has four components:
rect(), which draws a rectangle to represent the object.color(), which gives the rectangle a color.area(), which provides collision detection for the object.solid(), which will prevent other objects from moving past it.
We've given the object the tag "wall". Objects can have multiple tags, which can be used to define custom behavior, such as collision detection between objects with particular tags.
Next, let's look at the crate definition:
"#": () => [ // crate rect(32, 32), color(RED), z(1), outline(1), origin("center"), area(), body(), "movable" ],Compared to our wall, we've given our crate the following additional components:
z(), which defines the crate's z-order, ensuring it will be drawn on top of walls.outline(), which will draw a single-pixel outline around the object.origin(), which sets the sprite's origin to "center", so that we can move it around from its center, rather than the default top-left corner.body(), which makes our crate subject to gravity.
We've given it the tag "movable", a generic tag we can use for all objects that can be manipulated by the player's gravity gun.
Finally, let's look at the player object:
"@": () => [ // player circle(32), color(GREEN), z(2), outline(2), area({ width: 64, height: 64}), body(), origin("center"), { speed: 120, jumpspeed: 1000 }, "player" ],Note the following:
- As we're using the
circlecomponent to draw the player, we must specify a width and height for thearea()component. All collision areas in Kaboom.js are rectangular (as of v2000.1.6). - We've added
speedandjumpspeedcustom variables to the player object, which we'll use to control its movement speed and jump height.
Run your repl now, and you'll see your level, with player, crates and walls. As we've placed the player in mid-air, you should see them fall to the platform below, confirming the presence of gravity.

Moving the player
Let's write some code to control the player. First, we need to retrieve a reference to the player using get():
// playerplayer = get("player")[0]; Now we'll add code to move the player left and right. As we'll use the mouse to control the player's gravity gun, it makes ergonomic sense to control the player with the WASD keys rather than the arrow keys. Add the following code:
onKeyDown("a", () => { player.move(-player.speed, 0)});onKeyDown("d", () => { player.move(player.speed, 0)});Here we detect the onKeyDown event for the A key to move the player to the left and D key to move the player to the right. The move() function automatically checks for collisions with solid objects, so the player will only move if there is space to do so.
onKeyDown("w", () => { if (player.isGrounded()) { player.jump(player.jumpspeed) }});The isGrounded() and jump() functions are provided by the body() component, making basic platformer movement simple to implement in Kaboom.
Rerun your repl (or refresh your repl's webview) now, and you should be able to move left and right with A and D, and to jump with W. If the player jumps off the platform, they will fall out of view. We can fix this by having the game camera follow the player. Add the following code below your keyboard-handling code:
// camera follow playerplayer.onUpdate(() => { camPos(player.pos);});This code will run every frame and keep the camera focused on the player as they move around. Refresh your in-repl browser and try it out.
Pulling objects with the gravity gun
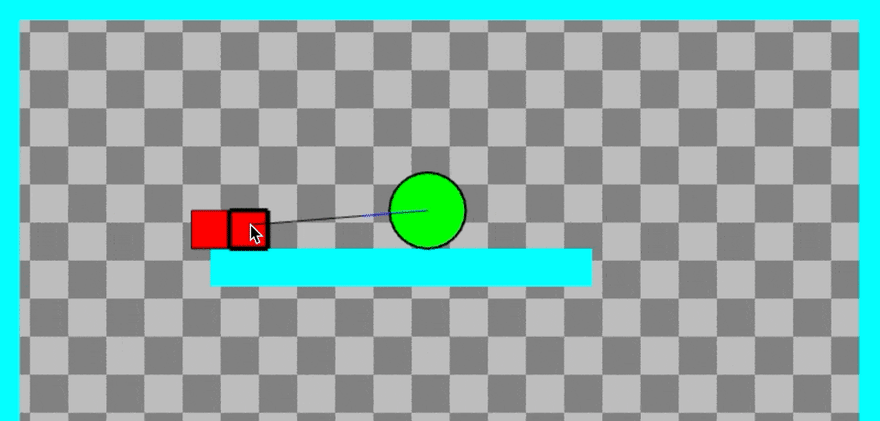
Now that we've got our generic platformer functionality implemented, it's time to add the gravity gun. The player will aim their gravity gun with the mouse. It will have a range, which we'll show as a line. Movable objects that fall into that range will have a thicker outline drawn around them. When the player holds down the right mouse button, objects in range will travel towards them, until they reach the edge of a secondary, "holding" range. Objects in the holding range will move with the player until the left mouse button is clicked, at which point they will be launched into the air. Alternatively, the player can click the right mouse button to drop the held object.
In the code above, we've implemented horizontal movement (walking) and vertical movement (jumping). Implementing our gravity gun will require us to implement movement at arbitrary angles. To this end, we will need to write a couple of helper functions. Go to the top of your file, and add the following code beneath the kaboom(); line:
// helper functionsfunction angleBetween(p1, p2) { return -Math.atan2(p2.y - p1.y, p2.x - p1.x);}function pointAt(distance, angle) { return vec2(distance*Math.cos(angle), -distance*Math.sin(angle));}The first function, angleBetween(), uses JavaScript's Math.atan2() to determine the angle two points make with the horizontal. The second function, pointAt(), uses sines and cosines to determine the point at a certain distance and angle.
Next, we'll add two custom components:
gravitygun(), which will define attributes and functions for our player's gravity gun.physics(), which will define attributes and functions for the movable objects the gravity gun will manipulate.
Add the following code for the gravitygun() component beneath your helper function definitions:
// custom componentsfunction gravitygun(range, hold, firepower) { return { id: "gravitygun", require: ["pos"], }}Components are written as functions that return objects of a specific format. Each component should have an id, and a list of components it depends on attached to the require attribute. Beyond that, components can have arbitrary attributes, which will be assigned to their parent object, and special functions, which will be integrated into the game's event loop.
The only dependency for our component is pos(), as it will not work on an object that doesn't have a position in the world. Function arguments will allow us to customize this component, in the form of specifying the gravity gun's range, hold distance, and firepower.
Let's add some custom attributes to our component, to help us aim and fire the gravity gun. Expand your component code to match the following:
function gravitygun(range, hold, firepower) { return { id: "gravitygun", require: ["pos"], firepower: firepower, // new code from this line range: range, hold: hold, aimAngle: angleBetween(this.pos, mouseWorldPos()), rangeLine: { p1: this.pos, p2: this.pos, color: BLACK }, holdLine: { p1: this.pos, p2: this.pos, color: BLUE }, }}In the above code:
firepoweris the amount of force to launch objects with.rangeis the length of our gravity gun's pulling range.holdis the distance from the player's center at which objects will be held once pulled in.aimAngleis the angle of our gravity gun's aim, which will be the angle created with the horizontal.rangeLineandholdLineare lines we will use to represent the gravity gun's range and hold.
Now we need to add a draw() function to draw both lines, and an update() function to recalculate the gravity gun's aim angle and the position of both lines as the mouse cursor moves around. Alter your component code to include these functions at the bottom:
function gravitygun(range, hold, firepower) { return { id: "gravitygun", require: ["pos"], firepower: firepower, range: range, hold: hold, aimAngle: angleBetween(this.pos, mouseWorldPos()), rangeLine: { p1: this.pos, p2: this.pos, color: BLACK }, holdLine: { p1: this.pos, p2: this.pos, color: BLUE }, draw() { // new code from this line drawLine(this.rangeLine); drawLine(this.holdLine); }, update() { this.aimAngle = angleBetween(this.pos, mouseWorldPos()); this.rangeLine.p1 = this.pos; this.rangeLine.p2 = this.pos.add(pointAt(this.range, this.aimAngle)); this.holdLine.p1 = this.pos; this.holdLine.p2 = this.pos.add(pointAt(this.hold, this.aimAngle)); } }}Our gravity gun component is complete. Now we need to add the physics() component, for objects affected by the gravity gun. Add the following code just below the last code you added:
function physics(mass) { return { id: "physics", require: ["area", "body"], mass: mass, inRange: false, inHold: false, held: false, dropping: false, direction: 0, speed: 0, draw() { if (this.inRange) { drawRect({ width: this.width, height: this.height, pos: vec2(this.pos.x - this.width/2, this.pos.y - this.height/2), opacity: 0, outline: { color: BLACK, width: 4} }); } }, }}This component requires both area and body to be affected by the gravity gun, objects must have a collision area and be subject to regular gravity. We also give our physics objects a mass, direction and speed, and several variables to aid the gravity gun. Finally, we define a draw() function, which will draw a thick rectangle around the object when it is in gravity gun range.
Now we need to add the gravitygun() component to the player object and the physics() component to the crate object. Find your level creation code and add the new component lines to the objects as below:
"#": () => [ // crate rect(32, 32), color(RED), z(1), outline(1), origin("center"), area(), body(), physics(100), // <-- NEW LINE "movable" ], "@": () => [ circle(32), color(GREEN), z(2), outline(2), area({ width: 64, height: 64}), body(), origin("center"), gravitygun(150, 55, 40), // <-- NEW LINE { speed: 120, jumpspeed: 1000 }, "player" ],We now have everything in place to write the code that will allow us to pull objects with the gravity gun. We'll do this in an onUpdate() event callback for objects with the "movable" tag. Add the following code to the bottom of the main.js file:
// gravity gun pull and holdonUpdate("movable", (movable) => { // test collisions myRect = movable.worldArea() movable.inRange = testRectLine(myRect, player.rangeLine); movable.inHold = testRectLine(myRect, player.holdLine);});First, we get the coordinates for the movable object's collision rectangle, using worldArea(), a function provided by the area() component. We then use the testRectLine() function to determine whether our player's range line or hold line intersects with this collision rectangle.
Now let's have the gravity gun pull objects in range when the player holds down the right mouse button. Add the following code below the line where you assigned movable.inHold in the body of the onUpdate event callback:
// gravity gun pull if (isMouseDown("right")) { if (movable.inHold) { movable.held = true; } else if (movable.inRange) { movable.moveTo(player.holdLine.p2); } }If the object is in holding range, we set held to true. If the object is in pulling range, we move it into holding range. We use the moveTo() function, provided by the pos() component, without a speed argument. This means the object will teleport to the specified position.
Next, we'll handle holding objects once they've been pulled in. Add the following code beneath the code you added above:
// gravity gun hold if (movable.held) { movable.moveTo(player.holdLine.p2) }This code will ensure that objects stay in the holding position when held, so the player will be able to move them around in an arc.
Finally, we'll need to move our object after it's been launched. Add the following code below the lines you added above:
// gravity gun launch movable.moveBy(dir(movable.direction).scale(movable.speed)); movable.speed = Math.max(0, movable.speed-1); //frictionWhen we launch an object, we'll give it a direction and a non-zero speed. We use moveBy(), provided by the pos() component, to move the object unless there are other solid objects in the way. To give the object a more natural movement arc, we will simulate friction by decreasing its speed every frame until it reaches zero.
Run your repl now and try out the gravity gun. You should be able to pull crates into the holding position, and then move them around your head.

Fixing the wall-clipping bugs
If you play around with the game, you should notice a couple of wall clipping bugs. When holding an object, you can force it to teleport below the platform you're standing on by aiming them. Similarly, objects will teleport through platforms if you pull them from the other side.
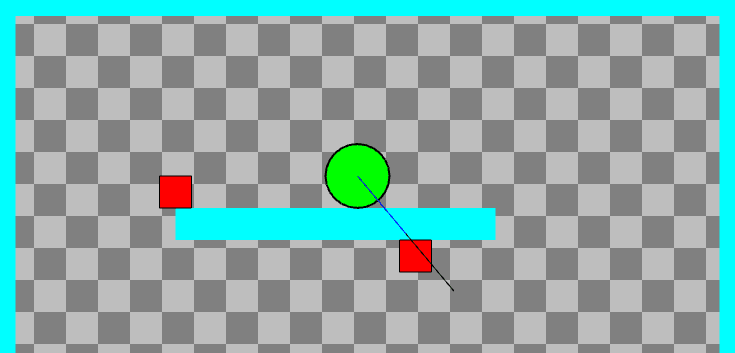
In both cases, this is because Kaboom's moveTo() function does not take solid objects into account, so we'll have to do that ourselves.
We'll fix the first bug by adding a new, collision-aware movement function to our physics() component. Find the component definition and append the function to the object it returns, just below the draw() function definition:
moveToNoCollide(dest) { const diff = dest.sub(this.pos); return this.moveBy(diff.unit().scale(diff.len())); }This function calculates the movement vector needed to move from the current position to the destination, and then passes this vector to the collision-aware function moveBy(). Our moveBy() function will return a Collision object if it detects a collision while moving. We'll return this and use it to cancel the hold if certain conditions are met.
Find the if (movable.held) block in your onUpdate("movable") event callback and alter it to match the code below:
// gravity gun hold if (movable.held) { col = movable.moveToNoCollide(player.holdLine.p2) if (col != null && col.target.solid) { if (col.target.is("player")) { // disregard player collisions movable.moveTo(player.holdLine.p2); } else movable.held = false; } }Here we've replaced moveTo() with moveToNoCollide(), and we're doing some checks on the collision object returned. If the collision is with the player, we ignore it and move the object back to the hold position. Otherwise, we cancel the hold.
Refresh your repl browser now and try to clip a held crate through the floor. You should be unsuccessful.
To fix the second clipping bug, we're going to need to detect solid objects between the movable object being pulled and the player's hold position. We'll write a new helper function to do this. Add the following code near the top of your file, just under the definition of pointAt():
function checkCollisionLine(line, tag) { collision = get(tag).some((object) => { return testRectLine(object.worldArea(), line); }); return collision;}The checkCollisionLine() function tests whether an object with a given tag intersects with a line. We do this by getting all objects with the tag and testing each one until we find a collision. The some() method will stop executing after a single true is returned, so this isn't quite as inefficient as it could be, but it's still probably not the optimal way to do this. Nonetheless, it should work fine while our game is relatively small.
To use this function, find the if (isMouseDown("right")) in your onUpdate("movable") event callback and make the modifications shown:
// gravity gun pull if (isMouseDown("right")) { colLine = { // new object definition p1: movable.pos, p2: player.holdLine.p2 } if (movable.inHold) { movable.held = true; } // expanded expression below else if (movable.inRange && !checkCollisionLine(colLine, "wall")) { movable.moveTo(player.holdLine.p2); } }To prevent the player from pulling objects through walls, we check that the line between the object in range and the player's hold position is free of walls before moving it. Rerun your repl now, and you should be unable to clip objects through walls.
Dropping and launching objects with the gravity gun
Now that we have a stable pulling and holding implementation, we need to be able to drop and launch objects. Add the following code at the bottom of your file:
// gravity gun droponMousePress("right", () => { holdList = get("movable").filter((element) => { return element.held; }); if (holdList.length) { selected = holdList[0]; selected.held = false; }});When the right mouse button is clicked, we retrieve all the "movable"-tagged objects and filter out the ones that aren't currently held. Only one object can be held at a time, so we select that object and release it.
If you restart your repl now, you may have trouble getting dropping to work. Because we use the right mouse button both for pulling and dropping, you need to be quite precise to avoid immediately grabbing objects after dropping them.
Let's implement a dropping timeout for dropped objects to make this more user-friendly. Add the following lines below selected.held = false:
selected.dropping = true; wait(0.2, () => { selected.dropping = false; });This code uses a wait() callback, which will execute after the given number of seconds.
We defined the dropping attribute as part of our physics() component, so now all we need to do is make our pull respect the timeout. Find the if (isMouseDown("right")) line in your onUpdate("movable") event callback and alter it to resemble the following:
// gravity gun pull if (isMouseDown("right") && !movable.dropping) { Now you should be able to drop objects more easily.
Finally, let's add some code to launch objects when the left mouse button is clicked. Enter the following code at the bottom of your file.
// gravity gun launchonMousePress("left", () => { rangeList = get("movable").filter((element) => { return element.held; }); if (rangeList.length) { selected = rangeList[0]; // 1st for now selected.held = false; selected.direction = rad2deg(-player.aimAngle); selected.speed = player.firepower; }});This code is largely similar to the dropping code, but instead of specifying a drop timeout, we give the previously held object a direction and a speed. The direction will be the player's aimAngle, which we need to convert to degrees for Kaboom. The speed will be the firepower value we defined in our gravitygun() module.
Restart your repl and play around with picking up, dropping and launching crates. Some odd behavior you may notice is that objects launched straight will tend to slide along the ceiling for a while as they bleed off their speed. We can prevent this by adding the following code to kill a movable object's speed on collision with a wall:
onCollide("movable", "wall", (a, b) => { a.speed = 0;});Object collisions
Our physics playground wouldn't be complete without collisions between objects, so let's add some simple code to make objects push each other. Add the following collision handler to the bottom of your file:
// physics object collisionsonCollide("movable", "movable", (a, b) => { if (a.speed > b.speed) b.direction = a.direction; else if (a.speed <= b.speed) a.direction = b.direction; finalSpeed = (a.speed) + (b.speed) / (a.mass + b.mass); a.speed = finalSpeed; b.speed = finalSpeed;});This code will assign the direction of the fastest object to both objects, and determine the speed of both from an altered form of a simple one-dimensional collision formula. Play around with the values and calculations and see what sort of behavior you prefer. Remember, it's more important for a game to be fun than for it to be realistic.
Next steps
We've built a rudimentary physics-based platform engine. From here, there's a lot you can do to expand this into a full game. Consider the following ideas:
- Add enemies to throw crates at.
- Add more movable objects of different sizes and masses.
- Add puzzles that can be solved by arranging crates in specific patterns, and launching them from specific angles.
- Improve the physics simulation with 2D collisions, rotating objects, and objects with different behaviors, such as bouncing and shattering.
Original Link: https://dev.to/ritza/build-a-physics-playground-with-kaboomjs-5hcg
Dev To
More About this Source Visit Dev To