
An Interest In:
Web News this Week
- March 21, 2024
- March 20, 2024
- March 19, 2024
- March 18, 2024
- March 17, 2024
- March 16, 2024
- March 15, 2024
Some of Our Sources
- Slashdot
- Engadget
- Joshua Blankenship
- You The Designer
- Crazy Leaf Design
- Web Design Ledger
- Android Dissected
- Willems Lab
- The Verge
- TechPowerUp
Help Webnuz
Referal links:
Web Scraping with NodeJS: a comprehensive guide [part-2]
Dealing with websites that have compression encoded in them.
let's take a closer look at what happened and why it didn't work. This is a frequent mistake that rookie scrapers make when playing with requests; it happens to everyone. You may have also noticed the gibberish encoded response; this is due to the IMDB's usage of the gzip compression algorithm.

This is done to reduce the size of the response data so that it may be returned faster and save a lot of bandwidth at the same time. Let's get started with this. We can address this by adding an extra parameter to the request function called gzip and setting it to true.
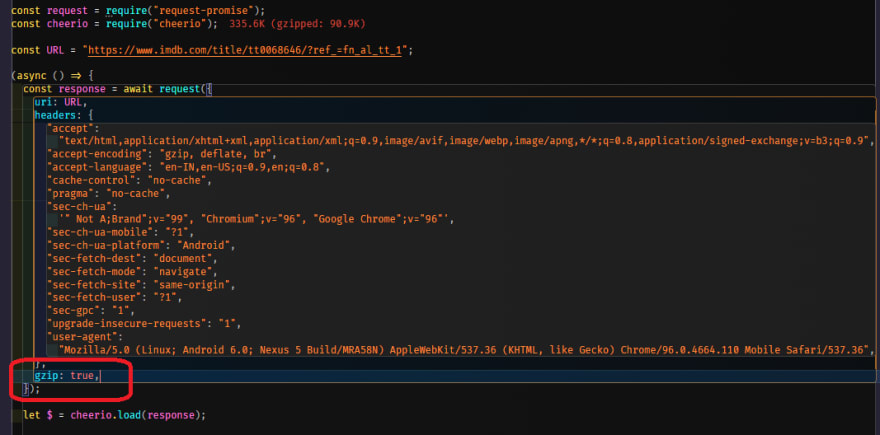
So this will inform the request library to decompress this actual request from IMDB using gzip compression. Let's fast test it out and see if it works, so run your scrapper again.

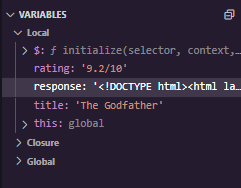
As you can see, we already have a readable <!DOCTYPE> HTML response, as well as everything we had before, and the title and ratings work perfectly.
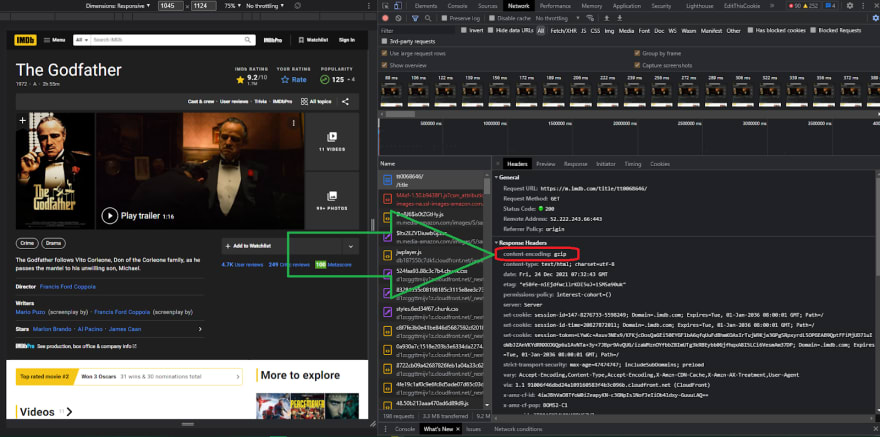
Let's go back to the dev tools, which we already have open, and search for the content encoding on the response headers from the website, which you can see here it states content encoding with the value of gzip, indicating that this website indeed uses gzip compression algorithm.
An in-depth look at jQuery selectors and data parsing
Let's learn a little more about jquery selectors and where to go for more information about them. It's quite normal and acceptable to not remember all of them. Jquery selectors This is why you should always have the documentation on hand. Let's go to the browser and search for jquery selectors. As you can see, there are a lot of results. Let's go to the w3 school link. It's not the official one, but it's a very popular website that has all of the selectors that we need. This is what we'll use to search for selectors that we need to scrape some parts of. website.


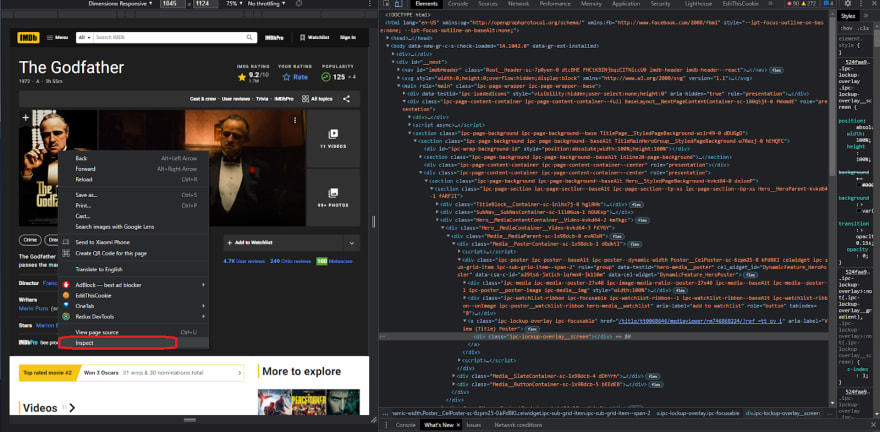
Now, let's get started scraping. Go to IMDB movie page and open the dev tools. Now that we have the movie open, our editor running, and our dev tools open, we can start scraping. There may be some errors, but we'll fix them as we go. By using this method, you'll be able to see the entire thought process behind it, so let's get started.
First, we have the title and the movie rating. Let's assume we want to retrieve the movie poster. To do so, go to the movie poster and check elements, looking for anything unique about it, such as an id or a class name that isn't repeated, or just discover the selector.
So the first thing that pops up is the div with the class name of ipc-poster, which we can easily get and then access the element and then the image within it. First, let's clear everything in the console, and because this website already has jquery implemented, we can check the jquery code that we're going to write directly in the console. If the website doesn't have jquery implemented, you can inject it and also check it in the console In the later section of this article there is a demo showing how to inject the jquery library inside the browser itself, but just so you know, if you don't see the console tab with the console, you can easily click on escape to toggle between them on and off.
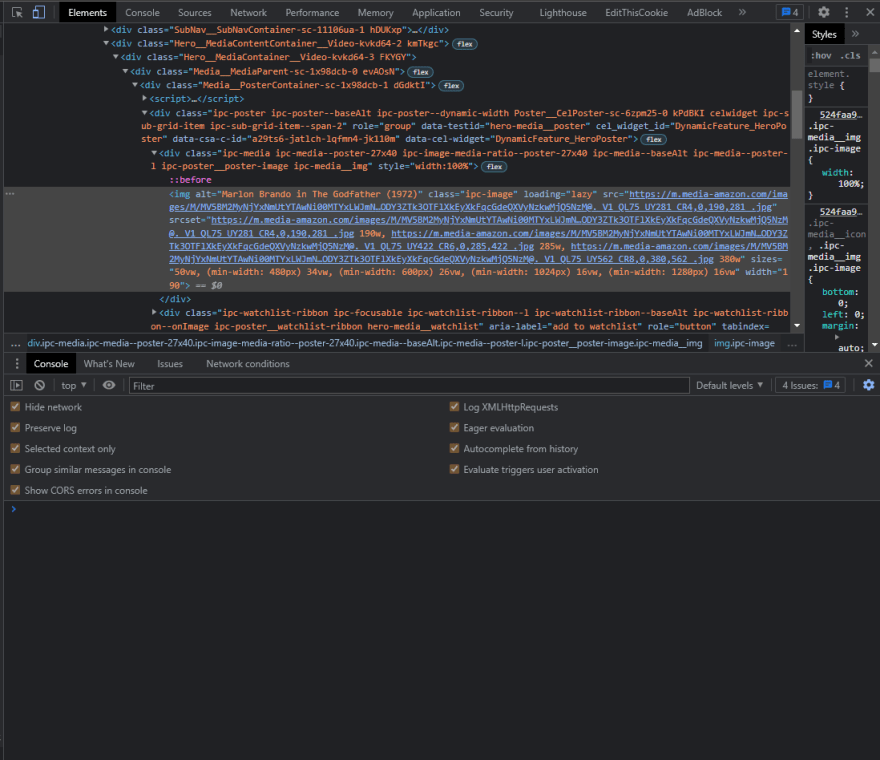
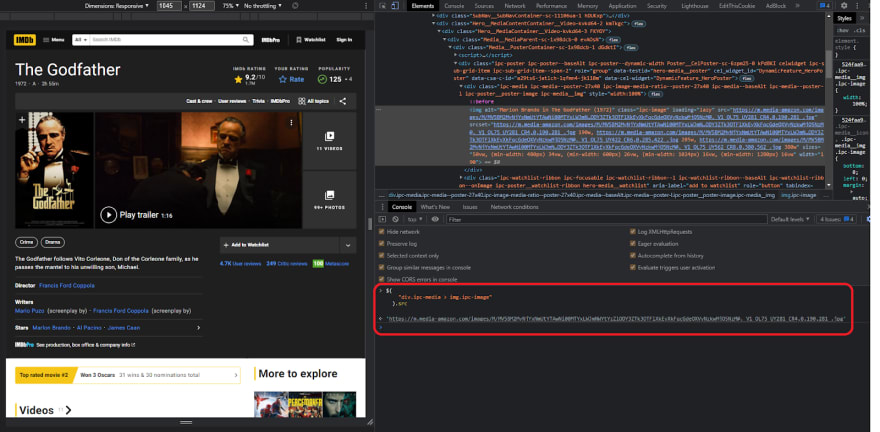
Let's write the code for this image selector. First, we'll select the div with the class name ipc-poster or ipc-media, and then we'll select the child within it, which is an IMG tag, which is the image. We can now expand this element and see that we have an image, so as you can see on the image below it appears that this selector is working perfectly fine.


Now that we have a proper and working selector, we need to choose the source of the image to get the actual link of the image, so for that, we can use the attribute function and pass into the parenthesis the exact attribute name that we want to select, in our case, it will be source src let's try it out so type attribute and then src enter and it should work.
Finally, let's put this code to the test in our editor by copying the code from the browser console and pasting it into a new variable called imagePoster inside our code editor. This should work the same, so let's console log the imagePoster and remove the breakpoint because we don't need it any longer (you can keep it if you want to check it). So, the code in "index.js" should look like this.
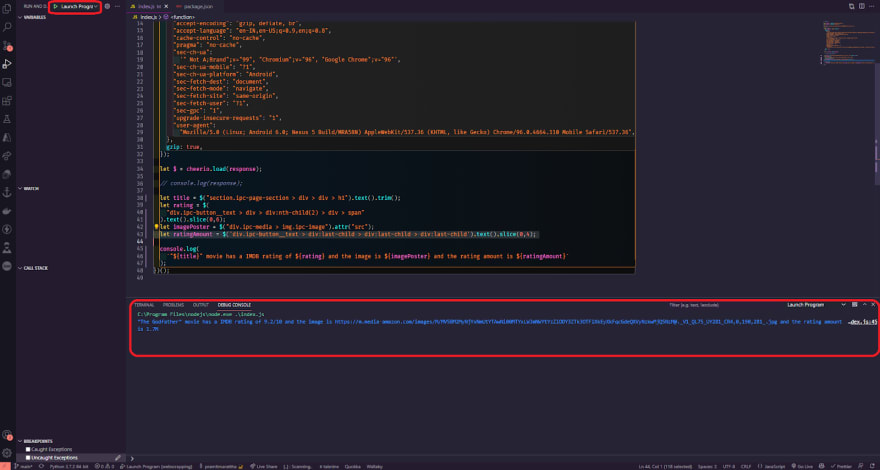
// index.jsconst request = require("request-promise");const cheerio = require("cheerio");const URL = "https://www.imdb.com/title/tt0068646/?ref_=fn_al_tt_1";(async () => { const response = await request({ uri: URL, headers: { "accept": "text/html,application/xhtml+xml,application/xml;q=0.9,image/avif,image/webp,image/apng,*/*;q=0.8,application/signed-exchange;v=b3;q=0.9", "accept-encoding": "gzip, deflate, br", "accept-language": "en-IN,en-US;q=0.9,en;q=0.8", "cache-control": "no-cache", "pragma": "no-cache", "sec-ch-ua": '" Not A;Brand";v="99", "Chromium";v="96", "Google Chrome";v="96"', "sec-ch-ua-mobile": "?1", "sec-ch-ua-platform": "Android", "sec-fetch-dest": "document", "sec-fetch-mode": "navigate", "sec-fetch-site": "same-origin", "sec-fetch-user": "?1", "sec-gpc": "1", "upgrade-insecure-requests": "1", "user-agent": "Mozilla/5.0 (Linux; Android 6.0; Nexus 5 Build/MRA58N) AppleWebKit/537.36 (KHTML, like Gecko) Chrome/96.0.4664.110 Mobile Safari/537.36", }, gzip: true, }); let $ = cheerio.load(response); // console.log(response); let title = $("section.ipc-page-section > div > div > h1").text(); let rating = $( "div.ipc-button__text > div > div:nth-child(2) > div > span" ).text().slice(0,6);let imagePoster = $("div.ipc-media > img.ipc-image").attr("src"); console.log( `"${title}" movie has a IMDB rating of ${rating} and the image is ${imagePoster}` );})();Now go to the debug and start the debugger

As you can see, the title The Godfather has a 9.2 rating, and we also have a link to the image source. Before we go any further, if you have a white space issue in the movie title, you can easily remove it by using the .trim() after the text() method, which will also eliminate the white space between the text.
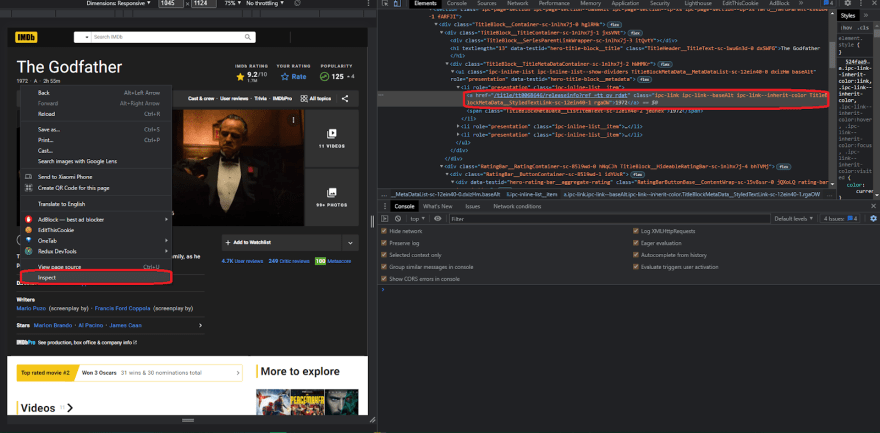
let title = $("section.ipc-page-section > div > div > h1").text().trim();Let's keep going and proceed to the next step. Okay, so now that we have the title, the poster, and the rating, let's see how much amounts of rating this movie has. Let's right-click on the rating amount and inspect the element first.

What we can see is that there is a div with another tag of div with the class AggregateRatingButton__TotalRatingAmount but nothing useful. We need to go a little higher because we only have the ipc-button__text class at the moment. So we can finally check this and grab onto it, acquire the link, and then obtain the text within it. As a result, let's clear the console and start writing code for it.
So first get the div with the class ipc-button__text, then get the last child, which is another div tag, and finally the last div child, so we can finally obtain the text, and click enter and check if it works.

and, as you can see from the image above, it works; as you can see, it displays the precise rating number. Now, let's quickly put this into action, so open the editor and create a new variable called ratingAmount, then paste the following code into it.
let ratingAmount = $('div.ipc-button__text > div:last-child > div:last-child > div:last-child').text().slice(0,4);We can immediately test it by logging the ratingAmount in the console and hit play to the debugger.
As you can see, it's functioning perfectly, so let's continue and try to get the movie's release year as well. To do so, repeat the previous method and inspect the element once more to see what we have.
So, there's a list tag with the class ipc-inline-list__item, and inside it, we'll select a tag and quickly test it in our console to see whether it's functioning.
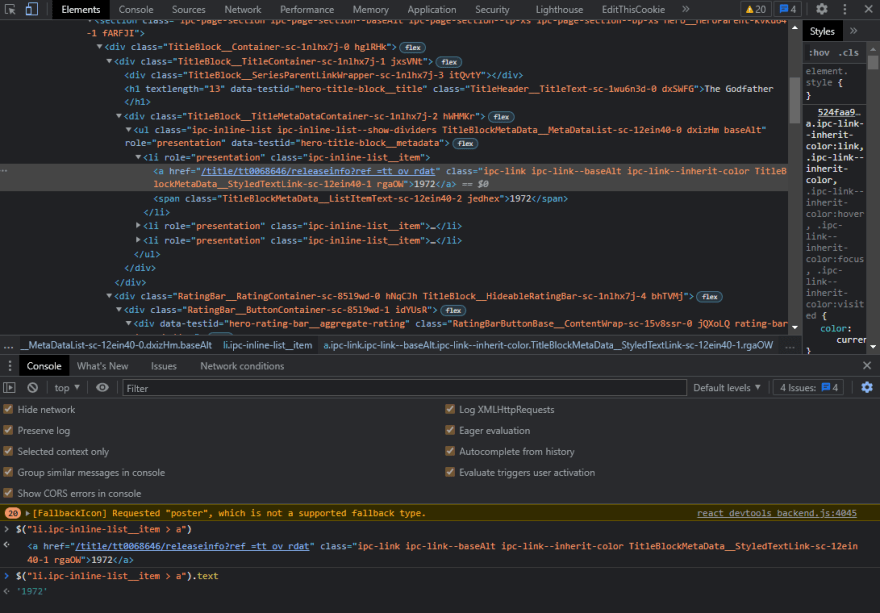
Finally, it works, and we can easily add it to our code editor and use it in our code. Let's copy this and check that it's the text that we want, but in your case, you might see some white space that can be easily removed using the trim function, and we'll also use slice to chuck the exact year only that we need.
So make a variable called releaseYear, paste the code in it, and slice it up.
let releaseYear = $("li.ipc-inline-list__item > a").text().slice(0,4);Let's put it to the test right away.

It works perfectly, and we have the title, the rating, the poster, the number of ratings, and the year of release. Now that this is starting to look pretty good, let's attempt something a little more difficult: let's try to get all of the movie's genres in an array rather than as text; we want to have an array with crime and drama.
Again, inspect the element and check it out, as you can see in the image below.
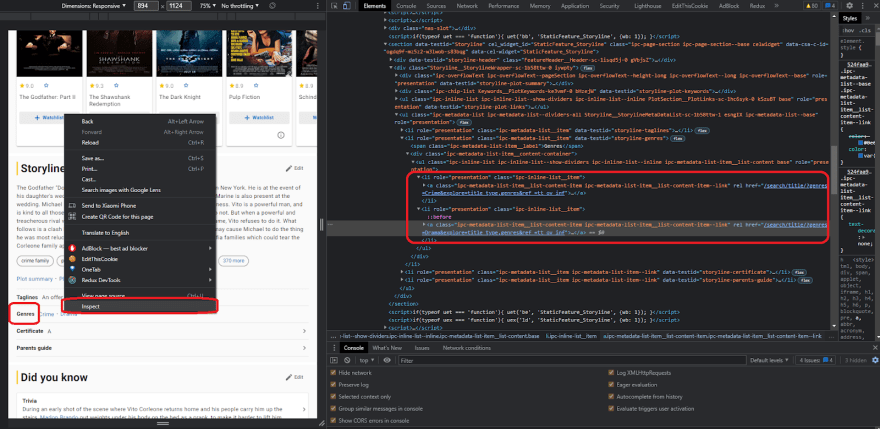
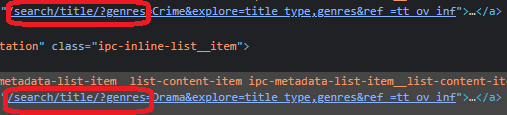
As you can see, all of the links to certain genres, such as crime, have a genre link in common, so this prefix /search/title/?genres is present right here in the drama, and we can latch on to it and choose all of the links that have the prefix of the href tag /search/title/?genres.
Let's try it out and see if it works; if it does, that's great; if it doesn't, and we're receiving more links than we need then it is because the IMDB page can have numerous links with these types of prefixes.
So first, let's empty off the terminal tab and start writing the code. We want to get all the li tags with data-testid="storyline-genres that have a tag with href equal to /search/title/?genres, but we don't want them to start with the prefix genres only but with /search/title/?genres. So, let's head over to the jquery selectors documentation and look for the starting keyword.
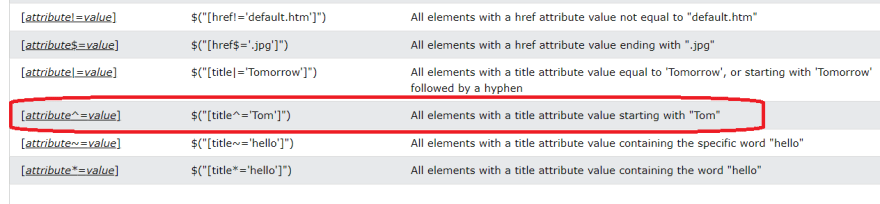
As you can see, we have something right here: all elements with the title attribute value beginning with tom. All we have to do now is add a ^ sign in front of our equal sign, and it will get all the elements that start with the /search/title/?genres prefix. Let's add it and then close it and get all the text just for testing purposes.
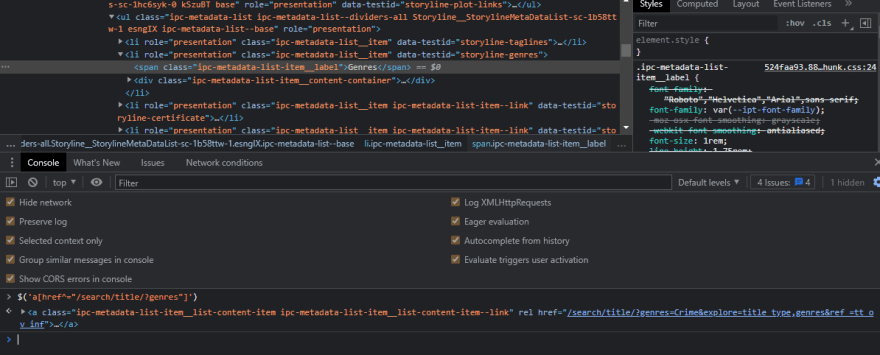
As you can see, it's not displaying the results properly. To fix this, we need to narrow down the search and try to select only the links within a specific parameter, more specifically within these li links. We can easily add this selector so that we can refine our search to get only the links within this parameter. You might be wondering how we do this. First, let's clear the console. Now, right in front of our selector, we need to add the li selector for the data-testid of storyline-genres, and this says that we want to select all the href elements that start with /search/title/?genres that are contained inside this list and let's test it out. Copy and paste the following code into the console.
$('li[data-testid="storyline-genres"] a[href^="/search/title/?genres"]').textAs you can see, the selector works perfectly, and crime, drama is perfect for the time being. But how do we put this into an array instead of using the text function? We'll use each function, which will iterate through all of the selectors that it finds, and by the way, you can check the documentation for cheerio on GitHub. Let's try it out, but this time instead of text, we'll use each function, which has two parameters: one for the index and the other for the actual element we'll utilize. close it and now that we've done that, we'll make an array called movieGenres and start it as an empty array, and then we'll access the specific element and get their text and insert it into the movieGenres array. We can do this easily by making it like genre equal access the element and then the text inside it, and then we'll just push it to the array movieGenres, and then let's console log movieGenres and yeah it works perfectly, we have an array of crime and drama. This is what your code should look like.
let moviesGenres = []; $('li[data-testid="storyline-genres"] a[href^="/search/title/?genres]"').each( function(i, elm) { let genre = elm.text; moviesGenres.push(genre); } ); console.log(moviesGenres);If your code throws an error or doesn't work, you'll need to load jquery into the browser. To do so, open the console and paste the following code.
var script = document.createElement('script');script.src = "https://ajax.googleapis.com/ajax/libs/jquery/1.6.3/jquery.min.js";document.getElementsByTagName('head')[0].appendChild(script);
Again, test the previous code in the console; you should see something similar to this.
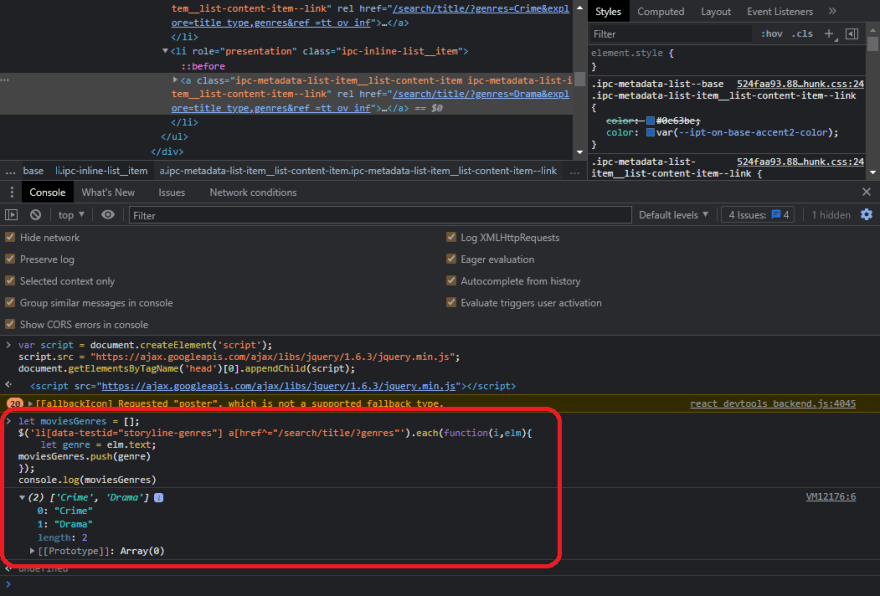
Finally, let's add the code to our scraper and see if it works. Also, copy this code and paste it into the code editor, then console log movieGenres and run it again. As you can see, it works well, and we have an array of crime, drama parsed precisely like in our chrome console.
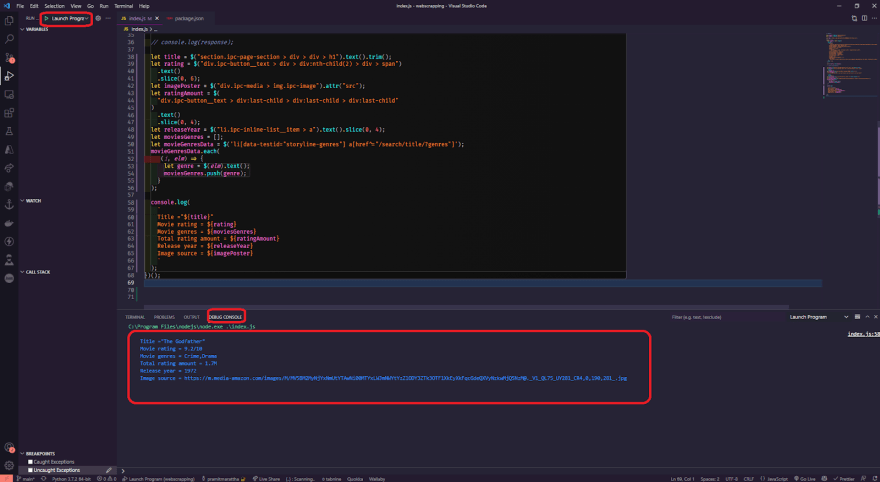
This is what your index.js source code should look like.
// index.jsconst request = require("request-promise");const cheerio = require("cheerio");const URL = "https://www.imdb.com/title/tt0068646/?ref_=fn_al_tt_1";(async () => { const response = await request({ uri: URL, headers: { "accept": "text/html,application/xhtml+xml,application/xml;q=0.9,image/avif,image/webp,image/apng,*/*;q=0.8,application/signed-exchange;v=b3;q=0.9", "accept-encoding": "gzip, deflate, br", "accept-language": "en-IN,en-US;q=0.9,en;q=0.8", "cache-control": "no-cache", "pragma": "no-cache", "sec-ch-ua": '" Not A;Brand";v="99", "Chromium";v="96", "Google Chrome";v="96"', "sec-ch-ua-mobile": "?1", "sec-ch-ua-platform": "Android", "sec-fetch-dest": "document", "sec-fetch-mode": "navigate", "sec-fetch-site": "same-origin", "sec-fetch-user": "?1", "sec-gpc": "1", "upgrade-insecure-requests": "1", "user-agent": "Mozilla/5.0 (Linux; Android 6.0; Nexus 5 Build/MRA58N) AppleWebKit/537.36 (KHTML, like Gecko) Chrome/96.0.4664.110 Mobile Safari/537.36", }, gzip: true, }); let $ = cheerio.load(response); let title = $("section.ipc-page-section > div > div > h1").text().trim(); let rating = $("div.ipc-button__text > div > div:nth-child(2) > div > span") .text() .slice(0, 6); let imagePoster = $("div.ipc-media > img.ipc-image").attr("src"); let ratingAmount = $( "div.ipc-button__text > div:last-child > div:last-child > div:last-child" ) .text() .slice(0, 4); let releaseYear = $("li.ipc-inline-list__item > a").text().slice(0, 4); let moviesGenres = []; let movieGenresData = $('li[data-testid="storyline-genres"] a[href^="/search/title/?genres"]'); movieGenresData.each( (i, elm) => { let genre = $(elm).text(); moviesGenres.push(genre); } ); console.log( ` Title ="${title}" Movie rating = ${rating} Movie genres = ${moviesGenres} Total rating amount = ${ratingAmount} Release year = ${releaseYear} Image source = ${imagePoster} ` );})();Scraping multiple movies and saving JSON to a file
In this section, we'll rapidly learn a new way for scraping several movies from an array of given URLs and saving the data we collect as JSON in a file, so let's get started. The first thing you'll want to do is turn the constant into an array.
![]()
So now we have multiple URLs, let's open another movie link on the IMDB website, copy the URL, convert it to an array, and input another movie, and that's all there is to it.
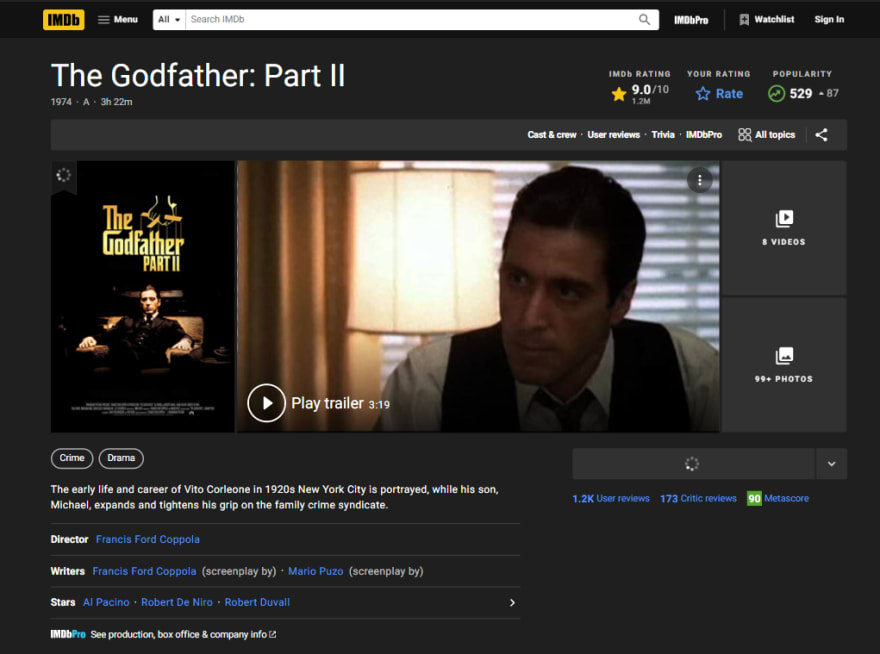
const URLS = ["https://www.imdb.com/title/tt0068646/?ref_=fn_al_tt_1","https://m.imdb.com/title/tt0071562/?ref_=tt_sims_tt_t_1"];So, right now, we have two movies that we want to scrape for information. To do so, simply go inside the defined asynchronous function and follow/paste the code as shown below.
// index.jsconst request = require("request-promise");const cheerio = require("cheerio");const URLS = ["https://www.imdb.com/title/tt0068646/?ref_=fn_al_tt_1","https://m.imdb.com/title/tt0071562/?ref_=tt_sims_tt_t_1"];(async () => { for (let url of URLS) { const response = await request({ uri: url, headers: { "accept": "text/html,application/xhtml+xml,application/xml;q=0.9,image/avif,image/webp,image/apng,*/*;q=0.8,application/signed-exchange;v=b3;q=0.9", "accept-encoding": "gzip, deflate, br", "accept-language": "en-IN,en-US;q=0.9,en;q=0.8", "cache-control": "no-cache", "pragma": "no-cache", "sec-ch-ua": '" Not A;Brand";v="99", "Chromium";v="96", "Google Chrome";v="96"', "sec-ch-ua-mobile": "?1", "sec-ch-ua-platform": "Android", "sec-fetch-dest": "document", "sec-fetch-mode": "navigate", "sec-fetch-site": "same-origin", "sec-fetch-user": "?1", "sec-gpc": "1", "upgrade-insecure-requests": "1", "user-agent": "Mozilla/5.0 (Linux; Android 6.0; Nexus 5 Build/MRA58N) AppleWebKit/537.36 (KHTML, like Gecko) Chrome/96.0.4664.110 Mobile Safari/537.36", }, gzip: true, }); let $ = cheerio.load(response); let title = $("section.ipc-page-section > div > div > h1").text().trim(); let rating = $("div.ipc-button__text > div > div:nth-child(2) > div > span") .text() .slice(0, 6); let imagePoster = $("div.ipc-media > img.ipc-image").attr("src"); let ratingAmount = $( "div.ipc-button__text > div:last-child > div:last-child > div:last-child" ) .text() .slice(0, 4); let releaseYear = $("li.ipc-inline-list__item > a").text().slice(0, 4); let moviesGenres = []; let movieGenresData = $('li[data-testid="storyline-genres"] a[href^="/search/title/?genres"]'); movieGenresData.each( (i, elm) => { let genre = $(elm).text(); moviesGenres.push(genre); }); console.log( ` Title ="${title}" Movie rating = ${rating} Movie genres = ${moviesGenres} Total rating amount = ${ratingAmount} Release year = ${releaseYear} Image source = ${imagePoster} ` ); }})();This loop will iterate over each of the URLs that we created previously. Now that the movie's URL is going to be URLs instead of URL, we need to alter the URI and assign URLs, and of course, this should work. We should give it a try right now and see what we have.
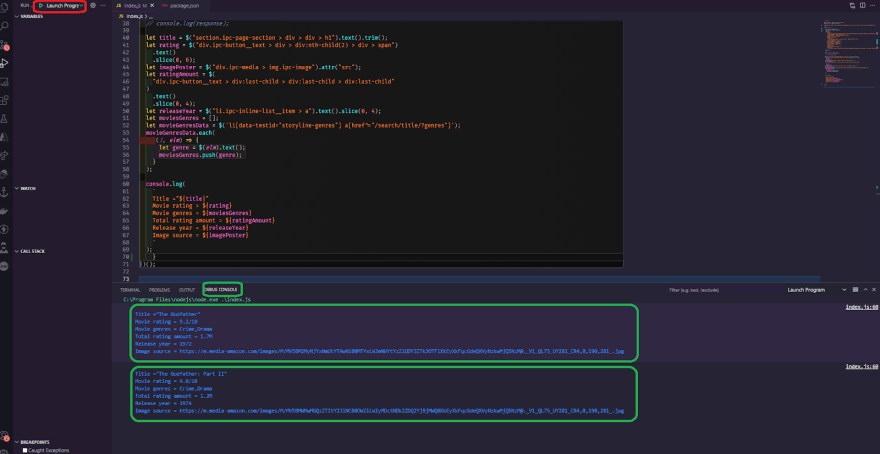
As you can see, the first request is made, and it outputs "The Godfather," the rating, and everything else we've got, and then it waits for the rest of the request to finish, and then it makes the second request to The Godfather Part 2 movie, and it outputs it to the console, so everything is working as it should. Let's prepare the data and save it as JSON into another variable. Let's start by defining moviesParseData as an empty array, then push in that array exactly before the console log, so that we have an array with all of the scraped movie results. We're using moviesParseData to add another entry to this array, and we want it to be an object. So, let's push the title, the rating, the poster, the number of ratings, the year of release, and, of course, the genres. As a side note, this is a shorthand strategy, but for the time being, let's keep it simple because it looks cleaner.
let moviesParseData = [];......... moviesParseData.push({ title, rating, imagePoster, ratingAmount, releaseYear, moviesGenres, })Okay, now let's test what we did. We should anticipate this array to be populated with all of the details of both movies. Let's comment out all of the console log and then console log moviesParseData to access all of the movies. We need to put a breakpoint in that console log so that the debugger stops right at that console log. so now, let's test it out and it does indeed stops right at the breakpoint line all right then let's take a look at the console so we have an array hence expand the array and then we have the length of two objects exactly what we expected as you can see the title The Godfather and The Godfather part 2 and its rating, poster, and everything else.

Right now, we have two movies that we scraped, and we'll continue by saving this data to a file. First, let's close the debugger, and to save files to the system, we'll use a native library from node.js called fs( file system). Currently, what we want to do is import the library, which we can easily do without having to install anything because it's already implemented inside the node.js itself.
const fs = require("fs");Now that we've got the library and the movie's data in an array, we can create the method to save it to a file with ease. We're going to use the writeFileSync fs method. Three parameters are required by this function. The first is the actual path to the file that you want to write, the second is the content, and the third is the type of information that you want to save the actual encoding. Lets save it as movies.json and the content inside it to be the moviesParseData in actual string form, so we'll use JSON stringify and pass in the moviesParseData array. This will transform the array into an actual JSON string and finally, we are going to save it in utf-8 encoding/format.
fs.writeFileSync("movies.json", JSON.stringify(moviesParseData), "utf-8");Before we start testing this, let's look at why we used the writeFileSync function. We're using this function with the sync after it because it tells node.js that we want to wait for this line to finish before moving on to the next one, which is similar to writing await in front of it but it doesn't work like this because the fs writeFile function doesn't return a promise, so await and async only work with promises.
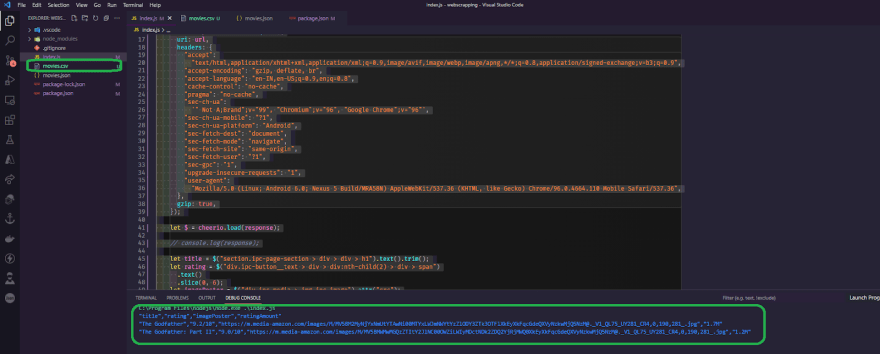
The next step is to start/run the debugger, and we should expect it to produce a movies.json file in our directory. So check it out, and everything is just as we expected it to be. We have the movies.json file, and all of the JSON material is placed in this file.
This is what your final code should look like.
// index.jsconst request = require("request-promise");const cheerio = require("cheerio");const fs = require("fs");const URLS = ["https://www.imdb.com/title/tt0068646/?ref_=fn_al_tt_1","https://m.imdb.com/title/tt0071562/?ref_=tt_sims_tt_t_1"];(async () => { let moviesParseData = []; for (let url of URLS) { const response = await request({ uri: url, headers: { "accept": "text/html,application/xhtml+xml,application/xml;q=0.9,image/avif,image/webp,image/apng,*/*;q=0.8,application/signed-exchange;v=b3;q=0.9", "accept-encoding": "gzip, deflate, br", "accept-language": "en-IN,en-US;q=0.9,en;q=0.8", "cache-control": "no-cache", "pragma": "no-cache", "sec-ch-ua": '" Not A;Brand";v="99", "Chromium";v="96", "Google Chrome";v="96"', "sec-ch-ua-mobile": "?1", "sec-ch-ua-platform": "Android", "sec-fetch-dest": "document", "sec-fetch-mode": "navigate", "sec-fetch-site": "same-origin", "sec-fetch-user": "?1", "sec-gpc": "1", "upgrade-insecure-requests": "1", "user-agent": "Mozilla/5.0 (Linux; Android 6.0; Nexus 5 Build/MRA58N) AppleWebKit/537.36 (KHTML, like Gecko) Chrome/96.0.4664.110 Mobile Safari/537.36", }, gzip: true, }); let $ = cheerio.load(response); // console.log(response); let title = $("section.ipc-page-section > div > div > h1").text().trim(); let rating = $("div.ipc-button__text > div > div:nth-child(2) > div > span") .text() .slice(0, 6); let imagePoster = $("div.ipc-media > img.ipc-image").attr("src"); let ratingAmount = $( "div.ipc-button__text > div:last-child > div:last-child > div:last-child" ) .text() .slice(0, 4); let releaseYear = $("li.ipc-inline-list__item > a").text().slice(0, 4); let moviesGenres = []; let movieGenresData = $('li[data-testid="storyline-genres"] a[href^="/search/title/?genres"]'); movieGenresData.each( (i, elm) => { let genre = $(elm).text(); moviesGenres.push(genre); } ); moviesParseData.push({ title, rating, imagePoster, ratingAmount, releaseYear, moviesGenres, }) // console.log( // ` // Title ="${title}" // Movie rating = ${rating} // Movie genres = ${moviesGenres} // Total rating amount = ${ratingAmount} // Release year = ${releaseYear} // Image source = ${imagePoster} // ` // ); } fs.writeFileSync("movies.json", JSON.stringify(moviesParseData), "utf-8"); console.log(moviesParseData);})();Exporting scraped data to CSV file.
Let's first learn how to export the scraped data to a CSV file if you're working with them and need to use them in any way. A CSV file is a comma-separated value file in which the first line represents the keys and the subsequent lines represent the rows with the values for those specific keys, with each value separated by a comma. While creating a CSV file is not a difficult task, it is preferable to use a well-maintained library that does the job with two or three lines of code rather than writing and maintaining your own.
So you can easily develop a CSV generator, but if you want to get things done quickly and easily, which is what most people want, you should use something like json2csv, which is a npm package that you can use straight with node. So go to json2csv and then to its npm and github repository.

As you can see, we can install it by simply typing the following command into our code editor's terminal.
npm i json2csvNow that we have this library, we can finally utilize it in our code, so go to the index.js file. Close the terminal, and instead of saving the data as JSON like we did before, we want to convert it into CSV data and then save it to the file, so for now, comment out the console log and return to the documentation to see how to import/use this library, as shown in the image below.

Copy the import command and paste it at the top of the code inside your code editor. Now, let's return to the documentation and look at an example. We have a great set of examples that could work for our situation.

So we have an array of objects and we want to convert them to CSV data. In our case, we have two movie lists with multiple data in each of them, and we're going to convert those to CSV data. By looking at this example, you'd need to specify the fields of the JSON object that you want to have converted, and then basically input your data into it. So let's go ahead and test this out ourselves.
So, first, right before the console log, define a constant variable named csvDataKeys, and let's say we only want the title and the rating, imagePoster, and rating amount only from the data we have, hence copy and paste the exact following code into your index.js file right at the bottom before console log.
const csvDataKeys = ["title", "rating", "imagePoster", "ratingAmount"]; const json2csvParser = new Parser({ fields: csvDataKeys, }); const csv = json2csvParser.parse(moviesParseData);We'll use the moviesParseData array to hold all the data, and if we did everything correctly, we should have a working CSV and instead of logging moviesParseData console log the actual CSV data, so let's start and run the debugger and see what we have. Of course, as you can see, it works properly; we have the title and the rating, imagePoster and ratingAmount, as the keys and the actual results of the moviesParseData.
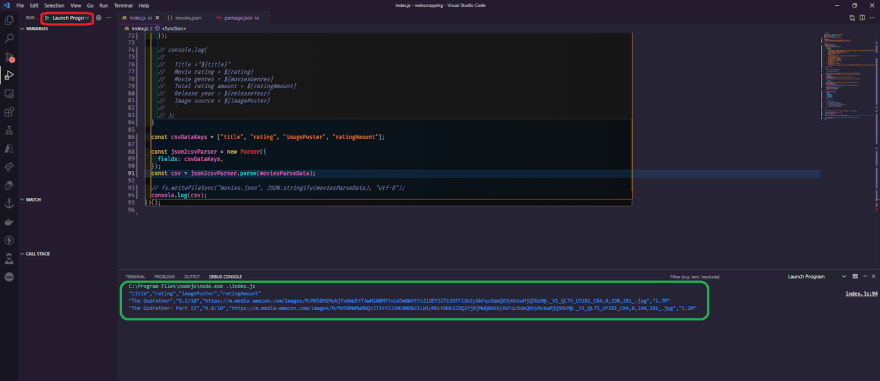
The only thing left is to save them in a file, which we can do easily with the command fsWriteFileSync, but instead of writing the data as movies.json, we'll write it as CSV, so uncomment the line and replace it with movies.csv, and instead of JSON.stringify, output the CSV and save the file, and your final code should look like this.
// index.jsconst request = require("request-promise");const cheerio = require("cheerio");const fs = require("fs");const { Parser } = require("json2csv");const URLS = [ "https://www.imdb.com/title/tt0068646/?ref_=fn_al_tt_1", "https://m.imdb.com/title/tt0071562/?ref_=tt_sims_tt_t_1",];(async () => { let moviesParseData = []; for (let url of URLS) { const response = await request({ uri: url, headers: { "accept": "text/html,application/xhtml+xml,application/xml;q=0.9,image/avif,image/webp,image/apng,*/*;q=0.8,application/signed-exchange;v=b3;q=0.9", "accept-encoding": "gzip, deflate, br", "accept-language": "en-IN,en-US;q=0.9,en;q=0.8", "cache-control": "no-cache", "pragma": "no-cache", "sec-ch-ua": '" Not A;Brand";v="99", "Chromium";v="96", "Google Chrome";v="96"', "sec-ch-ua-mobile": "?1", "sec-ch-ua-platform": "Android", "sec-fetch-dest": "document", "sec-fetch-mode": "navigate", "sec-fetch-site": "same-origin", "sec-fetch-user": "?1", "sec-gpc": "1", "upgrade-insecure-requests": "1", "user-agent": "Mozilla/5.0 (Linux; Android 6.0; Nexus 5 Build/MRA58N) AppleWebKit/537.36 (KHTML, like Gecko) Chrome/96.0.4664.110 Mobile Safari/537.36", }, gzip: true, }); let $ = cheerio.load(response); // console.log(response); let title = $("section.ipc-page-section > div > div > h1").text().trim(); let rating = $("div.ipc-button__text > div > div:nth-child(2) > div > span") .text() .slice(0, 6); let imagePoster = $("div.ipc-media > img.ipc-image").attr("src"); let ratingAmount = $( "div.ipc-button__text > div:last-child > div:last-child > div:last-child" ) .text() .slice(0, 4); let releaseYear = $("li.ipc-inline-list__item > a").text().slice(0, 4); let moviesGenres = []; let movieGenresData = $( 'li[data-testid="storyline-genres"] a[href^="/search/title/?genres"]' ); movieGenresData.each((i, elm) => { let genre = $(elm).text(); moviesGenres.push(genre); }); moviesParseData.push({ title, rating, imagePoster, ratingAmount, releaseYear, moviesGenres, }); // console.log( // ` // Title ="${title}" // Movie rating = ${rating} // Movie genres = ${moviesGenres} // Total rating amount = ${ratingAmount} // Release year = ${releaseYear} // Image source = ${imagePoster} // ` // ); } const csvDataKeys = ["title", "rating", "imagePoster", "ratingAmount"]; const json2csvParser = new Parser({ fields: csvDataKeys, }); const csv = json2csvParser.parse(moviesParseData); fs.writeFileSync("movies.csv", csv, "utf-8"); console.log(csv);})();After that, we should have a file generated, so let's run the debugger, and sure enough, we have a movies.csv file with all of the data we require.

One small tip: if you don't want to provide any fields, or if you don't want to specify all of the fields, and you want to obtain everything from the array, you can simply remove everything from the array, and the code should look like this.
const json2csvParser = new Parser(); const csv = json2csvParser.parse(moviesParseData); fs.writeFileSync("movies.csv", csv, "utf-8"); console.log(csv);Follow @aviyelHQ or sign-up on Aviyel for early access if you are a project maintainer, contributor, or just an Open Source enthusiast.
Join Aviyel's Discord => Aviyel's world
Twitter =>https://twitter.com/AviyelHq
Original Link: https://dev.to/aviyel/web-scraping-with-nodejs-a-comprehensive-guide-part-2-43lk
Dev To
More About this Source Visit Dev To