
An Interest In:
Web News this Week
- April 2, 2024
- April 1, 2024
- March 31, 2024
- March 30, 2024
- March 29, 2024
- March 28, 2024
- March 27, 2024
Some of Our Sources
- Team Treehouse
- Just Creative
- Smashing Magazine
- FanExtra - PSD
- Noupe
- Fudge Graphics
- Line 25
- Stylized Web
- Wal You
- Willems Lab
Help Webnuz
Referal links:
ETHEREAL : A Decentralized Virtual Banking system - Part I
In recent times, we have all heard about Blockchain once or twice and it has been a hot and controversial topic ,almost in the news every other day. In the 2 parts of this article-series we have explored the various terms related to Blockchain like Bitcoin, Ethereum, Solidity and we have built an actual working DApp(a decentralized application), where we have guided you in building the project from ground zero. This project was built as part of our event Ten Days of Code held from 17th October 2020 to 26th October 2020, where we mentored students all over India in building projects from scratch across various domains.

In this project, we have built a decentralized banking application, now decentralized here means that the central power doesn't lie in the hands of a single user but is instead divided equally among all the users and hence no one supervises all the account in our bank and everyone is responsible for their own account. We have implemented all the basic features that a bank can perform like deposition, withdrawal, and transfer of money.
Now, you might be wondering why decentralized, well great question indeed for this a simple analogy would suffice, we all hate dictatorships where the whole power lies with a single person and hence prefer democracies, well a debatable point, but let's not get there, now applying the same analogy wouldn't it be great if you and only you had the access to your account opposing the view of a single person having access to all the accounts, being the whole purpose of this project.
This DApp is supported using Solidity Smart Contracts and the frontend is built using the framework React JS, the application is deployed to the local blockchain network, Ganache. The whole project runs on an Ethereum supported browser, with the help of the Metamask extension. For building and compiling Truffle was used. Lastly, the frontend was connected to the solidity contract using a web3.
To understand all these terms and how Blockchain works do watch the video below which was a live session from our event Ten Days of Code.
What is Blockchain?
Blockchain technology is a type of distributed ledger technology (DLT) It is an accounting system where the ledger (record of transactions) is distributed among a network of computers.
So at its core, blockchain technology is a record-keeping tool.
Beginners guide for Blockchain
What is a Smart Contract ?
All of the code on the blockchain is contained in smart contracts, which are programs that run on the blockchain. All of the code on the blockchain is contained in smart contracts, which are programs that run on the blockchain. They are the building blocks of blockchain applications. We'll write a smart contract in this project to power our Banking system.
For in-depth detail click here
Intro To Solidity :
Solidity is the main programming language for writing smart contracts for the Ethereum blockchain. It is a contract-oriented language, which means that smart contracts are responsible for storing all of the programming logic that transacts with the blockchain. It's a high-level programming language that looks a lot like JavaScript, Python, and C++.
For in-depth detail click here
Prerequisites :
You can watch this video for setting up this project:
Ganache (Local Development Blockchain)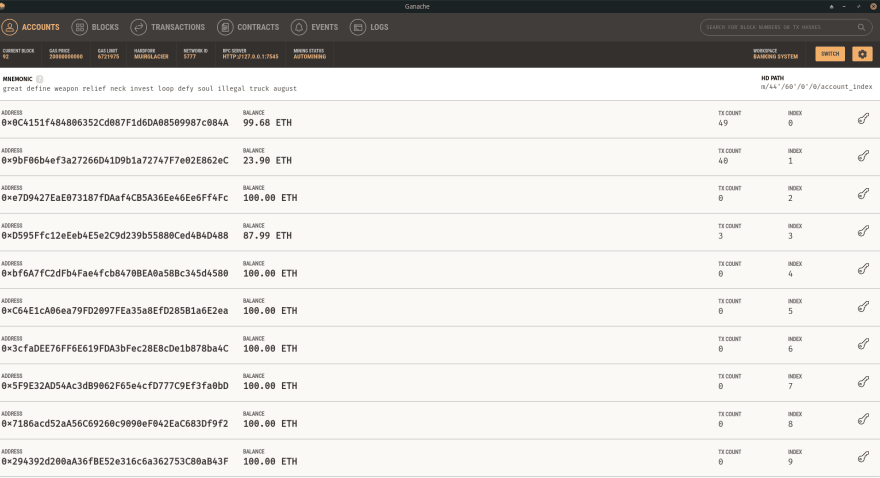
The dependency is a personal blockchain, which is a local development blockchain that can be used to mimic the behavior of a public blockchain. We recommend using Ganache as your personal blockchain for Ethereum development. It will allow you to deploy smart contracts, develop applications, and run tests. It is available on Windows, Mac, and Linux as a desktop application and a command-line tool !
Download it by clicking here (For both Windows and Linux)
For Linux(Ubuntu) Users :
Once the download is complete, go to the folder where you have downloaded the file and open the terminal and type the following to make the file executable:
chmod a+x <filename.AppImage>Node.JS
Now that you have a private blockchain running, you need to configure your environment for developing smart contracts. The first dependency you'll need is Node Package Manager , or NPM, which comes with Node.js.
You can see if you have node already installed by going to your terminal/cmd and typing:
node -vIf you don't have a node already installed then :
For Windows Users :
Download it by clicking here
It is recommended that you download LTS version.
For Linux(Ubuntu) Users :
Go to your terminal and type :
$ sudo apt install nodejs$ sudo apt install npmTruffle Framework
Now let's install the Truffle Framework,
which provides a suite of tools for developing Ethereum smart contracts with the Solidity programming language.
For Windows Users :
Go to your cmd and type :
npm install -g truffleFor Linux(Ubuntu) Users :
Go to your terminal and type :
$ sudo npm install -g truffleFor this project, we have used React JS framework for the frontend and to get the required folder structure for our project we run the following command:
For Windows Users :
Go to your cmd and type :
truffle unbox react For Linux(Ubuntu) Users :
Go to your terminal and type :
$ sudo npx truffle unbox react Metamask Wallet
For this project, we would require an Ethereum wallet, and here we will use the popular open-source wallet Metamask.
On Chrome/Firefox/Brave(It is recommended that you use Brave browser) :
- Go to the extensions page of your browser and install the Metamask plugin, click here
- On installation the user will be redirected to a setup page and the user has to choose a password and a recovery phrase.
For in-depth detail click here
Getting Started with the Project :
After running the command npx truffle unbox react you would have a folder structure of something similar to this in front of you :

Let us understand what each of these means :
node_modules : This folder contains all the required npm packages for your project which are installed when you run npm install after cloning our repository.
src : This folder contains all the components and pages for our React project
public : This is the directory where we save our images and which also contains the main HTML file index.html where all the components from src are finally rendered to give us a single page application.
The .gitignore file contains information-related code which you don't want to commit to Github .
The package.json and package-lock.json are initialized when you run npm init and install npm packages in your project.
For in-depth detail about React, click here
For React tutorial, click here
Must watch useState (3:39:00 to 4:23:00), useEffect (4:47:27 to 5:19:24) and React Router (9:00:41 to 9:23:22)
Part 0 : Creating a simple blockchain project: Ethereum Todo List
Referance to build this simple project:
Part 1 : First Functionality - Creating a new account
Let us begin with the Front-end.
Navigate to your client folder and then to src.

We will be writing all of our frontend code in the form of various components and import them all to the final index.js file which will be rendered onto the HTML file present in the public folder.
Now, that you have explored all the hooks used in the project , we add some basic lines of code to every component to fetch all the details like web3, Metamask connected account and the solidity contract.
This code is common for all the components as we need to fetch data in every component.
The only component which won't contain this snippet is the Navbar because this component is only for Navigation purposes and does not require all these details , for this project purposes we create a Navbar with 2 tabs for now : REGISTER and ACCOUNTS , on clicking the REGISTER tab it should redirect you to the URL "/create" , you can change the name for this route if you want, we have named it "/create" and the ACCOUNTS tab should redirect you to the URL "/accounts". You can import this Navbar in all the components you are creating to navigate to the different tabs of our application which are only 2 currently, but you will soon be creating more tabs.
The only modification is when you fetch more details or the particular function for that component from the contract you need to add this particular code snippet.
useEffect(() => { const getBasicDetails = async () => { try { // Get network provider and web3 instance. const web3 = await getWeb3(); // Use web3 to get the user's accounts. const accounts = await web3.eth.getAccounts(); // Get the contract instance. const networkId = await web3.eth.net.getId(); const deployedNetwork = BankingContract.networks[networkId]; const instance = new web3.eth.Contract( BankingContract.abi, deployedNetwork && deployedNetwork.address ); setWeb3(web3); setAccount(accounts[0]); setContract(instance); } catch (error) { // Catch any errors for any of the above operations. alert( `Failed to load web3, accounts, or contract. Check console for details.` ); console.error(error); } } getBasicDetails();}, []);This is how your first useEffect hook looks. To go through this useEffect hook once would be enough as you will be using this same useEffect hook in every component, even if you create new components.
In this hook we have defined a function getBasicDetails, where we load web3 from the getWeb3.js, and we get the Metamask connected account by using web3, as we have already mentioned in our intro section that web3 acts as a connector between our backend and frontend.
Here we will be using web3 for everything. For creating a new contract, for using the various functions from the backend, for loading accounts. You will soon understand that it makes everything much easier.
Firstly, throughout the application we use web3 and whenever we use web3, it is through asynchronous calls and we use the async await syntax and basic ES7 javascript .then, .catch syntax to resolve promises.
web3.eth ( eth is short for ethereum ) is the object which contains various functions for getting your accounts, getting your network id , creating a new contract from your JSON file .
Read more about the various methods of web3 here
In the getBasicDetails function , we use the getAccounts() , net.getId() , Contract() methods of web3.eth
getAccounts() gets all the accounts connected to the Ethereum browser (here Metamask), to access the present connected account we want the very first element of this accounts array which is at the 0th index, and we change the state of account variable to this
net.getId() gets the network Id of the Solidity contract which is one of the two things to initiate a new contract using web3, the other one is the abi object present in the Banking.json file.
new web3.eth.Contract(BankingContract.abi,deployedNetwork && deployedNetwork.address)This initiates a contract from our existing JSON file.
We set the empty web3 variable to the loaded web3 object and the empty contract variable to the newly created contract using useState hook of React.
To give an example of the usage of the useParams hook, we have used it in the Transactions component.
In the Transactions component, we have accessed the id parameter from the URL and assigned it to a variable in the Transactions component.
const{id} =useParams(id);In the input of the useParams hook, we refer to the exact parameter variable we used in the URL, in this case id .
I hope that helps you understand the useParams hook, for more reference visit:
Let us briefly explore the Routing.js file :
In the Routing.js file we import Router and Route from 'react-router-dom' and the basic syntax of the whole Routing component is similar for every Route.
import { BrowserRouter as Router, Route } from "react-router-dom";import ComponentName1 from "<path-to-the-component>";import ComponentName2 from "<path-to-the-component>";<Router> <Route exact path="<specify-path1-here>"> <ComponentName1 /> </Route> <Route exact path="<specify-path2-here>"> <ComponentName2 /> </Route></Router>; The first useEffect hook will be present in all functional components like AccountDetails, DisplayAccounts , LoanTransaction, TransferMoney and all the other components except the Navbar .
Let's talk about the second useEffect hook which you will be used in some or almost all of the components to extract the required functionality from the contract because only the creation of the contract is not enough.
We need to access the particular functionality from our contract to perform various operations for us, for example, when we are creating the CreateAccount.js component we actually don't require any additional data, but we just use the second hook to log the contract details in our browser console .
In this hook we run the function only when web3, contract and account are not undefined as we had initialized them as undefined, the dependency array also has web3, account, contract in it so that useEffect runs until all of these variables change from undefined to a definitive value, this is done for easy coding purposes to view the various methods present in the contract (We'll explain what are these various methods).
So, let's continue building the createAccount.js component, for this, we require a basic HTML form
PRO TIP : To build forms in which the data field values are stored in some variable which can be further used at different places we use the useState hook, this has been done in all the components so I am specifying this in the beginning for your ease.
EXAMPLE :
const[name,setName]=useState("")<input value={name} onChange={(e) => setName(e.target.value)} placeholder="Name" type="text"/>;In the above example, we initialized the name variable as a blank variable and then when the form input value is changed we pass the onChange function where the state of the name variable is updated to the current target value, this name can be further used any place we want, overall throughout the application we use this same syntax, so when I refer to making a form input with a value equal to the value of the variable "x" what I actually will mean is the above syntax.
So, now if you recall from above in the Solidity contract the function to create a new account takes 3 inputs, and among those 3 - one is the creator address which is the account connected to Metamask which we already stored in the account state variable, the other 2 variables are the name and location inputs which we will get from the form that we are creating.
After creating the form with 2 input fields we need to create a SUBMIT button and we need to pass a function on the click of this button, now the syntax of this function will also be similar in every component and since this is for the first component let me give you the syntax.
EXAMPLE:
We defined the handleSubmit function inside our CreateAccount component but this should be above the rendering of the JSX.
ES7 arrow function syntax is being used here throughout the project, you may use it or may proceed with the normal function syntax.
//Function to handle the submit operation of the formconst handleSubmit = async (e) => { //prevents the default action that occurs when someone submits a form e.preventDefault() //...rest of the function code ...// } < button type = "submit"onClick = { handleSubmit} > SUBMIT < button / >This function is asynchronous because we need to communicate with the contract, send a request to it and wait for its response. Hence we use a similar syntax everywhere using .then and .catch to resolve the promises, more than one .then can also be changed as per the user requirement.
Now in our createAccount.js file, the handleSubmit function should contain the code to access the function to create new accounts from the backend, now how this is done?
Well, firstly we have already created a new contract, every contract is an object which further has an item called methods, now what does this methods item contain?
It contains every public variable and function defined in the solidity contract. That's it, you can refer to the contract object in the browser console, you will find the methods item in it.
For this component, we need to access the createAccount method, now there are 2 ways to access a function using web3, they are call and send, the major differences in these two are you use call only when you want to view data and not modify anything and it does not cost any ether to perform this transaction but if you use the send method it costs some amount of gas fees and it modifies data, why does it cost ether though?
Well, that is an interesting question though but as you already know that you need to send ether for any function to be executed or written on a new block and the miners of this block need to be rewarded somehow since they are securing the whole system by solving complex algorithms which creates new blocks for storing our executed function data, hence this is the a*mount deducted* from our account when we use the send method, which is rewarded to the miners.
In createAccount.js we are creating a new account, that is modifying data so we use the send method of web3 rather than the call method (which is used to just view the data), and the syntax of a send option is such that it also accepts another object which contains details like the from address, to address, and the value being sent.
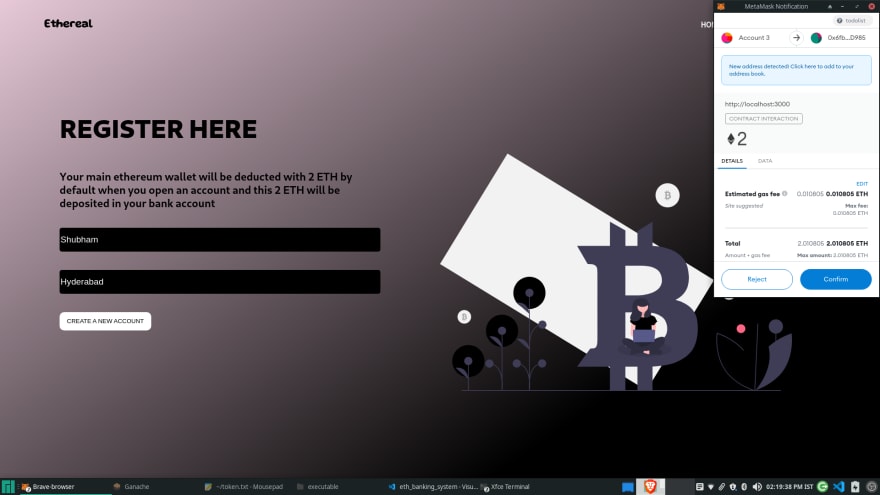
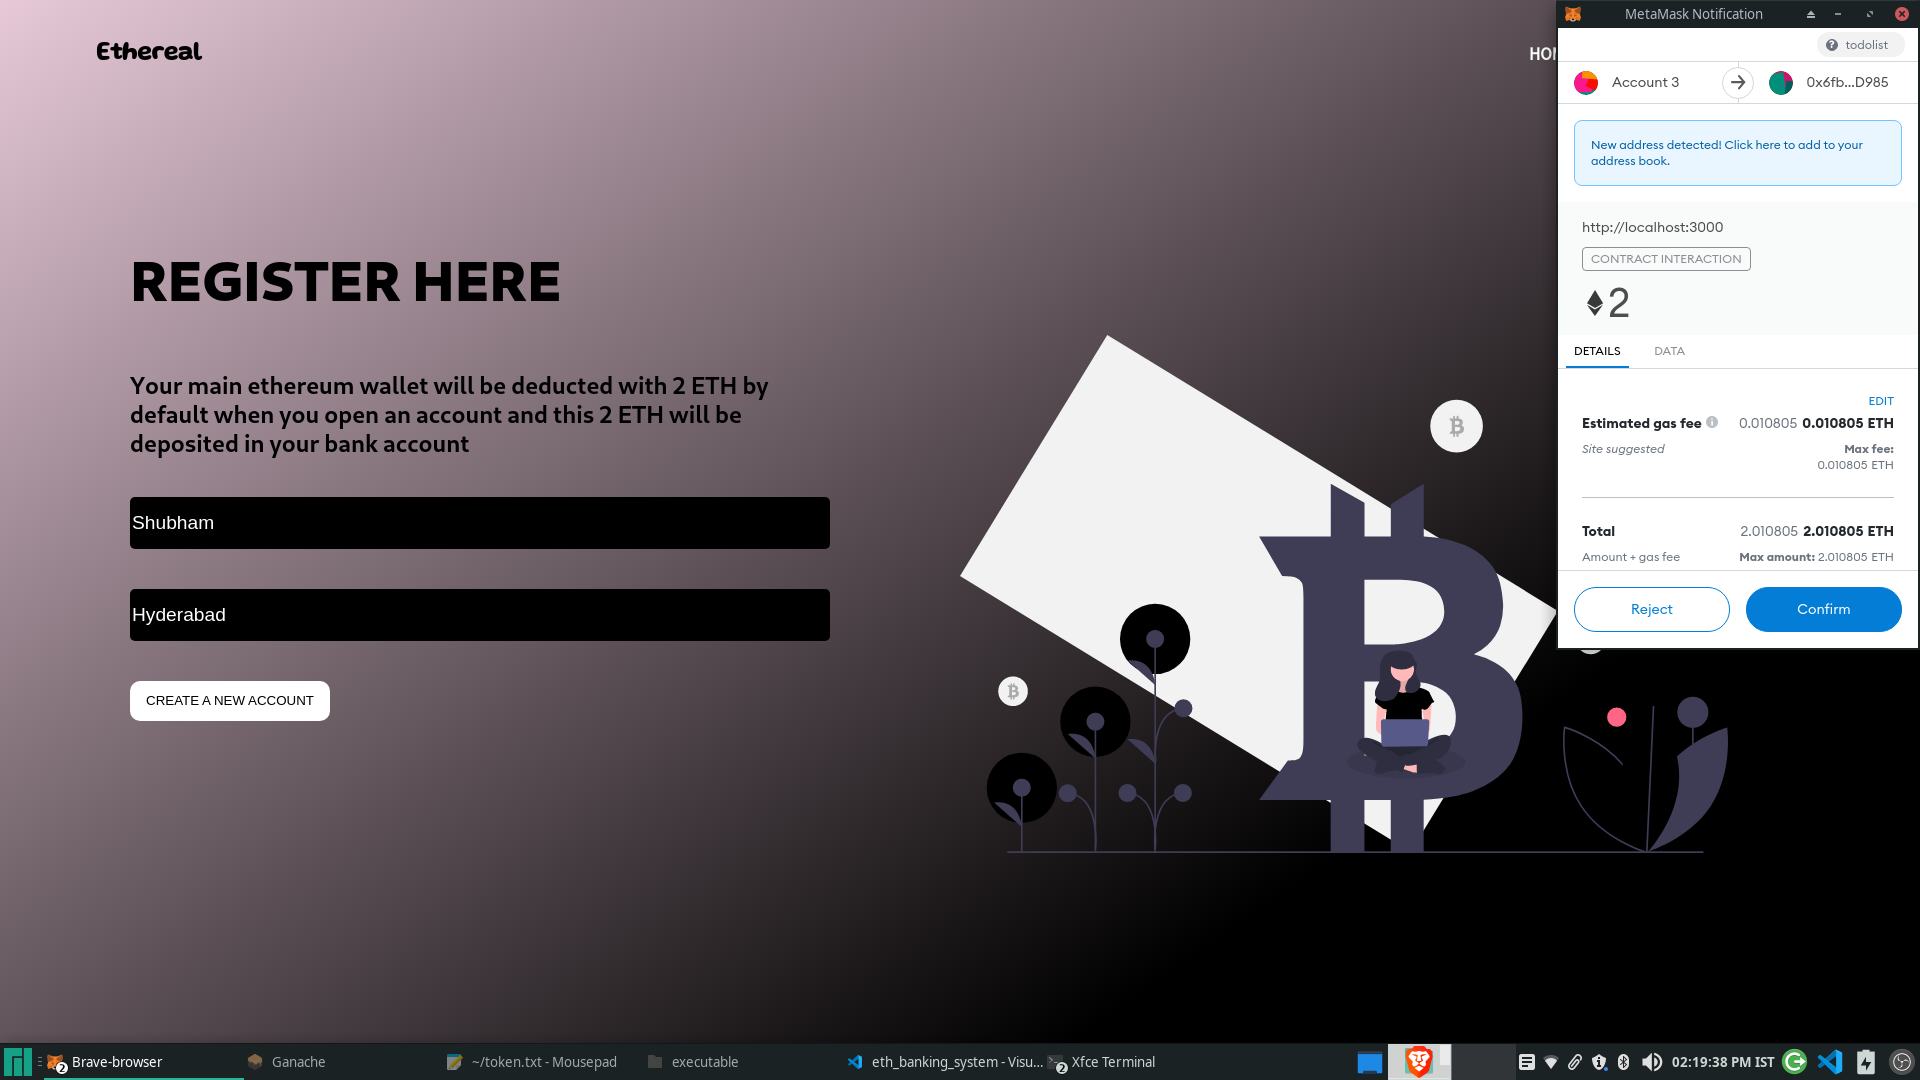
In, our banking application we deduct 2 ETH from the Metamask account on the creation of every new account as a starting balance to the virtual account and increment the balance of the virtual account from 0 to 2 (the increment of balance is handled on the backend).
await contract.methods .createAccount(account, name, location) .send({ from: account, value: web3.utils.toWei(2, "ether") }) .then((res) => { console.log(res); window.location.href = "/accounts"; }) .catch((err) => { console.log(err); });When you click on submit the Metamask will prompt you to approve the transaction with the cost of 2 ETH, on approval your new account will be created. On, successful approval according to the logic of the function the page will redirect to "/accounts".
This is an example of how to access any function from the backend passing the values and using the send method, if you just want to display values which we will see in the DisplayAccounts.js you just need to use the call method of web3 and spend no ether.
But, always remember if you want to perform a function that updates the existing contract you need to spend some amount of ether and send it from your Metamask connected account, the ether is sent to the contract which will, in turn, be sent to the miner accounts.
Navigate to your contracts folder and open SimpleStorage.sol file.
// SPDX-License-Identifier: MITpragma solidity >=0.4.21 <0.7.0;// import "github.com/Arachnid/solidity-stringutils/strings.sol";contract Banking { // using strings for *; uint256 public serialNumber = 0; uint256 public transacNum = 0; uint256 public bankBalance = 0; //Function to create account , the 2 ETH balance will be taken from your ethereum account and deposited to the banking contract function createAccount( address payable _creator, string memory _name, string memory _location ) public payable { if (_creator.balance >= 3) { serialNumber++; accounts[serialNumber] = Account( serialNumber, block.timestamp, _name, _location, _creator, 2, true ); bankBalance += 2; transacNum++; transactions[transacNum] = Transaction( transacNum, 2, 2, block.timestamp, "NewAccount", serialNumber ); emit TransactionCompleted( 2, transacNum, serialNumber, "NewAccount" ); } else { revert("Insufficient Funds"); // revert InsufficientFunds(serialNumber,2,_creator.balance-1,'NewAccount'); } }}Now, in the src folder, we further have the folder structure as:
->components ->contracts ->App.css ->App.js ->getWeb3.js ->index.js ->Routing.js ->serviceWorker.jsOnce you understand the purpose of each component you will be able to navigate easily through the code, and trust me when I say organizing your code into folders is much cleaner and accessible in the future.
The components folder contains various sub-folders for each of our components in our application, here in this application we used the components.
->AccountDetials (the component that gets all the account details of the current account serial number)
->DisplayAccounts (displays all the registered accounts connected to the particular Metamask account)
->DisplayTransactions (displays all the transactions that occurred in the particular account)
->LoanTransaction (a temporarily working function that resembles loan transactions)
->MainSection (the main landing page when one visits the application)
->Navbar (used to navigate to various components)
->TransferMoney (the component to transfer virtual amount)
By looking at the names of the components you might get a feel of the job they perform, you can edit the names of these components as you wish and once you edit them they will get edited in the files they were imported into.
The contracts folder contains the JSON file for the Banking contract we had deployed and we will be using and accessing this very JSON file to access our backend, for you full-stack developers out there you can imagine this as an API that can be used in your frontend application using asynchronous fetching.
The App.js contains various imports from all the components of the application and App.css defines the global styles for every component present in the application since all the components will be imported in App.js
The getWeb3.js is a boilerplate template generated for us by Truffle when we run the command truffle unbox react which contains a promise-based function to load Web3.
The index.js is the file where the App.js is finally imported and rendered onto the frontend HTML file.
The Routing.js is an important file that contains the various routes present in the whole application it is imported from react-router-dom which can be installed by running the command:
npm install react-router-domLastly, serviceWorker.js is not of much use for us as it is just a part of the boilerplate code that appears with React.
That was the folder structure! Now let us discuss some of the basic React hooks syntax that we have used in our application for React beginners:
Throughout this application, we have used only three React hooks and by three, I mean exactly three not more, not less all the work can be done using these three hooks. These are useState, useEffect, and useParams.
So, let us just get to know briefly about each of these and a little bit about the project syntax
An example for useParams is where we have imported the Transactions component to our Routing.js file and in the path URL, we have specified the parameter id.
In the Transactions component, we can use this id parameter to perform actions that are specific to the account with that id, we can access this id parameter in another component from the URL using the useParams hook
In the Transactions component, we have accessed the id parameter and assigned it to a variable in the Transactions component.
const{id} =useParams(id);In the bracket of the useParams hook, we refer to the exact parameter variable we used in the URL.
I hope that helps you understand the useParams hook, for more reference visit :
Let us briefly explore the Routing.js file :
In the Routing.js file we import Router and Route from 'react-router-dom' and the basic syntax of the whole Routing component is similar for every Route.
import { BrowserRouter as Router, Route } from "react-router-dom";import ComponentName1 from "<path-to-the-component>";import ComponentName2 from "<path-to-the-component>";<Router> <Route exact path="<specify-path1-here>"> <ComponentName1 /> </Route> <Route exact path="<specify-path2-here>"> <ComponentName2 /> </Route></Router>;Now, that was all about the first useEffect hook which will be present in all functional components like AccountDetails, DisplayAccounts , LoanTransaction, TransferMoney and every other component other than Navbar .
Let's talk about the second useEffect hook which you will be using in some or almost all of the components to extract the functionality from the contract because only the creation of the contract is not enough we need to access the functionality of the contract to perform various operations for us, in the first component we are creating the CreateAccount.js component we actually don't require any additional data, but we just use the second hook to console.log the contract details, and in this hook, we only run the function when web3, contract and account are not undefined as we had initialized them as undefined, the dependency array also has web3, account, contract in it so that useEffect runs until all of these variables change from undefined to a definitive value, this is done for easy coding purposes to view the various methods present in the contract (We'll explain what are these various methods).
So, let's continue building the createAccount.js component, for this, we require a basic HTML form
EXAMPLE :
const [name, setName] = useState("") < input value = { name }onChange = { (e) => setName(e.target.value)}placeholder = "Name"type = "text" / >In the above example we initialized name as a blank state variable and then when the form input value is changed we pass the onChange function, where the state of the name variable is updated to the current target value, this name can be further used any place we want, overall throughout the application we use this, so when I refer to making a form input with a value equal to the value of the variable "x" what I actually will mean is the above syntax.
So, now if you recall in the Solidity contract the function to create a new account takes 3 inputs, and among those 3 -one is the creator address which is the account connected to Metamask which we already stored in the account state variable, the other 2 variables are the name and location inputs which we will get from the form which we are creating.
After creating the form with 2 input fields we need to create a Submit button and we need to pass a function on click of this button, now the syntax of this function will also be similar in every component since it is the first component let us give you the format.
EXAMPLE :
We defined the handleSubmit function inside our CreateAccount.js component but this should be above the rendering of the JSX
ES7 arrow function syntax is being used here throughout the project, you may use it or may proceed with the normal function syntax.
//Function to handle the submit operation of the formconst handleSubmit = async (e) => { //prevents the default action that occurs when someone submits a form e.preventDefault() //...rest of the function code ...// } < button type = "submit"onClick = { handleSubmit} > SUBMIT < button / >This function is asynchronous because we need to communicate with the contract and send a request to it and wait for its response, and hence the syntax is similar everywhere using .then and .catch to resolve the promises, more than one .then can also be changed as per the user requirement.
Now in our createAccount.js file, the handleSubmit function should contain the code to access the function to create new accounts from the backend, now how this is done?
Well, firstly we have already created a new contract, every contract is an object which further has an item called methods, now what does this methods item contain?
It contains every public variable and function defined in the solidity contract. That's it, you can refer to the contract object in the console.log, you will find the methods item in it.
For this component we need to access the createAccount method, now there are 2 ways to access a function using web3, they are call and send, the major differences in these two are you use call only when you want to view data and not modify anything and it does not cost any ether to perform this transaction but if you use the send method it costs some amount of gas fees and it modifies data, why does it cost ether though?
Well, that is an interesting question though but as you already know from the Basics module that you need to send ether for the function to be executed or written on a new block and the miners of this block need to be rewarded somehow since they are securing the whole system by solving complex algorithms which creates new blocks for storing our executed function data, hence this is the amount deducted from our account when we use the send method, which is rewarded to the miners.
For, the createAccount.js we are creating a new account, that is modifying data so we use the send option, and the syntax of a send option is such that it also accepts another object which contains details like the from address, to address, and the value being sent.
In, our banking application we deduct 2 ETH from the Metamask connected account on the creation of every new account as a starting balance to the virtual account and increment the balance of the virtual account from 0 to 2 (the increment of balance is handled on the backend).
await contract.methods .createAccount(account, name, location) .send({ from: account, value: web3.utils.toWei(2, "ether") }) .then((res) => { console.log(res); window.location.href = "/accounts"; }) .catch((err) => { console.log(err); });When you click on SUBMIT, Metamask will prompt you to approve the transaction with the cost of 2 ETH, on approval your new account will be created. On, successful approval according to the logic of the function the page will redirect to "/accounts".
This is an example of how to access any function from the backend passing the values and using the send method, if you just want to display values which we will see in the DisplayAccounts.js in the next module you just need to use the call option and spend no ether. But, always remember if you want to perform a function you need to spend some amount of ether and send it from your Metamask connected account, the ether is sent to the contract which will, in turn, be sent to the miner accounts.
Part 2 : Displaying Accounts, Account Details and Adding Balance

Now let us start coding the solidity component (Just navigate to SimpleStorage.sol file and paste this inside contract Banking {} ).
//Defining a struct to store the account details struct Account { uint256 serial; uint256 createdAt; string name; string location; address creator; // bytes32 accountName; uint256 balance; bool doesExist; } constructor() public { accounts[0] = Account( 0, block.timestamp, "Ethereal", "NIT Durgapur", address(this), 0, true ); //Function to get the msg.sender's ETH balance function getSenderBalance(address payable _account) external view returns (uint256) { return _account.balance; } //Function to get the contract's existing balance function getContractBalance() external view returns (uint256) { return address(this).balance; } //Function to get the owner function getOwner() public view returns (address) { return msg.sender; } //Function to add balance to your existing acccount ,the balance will be taken from your ethereum account function addBalance( uint256 _serial, uint256 _amount, address payable _creator ) public payable { if (_creator.balance >= _amount / 1000000000000000000 + 1) { accounts[_serial].balance += _amount / 1000000000000000000; bankBalance += _amount / 1000000000000000000; transacNum++; transactions[transacNum] = Transaction( transacNum, accounts[_serial].balance, _amount / 1000000000000000000, block.timestamp, "AddingBalance", _serial ); emit TransactionCompleted( _amount / 1000000000000000000, transacNum, serialNumber, "AddingBalance" ); } else { revert("Insufficient Funds"); // revert InsufficientFunds(_serial,_amount/1000000000000000000,_creator.balance-1,'AddingBalance'); } }Now, let us move on to the Front-end part.

The logic for this is simple, as you might have remembered we have an accounts mapping in the backend and we can access them using the serialNumber key which is the normal index of the account. Here we need to use the call option and call the accounts method (even mappings are part of the methods object) one by one and push it into a state variable of bankingAccounts if and only if the creator of the account is the same as that of the currently connected Metamask account(important check -verification condition to know that the person who created the account is the only person who can access it and perform operations in it)
The basic layout of this component is no different from the other components, but the second useEffect hook here has actual use since you need to call the accounts mapping (from the contract methods), and you need to call this method serialNumber the number of times(serialNumber is also a method from the contract methods) and check for only those accounts whose _creator address is same as that of the Metamask connected account.
In the second useEffect hook we need to do two things, we need to get the value of serialNumber, and then we need to get the various accounts connected to the Metamask address and push it to the bankingAccounts state array.
var serial =await contract.methods.serialNumber().call() [even public variables from the backend need to be called ]Now we need to run a for loop from 1 to less than or equal to serialNumber and call the accounts methods with the key as the value of the iterator, the account object is pushed to the bankingAccounts array after it passes the check that the creator address is equal to the Metamask connected address.
for (int i = 1; i <= serial; i++) { await contract.methods.accounts(i).call() //ES7 promise resolving syntax using .then and .catch .then(() => { if (res.creator == account) { setBankingAccounts(bankingAccounts.push({ name: res.name, ...so on... })) } }) .catch((err) => { console.log(err) })}The above snippet is an example where you update the state of
bankingAccounts as you are pushing each bankingAccount connected the that particular Metamask address.
Finally, setLoading(false) after the whole for loop is run.
Now you need to use one of the famous array methods mappings in the frontend to print the contents of the bankingAccounts array, to give you an idea of the CSS layout of this page it will only contain various account bars with the name and serial number, which after clicking on them will redirect you to the account details page of that particular account where you can find the complete account details and various operations to perform on the account.
Before printing all the accounts check for if loading is false using the ternary operator and then map the bankingAccounts, if the loading is still true print nothing, now you need to make these bars where you are printing clickable and they should redirect you to the specific page for that account with the parameter as serialNumber ( to "/accounts/:id") and here the usage of useParams begin as we have mentioned in the third module. Also, react throws you an error in the console that every child element must contain a key which is a unique identifier value so in this case, also you can set the key={account. serial}
The location is changed using the window. location method.
!loading ? bankingAccounts.map((account) => { <div key = { account.serial } onClick = { () => { window.location.href = accounts / $ { serialNumber } } > {account.name} {account.serialNumber} </ div > }): nullNow that was displaying all the accounts, we need to also keep updating the router and adding all the new routes we are creating to the router for example until now "/" route has been occupied by createAccounts component, and the "/accounts" route is occupied by DisplayAccounts.js, now we add the third route "/accounts/:id" for the AccountDetails.js
Let us begin coding the AccountDetails component!
As usual, the two useEffect hooks are common like in every component.
The second useEffect hook, like the previous component, DisplayAccounts is not empty, in it the specific account pertaining to that page is called, using the id parameter from the URL, and the details are stored in a state variable, specifically, balance item of the bankAccount is stored in another state variable so that it can easily be updated every time the balance changes, for example when we add more balance or withdraw the balance.
const[bankAccount,setBankAccount]=useState("") const[balance,setBalance]=useState("") const{id} =useParams(id) const [loading,setLoading]=useState(true)The function in the second useEffect hook :
await contract.methods .accounts(id) .call() .then((res) => { console.log(res); setBankingAccount(res); setBalance(res.balance); }) .then(() => { setLoading(false); }) .catch((err) => { console.log(err); });Now we have the data stored in our state variables we just display it somewhere on our application.
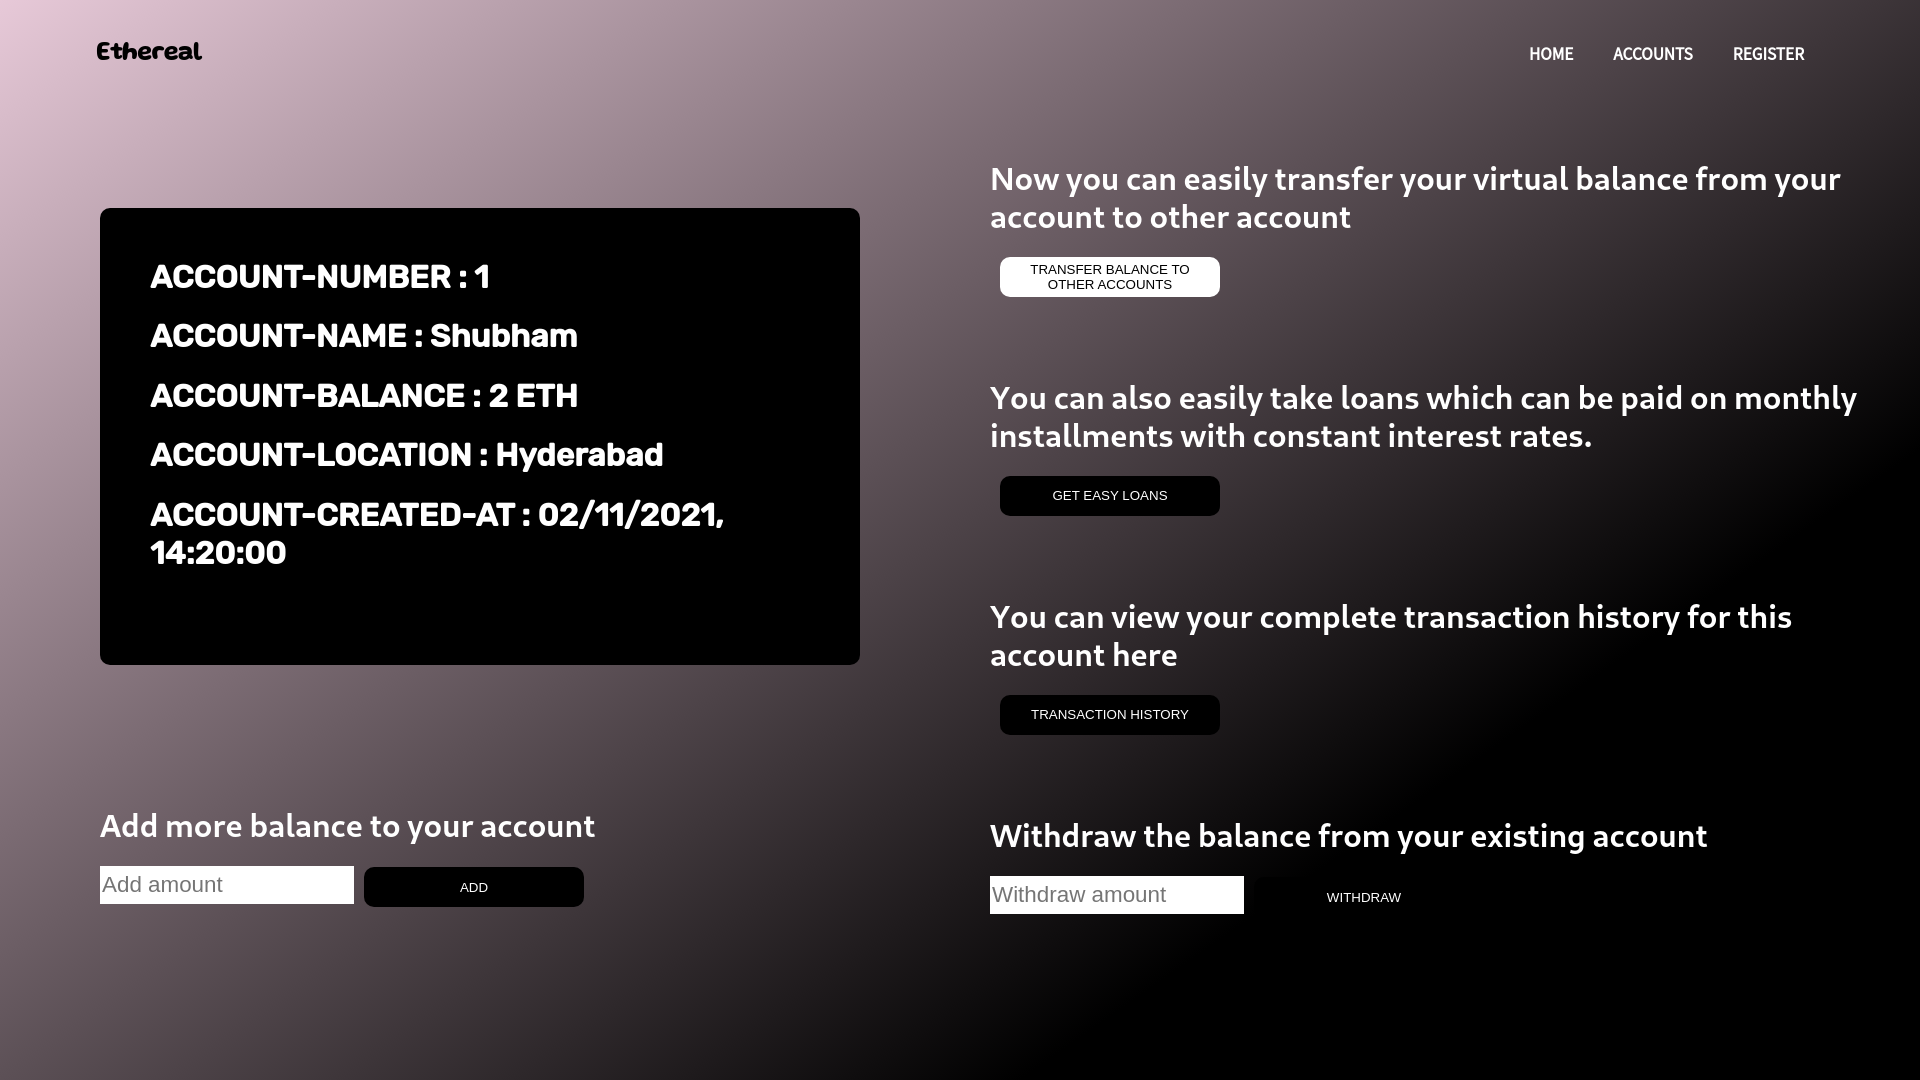
To, give a brief idea of the layout of the page let us divide the page into various columns, one in the extreme left to print the account details, there are various other grid boxes for each functionality that contain a simple form, for example, there is an additional balance grid box, a withdraw balance grid box, a transfer amount grid box and a box for transferring amount from one account to other, later we can add more grid boxes which contains buttons that redirect to pages for displaying transaction(last extras section) and the other one for performing loan transactions.
Now, let us move on to the second part of this article, and create a function in the backend to add virtual balance to our bank account.
We create a public payable addBalance function which takes inputs as the serial , amount , and the creator address .
Why these 3 inputs?
Serial number is required to increase the virtual balance of that particular virtual account.
The amount is the amount to be passed that is to be added.
You need the creator address that is connected to Metamask to transfer actual ether from your Ganache account.
We need to increase the virtual balance by accessing the balance item of the particular account from the serialNumber and we also need to increase the bankBalance of the whole application present at the 0th index of the accounts mapping.
We need to also add a check to only update the virtual balance when the Metamask connected Ganache account balance is greater than the amount entered.
Add balance code snippet:
if(creator.balance>amount){account[serialNumber].balance+=amount;account[0].balance+=amount;}Now after displaying the account details, we start coding the add balance functionality grid box on the frontend, it should contain a form input with the state variable balanceAdded as we have specified in previous examples, and also a submit button which onClick should fire an addBalance function which is similar to the syntax of our previous functions and should take the 3 input values.
We use the send method here and the from address is from the Metamask account and the value is the balance to be added which should also be passed in the object. We need to pass this value in the send method since that amount of ether should be transferred from our Ganache account to the contract, if we don't specify the amount only a minimal amount of ether will be costed that will be the gas amount to perform the function from the backend.
Adding Balance: Ether from Ganache -> Contract Address
Virtual Balance of the account and Contract (Bank) are both increased since actual Ether flows from the Contract.
We have to also again call the accounts method with the key serial number, and then update the balance variable to instantly print the new balance in the account details grid section.
const addBalance = async (e) => { e.preventDefault(); `The addBalance is the state variable which we get from the addBalance form and the account is the Metamask connected account`; await contract.methods .addBalance(id, addBalance, account) .send({ from: account, value: addBalance }) .then((res) => { console.log(res); }) .then(async () => { await contract.methods .accounts(id) .call() .then((res) => { setBalance(res.balance); }) .catch((err) => { console.log(err); }); }) .catch((err) => { console.log(err); });};We have completed the first 2 functionalities of our virtual bank, namely Creating a new account and Updating the Balance for the account in this article, in the 2nd part of this article-series we will be adding features like: Withdrawing Balance, Transfering Amount to other virtual accounts on the Bank and Displaying Transaction history of an account, to our virtual bank.
This is a 2nd Part of this article in which we will be adding features like : Withdrawing Balance, Transfer Amount to other virtual accounts on the Bank and Displaying Transaction history to our Project.

You can find all the Resources required for this Project by clicking here.
Project Github repository :

A decentralized virtual banking system
About the project:
This project was built with my teammates as a part of our club ,GNU Linux Users' Group 's event Ten Days of Code where we mentored students from all over India to build projects from scratch over a period of ten days.
This DApp is supported using Solidity Smart Contracts and the frontend is built using the framework React JS, the application is deployed to the local blockchain network,Ganache. The whole project runs on an Ethereum supported browser, with the help of the Metamask extension.For, building compiling and testing the written contracts, Truffle was used.Lastly,the frontend was connected to the solidity contract using a wonderful library,web3.
The detailed guide to build this project is present in the resources folder
Display:
Here are few glimpses of the project we built.
HOME PAGE

REGISTER HERE
ACCOUNTS PAGE

ACCOUNT DETAILS
TRANSFER
Project collaborators :


Apurva Jyoti PaulFollow
Connect with us :


Original Link: https://dev.to/nitdgplug/ethereal-a-decentralized-virtual-banking-system-part-i-1mol
Dev To
More About this Source Visit Dev To