
An Interest In:
Web News this Week
- March 19, 2024
- March 18, 2024
- March 17, 2024
- March 16, 2024
- March 15, 2024
- March 14, 2024
- March 13, 2024
Some of Our Sources
- Slashdot
- Simplebits
- TutsPlus - Code
- Smashing Magazine
- TutsPlus - Design
- Inspiredology
- Naldz Graphics
- Android Headlines
- Hashedout
- TechPowerUp
Help Webnuz
Referal links:
Building a CRUD API with Node.js and MongoDB
Howdy everyone, in this article we are going to build a CRUD (Create, Read, Update, Delete) API with Node.js and MongoDB. This API will be able to add, get, edit and delete todos!
Setting up our node app
Create a new folder and give it a name-
mkdir crud-APINavigate into the project-
cd crud-APIInitialize node-
npm init -yInstalling the packages needed-
npm install mongoose express dotenv corsInstalling nodemon as dev dependency-
npm install -D nodemonCreating our server
Create a new file index.js and add the following-
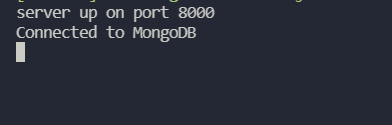
const express = require("express");const PORT = 8000;const app = express();app.listen(PORT, async () => { console.log(`server up on port ${PORT}`);});Inside package.json and inside of scripts add this new script-
"start": "nodemon index.js"If you now run npm run start it will show server up on port 8000 in the console

Creating the router and routes
Create a new file router.js and add the following-
const router = require("express").Router();router.get("/", (req, res) => { res.send("Let's build a CRUD API!");});module.exports = router;This will create a new get create route on the home page. So let's use the router in our app now. Go back to index.js and add a middleware like this-
app.use(router);We also need to import router-
const router = require("./router");If you now go to http://localhost:8000/ we can see "Let's build a CRUD API!"

Setting up MongoDB
Go to MongoDB and sign up/login. After you sign in click on create a new project and give your project a name!

You can also add a member if you want but I am not going to do that right now.
After the project has been created, click on Build a database. You will be able to see 3 plans to choose from. We are good to go with the free one for now. It will prompt you to select a location for your database, I would recommend you to go with the closes one :)

Create a new user with a username and password, you are going to need this to connect MongoDB to your node.js app so don't forget it so fast :P. Now, select database in the sidebar. It will probably show you that the cluster is being created so wait for some time.

After the database is created click on Connect. You can allow access from everywhere for now.
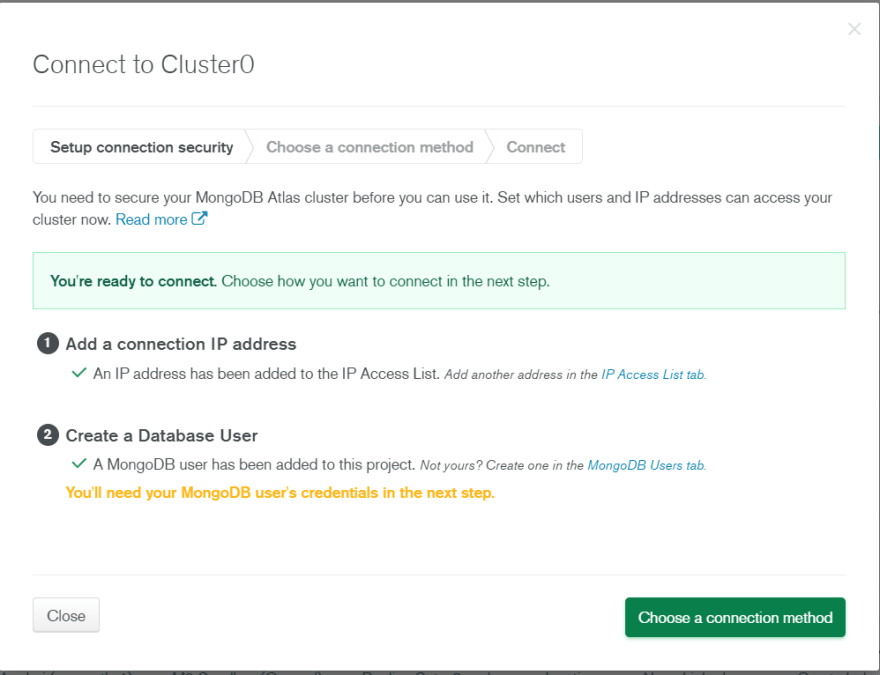
Finally, click on choose a connection method then connect your application. Copy the URL that you get as we are going to need it now.

Let's head back to our code now.
Connecting MongoDB to Node.js
Inside of our app create a new file .env and create a new variable MONGODB_URL like this-
MONGODB_URL=mongodb+srv://avneesh0612:password>@cluster0.wz3aq.mongodb.net/myFirstDatabase?retryWrites=true&w=majorityYou need to replace the URL with the one you got from MongoDB and also change the password to your actual password.
Go to index.js and add in the following for connecting our app to MongoDB-
mongoose .connect(process.env.MONGODB_URL, { useNewUrlParser: true, useUnifiedTopology: true, }) .then(() => { console.log("Connected to MongoDB"); }) .catch((err) => { console.log(err); });Import mongoose-
const mongoose = require("mongoose");You also need to restart the server as we have changed the env variables. So, cut the server and restart the dev server with npm start
This is going to give us an error as we haven't configured our env variables yet, so you need to add just these two lines-
const dotenv = require("dotenv");dotenv.config();It finally shows us that our app is connected to MongoDB!
Creating the Model for our Todo
We are going to create a new folder Model to keep things organized. So, create a new folder Model and a file Todo.js inside of it. Our model is going to have only 4 things- title, description, completed, and createdAt. So add the following in Todo.js-
const mongoose = require("mongoose");const TodoSchema = new mongoose.Schema({ title: { type: String, required: true, }, description: { type: String, }, completed: { type: Boolean, default: false, }, createdAt: { type: Date, default: Date.now, },});module.exports = mongoose.model("Todo", TodoSchema);If you want to have more/less data then feel free to edit this.
Creating CRUD functionality
Create a new folder controllers and Todo.js inside of it. I am going to create a dummy function for now-
const getTodos = (req, res) => { res.send("I am the get todos route");};module.exports = { getTodos,};Now, go to router.js and create a new get route like this-
router.get("/todos", getTodos);You also need to import getTodos-
const { getTodos } = require("./controllers/Todo");If you now go to http://localhost:8000/todos then it will show you "I am the get todos route"

First, let's build the create functionality then we will do the read functionality!
Building Create functionality
Create a new POST todos route in router.js-
router.post("/todos", createTodo);Import createTodo from the controller-
const { getTodos, createTodo } = require("./controllers/Todo");Now create a new function in controllers/Todo.js-
const createTodo = (req, res) => { const todo = new Todo({ title: req.body.title, description: req.body.description, completed: req.body.completed, }); todo.save((err, todo) => { if (err) { res.send(err); } res.json(todo); });};This is going to take the title, description, and completed from the body and create a new Todo from the model that we created. Also, it will save it to to the database with the .save function. We also need to import Todo like this-
const Todo = require("../model/Todo");We also need to export createTodo-
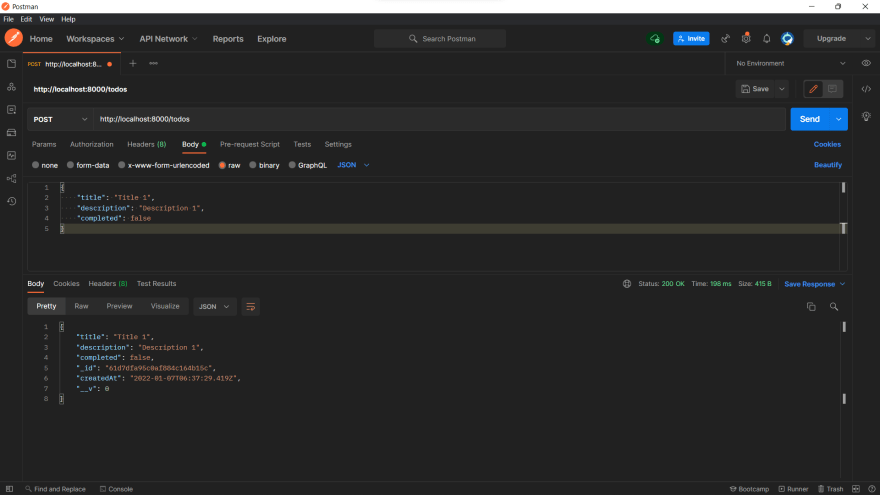
module.exports = { getTodos, createTodo,};I am going to use Postman for testing the API. You can use any client :). So open postman and create a new post request to http://localhost:8000/todos with this in the body-
{ "title": "Title 1", "description": "Description 1", "completed": false}
Let's hit send , and we get an error.
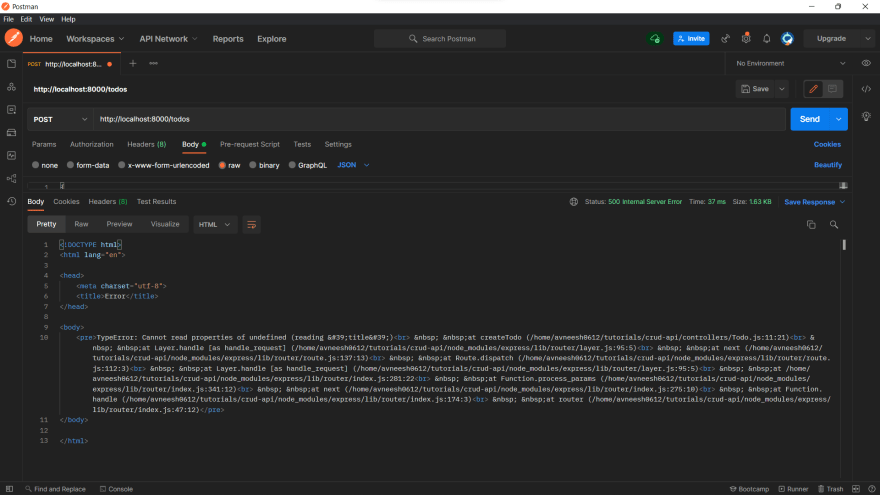
We get this error because we haven't used some middleware. So inside of index.js just above app.use(router) and below mongoose.connect add the following middlewares-
app.use(cors());app.use(express.json());app.use(express.urlencoded({ extended: false }));We also need to import cors-
const cors = require("cors");If we re-run the request on Postman, it works!
Building Read functionality
We are going to need to change the getTodos function that we created. So, replace the function with this-
const getTodos = (req, res) => { Todo.find((err, todos) => { if (err) { res.send(err); } res.json(todos); });};This is going to show all the todos in the collection of "Todos", now if we make a GET request to http://localhost:8000/todos then it will show us all the todos! Currently, we have only one.

We can also test this by adding another todo and it will then show us both the todos.

Edit functionality
Create a new PUT route in router.js-
router.put("/todos/:todoID", updateTodo);Import it from controllers/Todo.js-
const { getTodos, createTodo, updateTodo } = require("./controllers/Todo");Inside controllers/Todo.js let's build our updateTodo function-
const updateTodo = (req, res) => { Todo.findOneAndUpdate( { _id: req.params.todoID }, { $set: { title: req.body.title, description: req.body.description, completed: req.body.completed, }, }, { new: true }, (err, Todo) => { if (err) { res.send(err); } else res.json(Todo); } );};This will take a new title, description, and completed from the request body and update it according to the id in the URL. So, in postman create a new PUT request to http://localhost:8000/todos/todo_id. You also need to provide data in the body-
{ "title": "Title 3", "description": "Description 3", "completed": false}It works!

If you make a new GET request, you will see the updated todos.

Delete functionality
Create another route in router.js-
router.delete("/todos/:todoID", deleteTodo);You also need to import as always-
const { getTodos, createTodo, updateTodo, deleteTodo,} = require("./controllers/Todo");Finally, create a new function in Todo.js-
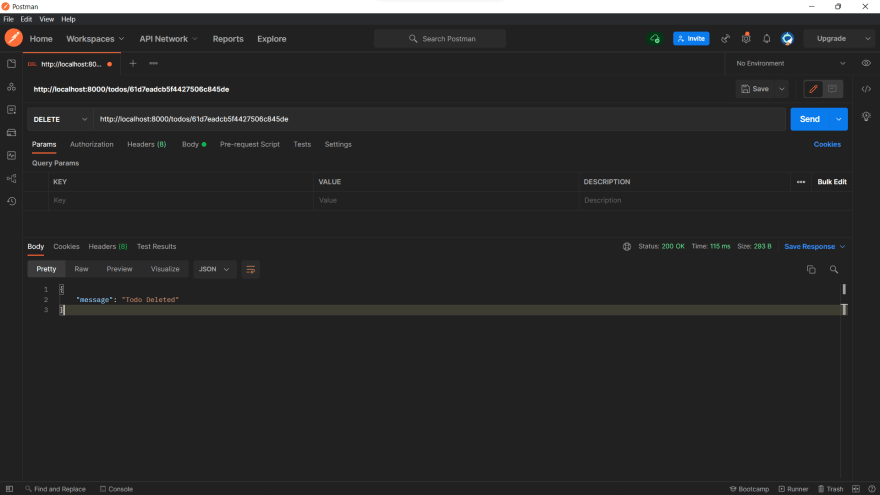
const deleteTodo = (req, res) => { Todo.deleteOne({ _id: req.params.todoID }) .then(() => res.json({ message: "Todo Deleted" })) .catch((err) => res.send(err));};This will take the todoID from the URL and delete it. Export the function-
module.exports = { getTodos, createTodo, updateTodo, deleteTodo,};Let's put it to the test now. It works now!
We now have a fully working CRUD API! Let's deploy it to Heroku now.
Deploying to Heroku
Creating a GitHub repo
Initialize git-
git initCreate a new file .gitignore and add the node modules in it-
/node_modulesCommit the code-
git add .git commit -m "your commit message"Go on GitHub and create a New Repo. You can give it any name you like!
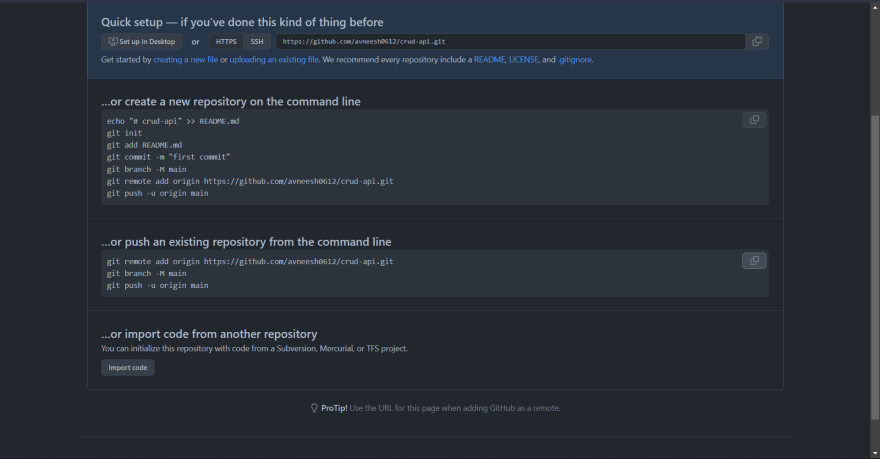
Copy the commands in "push an existing repository from the command line" and paste it into your terminal.
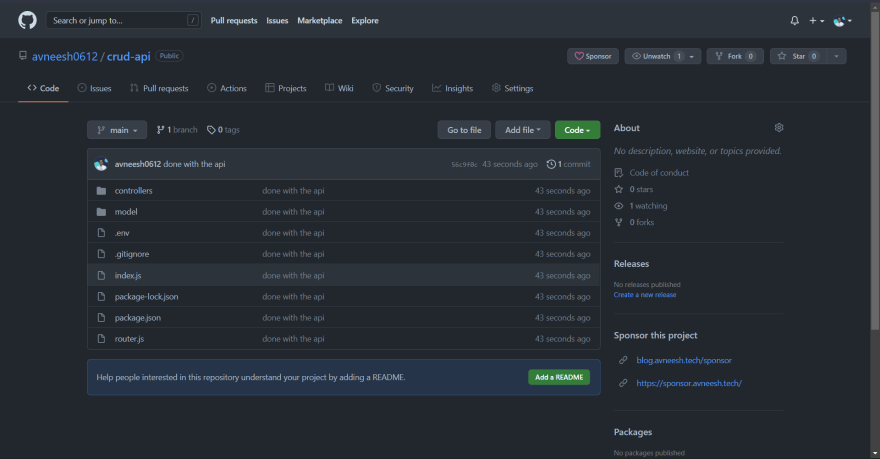
If you now refresh the page, you will be able to see your code!
Now, go to heroku, sign in/sign up. Then, create a new app

Give your app a name and hit "Create app"

Connect GitHub and select your repository.
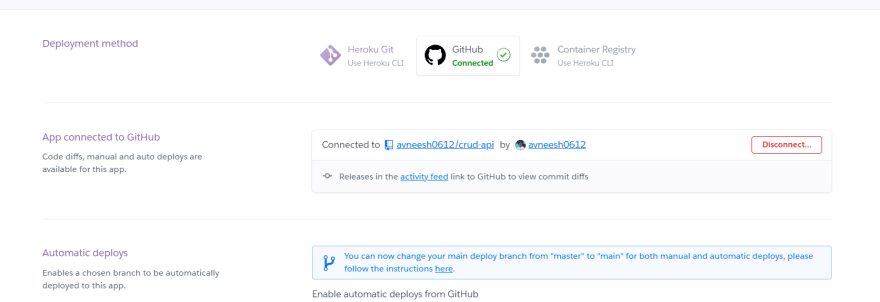
You can enable automatic deploys and also click on deploy branch.
We also need to add the env variables, so go to the settings tab, scroll down to Config Vars and paste in the variable.

You are going to see an error in your app, so head back to the code! Inside package.json change the start script to-
node index.jsThe script should look like this-
"start": "node index.js"We also need to change the port, so inside index.js change port to this-
const PORT = process.env.PORT || 8000;Now, you can push the code again!
git add .git commit -m "fix: deploy errors"git pushIf you enabled automatic deploys then it will deploy automatically, else manually deploy the branch. Now our API successfully works! This is the API if you want to try it out: https://crud-api-demo.herokuapp.com/.
Conclusion
Hope you were able to build an amazing CRUD API for your next project. Feel free to drop your questions below . See ya in the next one
Useful links
Original Link: https://dev.to/avneesh0612/building-a-crud-api-with-nodejs-and-mongodb-5oi
Dev To
More About this Source Visit Dev To