
An Interest In:
Web News this Week
- April 19, 2024
- April 18, 2024
- April 17, 2024
- April 16, 2024
- April 15, 2024
- April 14, 2024
- April 13, 2024
Some of Our Sources
- Techcrunch
- Technology Review
- Web Designer Wall
- Joshua Blankenship
- Abduzeedo
- Vandelay Design
- You The Designer
- Creative Curio
- Stylized Web
- Web Resource Source
Help Webnuz
Referal links:
Part 2. Quick guide to make your Azure applications work.
Introduction
In the previous article, we have already created an Azure App service instance. And now you are able to see the Microsoft Azure default page by the link. This time we are going to migrate Strapi app, Next.js app and Mongo DB to Azure.
Preparing Azure App Services for the Migration process
Your project probably has specific environment variables. They should be added to Azure.
Go to the Azure App service instance, find the Configuration in the Settings tab, select Application Settings section.
Here are two kinds of it. Application Settings and Connection Strings. There is only one case for using strings instead of settings, more detailed information can be found by the link. Use Application settings and click on +New application setting.
Put the name and value of the variable and select if it is a deployment slot setting. With this setting in place, database connection strings and other settings are not swapped when the slots are swapped. So the staging slot will always point to the staging database, and the production slot will always point to the production database.

Keep in mind that the values you set in App Service override the values in Web.config and others.
Later I will talk about different deployment methods. But no matter which one you choose, you need to know that deploying new code directly to the production application is a bad practice. For this purpose, every App service instance has staging slots. Deploying your application to a non-production slot has the following benefits:
- You can validate app changes in a staging deployment slot before swapping it with the production slot.
- Deploying an app to a slot first and swapping it into production guarantees that all instances of the slot are warmed up before being swapped into production. This eliminates downtime when you deploy your app. The traffic redirection is seamless, and no requests are dropped because of swap operations. You can automate this entire workflow by configuring autoswap when pre-swap validation isn't needed.
- After a swap, the slot with the previously staged app now has the previous production app. If the changes swapped into the production slot aren't as you expect, you can perform the same swap immediately to get your "last known good site" back.
So the best idea is to create a preview slot that will not affect the production. Creating the slot for an app:
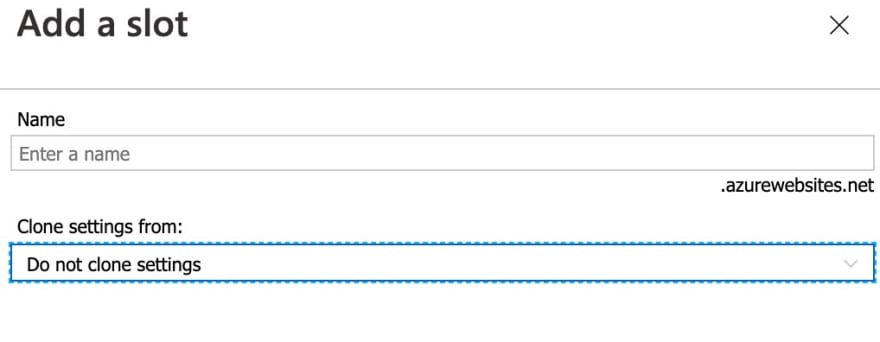
- Go to Azure App service instance, find the deployment slots in the Deployment tab, click on Add slot
- Put the slot name. It will take your main slot root domain name + name that you will write.
- After that, you can select if you need to clone all settings from the main slot or not. If you clone settings, it will make the full copy of the existing slot with the same environment variables. So if you want to use another database or change other settings, you shouldn't clone settings or change them manually after the new slot is ready.
In a few minutes, the preview slot will be available by its own url and can be found in the Deployment Slots tab of the Azure App service instance. And we can proceed to deploy.
Choosing the deployment way
There are a few options to move your project to the instance. Most popular are:
- You can deploy to Azure App Service as part of your continuous deployment (CD) workflows via GitHub, Azure Repos
- Try Azure Repos with Azure App, make sure you have already created an Azure DevOps Organization to store your project files.
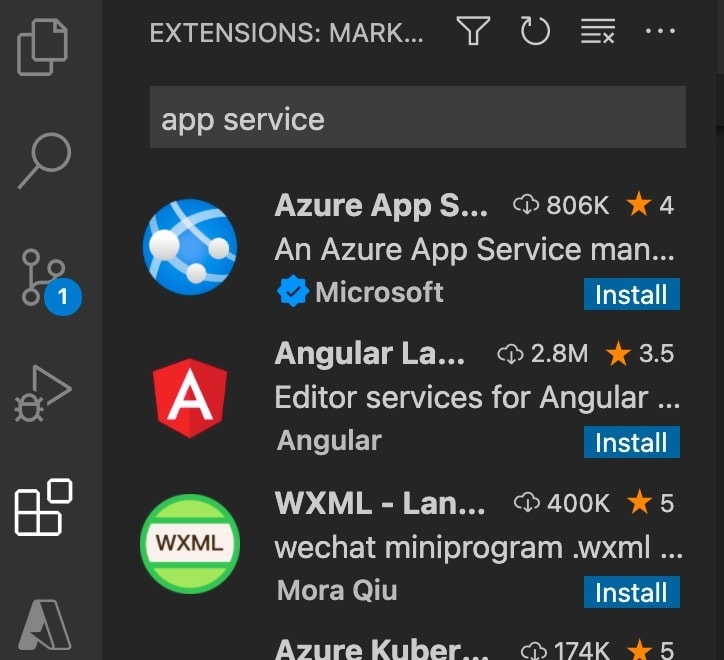
- Or use the Azure App Service extension for VS Code to create quickly, manage, and deploy your websites. Just press the install button.
The simplest way for me is deploying via VScode. You will be able to create and deploy resources with it. But this method has a list of disadvantages for my purposes and for. Probably this deployment way will be described in my other article, and for now, deploying using workflows via GitHub was chosen for my project.
Steps to deploy my Strapi back-end application (or any other node.js app) to Azure via GitHub:
- Certainly, to achieve this target, your app should be connected to the remote git repository.
- Go to your project and create the .github folder at the root of it.
- In the .github folder create workflows folder.
- In workflows folder create the file with the following name scheme branch_name_app_name(slot_name).yml
- For example:App-name: production-appBranch from which you want deploy: masterSlot: previewFinal name of the file: master_production-app(preview).yml
- Now configure the created .yml file with the following settings. Here is an example that uses the above-declared names:
push: branches: - master pull_request: branches: - masterenv: AZURE_WEBAPP_NAME: production-app # set this to your application's name AZURE_WEBAPP_PACKAGE_PATH: "." # set this to the path to your web app project, defaults to the repository root NODE_VERSION: '14.x' # set this to the node version to use API_URL: "https://production-app.azurewebsites.net" # main slot urljobs: build-and-deploy: runs-on: ubuntu-latest steps: - uses: actions/checkout@master - name: Set Node.js version uses: actions/setup-node@v1 with: node-version: '14.x' # install dependencies, build, and test - name: npm install, build, and test #describes which commands need to be run run: | npm install npm run build --if-present npm run test --if-present - uses: azure/webapps-deploy@v2 with: app-name: 'production-app' slot-name: 'preview' publish-profile: ${{ secrets.AzureAppService_PublishProfile_PRODUCTION }} package: .- In the file, all seems to be clear. The only exception is some odd variable used on the penultimate line of code. This setting is required to secure your deployments. Reproduce the following steps to get the value :
a. Go to your preview slot instance and select Get Publish Profile. The file will be downloaded. Open it with the notepad or use your imagination.

b. Copy all content of the opened file.
c. Go to your repository on GitHub -> Settings -> Secrets and press New Repository Secret button.
d. Add name AZUREAPPSERVICE_PUBLISHPROFILE_PRODUCTION in value input, paste the copied content from the file and save changes. In two words, this variable connects your repo with the application instance on Azure.
So, when this thousandth step is complete, you can finally push your code to GitHub by directly pushing or creating a pull request to master-branch. Now it is time to take a cup of tea and just follow the action with full deployment logs on GitHub in Actions tab. It may take some time

What happens now? First of all, GitHub sets the node.js version, installs all dependencies from package.json, and runs the build command. If there are no errors during building, it zips all the files without the node-modules folder and passes them to Azure. Azure does the same steps: extracts files, installs node modules, creates the production build, then removes the previous project folder and instead puts the new one. After it starts the new Docker container and it is warmed up, it runs the npm start command and starts the app.

Dont be nervous while waiting. The action can take up to 10 minutes or even more for the first time deploying. When the action is completed, you can visit the link of the preview slot. If you are lucky, you will see your app working. But dont forget the main Microsoft concept: Microsoft Just restart it. Check if everything works, and then proceed to swap the app to the production slot. To do this, go to the production Azure App service to Deployment slots, find and press the swap button. Select which slot to swap and to which, confirm the action and wait about 5 minutes. When the swap process is ready, you will get the message. And now all your changes are available on the production slot, and the preview slot link should lead you to the example Microsoft Page.
Steps to deploy my Next.js application to Azure via GitHub.
Actually, the steps to deploy next.js are almost the same as for Node.js application. There are some small distinctions. Next.js project doesnt have the obvious server.js file that is required to deploy it to Azure App Service. There is also another way: deploy to Static Web App Azure service. But it also cant be used in a simple way because Next.js has the server-side part, which leads to difficulties with deploying it as the static app. So here is what we should do to deploy Next.js app to Azure App Service, besides what we have already done for the previous app:
- In the root project folder create server.js file with the next content and install all missing dependencies:
const { createServer } = require("http");const next = require("next");const port = process.env.PORT || 3000;const app = next({ dev: false });const handle = app.getRequestHandler();app.prepare().then(() => { createServer((req, res) => { handle(req, res); }).listen(port, (err) => { if (err) throw err; console.log(`> Ready on http://localhost:${port}`); });});- Change your start script in the package.json file to node server.
- In the projects root create web.config file with the code:
<?xml version="1.0" encoding="utf-8"?><!-- This configuration file is required if iisnode is used to run node processes behind IIS or IIS Express. For more information, visit: https://github.com/tjanczuk/iisnode/blob/master/src/samples/configuration/web.config--><configuration> <system.webServer> <!-- Visit http://blogs.msdn.com/b/windowsazure/archive/2013/11/14/introduction-to-websockets-on-windows-azure-web-sites.aspx for more information on WebSocket support --> <webSocket enabled="false" /> <handlers> <!-- Indicates that the server.js file is a node.js site to be handled by the iisnode module --> <add name="iisnode" path="server.js" verb="*" modules="iisnode"/> </handlers> <rewrite> <rules> <!-- Do not interfere with requests for node-inspector debugging --> <rule name="NodeInspector" patternSyntax="ECMAScript" stopProcessing="true"> <match url="^server.js\/debug[\/]?" /> </rule> <!-- First we consider whether the incoming URL matches a physical file in the /public folder --> <rule name="StaticContent"> <action type="Rewrite" url="public{REQUEST_URI}"/> </rule> <!-- All other URLs are mapped to the node.js site entry point --> <rule name="DynamicContent"> <conditions> <add input="{REQUEST_FILENAME}" matchType="IsFile" negate="True"/> </conditions> <action type="Rewrite" url="server.js"/> </rule> </rules> </rewrite> <!-- 'bin' directory has no special meaning in node.js and apps can be placed in it --> <security> <requestFiltering> <hiddenSegments> <remove segment="bin"/> </hiddenSegments> </requestFiltering> </security> <!-- Make sure error responses are left untouched --> <httpErrors existingResponse="PassThrough" /> <!-- You can control how Node is hosted within IIS using the following options: * watchedFiles: semi-colon separated list of files that will be watched for changes to restart the server * node_env: will be propagated to node as NODE_ENV environment variable * debuggingEnabled - controls whether the built-in debugger is enabled See https://github.com/tjanczuk/iisnode/blob/master/src/samples/configuration/web.config for a full list of options --> <iisnode watchedFiles="web.config;*.js"/> </system.webServer></configuration>- Reproduce all steps for deploying node.js app.
Congrats! Deploying both front-end and back-end applications is finally finished. The last thing we need to migrate is the Mongo database.
The first and main thing you should know before starting the migration database to Azure Cosmos DB for Mongo dont ever do this!!! Strapi and Azure Cosmos DB for Mongo are almost incompatible. Actually, I still dont understand what Azure Cosmos for Mongo is compatible with.
It doesnt support a lot of operators and expressions that Strapi uses. For example: $let, $where, $meta and others. I have made a migration and faced indexing problems and a lot of unsupported operators. After a huge amount of work was done and after most of the problems were fixed, it finally started to work together. But when I updated the Strapi to the new version, I got one thousand additional problems. And finally, official representatives of the company Strapi gave me the answer:
Technically CosmosDB is not entirely MongoDB (even with the API implemented) It's not on the list of supported databases, and may not fully work with the ORM being used (mongoose).
Moreover, it has a complicated way to take backups. The system takes snapshots, but you can't get them immediately. Firstly you need to create a support request for the Microsoft Support team. It can be done manually in 2 minutes in Mongo Atlas. Just select the required snapshot and click the restore button. Looks much simpler, doesn't it?
Don't waste time fixing problems, there is an easy way to avoid them. If your target is just to speed up the application, use Mongo Atlas for hosting the database and select the Azure cloud provider and the region closest to your customers. In case you need more options for regions, backup settings and some other benefits, learn about dedicated cluster tier features.
If Mongo Atlas cluster is hosted on Azure servers, most of the requests will not go over the public network, they will use the Azure backbone network instead. Which is more secure and the fastest way to deliver the data.
In the end, we have two applications moved to Azure and Mongo DB hosted on the Mongo Atlas. It is the optimal solution for my purposes. But be ready to read more about Azure, believe me, you will definitely need it.
Original Link: https://dev.to/halolab/part-2-quick-guide-to-make-your-azure-applications-work-gd1
Dev To
More About this Source Visit Dev To