
An Interest In:
Web News this Week
- April 19, 2024
- April 18, 2024
- April 17, 2024
- April 16, 2024
- April 15, 2024
- April 14, 2024
- April 13, 2024
Some of Our Sources
- Engadget
- Simplebits
- Pearsonified
- Vandelay Design
- Fuel Your Creativity
- 24 Ways
- Web Resource Source
- Android Headlines
- Hashedout
- TechPowerUp
Help Webnuz
Referal links:
How To Use HarperDB Custom Functions With Your React App.
Last week, I got a chance to explore HarperDB - a fast, modern database that allows you to develop full-stack apps.
I've developed a ToDo React app with HarperDB Custom Functions.
HarperDB is a distributed database focused on making data management easy.
- It supports both SQL and NoSQL queries.
- It also offers to access the database instance directly inside the client-side application.
In this article, let's learn about HarperDB and how to build a React app using HarperDB Custom Functions!
Let's talk about HarperDB custom functions:
- Add your own API endpoints to a standalone API server inside HarperDB.
- Use HarperDB Core methods to interact with your data at lightning speed.
- Custom Functions are powered by Fastify, so theyre extremely flexible.
- Manage in HarperDB Studio, or use your own IDE and Version Management System.
- Distribute your Custom Functions to all your HarperDB instances with a single click.

What are we building?
We will create a simple ToDo React App. When we are done, it will look like this when it runs in localhost:
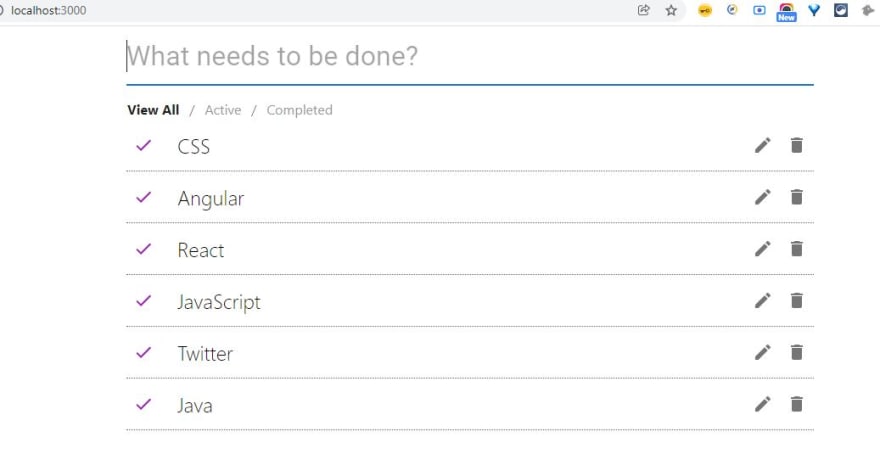
Let's look at how we develop our To-Do React app:
This ToDo app allows a user to create a task that needs to be completed by the user.
It has 2 states:
- Active
- Completed
Users can filter the tasks list based on the status of tasks as well. It will also allow the user to edit a task & delete one as well.
So the main idea is whatever task is created by the user which you can see in the "View All" list, all the tasks will be saved in HarperDB with the help of Custom Functions.
Project setup overview:
Create React App is the best way to start building a new single-page application in React.
npx create-react-app my-appcd my-appnpm startDependencies used: "@emotion/react": "^11.5.0", "@emotion/styled": "^11.3.0", "@mui/icons-material": "^5.0.5", "@mui/material": "^5.0.6", "@testing-library/jest-dom": "^5.15.0", "@testing-library/react": "^11.2.7", "@testing-library/user-event": "^12.8.3", "axios": "^0.24.0", "classnames": "^2.3.1", "history": "^5.1.0", "lodash.debounce": "^4.0.8", "react": "^17.0.2", "react-dom": "^17.0.2", "react-router-dom": "^6.0.1", "react-scripts": "4.0.3", "web-vitals": "^1.1.2"it just creates a frontend build pipeline for this project, so we can use HarperDB in the backend.
Alternatively, you can clone the GitHub repository and use the start directory as your project root. It contains the basic project setup that will get you ready. In this project for the CSS you can refer to Tasks.css (srcodo-component\Tasks.css)
Let's talk about the react components which are being used:
This is the folder structure:

In file structure, we can see that Tasks is the container component where we are managing the application's state, here the app state means the data we are getting from HarperDB using API endpoints, and this data is shared across all child components through props.
Task component (Tasks.jsx):
Here is the file reference in the project:
srcodo-component\Tasks.jsx
This component acts as a container component (which is having a task list & task search as a child component)
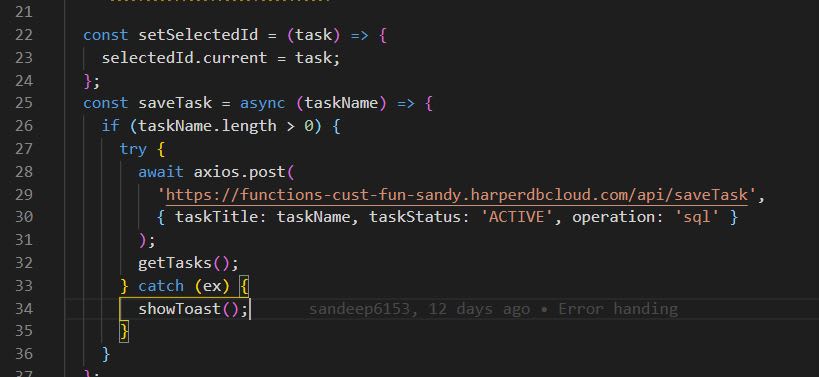
import React, { useEffect, useCallback, useState, useRef } from 'react';import { useNavigate, useSearchParams } from 'react-router-dom';import TaskSearch from './task-search-component/TaskSearch';import './Tasks.css';import axios from 'axios';import debounce from '@mui/utils/debounce';import TaskItem from './task-list-component/TaskList';import Snackbar from '@mui/material/Snackbar';export default function Tasks() { const navigate = useNavigate(); const [searchParams, setSearchParams] = useSearchParams(); const [taskList, setTaskList] = useState([]); const [filteredList, setFilteredList] = useState([]); const [open, setOpen] = useState(false); const [msg, setMsg] = useState('') const selectedId = useRef(); useEffect(() => { getFilteredList(); }, [searchParams, taskList]); const setSelectedId = (task) => { selectedId.current = task; }; const saveTask = async (taskName) => { if (taskName.length > 0) { try { await axios.post( 'your_url_here', { taskTitle: taskName, taskStatus: 'ACTIVE', operation: 'sql' } ); getTasks(); } catch (ex) { showToast(); } } }; const updateTask = async (taskName) => { if (taskName.length > 0) { try { await axios.put( 'your_url_here', { taskTitle: taskName, operation: 'sql', id: selectedId.current.id, taskStatus: selectedId.current.taskStatus, } ); getTasks(); } catch (ex) { showToast(); } } }; const doneTask = async (task) => { try { await axios.put( 'your_url_here', { taskTitle: task.taskTitle, operation: 'sql', id: task.id, taskStatus: task.taskStatus, } ); getTasks(); } catch (ex) { showToast(); } }; const deleteTask = async (task) => { try { await axios.delete( `your_url_here/${task.id}` ); getTasks(); } catch (ex) { showToast(); } }; const getFilteredList = () => { if (searchParams.get('filter')) { const list = [...taskList]; setFilteredList( list.filter( (item) => item.taskStatus === searchParams.get('filter').toUpperCase() ) ); } else { setFilteredList([...taskList]); } }; useEffect(() => { getTasks(); }, []); const getTasks = async () => { try { const res = await axios.get( 'your_url_here' ); console.log(res); setTaskList(res.data); } catch(ex) { showToast(); } }; const debounceSaveData = useCallback(debounce(saveTask, 500), []); const searchHandler = async (taskName) => { debounceSaveData(taskName); }; const showToast = () => { setMsg('Oops. Something went wrong!'); setOpen(true) } return ( <div className="main"> <TaskSearch searchHandler={searchHandler} /> <ul className="task-filters"> <li> <a href="javascript:void(0)" onClick={() => navigate('/')} className={!searchParams.get('filter') ? 'active' : ''} > View All </a> </li> <li> <a href="javascript:void(0)" onClick={() => navigate('/?filter=active')} className={searchParams.get('filter') === 'active' ? 'active' : ''} > Active </a> </li> <li> <a href="javascript:void(0)" onClick={() => navigate('/?filter=completed')} className={ searchParams.get('filter') === 'completed' ? 'active' : '' } > Completed </a> </li> </ul> {filteredList.map((task) => ( <TaskItem deleteTask={deleteTask} doneTask={doneTask} getSelectedId={setSelectedId} task={task} searchComponent={ <TaskSearch searchHandler={updateTask} defaultValue={task.taskTitle} /> } /> ))} <Snackbar open={open} autoHideDuration={6000} onClose={() => setOpen(false)} message={msg} /> </div> );}your_url_here = you should replace this with your HarperDB endpoint URL.
For an example of the URL, look below:

Task List (TaskList.jsx):
Here is the file reference in the project:
srcodo-componentask-list-component\TaskList.jsx
This component is used to render all the list of tasks that we are getting from the HarperDB
import React, { useState } from 'react';import classNames from 'classnames';import IconButton from '@mui/material/IconButton';import DoneIcon from '@mui/icons-material/Done';import EditIcon from '@mui/icons-material/Edit';import ClearIcon from '@mui/icons-material/Clear';import DeleteIcon from '@mui/icons-material/Delete';import TextField from '@mui/material/TextField';export default function TaskItem({ task, searchComponent, getSelectedId, doneTask, deleteTask }) { const [editing, setEditing] = useState(false); const [selectedTask, setSelectedTask] = useState(); let containerClasses = classNames('task-item', { 'task-item--completed': task.completed, 'task-item--editing': editing, }); const updateTask = () => { doneTask({...task, taskStatus: task.taskStatus === 'ACTIVE' ? 'COMPLETED' : 'ACTIVE'}); } const renderTitle = task => { return ( <div className="task-item__title" tabIndex="0"> {task.taskTitle} </div> ); } const resetField = () => { setEditing(false); } const renderTitleInput = task => { return ( React.cloneElement(searchComponent, {resetField}) ); } return ( <div className={containerClasses} tabIndex="0"> <div className="cell"> <IconButton color={task.taskStatus === 'COMPLETED' ? 'success': 'secondary'} aria-label="delete" onClick={updateTask} className={classNames('btn--icon', 'task-item__button', { active: task.completed, hide: editing, })} > <DoneIcon /> </IconButton> </div> <div className="cell"> {editing ? renderTitleInput(task) : renderTitle(task)} </div> <div className="cell"> {!editing && <IconButton onClick={() => {setEditing(true); getSelectedId(task)}} aria-label="delete" className={classNames('btn--icon', 'task-item__button', { hide: editing, })} > <EditIcon /> </IconButton> } {editing && <IconButton onClick={() => {setEditing(false); getSelectedId('');}} aria-label="delete" className={classNames('btn--icon', 'task-item__button', { hide: editing, })} > <ClearIcon /> </IconButton> } {!editing && <IconButton onClick={() => deleteTask(task)} aria-label="delete" className={classNames('btn--icon', 'task-item__button', { hide: editing, })} > <DeleteIcon /> </IconButton> } </div> </div> );}Task Search (TaskSearch.jsx):
Here is the file reference in the project:
srcodo-componentask-search-component\TaskSearch.jsx
This component provides a text box to users where users can enter the name of the task which they need to perform. (Same component we are using while editing a task)
import React from 'react';import TextField from '@mui/material/TextField';export default function TaskSearch({ searchHandler, defaultValue, resetField }) { const handleEnterKey = event => { if(event.keyCode === 13) { searchHandler(event.target.value); event.target.value = ''; if(resetField) { resetField(); } } } return ( <TextField id="filled-required" variant="standard" fullWidth hiddenLabel placeholder="What needs to be done?" onKeyUp={handleEnterKey} defaultValue={defaultValue} /> );}Here you can find the complete source code of the ToDo App.
In the Tasks.js component, you can see we are leveraging Custom Function APIs which allows us to save & edit the data from HarperDB.
How we develop an API using HarperDB Custom functions:
Let's create the schema first:

Created table:

Create a project:
Tip: Before creating a project, you need to enable custom functions, once you click on functions you will see a pop up like below:

Click on the green button "enable the custom function" it will look like

Now let's create project "ToDoApi" which will look like
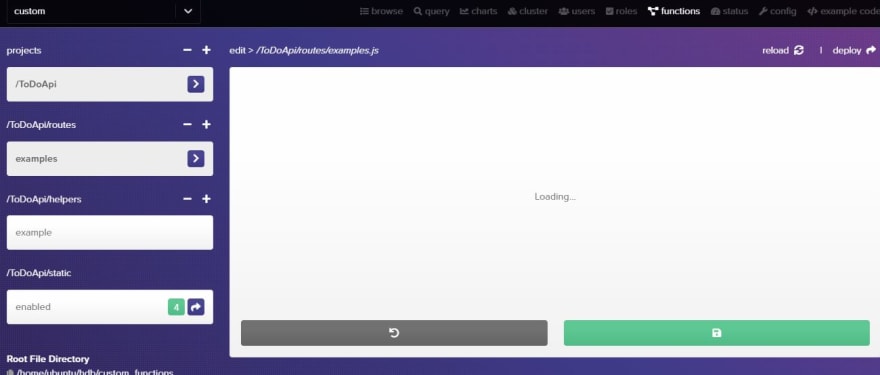
Under the section "/ToDoApi/routes" we will see one file example.js contains the API endpoints.
Let's write our own API endpoints in order to :
- create a task
- edit a task
- delete a task
- get task
Save Task endpoint:
Which is used to store data in DB
server.route({ url: '/saveTask', method: 'POST', // preValidation: hdbCore.preValidation, handler: (request) => { request.body= { operation: 'sql', sql: `insert into example_db.tasks (taskTitle, taskStatus) values('${request.body.taskTitle}', '${request.body.taskStatus}')` }; return hdbCore.requestWithoutAuthentication(request); }, });Edit Task endpoint:
This is used to edit an existing record in your DB, we are using the same endpoint as the save task but having a different method type as PUT.
server.route({ url: '/saveTask', method: 'PUT', // preValidation: hdbCore.preValidation, handler: (request) => { request.body= { operation: 'sql', sql: `update example_db.tasks set taskTitle='${request.body.taskTitle}', taskStatus='${request.body.taskStatus}' where id='${request.body.id}'` }; return hdbCore.requestWithoutAuthentication(request); }, });Delete a task endpoint:
server.route({ url: '/deleteTask/:id', method: 'DELETE', // preValidation: hdbCore.preValidation, handler: (request) => { request.body= { operation: 'sql', sql: `delete from example_db.tasks where id='${request.params.id}'` }; return hdbCore.requestWithoutAuthentication(request); }, });Get task endpoint:
// GET, WITH ASYNC THIRD-PARTY AUTH PREVALIDATION server.route({ url: '/tasks', method: 'GET', // preValidation: (request) => customValidation(request, logger), handler: (request) => { request.body= { operation: 'sql', sql: 'select * from example_db.tasks' }; /* * requestWithoutAuthentication bypasses the standard HarperDB authentication. * YOU MUST ADD YOUR OWN preValidation method above, or this method will be available to anyone. */ return hdbCore.requestWithoutAuthentication(request); } });All about helpers in Custom Functions:
In this, we can implement our own custom validation using JWT.

In our, ToDo React app on the UI.
How to get the endpoint URL to hit on the UI.

You can host a static web UI:
Your project must meet the below details to host your static UI
- An index file located at /static/index.html
- Correctly path any other files relative to index.html
- If your app makes use of client-side routing, it must have [project_name]/static as its base (basename for react-router, base for vue-router, etc.):
<Router basename="/dogs/static"> <Switch> <Route path="/care" component={CarePage} /> <Route path="/feeding" component={FeedingPage} /> </Switch></Router>The above example can be checked out at HarperDB as well.
Custom Functions Operations:
There are 9 operations you can do in total:
- custom_functions_status
- get_custom_functions
- get_custom_function
- set_custom_function
- drop_custom_function
- add_custom_function_project
- drop_custom_function_project
- package_custom_function_project
- deploy_custom_function_project
You can have a more indepth look at every individual operation in HarperDB docs.
Restarting the Server:
For any changes youve made to your routes, helpers, or projects, youll need to restart the Custom Functions server to see them take effect. HarperDB Studio does this automatically whenever you create or delete a project, or add, edit, or edit a route or helper. If you need to start the Custom Functions server yourself, you can use the following operation to do so:
{ "operation": "restart_service", "service": "custom_functions"}That was it for this blog.
I hope you learned something new today. If you did, please like/share so that it reaches others as well.
If youre a regular reader, thank you, youre a big part of the reason Ive been able to share my life/career experiences with you.
Let me know how you will use HarperDB to create your next project.
Follow HarperDB on Twitter for the latest updates.
*Connect with me on Twitter *
If you like this. I encourage you all to sign up for my newsletter.
It's free. You can ask me your questions via email.
Check out old editions here: The 2-1-1 Developer Growth Newsletter by Ankur
Original Link: https://dev.to/tyaga001/how-to-use-harperdb-custom-functions-with-your-react-app-2c43
Dev To
More About this Source Visit Dev To