
An Interest In:
Web News this Week
- April 20, 2024
- April 19, 2024
- April 18, 2024
- April 17, 2024
- April 16, 2024
- April 15, 2024
- April 14, 2024
Some of Our Sources
- TutsPlus - Code
- Team Treehouse
- Joshua Blankenship
- Smashing Magazine
- Six Revisions
- TutsPlus - Design
- Web Designer Depot
- Fudge Graphics
- CSS Globe
- Line 25
Help Webnuz
Referal links:
Using Tuya Link SDK to build water level monitoring system.
Hardware devices required
- Raspberry Pi
- Ultrasonic sensor
- Jumper wires
Software required
- Tuya IoT platform
- Link SDK python package
- Tuya Smart app (mobile app)
Getting started with Tuya IoT platform
Create an account in the platform.
If you already have an account, go on login here or if you don't have an account, then create one in this link.
If you are registered or login successfully, then you'll see this dashboard:

Then open Product > Development > Create then scroll down and you'll see Can't find the category? in the left bottom corner. Open up and fill the information like below then Create:
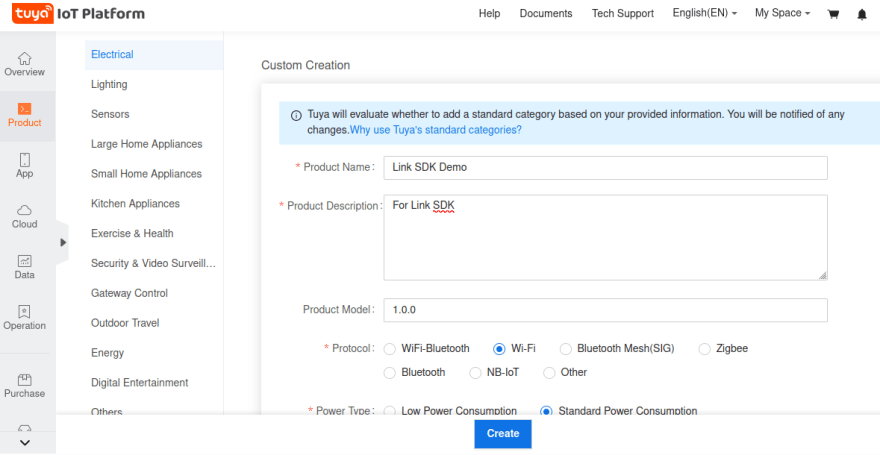
By creating the Product we mean, the project which will exist in the Tuya platform to receive data from the sensors and monitored remotely from the phone or your PC. The information we filled in the platform tries to mimic our hardware devices which we will use in the circuit.
Create custom functions
Here we specify some metrics about the sensor (Ultrasonic sensor) so as it may link correctly as how we want it to be. These metrics including, Data Point (DP), Identifier,Data Transfer Type, Data Type and Value
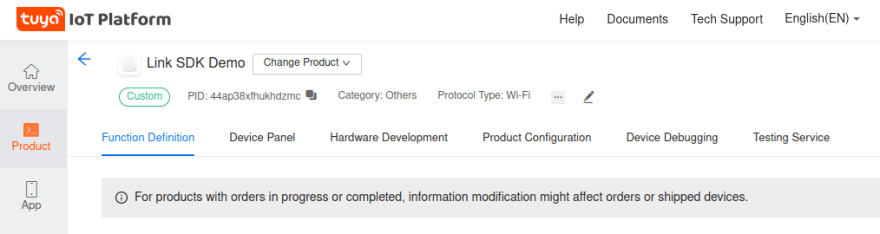
Open up our Product and then click ** Function Definition** > Custom Function > Add, you'll see the form to fill the metrics above. Go ahead and fill like this:

Obtain credentials for your project
Credentials which are needed in tuyalinksdk are PID, AUTHKEY and UUID. Once you create a Product in the platform, you automatically obtain the PID (aka, Product ID).
But for AUTKEY and UUID, you'll have to apply for a license. The license comes with these two credentials. Follow these steps to get the license. Navigate to Purchase > Material & License then click Buy Now the Generic License 2 free licenses for each developer account, you need to buy when you use up.
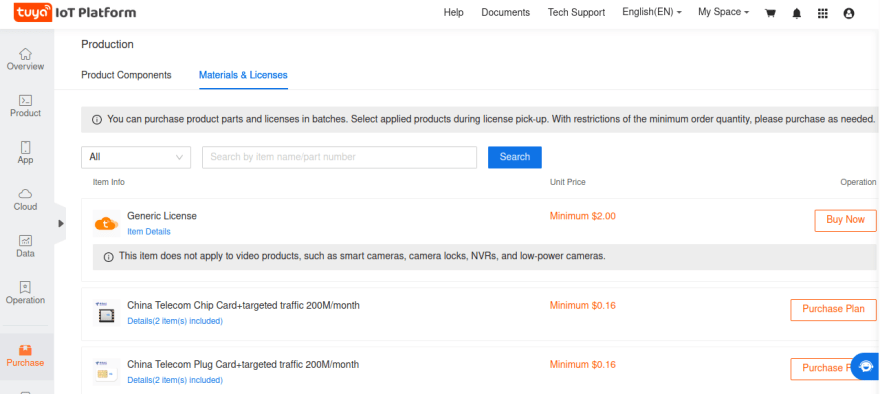
Click Buy Now **, another window will open then **Select Product and Delivery Mode as License.
The order process will take some time to complete. Just relax and worry out meanwhile, get a cup of coffee :)
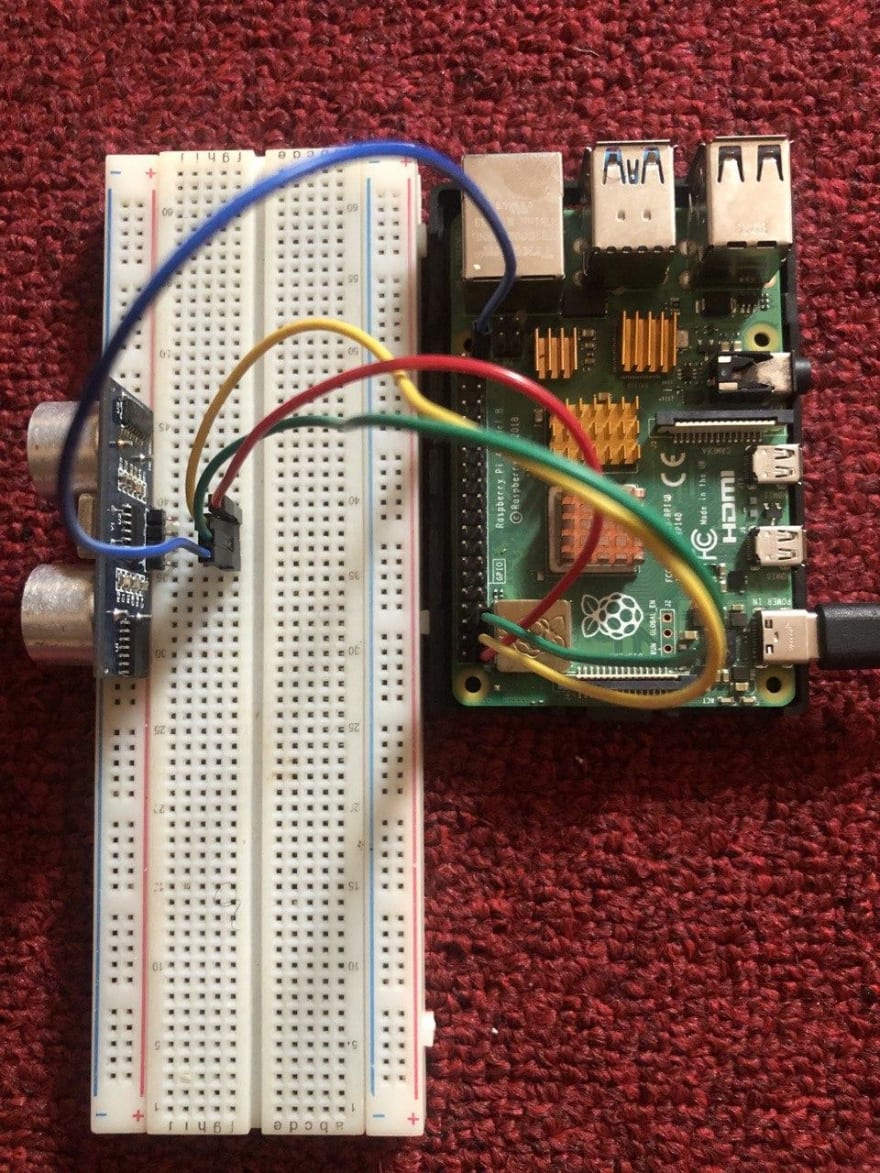
The Circuit (Hardware part)
In this section, we're going to build our circuit. Connect the Raspberry Pi on the power source and the keyboard. Mount Ultrasonic sensor on the Raspberry Pi. We use Ultrasonic sensor to measure the level of water calculating the distance from the sensor to the water surface in the tank.

Project in Tuya IoT platform (Software part)
In this section, we're going to setup our project in the Tuya IoT platform. We already have the credentials which we got in the above steps (by credentials i mean, PID, UUID and AUTHKEY). We will use these credentials in the tuyalinksdk to setup a link connection between the circuit and platform.
Link Tuya SDK python library
tuyalinksdk is a Python library which makes the connection between the circuit and the Tuya IoT platform.
We'll install this package in our Raspberry Pi in order to link and upload data from the sensor (in the circuit) to the platform. In the directory of your project in Raspberry Pi, run:
# install the package$ pip install tuyalinksdkor install from the github repository:
$ git clone https://github.com/tuya/tuyaos-link-sdk-python.git$ python3 -m pip install ./tuyaos-link-sdk-pythonNext thing is to write the codes which establish connection by using this package.
from tuyalinksdk.client import TuyaClientclient = TuyaClient(productid='PID', uuid='UUID', authkey='AUTHKEY')def on_connected(): print('Connected.')def on_dps(dps): print('DataPoints:', dps) client.push_dps(dps)client.on_connected = on_connectedclient.on_dps = on_dpsclient.connect()client.loop_start()on_connected is the method which checks if the connection is well setup. If everything is okay the print statement will run.
on_dps is a method which receives the datapoints (values of the sensor) and upload them to the platform so that we can monitor the process from our devices (phones and PC), ie IoT itself. Data are uploaded through client.push_dps() method.
Write the codes for the Raspberry Pi codes for the ultrasonic sensor alongside the above codes. This is the complete codes:
#!/usr/bin/pythonimport RPi.GPIO as GPIOimport timeimport coloredlogsfrom tuyalinksdk.client import TuyaClientfrom tuyalinksdk.console_qrcode import qrcode_generatefrom time import sleepGPIO.setmode(GPIO.BCM)coloredlogs.install(level='DEBUG')client = TuyaClient( productid='44apXXXXXXXXXXX', uuid='tuya19dXXXXXXXXXXX', authkey='uFjw3VqrrfXXXXXXXXXXXXXX')TRIG = 2ECHO = 3i=0GPIO.setup(TRIG ,GPIO.OUT)GPIO.setup(ECHO,GPIO.IN)GPIO.setup(4 ,GPIO.OUT)GPIO.output(TRIG, False)print("Starting.....")sleep(2)while True: GPIO.output(TRIG, True) sleep(0.00001) GPIO.output(TRIG, False) while GPIO.input(ECHO)==0: pulse_start = time.time() while GPIO.input(ECHO)==1: pulse_stop = time.time() pulse_time = pulse_stop - pulse_start water_level = pulse_time * 17150 print(round(water_level, 2)) time.sleep(1) if water_level < 4: print("Water will overflow") GPIO.output(4, True) time.sleep(0.5) GPIO.output(4, False) time.sleep(0.5) GPIO.output(4, True) time.sleep(0.5) GPIO.output(4, False) time.sleep(0.5) else: GPIO.output(4, False)def on_connected(): print('Connected.')def on_qrcode(url): qrcode_generate(url)def on_reset(data): print('Reset:', data)def on_dps(dps): print('DataPoints:', dps) dps = {'101':True} dps['101'] = data client.push_dps(dps)client.on_connected = on_connectedclient.on_qrcode = on_qrcodeclient.on_reset = on_resetclient.on_dps = on_dpsclient.connect()client.loop_start()while True: data = water_level time.sleep(1)You can get the starter codes from Tuya's page in Github and edit the codes by adding Raspberry Pi configuration codes. Run these commands:
$ git clone https://github.com/tuya/tuyaos-link-sdk-python.git $ cd examples# view the starter codes here $ cat outlet.pyReference is here and the codes can be found here
Running the codes at first time will create a connection between your project in Tuya platform and the Tuya mobile application which will enable you to send commands from the application to your Raspberry Pi remotely through the platform. To allow the connection, you'll need to scan the qrcode by using your mobile phone generated once you run the outlets.py.

Now lets design a monitoring dashboard in the platform which will receive data from our sensor and display visuals and monitoring. Then after, we will connect a smartphone to view this dashboard just like how we view in the platform (in the platform, a web based)
Monitoring dashboard
In the platform, navigate to Product > Development, it will open the product we've just created in the above steps. Open up that Product (aka, the project) and you'll see something like this:

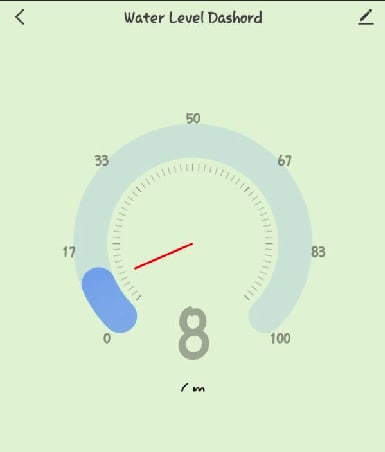
Open the Device Panel and select a blank screen where it will open up a new page for designing the mobile view screen for your dashboard. Make the UI design of your choice, this is what i came up with:

When you're done with the design, Preview to check if its okay then Save As and finally Release your design. Up to this point, the dashboard is ready. We can visualize this design from the smartphone by using Tuya Smart App
Up to this point, the project is ready for testing and using. You can monitor the water level of your tank remotely from your device (phone for example).
Output
If you follow along up to this point, you should be able to send values directly from your phone remotely to the platform.

References
Original Link: https://dev.to/maen/using-tuya-link-sdk-to-build-water-level-monitoring-system-ocm
Dev To
More About this Source Visit Dev To