
An Interest In:
Web News this Week
- April 19, 2024
- April 18, 2024
- April 17, 2024
- April 16, 2024
- April 15, 2024
- April 14, 2024
- April 13, 2024
Some of Our Sources
- TutsPlus - Code
- Web Designer Wall
- Fuel Your Creativity
- Naldz Graphics
- Web Design Ledger
- CSS Globe
- Wal You
- Web Resource Source
- Codrops
- Willems Lab
Help Webnuz
Referal links:
React Component Testing
In our last article, we have introduced the usage of Jest to test our JavaScript code Start Testing Your JavaScript Code with Jest. We are going to further extend the topic to introduce how do we use React Testing Library and Jest to test our React components.
React Testing Library and Jest are provided out-of-the-box support with create-react-app and we do not need to install them separately. React Testing Library (RTL) is built on top of the DOM testing library, as in the tests will work with the actual DOM. This allows the tests to simulate the ways that users will interact with DOM, as closer as possible. It is super easy to use, provides an array of assertion methods (extended from Jest), user-events simulation and etc.
create-react-app uses Jest as its test runner. Jest will look for the test files name with the following naming conventions (according to official site):
- Files with .js suffix in __tests__ folders.
- Files with .test.js suffix.
- Files with .spec.js suffix.
Today we are going to explore how render our components to be tested, finding the right element in the component, and performing snapshot testing. Let's get started with creating a new create-react-app project:
npx create-react-app testing-react-demoAfter the creation, change directory into the app that you created and open the directory in your desired code editor.
You should already see an App.test.js in the src folder.
import { render, screen } from '@testing-library/react';import App from './App';test('renders learn react link', () => { render(<App />); const linkElement = screen.getByText(/learn react/i); expect(linkElement).toBeInTheDocument();});You may remove this file, or leave it. I will remove it for this demonstration and therefore you will not see it being included in the test suites.
What I will normally do next is that I will create a components folder and include the files (such as css and test files) that belong to this component inside this folder. After created components folder, create two more folders called SubscribeForm and PokeSearch. These are the two components that we want to write some tests on today.
Let's create our first simple component in SubscribeForm folder:
SubscribeForm.js
import React, { useState } from 'react';import "./SubscribeForm.css";const SubscribeForm = () => { const [isDisabled, setIsDisabled] = useState(true); const [email, setEmail] = useState(""); function handleChange(e){ setEmail(e.target.value); setIsDisabled(e.target.value === ""); } return ( <div className="container"> <h1>Subscribe To Our Newsletter</h1> <form className="form"> <label htmlFor="email">Email Address</label> <input onChange={handleChange} type="email" id="email" name="email" placeholder="Email Address" value={email} /> <input type="checkbox" name="agreement_checkbox" id="agreement_checkbox" /> <label htmlFor="agreement_checkbox">I agree to disagree whatever the terms and conditions are.</label> <button name="subscribe-button" type="submit" className="button" disabled={isDisabled} >Subscribe</button> </form> </div> );};export default SubscribeForm;This is a simple component, where we have an input field for email address, and a button to hit "subscribe". The button is first disabled and prevent clicking before any text is entered to the input field. This button seems to be one of the perfect test cases that we can create.
Button is disabled before text input
Button is enabled after text input

Followed by this, we are going to create another component called PokeSearch (I am not a Pokemon fan, but Poke API is good for demonstration). As another simple enough example, we have a component that has a useEffect hook to fetch information from an API, and display it (Pokemon name) to the screen. Before the result is fetched, we display a "...Loading..." text to users.
PokeSearch.js
import React, { useEffect, useState } from 'react';const PokeSearch = () => { const [pokemon, setPokemon] = useState({}); const [isLoading, setIsLoading] = useState(true); useEffect(() => { fetch(`https://pokeapi.co/api/v2/pokemon/bulbasaur`) .then((res) => res.json()) .then((result) => { setPokemon(result); setIsLoading(false); }) .catch((err) => console.log(err)); }, []) return ( <div> {isLoading ? <h3>...Loading...</h3> : <p>{pokemon.name}</p> } </div> );}export default PokeSearch;Let's jump into testing these two components. For our first component, SubscribeForm component, we create a new file called SubscribeForm.test.js. We followed the naming convention, so that it could be recognized by our test runner. In order to create tests, we will need render and screen from testing-library/react and the user events from testing-library/user-event. Besides, remember to import the component that we want to test.
import React from 'react';import { render, screen } from '@testing-library/react';import userEvent from '@testing-library/user-event';import SubscribeForm from './SubscribeForm';We can first create a test to ensure that our button is disabled when the page first loaded, since there is no input in the email address field.
it("The subscribe button is disabled before typing anything in the input text box", () => { render(<SubscribeForm />); expect(screen.getByRole("button", {name: /subscribe/i})).toBeDisabled();});From the last article, we know that we will give a name to our test, and provide a callback function, which includes the assertions.
First, we use render method to render the component to be tested in a container which is appended to document.body (on a side note, Jest 26 and before is using jsdom as default environment). After rendering out the component, we need to have a way to find the right element (which is the button) to test. We can use query methods from RTL to do so. The elements in DOM can be found by their accessibility roles and names (more on this later), or by text, or by test id that we give to the elements. There is a priority given by official statements. They recommend to query by role or text (where everyone is accessible), by semantic HTML (alt text such as img, area, etc), and by test id (user cannot see or hear this, therefore if you could not make sense of using any of previous methods, use this).
<div data-testid="test-element" />screen.getByTestId('test-element')You can find more information about the priority here:
About Queries of React Testing Library
You can do this to find out the accessible roles within your component: You can just write screen.getByRole("") in the test for that component, it will fail but give you the accessibility information and the name of those elements.
Here are the accessible roles: heading: Name "Subscribe To Our Newsletter": <h1 /> -------------------------------------------------- textbox: Name "Email Address": <input id="email" name="email" placeholder="Email Address" type="email" value="" /> -------------------------------------------------- checkbox: Name "I agree to disagree whatever the terms and conditions are.": <input id="agreement_checkbox" name="agreement_checkbox" type="checkbox" /> -------------------------------------------------- button: Name "Subscribe": <button class="button" disabled="" name="subscribe-button" type="submit" /> --------------------------------------------------From here we know that we have different accessibility roles such as button, textbox, checkbox and heading. In order to target our subscribe button, we need to target role "button". After targeting the role, we want specifically the button with the accessible name "Subscribe", as stated in the accessibility information provided ('Name "Subscribe"'). This value of "Name" can be derived from visible or invisible property of an element, the text in the button is one of them. In order to search for its name, we usually put insensitive case for regex on the name, into the second object argument of getByRole ({name: /subscribe/i}). After getting that button, we want to check if this button is disabled (it should be disabled).
Then we have the second test. In this test, we simulate the user event to type something in the text box, and make the button enabled.
it("The subscribe button becomes enabled when we start typing in the input text box", () => { render(<SubscribeForm />); userEvent.type(screen.getByRole("textbox", {name: /email/i}), "[email protected]"); expect(screen.getByRole("button", {name: /subscribe/i})).toBeEnabled();});We use the same step to render the SubscribeForm to the document, and use user event of "type", to type some text on the element that we want, in this case, it is the textbox that we can select by accessible role and name (refer back to the accessibility information that we took just now). The second argument of userEvent.type() is the text that you want to input. After the text has been typed, we can now expect the button to be enabled.
Finally, we are doing a snapshot testing for our React componenet. We need to use react-test-renderer to render a pure JavaScript object (does not depend on DOM) for the snapshot.
npm install react-test-rendererAfter installing and importing, we can use the renderer to create SubscribeForm component in JavaScript Object. Finally, we use a toMatchSnapshot() function from Jest, to kickstart the snapshot testing.
it("Test to match snapshot of component", () => { const subscribeFormTree = renderer.create(<SubscribeForm />).toJSON(); expect(subscribeFormTree).toMatchSnapshot();})When you run this test for the first time, it will create a new folder (automatically after you run the test), called __snapshots__ within your directory, in this case is the SubscribeForm folder.
PASS src/components/PokeSearch/PokeSearch.test.js PASS src/components/SubscribeForm/SubscribeForm.test.js 1 snapshot written.Snapshot Summary 1 snapshot written from 1 test suite.Test Suites: 2 passed, 2 totalTests: 5 passed, 5 totalSnapshots: 1 written, 1 totalTime: 2.519 sRan all test suites.Watch Usage: Press w to show more.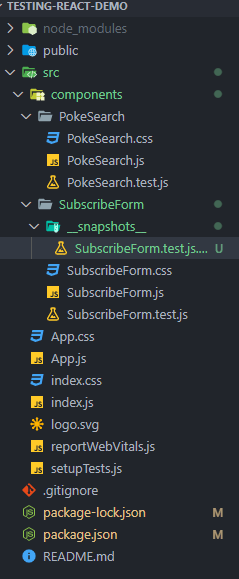
You can find a snap document in it.
SubscribeForm.test.js.snap
// Jest Snapshot v1, https://goo.gl/fbAQLPexports[`Test to match snapshot of component 1`] = `<div className="container"> <h1> Subscribe To Our Newsletter </h1> <form className="form" > <label htmlFor="email" > Email Address </label> <input id="email" name="email" onChange={[Function]} placeholder="Email Address" type="email" value="" /> <input id="agreement_checkbox" name="agreement_checkbox" type="checkbox" /> <label htmlFor="agreement_checkbox" > I agree to disagree whatever the terms and conditions are. </label> <button className="button" disabled={true} name="subscribe-button" type="submit" > Subscribe </button> </form></div>`;Now that the test suite take note of your previous snapshot of the component. If you run the test again, it will take another snapshot of the compoenent, and compare to the one in __snapshots__ folder. If they are different, the test is going to fail. This is useful to make sure that our UI components did not get changed unexpectedly. Let's try to make a change to our SubscribeForm component and run the test again. We are going to change "Subscribe to Our Newsletter" to "Subscribe to Their Newsletter".
<h1>Subscribe To Their Newsletter</h1>Then we run the test again.
PASS src/components/PokeSearch/PokeSearch.test.js FAIL src/components/SubscribeForm/SubscribeForm.test.js Test to match snapshot of component expect(received).toMatchSnapshot() Snapshot name: `Test to match snapshot of component 1` - Snapshot - 1 + Received + 1 @@ -1,10 +1,10 @@ <div className="container" > <h1> - Subscribe To Our Newsletter + Subscribe To Their Newsletter </h1> <form className="form" > <label 22 | it("Test to match snapshot of component", () => { 23 | const subscribeFormTree = renderer.create(<SubscribeForm />).toJSON(); > 24 | expect(subscribeFormTree).toMatchSnapshot(); | ^ 25 | }) at Object.<anonymous> (src/components/SubscribeForm/SubscribeForm.test.js:24:31) 1 snapshot failed.Snapshot Summary 1 snapshot failed from 1 test suite. Inspect your code changes or press `u` to update them.Test Suites: 1 failed, 1 passed, 2 totalTests: 1 failed, 4 passed, 5 totalSnapshots: 1 failed, 1 totalTime: 3.817 sRan all test suites.Watch Usage: Press w to show more....and the test failed. If this is an intended change, we can update our snapshot to the latest by pressing "u". By doing that, the snap file in our __snapshots__ folder will get updated, all the tests are re-run and they pass this time. This is pretty similar to what we used (Enzyme library) last time.
PASS src/components/PokeSearch/PokeSearch.test.js PASS src/components/SubscribeForm/SubscribeForm.test.js 1 snapshot updated.Snapshot Summary 1 snapshot updated from 1 test suite.Test Suites: 2 passed, 2 totalTests: 5 passed, 5 totalSnapshots: 1 updated, 1 totalTime: 2.504 sRan all test suites.Watch Usage: Press w to show more.Therefore, this is the complete script to test our SubscribeForm component.
import React from 'react';import { render, screen } from '@testing-library/react';import userEvent from '@testing-library/user-event';import renderer from 'react-test-renderer';import SubscribeForm from './SubscribeForm';it("The subscribe button is disabled before typing anything in the input text box", () => { render(<SubscribeForm />); expect(screen.getByRole("button", {name: /subscribe/i})).toBeDisabled();});it("The subscribe button becomes enabled when we start typing in the input text box", () => { render(<SubscribeForm />); userEvent.type(screen.getByRole("textbox", {name: /email/i}), "[email protected]"); expect(screen.getByRole("button", {name: /subscribe/i})).toBeEnabled();});it("Test to match snapshot of component", () => { const subscribeFormTree = renderer.create(<SubscribeForm />).toJSON(); expect(subscribeFormTree).toMatchSnapshot();})Note to mention: There is a clean up process (afterEach(cleanup)) done to prevent memory leak automatically by Jest (injected globally) after each test.
Finally, we would also like to test our component asynchronously (PokeSearch).
import React from 'react';import { render,screen,waitForElementToBeRemoved } from '@testing-library/react';import PokeSearch from './PokeSearch';it("Loading is shown until the Pokemon is fetched", async () => { render(<PokeSearch />); expect(screen.getByText('...Loading...')).toBeInTheDocument(); await waitForElementToBeRemoved(screen.queryByText('...Loading...'));});First we can test if the "...Loading..." text is rendered correctly to the screen. We need to query on the correct element that contains "...Loading...", and use assertion method to check if it is in the DOM. Then we can use an asynchronous function provided by RTL to be resolved by the loading text element to disappear after the result is fetched. Besides, it is also recommended by official site to use queryBy... to query for the element to disappear from DOM.
After testing the Loading text, we can then test the case after fetched. In this test case, we do not want to test with the real API (we are just ensuring that our component is working fine), there we can just mock the fetch function. We fix the returned data by the fetch function when the promise is resolved. After that, we will render the PokeSearch, and the fetch call is made to fetch our fake data. After the data is back, we will try to use findBy... (use findBy... for asynchronous case) to find for the element that has text "bulbasaur", and check if the element is in the DOM.
it("The Pokemon name is displayed correctly after it has been fetched", async () => { // Mock the browser fetch function window.fetch = jest.fn(() => { const pokemon = { name: 'bulbasaur', weight: 69, height: 7 }; return Promise.resolve({ json: () => Promise.resolve(pokemon), }); }); render(<PokeSearch />); const pokemonName = await screen.findByText('bulbasaur'); expect(pokemonName).toBeInTheDocument(); });Hope this gives you an insight on how do get started on testing React components.
Do follow me for more future articles on web design, programming and self-improvement
Original Link: https://dev.to/ohdylan/react-component-testing-54ie
Dev To
More About this Source Visit Dev To