
An Interest In:
Web News this Week
- April 2, 2024
- April 1, 2024
- March 31, 2024
- March 30, 2024
- March 29, 2024
- March 28, 2024
- March 27, 2024
Some of Our Sources
- Slashdot
- Techcrunch
- Web Designer Wall
- Team Treehouse
- Abduzeedo
- Creative Curio
- Inspiredology
- Web Designer Depot
- Wal You
- TechPowerUp
Help Webnuz
Referal links:
How I built a Full Stack Web3 App on the Cloud
As a builder, I am always curious about how to develop applications with emerging technology. A technology that has captured my attention recently has been non fungible tokens (NFTs). An NFT is a unique digital item that is stored on a blockchain. A common use case is to store digital art as an NFT that can be sold to collectors. Ive always fostered the idea that code is art. With the resurgent demand for NFTs it provided the perfect opportunity to build a product that can embed code as a art. Thus GitGallery was born, a website that allows you to mint your GitHub commits as an NFT. This post will dive deep on how I built GitGallery highlighting
- Smart Contract Development
- Backend API
- User Interface
- Application Deployment
Overview
To provide a scalable, cost effective process for minting NFTs I leveraged Polygon which is a protocol and framework that provides reduced fees needed to run Ethereum based applications.
In addition, the entire web application is deployed on Amazon Web Services (AWS). By leveraging AWS, I was able to create a serverless application that responds to events rather than wasting compute sitting idly if deployed onto a server. With AWS Lambda and API Gateway one million events are free to use each month which provides a cost-effective way to host the application. The following sections will detail the tools and processes I used to develop the smart contract, the backend API (Application Programming Interface) and the user interface.
Smart Contract
The smart contract I developed provides the ability to create a unique token named GitNFT which is linked to a GitHub commit. The code was developed using the Solidity programming language. I was able to import code developed by OpenZeppelin a firm that provides secure code for blockchain applications. The code implements the NFT standard known as ERC (Ethereum Request for Comment) 721 which provides the functionality to deploy the smart contract to the blockchain and mint NFTs.
pragma solidity ^0.8.0;import "./ERC721Tradable.sol";/** * @title GitNFT * GitNFT - a contract for code GitNFTs. */contract GitNFT is ERC721Tradable { uint256 public nextTokenId; address public admin; constructor(address _proxyRegistryAddress) public ERC721Tradable("GitNFT", "GitNFT", _proxyRegistryAddress) { admin = msg.sender; } // only our wallet should be able to mint function mint(address to) external onlyOwner { _safeMint(to, nextTokenId); nextTokenId++; } function baseTokenURI() public pure override returns (string memory) { return "https://www.gitgallery.com/tokenid/"; }}Once the code is written the next step is to deploy the contract to the Polygon blockchain.
I used the deployment software Truffle with the Ethereum API Infura to compile my contract code and deploy the artifacts to the Polygon blockchain. Here is a code used to deploy the contract to the Polygon Blockchain
const NFT = artifacts.require("GitNFT");const proxyRegistryAddress = process.env.OWNER_ADDRESSmodule.exports = async function (deployer, _network, accounts) { await deployer.deploy(NFT,proxyRegistryAddress, {gas: 5000000}); const nft = await NFT.deployed();};This transaction required the Polygon token MATIC to pay for the contract fees, which in total cost about 1 cent. Compiling the code also produces an Application Binary Interface (ABI) which is a JavaScript Object Notation (JSON) file that allows for other applications to interact with the contract.
Backend API
I used Python to develop the business logic needed for GitGallery and used the Flask framework to encode the API endpoints. The 4 major endpoints needed for the application are login, verify, mint, and get items.
Login
By leveraging Auth0 a platform designed to make it easy to login via 3rd party authentication, I created an endpoint that allows users to login via their GitHub account. The code stores the logged in user details via cookies in the current web browser session, to track state from each request. When a user logs out, the browser session clears all cookies.
Verify
To verify a GitHub commit, users enter in the URL of their GitHub commit. By using the GitHub GraphQL API, I created a query that could verify if the user created the commit ID for the given project. Here is the GraphQL query used to verify the author of the commit.
{ repository(owner: "OWNER", name: "NAME") { object(expression: "COMMIT_ID") { ... on Commit { author{ name user{ login } } } } }}Mint
Once a commit is verified, the user can mint the commit as an NFT. By using the ABI and the python Ethereum library web3.py the code executes the mint function of the NFT contract. Here is the code used to mint the GitNFT
def web3_mint(userAddress: str): """ Purpose: mint a token for user on blockchain Args: userAddress - the user to mint for Returns: hash - txn of mint tokenid - token minted """ nonce = w3.eth.get_transaction_count(PUBLIC_KEY) # Create the contract function mint_txn = CODE_NFT.functions.mint(userAddress).buildTransaction( { "chainId": CHAIN_ID, "gas": 10000000, "gasPrice": w3.toWei("1", "gwei"), "nonce": nonce, } ) signed_txn = w3.eth.account.sign_transaction(mint_txn, private_key=PRIVATE_KEY) w3.eth.send_raw_transaction(signed_txn.rawTransaction) hash = w3.toHex(w3.keccak(signed_txn.rawTransaction)) receipt = w3.eth.wait_for_transaction_receipt(hash) hex_tokenid = receipt["logs"][0]["topics"][3].hex() # this is token id in hex # convert from hex to decmial tokenid = int(hex_tokenid, 16) logging.info(f"Got tokenid: {tokenid}")return hash, tokenidThe fee for calling the contract is paid from MATIC I allocated for the project. Since the minting cost is less then a fraction of a penny the process is virtually free and more importantly has no costs to the user. Each minted NFT produces a JSON file with the commit metadata. The metadata is stored in Amazon S3 and DynamoDB.
Get Items
To display Items for a particular user the code creates a DynamoDB query using the selected user as the partition key. The JSON in S3 is used for external platforms such as OpenSea which is a marketplace for NFTs. There is a particular format needed for the data to show correctly in external applications which is handled by S3, while data on GitGallery is rendered from DynamoDB.
Deployment
To deploy the code to the web, I leveraged the Serverless framework. Serverless allows me to create a YAML (YAML Ain't Markup Language) file that specifies all infrastructure and security needed to deploy the Flask application as a docker image. Serverless will deploy the docker image on AWS Lambda with the endpoints mapping to API Gateway, with the necessary Identity and Access Management (IAM) roles to access services such as S3 and DynamoDB.
User Interface
The user interface is a website built using HTML, Bootstrap, JavaScript, jinja2 and JQuery. These tools allowed me to create a user interface that leverages server-side rendering to allow for dynamic routes such as www.gitgallery.com/gallery/{USER_NAME}/minted
@application.route("/gallery/<user>/minted")def minted(user): """ Purpose: load gallery page Args: N/A Returns: html - gallery html """ if "profile" in session: curr_user = session["profile"] else: curr_user = None # check if user exists... userdata = users.get_item(Key={"username": user}) if not "Item" in userdata: logging.error(f"No such user {user}") return redirect(f"/") user_metadata = userdata["Item"] # get minted items minted_items = get_minted_items(user) return render_template( "gallery.html", userinfo=curr_user, minted_items=minted_items, user=user, user_metadata=user_metadata, )In addition, I utilized the ethers.js library to provide a way for users to sign their GitHub commits using their MetaMask Wallet. The MetaMask wallet provides users an interface to interact with the Ethereum blockchain. The following is the front end code used to mint tokens
async function safe_mint(data) {                    // console.log("safe mint called")                    let userAddress = ""                    try {                        userAddress = await walletSigner.getAddress()                    } catch (error) {                        alert("Metamask not detected")                        console.log(error)                        return                    }                    let username = data["username"]                    let ver_url = data["verify_url"]                    let ver_date = data["status_json"]["date"]                    // Commint                    const base_message = "Signed on GitGallery

" + username + " " + ver_date + "
 " + ver_url                    const signature = await walletSigner.signMessage(base_message)                    var mintObj = {}                    mintObj["verify_json"] = data                    mintObj["signature"] = signature                    mintObj["userAddress"] = userAddress                    var mintString = JSON.stringify(mintObj)                    $("body").css("opacity", ".3");                    $("#load_spinner").toggle();                    $.ajax({                        type: "POST",                        url: "/mint_token",                        dataType: "json",                        data: mintString,                        contentType: "application/json",                        success: function (data) {                            console.log("mint returned")                            console.log(data)                            $("#load_spinner").toggle();                            $("body").css("opacity", "1");                            //check for error                            if ('error' in data) {                                alert(data["error"]);                                return -1                            }                            alert("Mint Successful")                            //passed? reload page?                            location.reload()                        },                        error: function (xhr, textStatus, thrownError, data) {                            alert("Error: " + thrownError);                            $("body").css("opacity", "1");                            $("#load_spinner").toggle();                        }                    })                }
Conclusion
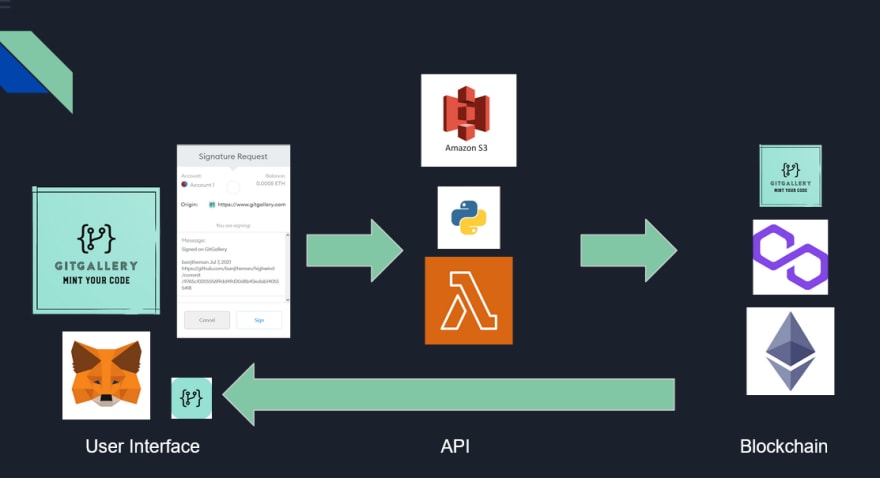
Connecting all the dots results in a full stack NFT application with a simple workflow. A user signs in using their GitHub credentials. The user enters in a URL for a GitHub Commit. The system verifies the commit for the user. The user then signs the commit with MetaMask. Finally, the GitHub commit is minted as an NFT and stored in the users MetaMask wallet. This workflow allows for the creation of an NFT in less than 30 seconds for free.
If you itching to build your own NFT project, I've created a hands on workshop that focusing on leveraging these tools to launch your own smart contract.
Original Link: https://dev.to/banjtheman/how-i-built-a-full-stack-web3-app-on-the-cloud-574j
Dev To
More About this Source Visit Dev To