
An Interest In:
Web News this Week
- April 19, 2024
- April 18, 2024
- April 17, 2024
- April 16, 2024
- April 15, 2024
- April 14, 2024
- April 13, 2024
Some of Our Sources
- Mashable
- Technology Review
- Smashing Magazine
- TutsPlus - Design
- Inspiredology
- Line 25
- 24 Ways
- Specky Boy
- Web Resource Source
- Dev To
Help Webnuz
Referal links:
Build a REST API with Golang and MongoDB - Gin-gonic Version
Representational state transfer (REST) is an architectural pattern that guides an Application programming interface(API) design and development. REST APIs have become the standard of communication between the server part of the product and its client to increase performance, scalability, simplicity, modifiability, visibility, portability, and reliability.
This post will discuss building a user management application with Golang using the Gin-gonic framework and MongoDB. At the end of this tutorial, we will learn how to structure a Gin-gonic application, build a REST API and persist our data using MongoDB.
Gin-gonic, popularly known as Gin, is an HTTP web framework written in Golang with performance and productivity support. Gin uses a custom version of HttpRouter, a lightweight, high-performance HTTP request router that navigates through API routes faster than most frameworks out there.
MongoDB is a document-based database management program used as an alternative to relational databases. MongoDB supports working with large sets of distributed data with options to store or retrieve information seamlessly.
You can find the complete source code in this repository.
Prerequisites
The following steps in this post require Golang experience. Experience with MongoDB isnt a requirement, but its nice to have.
We will also be needing the following:
- A MongoDB account to host database. Signup is completely free.
- Postman or any API testing application of your choice
Lets code
Getting Started
To get started, we need to navigate to the desired directory and run the command below in our terminal
mkdir gin-mongo-api && cd gin-mongo-apiThis command creates a gin-mongo-api folder and navigates into the project directory.
Next, we need to initialize a Go module to manage project dependencies by running the command below:
go mod init gin-mongo-apiThis command will create a go.mod file for tracking project dependencies.
We proceed to install the required dependencies with:
go get -u github.com/gin-gonic/gin go.mongodb.org/mongo-driver/mongo github.com/joho/godotenv github.com/go-playground/validator/v10github.com/gin-gonic/gin is a framework for building web applications.
go.mongodb.org/mongo-driver/mongo is a driver for connecting to MongoDB.
github.com/joho/godotenv is a library for managing environment variables.
github.com/go-playground/validator/v10 is a library for validating structs and fields.
Application Entry Point
With the project dependencies installed, we need to create main.go file in the root directory and add the snippet below:
The snippet above does the following:
- Import the required dependencies.
- Initialize a Gin router using the
Defaultconfiguration. TheDefaultfunction configures Gin router with default middlewares (logger and recovery). - Use the
Getfunction to route to/path and a handler function that returns a JSON ofHello from Gin-gonic & mongoDB. - Use the
Runfunction to attach therouterto an http.Server and starts listening and serving HTTP requests onlocalhost:6000.
Next, we can test our application by starting the development server by running the command below in our terminal.
go run main.go
Modularization in Golang
It is essential to have a good folder structure for our project. Good project structure simplifies how we work with dependencies in our application and makes it easier for us and others to read our codebase.
To do this, we need to create configs, controllers, models, responses and routes folder in our project directory.
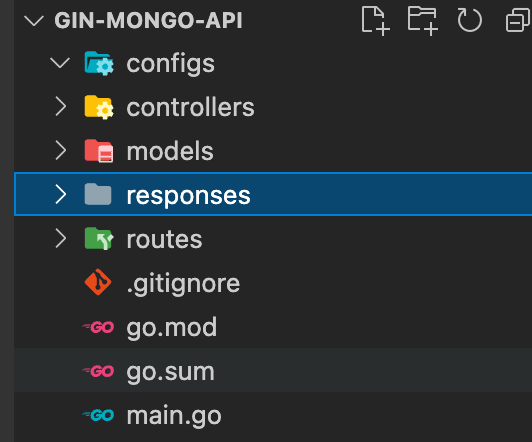
PS: The go.sum file contains all the dependency checksums, and is managed by the go tools. We dont have to worry about it.
configs is for modularizing project configuration files
controllers is for modularizing application logics.
models is for modularizing data and database logics.
responses is for modularizing files describing the response we want our API to give. This will become clearer later on.
routes is for modularizing URL pattern and handler information.
Setting up MongoDB
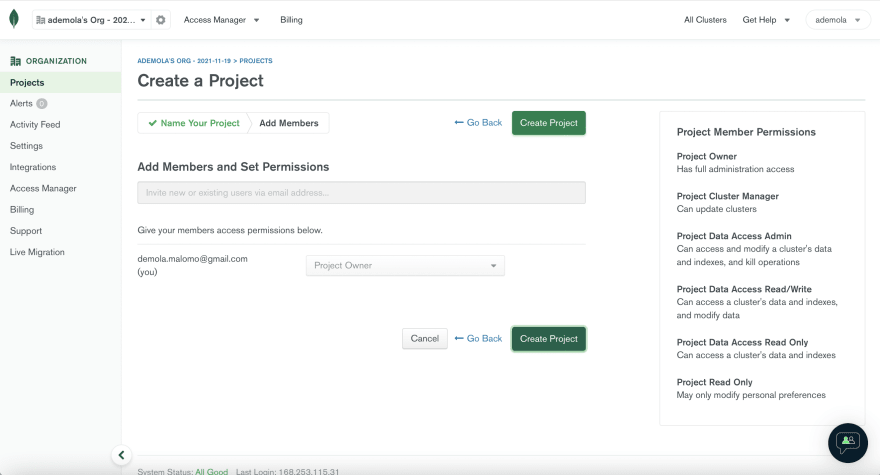
With that done, we need to log in or sign up into our MongoDB account. Click the project dropdown menu and click on the New Project button.

Enter the golang-api as the project name, click Next, and click Create Project..

Click on Build a Database

Select Shared as the type of database.

Click on Create to setup a cluster. This might take sometime to setup.

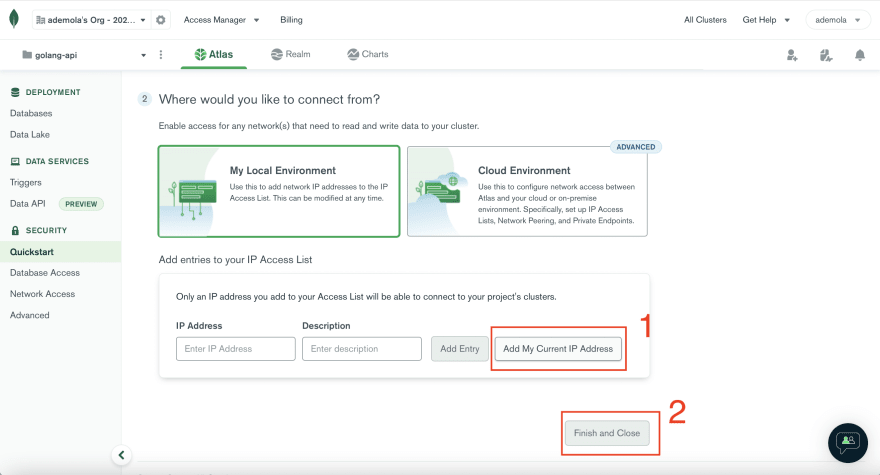
Next, we need to create a user to access the database externally by inputting the Username, Password and then clicking on Create User. We also need to add our IP address to safely connect to the database by clicking on the Add My Current IP Address button. Then click on Finish and Close to save changes.

On saving the changes, we should see a Database Deployments screen, as shown below:

Connecting our application to MongoDB
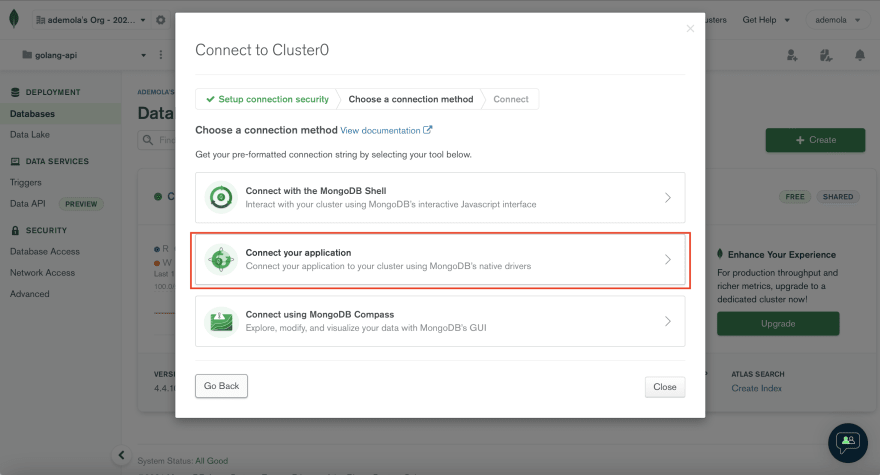
With the configuration done, we need to connect our application with the database created. To do this, click on the Connect button

Click on Connect your application, change the Driver to Go and the Version as shown below. Then click on the copy icon to copy the connection string.

Setup Environment Variable
Next, we must modify the copied connection string with the user's password we created earlier and change the database name. To do this, first, we need to create a .env file in the root directory, and in this file, add the snippet below:
MONGOURI=mongodb+srv://<YOUR USERNAME HERE>:<YOUR PASSWORD HERE>@cluster0.e5akf.mongodb.net/myFirstDatabese?retryWrites=true&w=majoritySample of a properly filled connection string below:
MONGOURI=mongodb+srv://malomz:[email protected]/golangDB?retryWrites=true&w=majority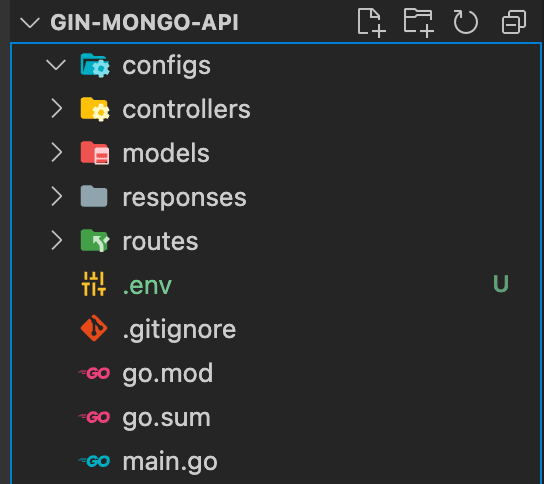
Load Environment Variable
With that done, we need to create a helper function to load the environment variable using the github.com/joho/godotenv library we installed earlier. To do this, we need to navigate to the configs folder and in this folder, create an env.go file and add the snippet below:
The snippet above does the following:
- Import the required dependencies.
- Create an
EnvMongoURIfunction that checks if the environment variable is correctly loaded and returns the environment variable.
Connecting to MongoDB
To connect to the MongoDB database from our application, first we need to navigate to the configs folder and in this folder, create a setup.go file and add the snippet below:
The snippet above does the following:
- Import the required dependencies.
- Create a
ConnectDBfunction that first configures the client to use the correct URI and check for errors. Secondly, we defined a timeout of 10 seconds we wanted to use when trying to connect. Thirdly, check if there is an error while connecting to the database and cancel the connection if the connecting period exceeds 10 seconds. Finally, we pinged the database to test our connection and returned theclientinstance. - Create a
DBvariable instance of theConnectDB. This will come in handy when creating collections. - Create a
GetCollectionfunction to retrieve and createcollectionson the database.
Next, we need to connect to the database when our application startup. To do this, we need to modify main.go as shown below:
Setup API Route Handler and Response Type
Route Handler
With that done, we need to create a user_route.go file inside the routes folder to manage all the user-related routes in our application, as shown below:
Next, we need to attach the newly created route to the http.Server in main.go by modifying it as shown below:
Response Type
Next, we need to create a reusable struct to describe our APIs response. To do this, navigate to the responses folder and in this folder, create a user_response.go file and add the snippet below:
The snippet above creates a UserResponse struct with Status, Message, and Data property to represent the API response type.
PS: json:"status", json:"message", and json:"data" are known as struct tags. Struct tags allow us to attach meta-information to corresponding struct properties. In other words, we use them to reformat the JSON response returned by the API.
Finally, Creating REST APIs
Next, we need a model to represent our application data. To do this, we need to navigate to the models folder, and in this folder, create a user_model.go file and add the snippet below:
The snippet above does the following:
- Import the required dependencies.
- Create a
Userstruct with required properties. We addedomitemptyandvalidate:"required"to the struct tag to tell Gin-gonic to ignore empty fields and make the field required, respectively.
Create a User Endpoint
With the model setup, we can now create a function to create a user. To do this, we need to navigate to the controllers folder, and in this folder, create a user_controller.go file and add the snippet below:
The snippet above does the following:
- Import the required dependencies.
- Create
userCollectionandvalidatevariables to create a collection and validate models using thegithub.com/go-playground/validator/v10library we installed earlier on, respectively. - Create a
CreateUserfunction that returns a Gin-gonic handler. Inside the returned handler, we first defined a timeout of 10 seconds when inserting user into the document, validating both the request body and required field using the validator library. We returned the appropriate message and status code using theUserResponsestruct we created earlier. Secondly, we created anewUservariable, inserted it using theuserCollection.InsertOnefunction and check for errors if there are any. Finally, we returned the correct response if the insert was successful.
Next, we need to update user_routes.go with the route API URL and corresponding controller as shown below:
Get a User Endpoint
To get the details of a user, we need to modify user_controller.go as shown below:
The snippet above does the following:
- Import the required dependencies.
- Create a
GetAUserfunction that returns a Gin-gonic handler. Inside the returned handler, we first defined a timeout of 10 seconds when finding a user in the document, auserIdvariable to get the users id from the URL parameter and auservariable. We converted theuserIdfrom a string to aprimitive.ObjectIDtype, a BSON type MongoDB uses. Secondly, we searched for the user using theuserCollection.FindOne, pass theobjIdas a filter and use theDecodeattribute method to get the corresponding object. Finally, we returned the decoded response.
Next, we need to update user_routes.go with the route API URL and corresponding controller as shown below:
PS: We also passed a userId as a parameter to the URL path. The specified parameter must match the one we specified in the controller.
Edit a User Endpoint
To edit a user, we need to modify user_controller.go as shown below:
The EditAUser function above does the same thing as the CreateUser function. However, we included an update variable to get updated fields and updated the collection using the userCollection.UpdateOne. Lastly, we searched for the updated users details and returned the decoded response.
Next, we need to update user_routes.go with the route API URL and corresponding controller as shown below:
Delete a User Endpoint
To delete a user, we need to modify user_controller.go as shown below:
The DeleteAUser function follows the previous steps by deleting the matched record using the userCollection.DeleteOne. We also checked if an item was successfully deleted and returned the appropriate response.
Next, we need to update user_routes.go with the route API URL and corresponding controller as shown below:
Get List of Users Endpoint
To get the list of users, we need to modify user_controller.go as shown below:
The GetAllUsers function follows the previous steps by getting the list of users using the userCollection.Find. We also read the retuned list optimally using the Next attribute method to loop through the returned list of users.
Next, we need to update user_routes.go with the route API URL and corresponding controller as shown below:
Complete user_controller.go
Complete user_route.go
With that done, we can test our application by starting the development server by running the command below in our terminal.
go run main.go


Conclusion
This post discussed how to structure a Gin-gonic application, build a REST API, and persist our data using MongoDB.
You may find these resources helpful:
Original Link: https://dev.to/hackmamba/build-a-rest-api-with-golang-and-mongodb-gin-gonic-version-269m
Dev To
More About this Source Visit Dev To