
An Interest In:
Web News this Week
- April 2, 2024
- April 1, 2024
- March 31, 2024
- March 30, 2024
- March 29, 2024
- March 28, 2024
- March 27, 2024
Some of Our Sources
- Slashdot
- Simplebits
- Web Designer Wall
- Team Treehouse
- The Logo Smith
- Vandelay Design
- Inspiredology
- Reencoded
- Stylized Web
- Daily Now
Help Webnuz
Referal links:
Introduction to Kubernetes with Amazon EKS
You can access key assets in this article on GitHub.
In this article, we will introduce basic concepts around Kubernetes, followed by a hands-on session where we spin up a Kubernetes cluster on Amazon EKS and deploy a simple website to the cluster.
Prerequisites
It is assumed that you:
- Are comfortable with the Linux command line
- Are familiar with the concept of containers; practical experience with Docker would be beneficial
- Have an AWS account
- Possess basic experience in configuring and using the AWS CLI
- Are aware that following this hands-on session may incur monetary costs and you are solely responsible for any such costs
With the prerequisites addressed, let's get started!
Background
Modern applications are often comprised of microservices communicating with each other through the network, instead of as a single, monolithic entity. Each microservice typically runs in its own container, which calls for an efficient and standardized approach for scheduling and managing these containers. Kubernetes is the industry-standard solution that addresses these needs.
Kubernetes
History
Reference: Kubernetes - Wikipedia
Kubernetes is a container orchestration tool originally developed by Google, which was released under the open source Apache 2.0 license in 2015 and donated to the Cloud Native Computing Foundation (CNCF), a non-profit organization jointly founded by Google and The Linux Foundation at the same time for this purpose. Kubernetes allows for one or more physical or virtual machines, otherwise known as nodes, to form a cluster, on which containerized workloads can be scheduled, deployed and managed with relative ease, providing benefits such as scalability, reliability and high availability.
Architecture
Reference: Kubernetes
A Kubernetes cluster consists of one or more nodes, which are further subdivided into control and worker nodes. Control nodes reside in the control plane and are responsible for scheduling and managing where containerized workloads should be run, while worker nodes reside in the data plane and are responsible for actually running the containerized workloads, as well as reporting the status of these workloads (and the status of the nodes themselves) to the control plane.
Kubernetes primarily relies on a declarative configuration model where the Kubernetes administrator specifies one or more YAML files to be applied to the cluster. Each YAML file describes one or more objects, logical entities that represent part of a desired state. The Kubernetes cluster then constantly works towards ensuring that each object exists and that the actual state matches the desired state, taking corrective action whenever necessary to maintain or re-converge to the desired state. We say that the state of the Kubernetes cluster is eventually consistent.
The most basic type of object in a Kubernetes cluster is the Pod. A pod is essentially a wrapper around a container, though it is possible for a pod to hold more than one container. Pods are ephemeral, meaning that they can be created and destroyed at will, either directly by the Kubernetes administrator, or through higher-level objects such as Deployments that automatically manage such pods. Therefore, one should not expect any particular pod to exist over a prolonged period of time.
Next, we have ReplicaSets, where each ReplicaSet manages a fixed number of identical pods (replicas), and works hard to ensure that the specified number of replicas exist. So, if for some reason, a replica in a ReplicaSet terminates, the ReplicaSet will automatically spawn a new replica. Conversely, if an extra replica was somehow created (e.g. by the Kubernetes administrator), the ReplicaSet will automatically terminate a replica.
Deployments are another type of object very similar to ReplicaSets, except the former also supports rolling updates and rollbacks with zero downtime. When a new version of the containerized workload is deployed to the cluster, the deployment performs a rolling update; that is, each pod running the old workload is incrementally replaced by a pod running the new one, until all pods have been replaced and running the new workload. As long as the deployment consists of 2 or more replicas, this guarantees that the application will always be available.
In order to expose a Deployment to other workloads within the cluster or the outside world, a Service needs to be created for it, which is essentially an abstraction specifying how a particular workload can be contacted through the network, e.g. what IP address and / or port should be used.
Within a cluster, the workloads can be further segregated into Namespaces, which can be thought of as virtual clusters within the real, physical cluster. This allows related workloads to be grouped together, and for unrelated workloads to be logically separated from one another.
Finally, Kubernetes allows for CustomResourceDefinitions where a Kubernetes developer and / or administrator can define their own objects to extend the functionality of Kubernetes. Needless to say, this is an advanced topic that casual Kubernetes users should not need to worry too much about.
With most of the basic concepts cleared, let's get our hands dirty ;-)
Spinning up a Kubernetes cluster with Amazon EKS
Reference: Getting started with Amazon EKS
Amazon EKS stands for Elastic Kubernetes Service and is a managed Kubernetes offering provided by AWS. The term "managed" roughly means that certain aspects of Kubernetes, such as provisioning each node and connecting them to form the cluster, are managed by the cloud provider so you do not have to worry about it yourself. Of course, this means that there are options for provisioning and configuring a Kubernetes cluster from scratch, which will not be covered in this article:
- Minikube, kind for spinning up a single-node cluster, intended primarily for development and testing purposes
- kubeadm for provisioning a multi-cluster node
To create a cluster with Amazon EKS and communicate with it, we need two tools:
eksctl: A command-line tool specific to EKS for creating EKS Kubernetes clusterskubectl: The Kubernetes command-line client, used for communicating with a Kubernetes server (cluster)
We also need AWS CLI version 2 or later, configured with an IAM user with sufficient permissions to create the cluster and its associated resources. If not, you may wish to first go through this introductory hands-on session on AWS CLI.
Technically, eksctl is not strictly required and an EKS cluster can be manually created using a combination of the AWS web console and the AWS CLI (and quite possibly with the CLI alone), but the process is rather complex and requires a detailed understanding of the underlying AWS services, roles, permissions, etc. eksctl manages these complexities for us under the hood so we can easily create a cluster with a single command and focus on deploying our apps to Kubernetes.
Now, assuming you have AWS CLI v2 installed and an IAM user with sufficient permissions (such as an IAM administrator), let's download kubectl version 1.21 from AWS:
$ curl -o kubectl https://amazon-eks.s3.us-west-2.amazonaws.com/1.21.2/2021-07-05/bin/linux/amd64/kubectlIt is also possible to download kubectl from upstream; they should be the same so it shouldn't make a difference.
Download the associated checksum file and use it to verify our kubectl download:
$ curl -o kubectl.sha256 https://amazon-eks.s3.us-west-2.amazonaws.com/1.21.2/2021-07-05/bin/linux/amd64/kubectl.sha256$ sha256sum -c kubectl.sha256If the download was not corrupted, the second command should output:
kubectl: OKFinally, make kubectl executable and install it somewhere under your PATH:
$ chmod +x ./kubectl$ sudo mv kubectl /usr/local/binNext, download and install eksctl:
$ curl --silent --location "https://github.com/weaveworks/eksctl/releases/latest/download/eksctl_$(uname -s)_amd64.tar.gz" | tar xz -C /tmp$ sudo mv /tmp/eksctl /usr/local/binIf the installation was successful, running eksctl version should print an appropriate version number and exit.
With the tools installed, let's spin up a cluster:
$ eksctl create clusterYou will see some blue information text printed to the console, and the command may take a while to complete, so do be patient. In my case, it took about 20 minutes before my cluster was ready.
On success, the last line of output should be similar to the following:
2021-12-29 21:30:44 [] EKS cluster "beautiful-unicorn-1640783508" in "us-east-1" region is readyThe name of your cluster (beautiful-unicorn-1640783508 in my case) and the region in which it is deployed (us-east-1) may vary. Note that you could also have explicitly specified a name and region when creating the cluster by passing in the --name and --region flags respectively.
Now check our Kubernetes version. Note that you should see two versions: one for the kubectl client that we downloaded (v1.21.x if you followed the instructions exactly), and one for the server (cluster). However, if kubectl is not correctly configured to connect to the cluster, you may receive an error when attempting to read the Kubernetes version from the server. Therefore, checking the Kubernetes version also serves to check that the cluster is up and running, and that we can connect to it with kubectl.
$ kubectl version --short(omitting the --short flag prints detailed version information in JSON format)
Here, I get:
Client Version: v1.21.2-13+d2965f0db10712Server Version: v1.21.2-eks-06eac09Another thing to note is that the Kubernetes client and server versions should only be at most 1 minor version apart. So if you downloaded the absolute latest kubectl version (1.23 at the time of writing), you would see a warning about incompatible Kubernetes client / server versions as the server is at 1.21 which is 2 minor versions behind. In that case, you will have to downgrade your version of kubectl accordingly.
Now that our cluster is ready and we can connect to it, let's fetch some info about our cluster.
Get a list of all clusters we have created with eksctl:
$ eksctl get cluster2021-12-29 21:47:35 [] eksctl version 0.77.02021-12-29 21:47:35 [] using region us-east-1NAME REGION EKSCTL CREATEDbeautiful-unicorn-1640783508 us-east-1 TrueGet a list of all nodes in our cluster:
$ kubectl get nodesNAME STATUS ROLES AGE VERSIONip-192-168-23-192.ec2.internal Ready <none> 20m v1.21.5-eks-bc4871bip-192-168-61-32.ec2.internal Ready <none> 20m v1.21.5-eks-bc4871bGet a list of all namespaces in our cluster:
$ kubectl get namespacesNAME STATUS AGEdefault Active 30mkube-node-lease Active 30mkube-public Active 30mkube-system Active 30mGet a list of services in the default namespace:
$ kubectl get servicesNAME TYPE CLUSTER-IP EXTERNAL-IP PORT(S) AGEkubernetes ClusterIP 10.100.0.1 <none> 443/TCP 31mGet a list of services in the kube-system namespace:
$ kubectl get services --namespace kube-systemNAME TYPE CLUSTER-IP EXTERNAL-IP PORT(S) AGEkube-dns ClusterIP 10.100.0.10 <none> 53/UDP,53/TCP 32mGet a list of pods in the default namespace:
$ kubectl get podsNo resources found in default namespace.There are no pods in the default namespace because we haven't deployed any apps yet. However, a number of pods were created in other namespaces (such as kube-system) for the control plane:
$ kubectl get pods --all-namespacesNAMESPACE NAME READY STATUS RESTARTS AGEkube-system aws-node-ftwmx 1/1 Running 0 28mkube-system aws-node-km5k2 1/1 Running 0 29mkube-system coredns-66cb55d4f4-8645g 1/1 Running 0 37mkube-system coredns-66cb55d4f4-l5wxg 1/1 Running 0 37mkube-system kube-proxy-cmpr2 1/1 Running 0 29mkube-system kube-proxy-h5phz 1/1 Running 0 28mThe above command fetches pods from all namespaces. Here, we see all control plane components were automatically deployed to the kube-system namespace.
Now that everything is working correctly, let's deploy our first Pod!
Deploying a single Pod to our EKS cluster
Reference: Deploy a sample application
Let's first create a namespace for our website, to separate it from other workloads. Recall that Kubernetes favors a declarative approach, whereby we describe objects with YAML configuration files and apply them to the cluster.
Save the following in a file namespace.yaml:
apiVersion: v1kind: Namespacemetadata: labels: app: donaldsebleung-com name: donaldsebleung-comLet's look at some of the fields:
kind: Describes the kind of object we are defining; in this case, aNamespacelabels: A set of key-value pairs used to identify and keep track of objects. In this case, we define a single labelappwith valuedonaldsebleung-comname: The name of our object. Here, we call itdonaldsebleung-com
Now let's apply it to our cluster:
$ kubectl apply -f namespace.yamlnamespace/donaldsebleung-com createdAs seen above, we apply a YAML configuration file with kubectl apply. The -f <FILE> option specifies a single file to apply.
The output indicates that the namespace was successfully created, but let's list all namespaces again to be safe:
$ kubectl get namespacesNAME STATUS AGEdefault Active 44hdonaldsebleung-com Active 8skube-node-lease Active 44hkube-public Active 44hkube-system Active 44hWe can also get info for a single object, like so: kubectl get <OBJECT_KIND>/<OBJECT_NAME>:
$ kubectl get namespace/donaldsebleung-comNAME STATUS AGEdonaldsebleung-com Active 11mSince a namespace primarily exists to partition object within a cluster, they aren't very interesting on their own so we don't see much being printed out. But we can get more information on our namespace by specifying the -o yaml option, which outputs the information about the object in YAML format:
$ kubectl get namespace/donaldsebleung-com -o yamlapiVersion: v1kind: Namespacemetadata: annotations: kubectl.kubernetes.io/last-applied-configuration: | {"apiVersion":"v1","kind":"Namespace","metadata":{"annotations":{},"labels":{"app":"donaldsebleung-com"},"name":"donaldsebleung-com"}} creationTimestamp: "2021-12-31T09:56:19Z" labels: app: donaldsebleung-com kubernetes.io/metadata.name: donaldsebleung-com name: donaldsebleung-com resourceVersion: "367633" uid: ef89d626-1437-41b6-b969-db44eaa47d6cspec: finalizers: - kubernetesstatus: phase: ActiveNotice this contains all the information we specified in our namespace.yaml file, and more. Tip: if you're not sure where to start when writing a YAML file for a particular kind of object, printing the YAML configuration for other objects of the same kind could serve as a reference.
Now let's define a pod in our newly created namespace. Save the following configuration in a pod.yaml file:
apiVersion: v1kind: Podmetadata: labels: app: donaldsebleung-com name: donaldsebleung-com namespace: donaldsebleung-comspec: containers: - name: donaldsebleung-com image: donaldsebleung/donaldsebleung-com:0.2.0 ports: - containerPort: 8443Here, we see that the kind of object is a Pod instead of a namespace. Let's look at some new (and existing) fields as well:
- We added an
applabel to our pod again, with valuedonaldsebleung-com. Unlike the case of the namespace where the label was purely declarative, a label (or set of labels) on a pod has practical uses we'll see shortly - The name of our pod is
donaldsebleung-com, which is identical to that of our namespace. In general, distinct objects only require distinct names if (1) they belong to the same namespace, and (2) they are the same kind of object - The
namespacefield undermetadataspecifies that this pod should be created in thedonaldsebleung-comnamespace. If omitted, the pod is created in thedefaultnamespace instead - The
spectop-level field describes what our pod is actually made of - Under
containers, thenamefield specifies the name of a container inside our pod. Recall that a pod can have multiple containers; hence we see a dash-before thenamefield, indicating that we are specifying a list of containers, though in this case, the length of the list is 1 - The
imagefield specifies which image our container should be based on. Here, we use an image with tagdonaldsebleung/donaldsebleung-com:0.2.0, built from the following Dockerfile:
FROM ubuntu:focalRUN apt-get update && apt-get install -y wget openjdk-11-jdkRUN wget https://github.com/DonaldKellett/donaldsebleung-com/archive/refs/tags/v0.2.0.tar.gz && tar xvf v0.2.0.tar.gz && rm v0.2.0.tar.gzRUN mv donaldsebleung-com-0.2.0 /appWORKDIR /appRUN ./mvnw packageCMD ["/usr/bin/java", "-jar", "/app/target/personal-website-0.0.1-SNAPSHOT.jar"]- The
containerPortfield underportsexposes port8443from the container. This is because our web server serves an HTTPS web page on port 8443
Now let's apply the config:
$ kubectl apply -f pod.yamlpod/donaldsebleung-com createdView pods in our namespace (-n is short for --namespace):
$ kubectl get pods -n donaldsebleung-comNAME READY STATUS RESTARTS AGEdonaldsebleung-com 1/1 Running 0 85sHere we see it's up and running. If not, e.g. you see 0/1 under READY, wait for a short while and run the same command again until the pod is ready.
Congratulations! You've successfully deployed your first pod to a Kubernetes cluster. But wait - how do we know the web server is actually up and running? Recall that pods are ephemeral - they can be created and destroyed at will, either by the cluster administrator or by higher-level objects such as deployments - so we cannot rely on a particular pod always being available. To access the web server inside our pod, we'll need to expose our pod to the rest of the cluster (and later, to the outside world) via a Service.
Exposing our pod to the cluster via a Service
Reference: Deploy a sample application
Recall that a Service is an abstraction that exposes running workloads (in our case, a single pod). There are 4 types of services at the time of writing:
- ClusterIP: exposes the workload to the rest of the cluster through an internal IP, but not to the outside world
- NodePort: exposes the workload through a specified port on all nodes in the cluster. This is the simplest way to expose a workload to the outside world, but is rarely the best choice
- LoadBalancer: exposes the workload through a dedicated load balancer. The exact details of how the load balancer is provisioned, etc., depends on the cloud provider
- ExternalName: yet another type of service we won't cover in this article
(source)
More details about these types of services and how they differ can be found through in this excellent writeup.
Here, we'll use a ClusterIP service and explore our website within the cluster shortly. Save the following in a clusterip-service.yaml file:
apiVersion: v1kind: Servicemetadata: labels: app: donaldsebleung-com name: donaldsebleung-com namespace: donaldsebleung-comspec: selector: app: donaldsebleung-com type: ClusterIP ports: - name: https port: 443 targetPort: 8443 protocol: TCPAgain, a brief overview of the fields used:
- Under
spec, we have aselectorfield. This selects pods based on their labels that the service should target. Here, we specify that our service should target pods with anapplabel of valuedonaldsebleung-com. That's why I told you labels on pods are important and not purely decorative. See? ;-) - The
typeisClusterIP. This produces an internal IP we can use within the cluster to access the service - Under
ports, the first and only item hasportandtargetPortfields. ThetargetPortfield specifies the port within the pod(s) that network requests should be forwarded to; in this case,8443, since that's where our web server is listening at. Theportfield specifies the port through which the service is accessed from outside - The
protocolfield specifies the transport layer protocol used (e.g. TCP, UDP, ICMP); TCP in our case
So our service provides an IP within the cluster that forwards HTTPS requests from TCP port 443 (the standard HTTPS port) to TCP port 8443. The net result is that within the cluster, instead of having to access the website as https://<clusterIP>:8443 , we can access it as https://<clusterIP> instead like we would a normal website.
Apply the config:
$ kubectl apply -f clusterip-service.yamlservice/donaldsebleung-com createdConfirm the service is created:
$ kubectl get services -n donaldsebleung-comNAME TYPE CLUSTER-IP EXTERNAL-IP PORT(S) AGEdonaldsebleung-com ClusterIP 10.100.36.224 <none> 443/TCP 17mHere, we see an IP 10.100.36.224 accessible from within the cluster. Notice that the EXTERNAL-IP is <none>, i.e. we still cannot access the service from outside the cluster.
To access the service from within a cluster, spawn a shell inside our pod:
$ kubectl exec -n donaldsebleung-com -it donaldsebleung-com -- /bin/bashA breakdown of the command used:
kubectl exec: similar todocker exec, but here we execute a command within the specified pod-n donaldsebleung-com: in thedonaldsebleung-comnamespace-it donaldsebleung-com: allocate an interactive tty (same as in Docker) for the pod with namedonaldsebleung-com-- /bin/bash: pass the remaining arguments to the pod - here we pass in/bin/bashto execute the Bash shell
If successful, you should see a root shell and the working directory is /app. In the root shell, fetch the webpage with wget and print to stdout, replacing 10.100.36.224 with your cluster IP:
# wget -qO - https://10.100.36.224 --no-check-certificateThe --no-check-certificate option is required since the web server uses a self-signed certificate by default.
If successful, you should see an HTML page being printed:
<!DOCTYPE HTML><!-- Hyperspace by HTML5 UP html5up.net | @ajlkn Free for personal and commercial use under the CCA 3.0 license (html5up.net/license)-->...Now that we've seen how to expose a service within the cluster, let's see how to do the same but to the outside world. But before that, let's cover Deployments - a higher-level object that manages a ReplicaSet of pods and takes care of rolling updates and rollbacks.
Clean up our existing pod and service with the following commands:
$ kubectl delete -f clusterip-service.yaml$ kubectl delete -f pod.yamlkubectl delete deletes the object(s) specified in the provided YAML file.
Creating our first Deployment
Reference: Deploy a sample application
A Deployment manages a ReplicaSet, which in turn manages a fixed number of replicas of Pods. While a ReplicaSet only ensures that the number of pods remains at the desired number of replicas, a Deployment offers rolling update and rollback functionality as well by replacing pods in the deployment incrementally, so there is no downtime.
Save the following in a file deployment.yaml:
apiVersion: apps/v1kind: Deploymentmetadata: name: donaldsebleung-com labels: app: donaldsebleung-com namespace: donaldsebleung-comspec: replicas: 3 selector: matchLabels: app: donaldsebleung-com template: metadata: labels: app: donaldsebleung-com namespace: donaldsebleung-com spec: containers: - name: donaldsebleung-com image: donaldsebleung/donaldsebleung-com:0.2.0 ports: - containerPort: 8443Here, in the spec:
replicasindicates how many pod replicas should be created; in this case 3selectorindicates how the Deployment keeps track of its pods. Here, wematchLabelswhere theapplabel on the pod is equal todonaldsebleung-comtemplate: the template to use for each pod in the deployment. Notice this is identical to ourpod.yamlexcept leaving outapiVersion,kindandmetadata.name
Apply the config:
$ kubectl apply -f deployment.yamldeployment.apps/donaldsebleung-com createdCheck deployments in our namespace:
$ kubectl get deployments -n donaldsebleung-comNAME READY UP-TO-DATE AVAILABLE AGEdonaldsebleung-com 3/3 3 3 17mWe see here that all 3 replicas of the donaldsebleung-com deployment are up and running. If not, e.g. you see 2/3, wait a few seconds and try again, until all replicas are up.
Let's expose our deployment to the outside world using a load balancer. But as per Network load balancing on Amazon EKS, we need to first deploy AWS Load Balancer Controller to our EKS cluster.
Deploying AWS Load Balancer Controller to our EKS cluster
Reference: AWS Load Balancer Controller
Note: this section is highly specific to Amazon EKS and contains a lot of AWS-related details that are not applicable to other managed Kubernetes offerings or Kubernetes in general. Don't feel too bad if you find yourself blindly copy-pasting commands in this section without fully understanding what is going on (-:
First we need to create an IAM OIDC identity provider for our cluster (source) - replace beautiful-unicorn-1640783508 with the actual name of your cluster:
$ eksctl utils associate-iam-oidc-provider \ --cluster beautiful-unicorn-1640783508 \ --approveNow download "an IAM policy for the AWS Load Balancer Controller that allows it to make calls to AWS APIs on your behalf" (source), and use it to create an IAM policy:
$ curl -o iam_policy.json https://raw.githubusercontent.com/kubernetes-sigs/aws-load-balancer-controller/v2.3.1/docs/install/iam_policy.json$ aws iam create-policy \ --policy-name AWSLoadBalancerControllerIAMPolicy \ --policy-document file://iam_policy.jsonNow get our account ID and make note of it:
$ aws sts get-caller-identityIn my case, my account ID is 477657529190.
Now create an IAM role for use with a Kubernetes service account (view the linked reference article for details), replacing the cluster name and account ID as appropriate:
$ eksctl create iamserviceaccount \ --cluster=beautiful-unicorn-1640783508 \ --namespace=kube-system \ --name=aws-load-balancer-controller \ --attach-policy-arn=arn:aws:iam::477657529190:policy/AWSLoadBalancerControllerIAMPolicy \ --override-existing-serviceaccounts \ --approveFinally, we are ready to install the AWS Load Balancer Controller itself (-: Install cert-manager to our cluster for managing certificate-related stuff:
$ kubectl apply \ --validate=false \ -f https://github.com/jetstack/cert-manager/releases/download/v1.5.4/cert-manager.yamlThis may take a while to execute (no more than a few dozen seconds) as Kubernetes creates a large number of objects.
Now download the controller specification:
$ curl -Lo v2_3_1_full.yaml https://github.com/kubernetes-sigs/aws-load-balancer-controller/releases/download/v2.3.1/v2_3_1_full.yamlOpen the downloaded file v2_3_1_full.yaml in your favorite text editor (mine is Vim) and make the following changes:
- Delete the
ServiceAccountsection of the file. It looks like this:
apiVersion: v1kind: ServiceAccountmetadata: labels: app.kubernetes.io/component: controller app.kubernetes.io/name: aws-load-balancer-controller name: aws-load-balancer-controller namespace: kube-system- Replace
your-cluster-namein the deployment spec with the actual name of your cluster
Now apply the config:
$ kubectl apply -f v2_3_1_full.yamlAgain, this make take a few seconds.
To gain peace of mind, verify the controller is properly installed:
$ kubectl get deployment/aws-load-balancer-controller -n kube-systemNAME READY UP-TO-DATE AVAILABLE AGEaws-load-balancer-controller 1/1 1 1 105sPhew, that was complicated! Back to the interesting stuff ;-)
Expose our deployment to the outside world using a load balancer
Reference: Deploy a sample application
Let's make a copy of our clusterip-service.yaml. We'll name the copy loadbalancer-service.yaml:
$ cp clusterip-service.yaml loadbalancer-service.yamlOpen loadbalancer-service.yaml and change the line:
type: ClusterIPto:
type: LoadBalancerYup, that's it. Now apply the config:
$ kubectl apply -f loadbalancer-service.yamlservice/donaldsebleung-com createdGet the service details. Notice how the type is now LoadBalancer, and we have an external IP (or DNS name, rather)!
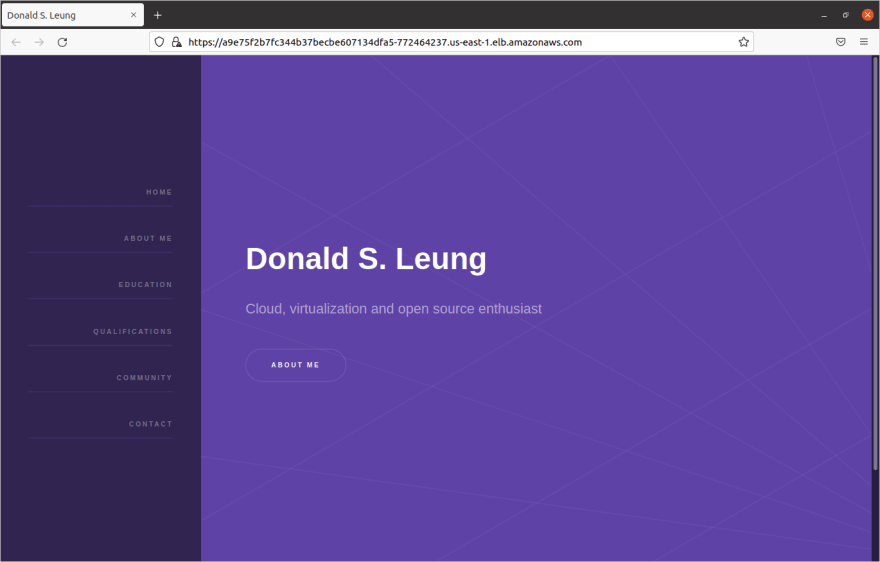
$ kubectl get services -n donaldsebleung-comNAME TYPE CLUSTER-IP EXTERNAL-IP PORT(S) AGEdonaldsebleung-com LoadBalancer 10.100.71.229 a9e75f2b7fc344b37becbe607134dfa5-772464237.us-east-1.elb.amazonaws.com 443:32501/TCP 47sNow visit https://a9e75f2b7fc344b37becbe607134dfa5-772464237.us-east-1.elb.amazonaws.com , replacing the external DNS name as appropriate for your scenario. The browser may display a scary warning about a self-signed certificate. Ignore it, and proceed with viewing the website content:

Feel free to poke around the website and learn more about me (shameless promotion here :-P). When you're done, continue with the rest of this article.
You did it! You exposed your deployment to the outside world using a load balancer and saw the results in your browser.
Rolling updates
A major advantage of deployments over standalone pods (or even ReplicaSets) is the ability to perform a rolling update without application downtime. It does this by replacing the pods in the deployment one by one (or as configured in the YAML file) until all the old pods have been replaced by new ones. Let's see this in action.
Copy our existing deployment.yaml to deployment-patched.yaml:
$ cp deployment.yaml deployment-patched.yamlNow update the container image used in each of the pods, from donaldsebleung/donaldsebleung-com:0.2.0 to donaldsebleung/donaldsebleung-com:0.2.0-1, which simply replaces the slogan "IT consultant by day, software developer by night" on the homepage with "Cloud, virtualization and open-source enthusiast", because I've recently realized that the old slogan doesn't fit well with the rest of the content on my website. Your modified deployment-patched.yaml file should look like this:
apiVersion: apps/v1kind: Deploymentmetadata: name: donaldsebleung-com labels: app: donaldsebleung-com namespace: donaldsebleung-comspec: replicas: 3 selector: matchLabels: app: donaldsebleung-com template: metadata: labels: app: donaldsebleung-com namespace: donaldsebleung-com spec: containers: - name: donaldsebleung-com image: donaldsebleung/donaldsebleung-com:0.2.0-1 ports: - containerPort: 8443Interested learners may refer to the Dockerfile for 0.2.0-1, which simply applies a patch to the downloaded source code before building the project:
FROM ubuntu:focalRUN apt-get update && apt-get install -y wget patch openjdk-11-jdkRUN wget https://github.com/DonaldKellett/donaldsebleung-com/archive/refs/tags/v0.2.0.tar.gz && tar xvf v0.2.0.tar.gz && rm v0.2.0.tar.gzRUN mv donaldsebleung-com-0.2.0 /appWORKDIR /appCOPY index.patch .RUN patch -p0 < index.patchRUN ./mvnw packageCMD ["/usr/bin/java", "-jar", "/app/target/personal-website-0.0.1-SNAPSHOT.jar"]Here's the patch, if you're interested:
--- src/main/resources/templates/index.html 2021-12-24 21:54:03.000000000 +0800+++ src/main/resources/templates/index_new.html 2021-12-30 21:39:42.666305634 +0800@@ -29,7 +29,7 @@ <section id="intro" class="wrapper style1 fullscreen fade-up"> <div class="inner"> <h1>Donald S. Leung</h1>- <p>IT consultant by day, software developer by night</p>+ <p>Cloud, virtualization and open source enthusiast</p> <ul class="actions"> <li><a href="https://dev.to/about" class="button scrolly">About me</a></li> </ul>@@ -55,4 +55,4 @@ <script src="assets/js/main.js"></script> </body>-</html>\ No newline at end of file+</html>Now apply the config:
$ kubectl apply -f deployment-patched.yamldeployment.apps/donaldsebleung-com configuredAnd refresh your browser multiple times. Notice that the website should be up all the time - there should be no moment where it is not available. Furthermore, for a while, you should see the slogan on the homepage alternate between the old and new versions. Eventually, though, it should converge to the following, which indicates all pods in the deployment have been replaced to use the new container image:
Before we conclude, let's look at one more feature: autoscaling deployments with HorizontalPodAutoscaler. But first, we need to install the Kubernetes metric server, which provides aggregate resource usage data needed for autoscaling.
Installing the Kubernetes metric server
Reference: Installing the Kubernetes metrics server
Just apply the appropriate YAML config, as follows:
$ kubectl apply -f https://github.com/kubernetes-sigs/metrics-server/releases/latest/download/components.yamlNow confirm it is properly deployed:
$ kubectl get deployment/metrics-server -n kube-systemNAME READY UP-TO-DATE AVAILABLE AGEmetrics-server 1/1 1 1 83sWe're good to go.
Autoscaling deployments with HorizontalPodAutoscaler
Reference: HorizontalPodAutoscaler Walkthrough
Currently, our deployment has a fixed number of 3 pods, which is good enough for testing and demonstration purposes. But what if the web traffic is low at a particular time interval? Would maintaining 3 pods in that case be a waste of resources? On the other hand, what if we experience a sudden surge in traffic? Is 3 pods enough to handle the surge gracefully without degradation in performance?
Fortunately, through HorizontalPodAutoscaler (HPA), Kubernetes allows you to automatically scale the number of replicas in a Deployment depending on some metric(s) such as CPU utilization per pod. But first, we need to define some resource limits for our pods in the deployment. Save the following in a file deployment-patched-with-limit.yaml:
apiVersion: apps/v1kind: Deploymentmetadata: name: donaldsebleung-com labels: app: donaldsebleung-com namespace: donaldsebleung-comspec: replicas: 3 selector: matchLabels: app: donaldsebleung-com template: metadata: labels: app: donaldsebleung-com namespace: donaldsebleung-com spec: containers: - name: donaldsebleung-com image: donaldsebleung/donaldsebleung-com:0.2.0-1 ports: - containerPort: 8443 resources: limits: cpu: 500m requests: cpu: 200mThis is identical to deployment-patched.yaml except we added the following part:
resources: limits: cpu: 500m requests: cpu: 200mHere, 1m represents one-thousandth (or 0.001) of a CPU core, so limits.cpu: 500m means each pod is not allowed to use more than 0.5 CPU cores. requests.cpu: 200m means that each pod requests 0.2 CPU cores.
Apply the config:
$ kubectl apply -f deployment-patched-with-limit.yamldeployment.apps/donaldsebleung-com configuredSince Kubernetes favors a declarative approach, notice we did not need to delete the deployment and re-deploy - we just had to apply the new YAML config and Kubernetes will configure the deployment to converge towards the new spec.
Now save the following in hpa.yaml:
apiVersion: autoscaling/v1kind: HorizontalPodAutoscalermetadata: labels: app: donaldsebleung-com name: donaldsebleung-com namespace: donaldsebleung-comspec: maxReplicas: 10 minReplicas: 1 scaleTargetRef: apiVersion: apps/v1 kind: Deployment name: donaldsebleung-com targetCPUUtilizationPercentage: 50Here:
maxReplicasis the maximum number of replicas we should have, regardless of the load. We set this to 10, so there can never be more than 10 replicasminReplicas: same asmaxReplicasbut sets the minimum. Here we make sure we always have at least 1 replicascaleTargetRef: what object does our HPA target? Here, we target the deploymentdonaldsebleung-comby nametargetCPUUtilizationPercentage: what percentage of CPU utilization relative to the CPU limit we should aim for in each pod. Here, we specify 50%, i.e. we aim for0.5 * 500m = 250m = 0.25CPU cores used per pod
Apply the config:
$ kubectl apply -f hpa.yamlhorizontalpodautoscaler.autoscaling/donaldsebleung-com createdWait a few seconds, then query our HPA:
$ kubectl get hpa -n donaldsebleung-comNAME REFERENCE TARGETS MINPODS MAXPODS REPLICAS AGEdonaldsebleung-com Deployment/donaldsebleung-com 0%/50% 1 10 1 20mNotice how we now have 1 replica instead of 3. This is because there is no traffic to be handled, so the pods aren't using any noticeable amount of CPU. In response, the HPA scaled our deployment down to 1 replica in order to conserve resources.
Another thing: hpa is short for horizontalpodautoscaler. Our command might as well have been:
$ kubectl get horizontalpodautoscalers -n donaldsebleung-comBut hpa is easier to type. In fact, this isn't the only abbreviation we can use:
| Object | Shorthand |
|---|---|
| Namespace | ns |
| Pod | po |
| ReplicaSet | rs |
| Deployment | deploy |
| Service | svc |
I personally find the full names more descriptive and readable. But if you're lazy, or the full name is insanely long (e.g. horizontalpodautoscaler), feel free to use the shorthands instead.
Now try to generate some load by querying the site repeatedly. You might want to open this in a new terminal window (or tab), to keep it running while we make our observations in the original window (replace the external DNS name accordingly):
$ while true; do wget -qO - https://a9e75f2b7fc344b37becbe607134dfa5-772464237.us-east-1.elb.amazonaws.com --no-check-certificate > /dev/null; doneYou might even want to run it in multiple terminal windows; I opened a few dozen of them myself (-:
Wait a short while (maybe a minute or two), and query our HPA again:
$ kubectl get hpa -n donaldsebleung-comNAME REFERENCE TARGETS MINPODS MAXPODS REPLICAS AGEdonaldsebleung-com Deployment/donaldsebleung-com 39%/50% 1 10 10 37mLook, now the CPU utilization has gone up and our HPA responded by scaling our deployment up to 10 replicas!
Once you're done exploring, stop bombarding the endpoint with requests by closing the appropriate terminal windows / tabs. Wait a few minutes, and you should see the CPU utilization go down again and the number of replicas scaled back down to 1:
$ kubectl get hpa -n donaldsebleung-comNAME REFERENCE TARGETS MINPODS MAXPODS REPLICAS AGEdonaldsebleung-com Deployment/donaldsebleung-com 1%/50% 1 10 1 45mCleanup
Let's delete our namespace. Since we put every other object we've created in this namespace, this should delete those objects as well:
$ kubectl delete -f namespace.yamlnamespace "donaldsebleung-com" deletedNow delete our cluster (replace the name accordingly):
$ eksctl delete cluster -n beautiful-unicorn-1640783508This may take a few minutes. In the end, you should see something like:
2022-01-01 12:30:38 [] all cluster resources were deletedConclusion
In this hands-on session, we learned:
- What Kubernetes is
- How it relates to the microservice architecture used in many modern applications
- Key concepts and objects in Kubernetes
- How Kubernetes works; in particular, the declarative approach it favors
- How to actually apply these concepts to a real, multi-node Kubernetes cluster by leveraging a managed Kubernetes offering by AWS known as Amazon EKS
Of course, this is just the tip of the iceberg - there are so many more features in Kubernetes that we have yet to explore. If this article piqued your interest in Kubernetes, consider learning more about it through the following resources (or otherwise):
- Official Kubernetes website
- Introduction to Kubernetes
- Introduction to Containers, Kubernetes, and OpenShift
Until then, happy new year!
References
DonaldKellett/k8s-intro-eks: https://github.com/DonaldKellett/k8s-intro-eks- Kubernetes - Wikipedia: https://en.wikipedia.org/wiki/Kubernetes
- Kubernetes: https://kubernetes.io/
- Getting started with Amazon EKS: https://docs.aws.amazon.com/eks/latest/userguide/getting-started.html
- Minikube: https://minikube.sigs.k8s.io/docs/start/
- kind: https://kind.sigs.k8s.io/
- kubeadm: https://kubernetes.io/docs/setup/production-environment/tools/kubeadm/install-kubeadm/
- Getting started with Amazon EKS - eksctl: https://docs.aws.amazon.com/eks/latest/userguide/getting-started-eksctl.html
- Deploy a sample application: https://docs.aws.amazon.com/eks/latest/userguide/sample-deployment.html
- Service | Kubernetes: https://kubernetes.io/docs/concepts/services-networking/service/
- Kubernetes NodePort vs LoadBalancer vs Ingress? When should I use what?: https://medium.com/google-cloud/kubernetes-nodeport-vs-loadbalancer-vs-ingress-when-should-i-use-what-922f010849e0
- Network load balancing on Amazon EKS: https://docs.aws.amazon.com/eks/latest/userguide/network-load-balancing.html
- AWS Load Balancer Controller: https://docs.aws.amazon.com/eks/latest/userguide/aws-load-balancer-controller.html
- Create an IAM OIDC provider for your cluster: https://docs.aws.amazon.com/eks/latest/userguide/enable-iam-roles-for-service-accounts.html
- Installing the Kubernetes metrics server: https://docs.aws.amazon.com/eks/latest/userguide/metrics-server.html
- HorizontalPodAutoscaler Walkthrough: https://kubernetes.io/docs/tasks/run-application/horizontal-pod-autoscale-walkthrough/
- Introduction to Kubernetes: https://www.edx.org/course/introduction-to-kubernetes
- Introduction to Containers, Kubernetes, and OpenShift: https://www.edx.org/course/introduction-to-containers-kubernetes-and-openshift
Original Link: https://dev.to/donaldsebleung/introduction-to-kubernetes-with-amazon-eks-1nj6
Dev To
More About this Source Visit Dev To