
An Interest In:
Web News this Week
- April 2, 2024
- April 1, 2024
- March 31, 2024
- March 30, 2024
- March 29, 2024
- March 28, 2024
- March 27, 2024
Some of Our Sources
- Slashdot
- Techcrunch
- Team Treehouse
- Abduzeedo
- TutsPlus - Design
- Naldz Graphics
- My Ink Blog
- Stylized Web
- Design Modo
- Android Headlines
Help Webnuz
Referal links:
Set up Dynamic DNS for Dynamic IP Addresses at Home (for free) WireGuard Configuration
We already talked about how to Bring Your Home Network Anywhere For Free - Home VPN with Wireguard on Raspberry Pi + Pi-hole (Ubuntu Server 20.04 LTS). It is an awesome thing, especially if you have a static IP address, but if you are like most households in the world (including myself), your internet service provider (ISP) provides you with a dynamic IP address. It means that your home network's IP address changes frequently, even a couple of times a day, so your VPN connection configuration needs to be changed accordingly to keep up.
To solve that, we will utilize the Dynamic DNS solution.
Dynamic DNS
Dynamic DNS is a way of assigning a custom domain name that automatically updates even as the IP address changes. This system has been around long enough that there are workarounds for these kinds of issues. For the purpose of this post, I will use a free DDNS service - No-IP.
Go to the No-IP website and choose some cool hostname and domain:
You are required to sign up, so just populate the required fields and complete the registration (email confirmation and stuff). Your hostname will be pre-populated and set up for the currently logged-in IP address.
If you are not logged in from your home network, you need to change the address to point to your home network's IP address.
Once you are done setting up (don't forget to add username, No-IP will complain), we can set up our router to ping No-IP servers whenever our IP address changes.
Router Set Up
My home router is Technicolor CGA2121, but the configuration shouldn't be different for others, just browse a bit around through the configuration options.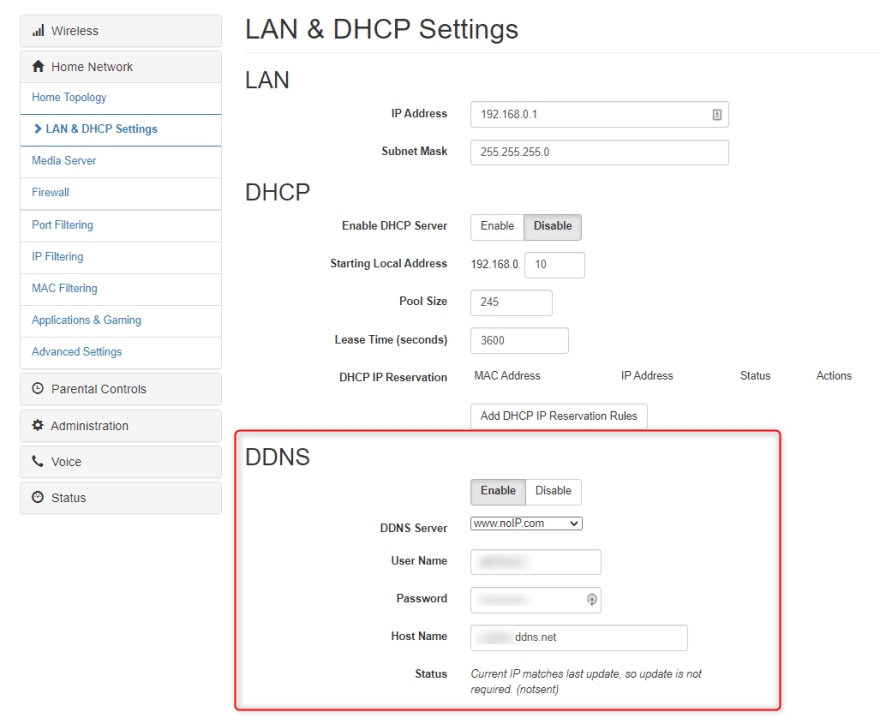
After this is done, our router should automatically call No-IP API to change the pointing IP address.
WireGuard Configuration
When we set up WireGuard on our Raspberry Pi in the previous post, we selected the Public IP option with the current home IP address.
Current configuration:
$ cat /etc/pivpn/wireguard/setupVars.confPLAT=UbuntuOSCN=focalUSING_UFW=0IPv4dev=eth0install_user=ubuntuinstall_home=/home/ubuntuVPN=wireguardpivpnPORT=51820pivpnDNS1=10.6.0.1pivpnDNS2=pivpnHOST=<PUBLIC IP ADDRESS> # <- We will change thisINPUT_CHAIN_EDITED=0FORWARD_CHAIN_EDITED=0pivpnPROTO=udppivpnMTU=1420pivpnDEV=wg0pivpnNET=10.6.0.0subnetClass=24ALLOWED_IPS="0.0.0.0/0, ::0/0"UNATTUPG=1INSTALLED_PACKAGES=(net-tools iptables-persistent wireguard-tools qrencode)Enter the edit mode for setupVars.conf file:
$ sudo nano /etc/pivpn/wireguard/setupVars.confChange pivpnHOST to point to your DDNS hostname which you created on No-IP - pivpnHOST=xxxx.ddns.net. Save with Ctrl+X, Y.
New clients you generate will use the new endpoint but you need to manually edit existing clients.
Open your configuration, for example, amel.conf, and update the line:
Endpoint = xxxx.ddns.net:51820Final Words
I hope this tutorial will help you overcome issues with dynamic IP and help you improve your online being.
Original Link: https://dev.to/amelspahic/set-up-dynamic-dns-for-dynamic-ip-addresses-at-home-for-free-wireguard-configuration-381j
Dev To
More About this Source Visit Dev To