
An Interest In:
Web News this Week
- April 19, 2024
- April 18, 2024
- April 17, 2024
- April 16, 2024
- April 15, 2024
- April 14, 2024
- April 13, 2024
Some of Our Sources
- Engadget
- Mashable
- TutsPlus - Code
- Spoon Graphics
- Smashing Apps
- Six Revisions
- Fuel Your Creativity
- Noupe
- Specky Boy
- Design Modo
Help Webnuz
Referal links:
Running a .NET Twitter bot on Pi: Part 3 Pi in the sky
Heya! The final part of this twitter bot series is here.
In the first part of this series, we've taken a look at creating a twitter bot in .NET that listens to particular tweets and retweets them. For the second part we created Api endpoints for it, so it now has the capability to change its tweet stream rules whilst listening at the same time. This final part is where we deploy our twitter bot to the Pi, lets go!
his is the link to the repo (here). It includes the previous changes as well as what will occur during the course of this blog.
Requirements first
In order for this to work, we will need a couple of things to have at hand:
- A Raspberry Pi
- Setting up the Pi with SSH (link here)
- Please take note of the OS chosen during the setup for later
- Docker installed in Pi (link here)
- I only followed the "Installing Docker to the Raspberry Pi" and "Testing the Docker Installation on Raspberry Pi" sections
- A docker hub account (link here)
- Docker desktop (link here)
- (Optional) Docker VS Code extension (link here)
Referring to the video for setting up an SSH for the Pi, her video pretty much applies the same to windows users, if you follow that you should be good to go on your Pi/SSH needs: thats if you actually need to SSH, if you dont and are fine with the full OS version then you can go ahead with that too
Dockerizing ..
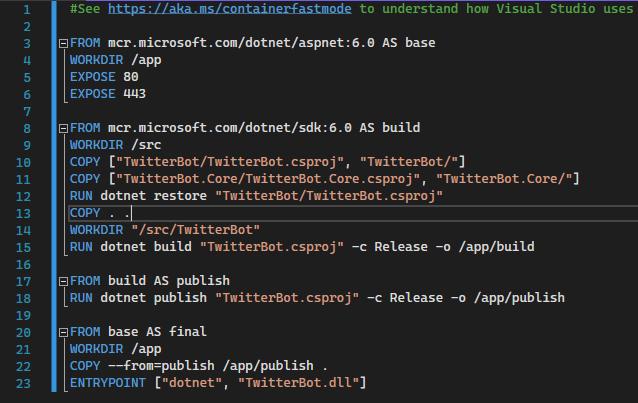
The dockerizing part is really nothing new, it's just adding the dockerfile and a dockerignore to our project as seen in many tutorials. I came across a hiccup when attempting to pull an image for our twitter bot into the Pi but we'll work up to that point.
To start off in visual studio, well first need to add the docker support to the project, and that is pretty much straight forward; right clicking the project and scrolling down the options to select the add docker support button. VS generates the necessary files for our docker process which are the dockerignore and dockerfile files:
This can also be done in VS code, ensuring the docker extension installed, via the command (select the first option):

Time to build
Once this is done, we are ready to start the build process and we do this by going to the terminal/cmd and cd-ing into our project directory. Because of the way the dockerfile looks for things, and how it sets up what current directory it looks at; I ensured that I ran the following docker command in the solution directory and not the individual project directory.
docker build -t {username}/abtest-image -f TwitterBot/Dockerfile . The command specifics can be found here. This command basically states to create a docker image named {username}/abtest-image which is based on the dockerfile located in the TwitterBot folder. The period at the end of the command is also a necessity as it states that we will execute this command in the current directory that we are in.
Time to test run
The previous command should build an image, however it has not been run in a container yet. The command to do so is this:
docker run --rm -p 8080:80 {username}/abtest-image Here we can see that docker instructs (via docker run) the {username}/abtest-image image to run on port 8080 (via -p 8080:80). The port argument shows that the left side of the colon is 8080 while the right side is 80. The left side is what docker exposes to the outside world (the users - us) to appropriately talk to this container. The right side is for communication inside the container itself, something we wouldnt need to look into too much for this project. --rm is simply an option to let docker know to remove containers once they have been stopped.
If we want to run this image in a container in the background and not have it hog the terminal, we can introduce the -d flag just after the run keyword in that same command above.
The hiccup
Now that we have test run this image in our OS, its time we talk about the potential nightmare we couldve gotten into.
I ran into the hiccup stemming from after creating the dockerfile as instructed above, which is perfectly fine for what were currently running on. This file has various steps that include packaging the app into the image we need, however it relies on a base image to create our image from which causes compatibility issues down the line.
This is usually the first command in the file and it would probably look like this by default:
FROM mcr.microsoft.com/dotnet/aspnet:6.0 AS baseThe problem is that this command doesnt get an image which targets the correct OS version that our Pi runs on (remember when we mentioned to keep a note of the OS). This could result in a little mess down the line trying to figure out what this message means:
The requested image's platform (linux/amd64) does not match the detected host platform (linux/arm/v7) and no specific platform was requestedThe crux of this states that we need to change that first line mentioned a little, depending on what platform we will be targeting. It looks like the platform is targeting the arm instruction set (based on the error message), but to find out what type our host platform (Pi) is running on, we can use the uname m command in the Pi terminal.
This will give us one of two answers, either aarch64 (which means were on 64 bit) or armv7l (which means were on 32 bit). Once we find that, we can go to this link to find out what version of aspnet in that command we should be pulling down. For my case, it was 6.0.1-bullseye-slim-arm32v7 and Id safely guess it could be yours too:
Now the command looks like this:
FROM mcr.microsoft.com/dotnet/aspnet:6.0.1-bullseye-slim-arm32v7 AS base After this change, running this image in our current OS wouldnt work as weve changed our target platform, but it will run on the Pi (have faith and stay the course!). Now that we have built up the image, its time to fling it off to the web!
Publishing the image to the hub
In order for us to publish the image to docker hub we will need to have a docker account. Given the steps mentioned at the start, we can safely assume this has been done already.
In our current terminal, we will need to log into to our docker hub:
docker login docker.io -u <username>A standard credential check will occur, after which we should be granted access to our account via the terminal.
Side note, the docker.io part was added to solve an issue I had with pulling from a private repo. I could have used docker login on its own and it would have worked for the steps later if I chose to have a public repo.
Anyway, once weve logged in, we can finally get to the juicy part which is pushing this image out there:
Docker push {username}/abtest-imageIt does what it says on the tin. The image we created earlier will now be pushed into a new repo in the cloud with the same name. There might be some problems here as I have experienced, mostly to do with the naming convention of the image name. I found that pushing an image name without my username preceding it was not possible, it gave me errors stating request to the resource is denied.
I looked at the logs when attempting to push the image with that exact name and it seems to push to a directory that didnt belong to me (if you know please drop a comment below ):
The push refers to repository [docker.io/library/abtest-image]However, when I used my docker username and then followed by /abtest-image, the logging looked different and the push succeeded:
The push refers to repository [docker.io/{username}/abtest-image]Check the web to see that the new repo is there and it should be .
Pulling the image from the Pi(moment of truth)
Coolio, well need to SSH in to the Pi for this. When we have done so, well need to install docker into the Pi. This blog is adequate enough to install docker, three quick easy steps to get docker into the Pi
Once that is done, all that is left is to say these magic words:
docker pull {username}/abtest-image It will do its thing, with regards to getting the image down from our remote repo and adding it to the list of images in our Pi docker. Check using the docker images for this list.
Once that is done, and the hiccup issue has been resolved, we should be able to run our twitter bot using the same command in previous steps:
docker run -d -p 8080:80 {username}/abtest-imageTest it in the Pi for a final time to see if it holds and we should have lift off!
This was a fun project to take on, this three-part series saw me create a .NET twitter bot app which listens to specific tags Ive pre-set and retweets those tags. We then went onto creating endpoints to change what the tweet stream should and shouldnt listen to by exposing the rules end point. This led to looking at deploying this .NET bot onto the Raspberry Pi.
Ive learnt quite a bit from this, I was able to enjoy some of the features of .NET 6 such as minimal Api. This was also followed by a refreshing and fun exposure to docker and how it can be used. I have some ideas for a bonus episode on how much a dockerized twitter bot in azure would rack up in costs. I have a feeling it wouldnt be more than two burgers worth a month (let's hope it doesn't cost me a pretty penny!).
Thank you for sticking around and following my journey with this twitter bot, I hope to see you in the next project I decide to take on. PS: lookout for that possible bonus episode on exploring this bot with Azure
Original Link: https://dev.to/iamabdul/running-a-net-twitter-bot-on-pi-part-3-pi-in-the-sky-39if
Dev To
More About this Source Visit Dev To