
An Interest In:
Web News this Week
- April 23, 2024
- April 22, 2024
- April 21, 2024
- April 20, 2024
- April 19, 2024
- April 18, 2024
- April 17, 2024
Some of Our Sources
- Techcrunch
- Team Treehouse
- Pearsonified
- The Logo Smith
- Smashing Magazine
- Abduzeedo
- Crazy Leaf Design
- Reencoded
- Stylized Web
- Freelance Switch
Help Webnuz
Referal links:
The Ultimate Guide You Need To Publish Your Python Package In Just 9 Easy Steps
Directory structure
- Create a directory that is named exactly how you want your package to be named.
- Place all the files, folders and classes that you want to publish into this directory.
- Create files required by PyPI to prepare the project for distribution.
- It should look something like this:

Clean your code
- Remove all "print" statements from the code.
- Use logs instead of print statements(debug/info/warn etc..)
Configuring metadata
setup.cfg--> It is the configuration file for setuptools. It tells setuptools about your package(such as the name and version) as well as which code files to include. There are a variety of metadata and options supported here.
[metadata]description-file = README.md setup.py--> It is the build script for which tells setuptools about your package(such as the name and version) as well as which code files to include.
setuptools is a library designed to facilitate packaging Python projects.
Open setup.py and enter the following content. Change the name to include your username; this ensures that you have a unique package name and that your package doesnt conflict with packages uploaded by other people.
from setuptools import setup, find_packagesversion = '0.0.1' # Any format you wantwith open("README.md", "r", encoding="utf-8") as fh: long_description = fh.read()setup( name='your-package-name', packages=find_packages(), version=version, license='MIT', description='Short description', long_description=long_description, long_description_content_type="text/markdown", author='Author Name', author_email='[email protected]', url='https://gitlab.com/username/repo-name', download_url=f'https://gitlab.com/username/repo-name/-/archive/{version}/repo-name-{version}.tar.gz', keywords=['Some', 'keywords'], install_requires=[ 'dependency-1', # All external pip packages you are importing 'dependency-2', ], classifiers=[ 'Development Status :: 3 - Alpha', 'Intended Audience :: Developers', 'Operating System :: OS Independent', 'Topic :: Software Development :: Build Tools', 'License :: OSI Approved :: MIT License', 'Programming Language :: Python :: 3.7', 'Programming Language :: Python :: 3.8', ],) You can find details about each arguments here.
Creating README.md (optional but recommended)
Open README.md and enter details about your package. You can customize this as youd like. This content can be displayed on the homepage of your package on PyPI.
Creating a LICENSE
Its important for every package uploaded to the Python Package Index to include a license. This tells users who install your package the terms under which they can use your package. For help picking a license, see https://choosealicense.com/. Once you have chosen a license, open LICENSE and enter the license text. For example, if you had chosen the MIT license:
Copyright (c) 2021 YOUR NAMEPermission is hereby granted, free of charge, to any person obtaining a copyof this software and associated documentation files (the "Software"), to dealin the Software without restriction, including without limitation the rightsto use, copy, modify, merge, publish, distribute, sublicense, and/or sellcopies of the Software, and to permit persons to whom the Software isfurnished to do so, subject to the following conditions:The above copyright notice and this permission notice shall be included in allcopies or substantial portions of the Software.THE SOFTWARE IS PROVIDED "AS IS", WITHOUT WARRANTY OF ANY KIND, EXPRESS ORIMPLIED, INCLUDING BUT NOT LIMITED TO THE WARRANTIES OF MERCHANTABILITY,FITNESS FOR A PARTICULAR PURPOSE AND NONINFRINGEMENT. IN NO EVENT SHALL THEAUTHORS OR COPYRIGHT HOLDERS BE LIABLE FOR ANY CLAIM, DAMAGES OR OTHERLIABILITY, WHETHER IN AN ACTION OF CONTRACT, TORT OR OTHERWISE, ARISING FROM,OUT OF OR IN CONNECTION WITH THE SOFTWARE OR THE USE OR OTHER DEALINGS IN THESOFTWARE.Create a PyPI account
Register yourself for a PyPI account here. Remember your username (not the Name, not the E-Mail Address) and your password, you will need it later for the upload process.
Upload your package to github/gitlab
Create a github/gitlab repo including all the above files and folders. Name the repo exactly as the package.
If uploading package to Gitlab,
- After uploading the required files, go to
Repository --> Tags --> New Tagand create new tag(tag name should be same as the version) for every release of the package to PyPI.
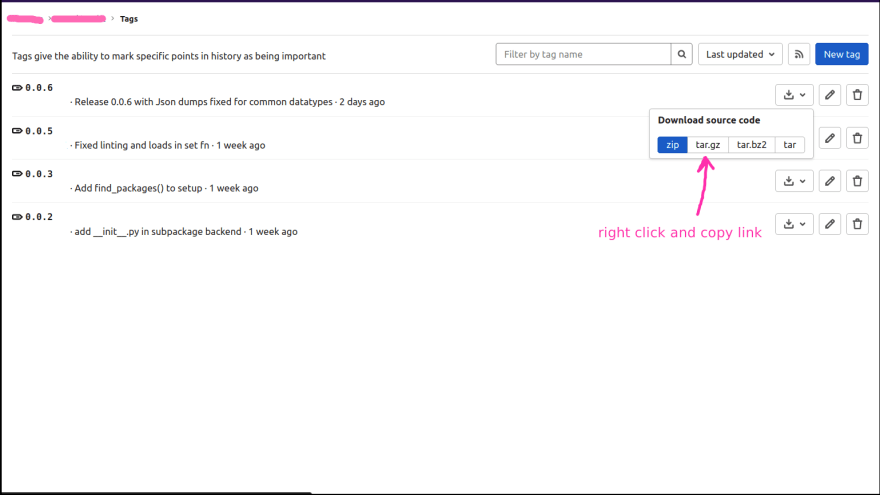
- This copied link should be the same as download_url argument in the
setup.pyfile.
If uploading package to GitHub,
- After uploading the required files, follow steps mentioned here to create a release.
NOTE:
Every time you want to update your package later on, upload a new version to gitlab/github, create a new release as discussed, specify a new release tag and copy-paste the link to Source into the setup.py file (do not forget to also increment the version number).
Uploading the distribution archives
The first thing to do is register an account on TestPyPI, which is a separate instance of the package index intended for testing and experimentation. To register an account, go to here and complete the steps on that page. You will also need to verify your email address before youre able to upload any packages.
After registration, use twine to upload the distribution packages.
- Navigate to folder where you have al the files and package located.
- Run
python setup.py sdist - Install Twine:
pip install twine - Run twine:
twine upload --repository testpypi dist/*Upload successful
Installing newly uploaded package
pip install -i https://test.pypi.org/simple/ your-package-name
When you are ready to publish your package to PyPI after proper testing, run the following command:twine upload dist/*
to publish it on PyPI.
NOTE:
Now for every future updates to your package:
- change the version number in setup.py file
- create tag/release in gitlab/github
- update the download_url in setup.py
- Run
python setup.py sdist - Run
twine upload dist/* - Run
pip install your-package --upgrade--> to see whether your changes worked.
AND IT'S DONE ...YAAAY !!
Visit PyPI and search for your package name. Now you can use your package just like any other python packages by installing it with pip i.e. pip install your-package-name.
I hope this blog helped you understand how to publish your own Python Package easily.
Happy coding !!
Original Link: https://dev.to/audarya07/the-ultimate-guide-you-need-to-publish-your-python-package-in-just-9-easy-steps-39o5
Dev To
More About this Source Visit Dev To