
An Interest In:
Web News this Week
- March 21, 2024
- March 20, 2024
- March 19, 2024
- March 18, 2024
- March 17, 2024
- March 16, 2024
- March 15, 2024
Some of Our Sources
- Mashable
- Smashing Apps
- Fuel Your Creativity
- FanExtra - PSD
- Crazy Leaf Design
- 24 Ways
- Specky Boy
- Codrops
- Android Headlines
- TechPowerUp
Help Webnuz
Referal links:
Build Marketplace App with Stripe Billing
Introduction
As a result of being home bound amidst the pandemic, public interest in marketplace apps has skyrocketed as it became the primary place for people to buy products. The marketplace model explains why online marketplaces are so popular and beneficial. It can be built for any market and niche with no initial inventory required and can grow exponentially, with benefits to all - sellers, buyers, and of course the marketplace owners.
To sell products online without a lot of marketing effort is appealing to sellers. Marketplace app is much easier and faster than creating your own e-commerce website/app and then struggling to get traffic.
It also makes it convenient for customers to buy products because of the wide selection and prices available, as well as the ability to compare products.
And owning a marketplace provides you with many effective ways to generate revenue. Advertising, charging a percentage for each deal, and a lot more.So, lets take a deep dive and know how to build one yourself!
Lets get started
- Setting up the React
Lets begin by creating a boilerplate using the creact-react-app
npx create-react-app marketplace- Install Material UI
We will be using Material UI to style the frontend that way we dont end up writing the CSS
cd marketplacenpm install @mui/material @emotion/react @emotion/styled- Create a Product component
Create a directory inside src and name it components where we'll be place all the different components we are gonna build!
Create another directory inside of it and name it Product. Create a Product.js inside the Product directory. This component will display the list of products we have. At first, we will be looping through a static list of products
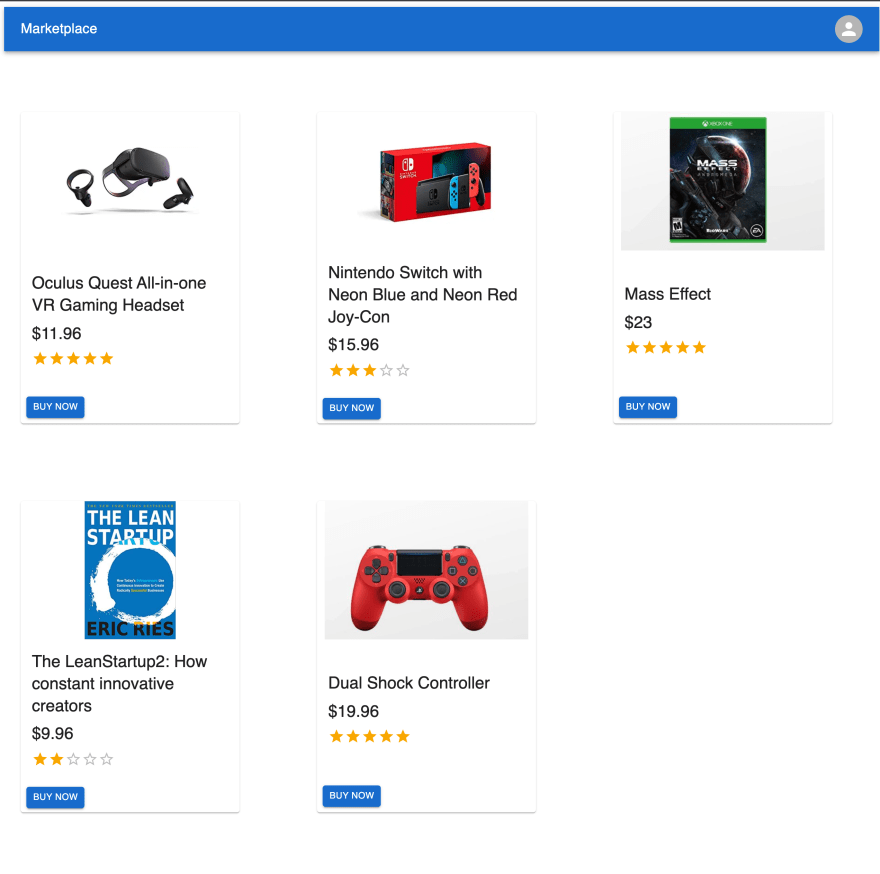
import React from "react";import { Box, Card, CardActions, CardContent, Button, Typography, Rating,} from "@mui/material";const Products = [ { title: "Oculus Quest All-in-one VR Gaming Headset", price: "11.96", rating: 5, }, { title: "Nintendo Switch with Neon Blue and Neon Red JoyCon", price: "15.96", rating: 3, }, { title: "Mass Effect", price: "23", rating: 5, }, { title: "The LeanStartup2: How constant innovative creators", price: "9.96", rating: 2, }, { title: "Dual Shock Controller", price: "19.96", rating: 5, },];function Product() { return ( <Box sx={{ display: "flex", flexDirection: "row", justifyContent: "space-between", alignItems: "start", }} > {Products.map((product) => ( <Card sx={{ maxHeight: 450, minWidth: 100, width: "25%", margin: "1.5rem", display: "flex", flexDirection: "column", justifyContent: "space-between", alignItems: "start", }} > <CardContent> <Typography gutterBottom variant="h5" component="div"> {product.title} </Typography> <Typography gutterBottom variant="h5" component="div"> ${product.price} </Typography> <Rating name="read-only" value={product.rating} readOnly /> </CardContent> <CardActions> <Button variant="contained" size="small"> Buy now </Button> </CardActions> </Card> ))} </Box> );}export default Product;- Create a Header component.
Create a directory inside components and name it header, and create a file inside it and name it Header.js. This file will hold the header where we will display the apps name and later on user sign in/sign out button.
import React from "react";import Product from "./components/product/Product";import Header from "./components/header/Header";function App() { return ( <> <Header /> <Product /> </> );}export default App;It should look something like this:
- Time to get the API ready!
Getting your APIs for the Marketplace app comes at real ease. All you have to do is clone this production-ready project on Canonic, and you're done. It will provide you with the backend, APIs, and documentation you need for integration, without writing any code. Just make sure you add your own callback URI, client ID and secret for your 0auth provider

You will have to add CMS entries for the Products as cloning a project does not clone CMS entries.
Backend integration with GraphQL
Let's now integrate! Now that we have our APIs ready, let's move on by installing GraphQL packages.
- Install GraphQL packages
To pull our data from the backend, we will need two packages - Apollo Client and GraphQL
npm i @apollo/client graphql- Configure GraphQL to communicate with the backend
Configure the Apollo Client in the project directory, inside index.js configure your apollo client so it would communicate with the backend.
Note to replace the
uriwith the one you'll get from Canonic.
import React from "react"; import ReactDOM from "react-dom"; import { ApolloClient, InMemoryCache, ApolloProvider } from "@apollo/client"; import App from "./App"; const client = new ApolloClient({ uri: "https://marketplace-app.can.canonic.dev/graphql", //You can replace this with your URI cache: new InMemoryCache(), }); ReactDOM.render( <React.StrictMode> <ApolloProvider client={client}> <App /> </ApolloProvider> </React.StrictMode>, document.getElementById("root") );- Query the data
For querying the data, we will create a directory inside src called gql and create a file inside it called query.js. In it will write all the data we need from the backend.
import { gql } from "@apollo/client"; export const LOGIN_WITH_GOOGLE = gql` query { getLoginUrlsForLogin { GOOGLE } } `; export const GET_PRODUCTS = gql` query { products { title _id price ratings priceApiId image { url name } } } `;- Setting up login with Google 0auth
Lets go back to the Header component, we will be importing the query we declared in previous step and holding it in data variable we get from useQuery hook by Apollo
import { useQuery } from "@apollo/client"; import { LOGIN_WITH_GOOGLE } from "../../gql/query"; const { data, loading: loginDataLoading } = useQuery(LOGIN_WITH_GOOGLE)We will add the following JSX to display the login button. data?.getLoginUrlsForLogin?.GOOGLE In here, the GOOGLE object contains login and callback links to let user login themeselves in.
<Box sx={{ flexGrow: 0 }}> <Tooltip title="Account"> {loginDataLoading && <CircularProgress color="secondary" />} <a href={data?.getLoginUrlsForLogin?.GOOGLE}> <Button variant="contained" startIcon={<GoogleIcon />}> <span sx={{ textDecoration: "none" }}>Login</span> </Button> </a> </Box>After adding these, the Header component should look something like this:
import React from "react"; import { useQuery } from "@apollo/client"; import { AppBar, Box, Toolbar, Typography, Container, Button, Tooltip, CircularProgress, } from "@mui/material"; import GoogleIcon from "@mui/icons-material/Google"; import { LOGIN_WITH_GOOGLE } from "../../gql/query"; function Header() { const { data, loading: loginDataLoading } = useQuery(LOGIN_WITH_GOOGLE); return ( <AppBar position="static"> <Container maxWidth="xl"> <Toolbar disableGutters sx={{ justifyContent: "space-between" }}> <Typography variant="h6" noWrap component="div" sx={{ mr: 2, display: { xs: "none", md: "flex" } }} > Marketplace </Typography> <Box sx={{ flexGrow: 0 }}> <Tooltip title="Account"> {loginDataLoading && <CircularProgress color="secondary" />} <a href={data?.getLoginUrlsForLogin?.GOOGLE}> <Button variant="contained" startIcon={<GoogleIcon />}> <span sx={{ textDecoration: "none" }}>Login</span> </Button> </a> </Tooltip> </Box> </Toolbar> </Container> </AppBar> ); } export default Header;- Getting logged in users status.
We are not yet done with the Header component, now that we have added a feature of letting the user sign themselves in on the app, we need to retrieve and store their information, so we could identify whether they are logged in or not, we can even use this persists their session, we also get some useful information such as first name, last name, email ID and all that good stuff. Lets set up for it, first we have to create a mutation. Create a file called mutation.js inside the gql directory
import { gql } from "@apollo/client"; export const LOGIN_WITH_GOOGLE_MUTATION = gql` mutation Login($code: String!, $service: String!) { loginForLogin(code: $code, service: $service) { token user { email firstName lastName avatar { url } } } } `;Now that our mutation is ready, we can call that inside our Header component, lets go back to it. The mutation would look like this:
import { useMutation } from "@apollo/client"; const [loginMutation, { data: mutationData }] = useMutation(LOGIN_WITH_GOOGLE_MUTATION); const urlCode = new URLSearchParams(window.location.search).get("code"); //We receive a code after a successful sign in, here pulling that code from the URL if (urlCode) { loginMutation({ variables: { code: urlCode, service: "GOOGLE" } }); }We receive a code from our provider be it, Google, Facebook or GitHub after the user successfully sign ins. We can get that code using this call to windows object URLSearchParams(window.location.search).get("code") and once we store that code we could just pass it in as a variable to the mutation. In service, you should write which ever service you are using, here this app just uses Google, so we added Google statically.
We will pass in this mutation inside a useEffect hook with empty array as a dependency. Well also need a state to hold this data we get back from mutation, so it could be used elsewhere, and while we are at it, we can store the token we receive from the mutation inside local storage, so we can persist the user login session.
const [accessToken, setAccessToken] = useState(); const [isLoggedIn,setIsLoggedIn] = useState() useEffect(() => { const urlCode = new URLSearchParams(window.location.search).get("code"); if (urlCode) { loginMutation({ variables: { code: urlCode, service: "GOOGLE" } }); }, []); useEffect(() => { setAccessToken(mutationData?.loginForLogin?.token); setIsLoggedIn(mutationData?.loginForLogin?.user); if (accessToken) localStorage.setItem("_id", accessToken); }, [accessToken, mutationData, setIsLoggedIn]);But, we will need this isLoggedIn state elsewhere as well, so a better option is to move this to App.js since it is a parent to all the component, well let Header component receive it as props. So the App.js will look like this:
import React, { useState } from "react"; import Header from "./components/header/Header"; import Product from "./components/product/Product"; function App() { const [isLoggedIn, setIsLoggedIn] = useState(); return ( <> { <div className="App"> <Header setIsLoggedIn={setIsLoggedIn} isLoggedIn={isLoggedIn} /> <Product /> </div> } </> ); } export default App;We will also add a way, so user can sign out. For that we will be using Material UIs components, after adding all that UI enhancements, the Header component will look like this
import React, { useEffect, useState, useCallback } from "react"; import { useQuery, useMutation } from "@apollo/client"; import { AppBar, Box, Toolbar, IconButton, Typography, Menu, Container, Avatar, Button, Tooltip, MenuItem, CircularProgress, } from "@mui/material"; import GoogleIcon from "@mui/icons-material/Google"; import { LOGIN_WITH_GOOGLE } from "../../gql/query"; import { LOGIN_WITH_GOOGLE_MUTATION } from "../../gql/mutation"; function Header({ setIsLoggedIn, isLoggedIn }) { const [accessToken, setAccessToken] = useState(); const { data, loading: loginDataLoading } = useQuery(LOGIN_WITH_GOOGLE); const [loginMutation, { data: mutationData }] = useMutation( LOGIN_WITH_GOOGLE_MUTATION ); useEffect(() => { const urlCode = new URLSearchParams(window.location.search).get("code"); if (urlCode) { loginMutation({ variables: { code: urlCode, service: "GOOGLE" } }); } }, []); useEffect(() => { setAccessToken(mutationData?.loginForLogin?.token); setIsLoggedIn(mutationData?.loginForLogin?.user); if (accessToken) localStorage.setItem("_id", accessToken); }, [accessToken, mutationData, setIsLoggedIn]); const [anchorElNav, setAnchorElNav] = React.useState(null); const [anchorElUser, setAnchorElUser] = React.useState(null); const handleOpenUserMenu = useCallback((event) => { setAnchorElUser(event.currentTarget); }); const handleCloseNavMenu = useCallback(() => { setAnchorElNav(null); }); const handleCloseUserMenu = useCallback(() => { setAnchorElUser(null); }); const onLogout = useCallback(() => { localStorage.removeItem("_id"); }); return ( <AppBar position="static"> <Container maxWidth="xl"> <Toolbar disableGutters sx={{ justifyContent: "space-between" }}> <Typography variant="h6" noWrap component="div" sx={{ mr: 2, display: { xs: "none", md: "flex" } }} > Marketplace </Typography> <Box sx={{ flexGrow: 0 }}> <Tooltip title="Account"> {loginDataLoading ? ( <CircularProgress color="secondary" /> ) : !isLoggedIn && !localStorage.getItem("_id") ? ( <a href={data?.getLoginUrlsForLogin?.GOOGLE}> <Button variant="contained" startIcon={<GoogleIcon />}> <span sx={{ textDecoration: "none" }}>Login</span> </Button> </a> ) : ( <IconButton onClick={handleOpenUserMenu} sx={{ p: 0 }}> {isLoggedIn?.avatar?.url ? ( <Avatar alt="User" src={isLoggedIn.avatar.url} /> ) : ( <Avatar src="/broken-image.jpg" /> )} </IconButton> )} </Tooltip> <Menu sx={{ mt: "45px" }} id="menu-appbar" anchorEl={anchorElUser} anchorOrigin={{ vertical: "top", horizontal: "right", }} keepMounted transformOrigin={{ vertical: "top", horizontal: "right", }} open={Boolean(anchorElUser)} onClose={handleCloseUserMenu} > <MenuItem onClick={handleCloseNavMenu}> <Typography textAlign="center"> <a onClick={onLogout} href={`https://www.google.com/accounts/Logout?continue=https://appengine.google.com/_ah/logout?continue=${window.origin}`} > Logout </a> </Typography> </MenuItem> </Menu> </Box> </Toolbar> </Container> </AppBar> ); } export default Header;- Finish the Product component
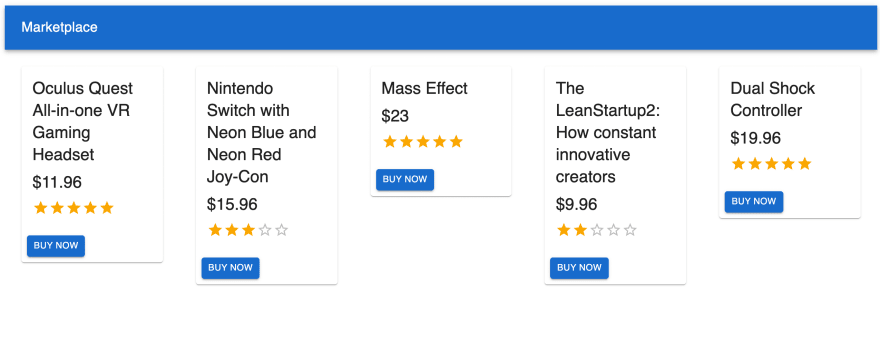
We will now shift our focus to Product component. To maintain component simplicity so, one component doesnt get too complicated, we will create a Home component that would act as a parent Product components. Lets set that up by creating a directory inside component and calling it Home and creating a Home.js file inside it.
import React, { useMemo } from "react"; import { useQuery } from "@apollo/client"; import { Box, CircularProgress } from "@mui/material"; import Product from "../product/Product.js"; import { GET_PRODUCTS } from "../../gql/query"; function Home() { const { data, loading: productsLoading } = useQuery(GET_PRODUCTS); const products = useMemo(() => data?.products || [], [data?.products]); return ( <Box sx={{ display: "flex", flexDirection: "row", flexWrap: "wrap", gap: "4rem", marginTop: "4rem", }} > {productsLoading && ( <CircularProgress sx={{ position: "absolute", left: "50%" }} /> )} {products.map((item, i) => { return ( <Product key={i} id={item.id} title={item.title} image={item.image.url} price={item.price} rating={item.ratings} price_api={item.priceApiId} /> ); })} </Box> ); } export default Home;Now that we are receiving the data dynamically, we can finally toss the static array of data from Product.js, lets get to it.
import React from "react"; import { Card, CardContent, CardMedia, Typography, Rating, } from "@mui/material"; function Product({ title, price, rating, image, price_api }) { return ( <Card sx={{ maxHeight: 450, minWidth: 100, width: "25%", margin: "1.5rem", display: "flex", flexDirection: "column", justifyContent: "space-between", alignItems: "start", }} > <CardMedia component="img" alt="title" height="auto" image={image} sx={{ objectFit: "contain", maxHeight: "200px" }} /> <CardContent> <Typography gutterBottom variant="h5" component="div"> {title} </Typography> <Typography gutterBottom variant="h5" component="div"> ${price} </Typography> <Rating name="read-only" value={rating} readOnly /> </CardContent> </Card> ); } export default Product;We are almost the completion here, just need to Stripes client only checkout
For that, first you need to have an account on Stripe, after that you should have Stripes API key. You can get your keys here. Then we will install stripe
npm install --save @stripe/react-stripe-js @stripe/stripe-jsNow that all these is done, lets hop back into Home component. We will create an asynchronous function lets name it handle click since it will be handle click from a Buy now button.
import { loadStripe } from "@stripe/stripe-js"; const stripePromise = loadStripe(process.env.REACT_APP_STRIPE_API); const handleClick = async () => { setLoading(true); const stripe = await stripePromise; const { error } = await stripe.redirectToCheckout({ lineItems: [ { price: price_api, quantity: 1, }, ], mode: "payment", cancelUrl: "https://canonic-marketplace.netlify.app/", successUrl: "https://canonic-marketplace.netlify.app/", if (error) { setLoading(false); console.log("The error ", error); } };Instead of process.env.REACT_APP_STRIPE_API you can add your own API key, you can replace cancelUrl and successUrl with your own URL as well. In here we are using price_api as a value to price key. In stripe every product has a unique product price ID I have stored all my product price ID on Canonic CMS, you thus using it as a value.
In your own projects CMS you can add your own Products price ID in the price_api field.
Last bit of validation we can is to check if the user is signed in or not before proceeding, since we have isLoggedIn inside the App component, we can easily get it through pass it to Home components
import React, { useState } from "react"; import Header from "./components/header/Header"; import Home from "./components/home/Home"; function App() { const [isLoggedIn, setIsLoggedIn] = useState(); return ( <> { <div className="App"> <Header setIsLoggedIn={setIsLoggedIn} isLoggedIn={isLoggedIn} /> **<Home isLoggedIn={isLoggedIn} />** </div> } </> ); } export default App;We will have to pass in handleClick function along with loading state, we are using loading state to disable to Buy now button after user click on it, so there wont be multiple call to Stripe.
import React, { useState, useEffect, useMemo } from "react"; import { useQuery } from "@apollo/client"; import { loadStripe } from "@stripe/stripe-js"; import { Box, CircularProgress } from "@mui/material"; import Product from "../product/Product.js"; import { GET_PRODUCTS } from "../../gql/query"; function Home({ **isLoggedIn** }) { const { data, loading: productsLoading } = useQuery(GET_PRODUCTS); const products = useMemo(() => data?.products || [], [data?.products]); const stripePromise = loadStripe(process.env.REACT_APP_STRIPE_API); const [loading, setLoading] = useState(); const handleClick = async (price_api, title) => { if (isLoggedIn) { setLoading(true); const stripe = await stripePromise; const { error } = await stripe.redirectToCheckout({ lineItems: [ { price: price_api, quantity: 1, }, ], mode: "payment", cancelUrl: window.origin, successUrl: window.origin + `?session_id=${title}`, }); if (error) { setLoading(false); } } else alert("Please log in to continue"); }; return ( <Box sx={{ display: "flex", flexDirection: "row", flexWrap: "wrap", gap: "4rem", marginTop: "4rem", }} > {productsLoading && ( <CircularProgress sx={{ position: "absolute", left: "50%" }} /> )} {products.map((item, i) => { return ( <Product key={i} id={item.id} title={item.title} image={item.image.url} price={item.price} rating={item.ratings} price_api={item.priceApiId} **handleClick={handleClick} loading={loading}** /> ); })} </Box> ); } export default Home;Product component is now receiving props of handleClick and loading, we can finally create a Buy now button
import React from "react"; import { Card, CardActions, CardContent, CardMedia, Button, Typography, Rating, } from "@mui/material"; function Product({ title, price, rating, image, price_api, handleClick, loading, }) { return ( <Card sx={{ maxHeight: 450, minWidth: 100, width: "25%", margin: "1.5rem", display: "flex", flexDirection: "column", justifyContent: "space-between", alignItems: "start", }} > <CardMedia component="img" alt={title} height="auto" image={image} sx={{ objectFit: "contain", maxHeight: "200px" }} /> <CardContent> <Typography gutterBottom variant="h5" component="div"> {title} </Typography> <Typography gutterBottom variant="h5" component="div"> ${price} </Typography> <Rating name="read-only" value={rating} readOnly /> </CardContent> <CardActions> <Button variant="contained" size="small" onClick={() => handleClick(price_api, title)} disabled={loading} > Buy now </Button> </CardActions> </Card> ); } export default Product;And, with this we can conclude our frontend.
Bonus! - Sending email and Slack notification
We can add webhooks to perform actions such as send a Slack notification whenever a product is purchased or send an email notification. Lets see how that done.
- Configuring the webhooks
Open your cloned project on Canonic, navigate to API and choose Notify table. Click on createNotify endpoint there you can see Message webhook of Slack, you can click on it and replace trigger URL and message body with your own trigger URL and message body. Chained to that you will find email webhook of Canonic, there as well, you can replace email subject and email body with your content.

- Configuring frontend
In order to trigger these webhooks, we need to make a mutation. Lets begin by declaring a mutation in our mutation.js file
export const NOTIFY = gql` mutation Notify($title: String!) { createNotify(input: { title: $title }) { title } } `;Final file would look like this:
import { gql } from "@apollo/client"; export const LOGIN_WITH_GOOGLE_MUTATION = gql` mutation Login($code: String!, $service: String!) { #This mutation is used to get logged in user's details loginForLogin(code: $code, service: $service) { #We feed in code which we get after user successfully signs in, services are the 0auth services we are using such as Google,Github and Facebook. token user { email firstName lastName avatar { url } } } } `; export const NOTIFY = gql` mutation Notify($title: String!) { createNotify(input: { title: $title }) { title } } `;We have to trigger this mutation from Home component. Lets go back to the Home component, there we will modify successUrl in handleClick function to include the title of the product in URL whenever a product is checked out successfully
const handleClick = async (price_api, title) => { if (isLoggedIn) { setLoading(true); const stripe = await stripePromise; const { error } = await stripe.redirectToCheckout({ lineItems: [ { price: price_api, quantity: 1, }, ], mode: "payment", cancelUrl: window.origin, successUrl: window.origin + `?session_id=${title}`, }); if (error) { setLoading(false); } } else alert("Please log in to continue"); };And, add useEffect to with empty dependency array, to check if URL has the products title
useEffect(() => { const hasSuccessUrl = new URLSearchParams(window.location.search).get( "session_id" ); if (hasSuccessUrl) { //Do something } }, []);Now that everything is set up we can trigger the mutation
import { useMutation } from "@apollo/client"; import { NOTIFY } from "../../gql/mutation"; const [notify] = useMutation(NOTIFY); useEffect(() => { const hasSuccessUrl = new URLSearchParams(window.location.search).get( "session_id" ); if (hasSuccessUrl) { notify({ variables: { title: hasSuccessUrl } }); } }, []);So the final file would look like this
import React, { useState, useEffect, useMemo } from "react";import { useMutation, useQuery } from "@apollo/client";import { NOTIFY } from "../../gql/mutation";import { loadStripe } from "@stripe/stripe-js";import { Box, CircularProgress } from "@mui/material";import Product from "../product/Product.js";import { GET_PRODUCTS } from "../../gql/query";function Home({ isLoggedIn }) { const { data, loading: productsLoading } = useQuery(GET_PRODUCTS); const products = useMemo(() => data?.products || [], [data?.products]); const stripePromise = loadStripe(process.env.REACT_APP_STRIPE_API); const [loading, setLoading] = useState(); const [notify] = useMutation(NOTIFY); const handleClick = async (price_api, title) => { if (isLoggedIn) { setLoading(true); const stripe = await stripePromise; const { error } = await stripe.redirectToCheckout({ lineItems: [ { price: price_api, quantity: 1, }, ], mode: "payment", cancelUrl: window.origin, successUrl: window.origin + `?session_id=${title}`, }); if (error) { setLoading(false); } } else alert("Please log in to continue"); }; useEffect(() => { const hasSuccessUrl = new URLSearchParams(window.location.search).get( "session_id" ); if (hasSuccessUrl) { notify({ variables: { title: hasSuccessUrl } }); } }, []); return ( <Box sx={{ display: "flex", flexDirection: "row", flexWrap: "wrap", gap: "4rem", marginTop: "4rem", }} > {productsLoading && ( <CircularProgress sx={{ position: "absolute", left: "50%" }} /> )} {products.map((item, i) => { return ( <Product key={i} id={item.id} title={item.title} image={item.image.url} price={item.price} rating={item.ratings} price_api={item.priceApiId} handleClick={handleClick} loading={loading} /> ); })} </Box> ); } export default Home;Once you've reached here, you've successfully completed the Marketplace project.
You can clone this sample project here. We hope this guide helped you to create your own Marketplace app; if you do, then share it with us in our Discord community.If you are not already a member, join us, and let's build together.
Connect on Discord.If you'd like to see our other guides, they're all here.For any support requests, write to us at [email protected]. Check out our website to know more about Canonic.
Original Link: https://dev.to/canonic/build-marketplace-app-with-stripe-billing-3j8
Dev To
More About this Source Visit Dev To