
An Interest In:
Web News this Week
- March 21, 2024
- March 20, 2024
- March 19, 2024
- March 18, 2024
- March 17, 2024
- March 16, 2024
- March 15, 2024
Some of Our Sources
- Mashable
- Techcrunch
- Technology Review
- Team Treehouse
- Six Revisions
- Inspiredology
- FanExtra - PSD
- Reencoded
- Line 25
- Dev To
Help Webnuz
Referal links:
Understanding Built In Angular Directives - Part 2
Today we will continue our journey to understand the remaining built in directives in Angular. This is a continuation of the previous post.
Here we will understand the use of ngStyle directive.
ngStyle is used to add one or more inline style to the tag it is associated either directly or conditionally.
There are few variations of usage.
a. Assigning an Object literal to ngStyle
[ngStyle]="{<Valid_Style>}"
e.g.'background-color':'green'
Now lets try it out in practice. Open the same component template/ html file 
and paste in the below code
<div [ngStyle] = "{ background: 'green' }" > This text will have a background green...</div>Once you open the project in browser you would see the below output -![]()
Now. lets understand the code. Since ngStyle is an attribute directive we are enclosing it inside a square bracket [] (as explained in my last post. Then comes the equals operator = followed by an object inside double quotes " or single quotes ' (both will work).
The object must be a valid CSS rule. Here in this case background is the property name and its corresponding value green.
So here the div on which ngStyle is used is getting a background of green color.
b. Applying inline style by Passing a Condition to ngStyle[ngStyle]="{'< CSS STYLE PROPERTY >': < CONDITION > }"
Now lets implement the same in our code. So open the same component html file and paste in the below code -
<div [ngStyle]="{ 'background-color': serverOneStatus === 'up' ? 'green' : 'red' }"> SERVER 1</div>In the component.ts file you must be having the variable serverOneStatus we created in our previous post. Remember???
So, now if you go to the browser you will see the following output- 
and if you change the the serverOneStatus value to anything except up it will give the following output -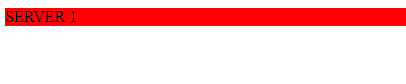
Here, when the condition serverOneStatus === 'up' is evaluating to true the background is green and if it is false background is red.
c. By calling a function which returns a style object[ngStyle]="<function()>"
For this we need to add a function in component.ts file which returns a style object. So lets open the component.ts file and add the below code-
getStyle() { return { 'font-size': '20px', 'color': 'gray', 'background': 'lightgreen' }; }So your component.ts file would look something like below
export class AttributeDirectiveDemoComponent implements OnInit { serverOneStatus = 'up1'; ngOnInit(): void { } getStyle() { return { 'font-size': '20px', 'color': 'gray', 'background': 'lightgreen' }; }}In your html file we need to write the below code -
<div [ngStyle]="getStyle()">SERVER 1</div>Now if you open the browser you will see the below output - 
Here, we are simply returning a style object from the function getStyle and we are calling the function from the template in the following way [ngStyle]="getStyle()"
In this way you can set multiple styles at the same time and also write some condition directly in the component.ts file.
So that's all about ngStyle.
We will be learning about other built-in Angular directives in the upcoming post. So stay tuned....
Hope you enjoyed the post. Please do like, comment and share with your friends :)
Cheers!!!
Happy Coding
Original Link: https://dev.to/anubhab5/understanding-built-in-angular-directives-part-2-3fi1
Dev To
More About this Source Visit Dev To