
An Interest In:
Web News this Week
- April 15, 2024
- April 14, 2024
- April 13, 2024
- April 12, 2024
- April 11, 2024
- April 10, 2024
- April 9, 2024
Some of Our Sources
- Engadget
- Technology Review
- Team Treehouse
- Smashing Magazine
- TutsPlus - Design
- Web Designer Depot
- Line 25
- CSS Tricks
- Dev To
- The Verge
Help Webnuz
Referal links:
How to Create a Node, React and Typescript Monorepo with Git Submodules
All code from this tutorial as a complete package is available in this repository.
Do you work with large or semi-large codebases that are starting to get out of control? Do you have to deal with multiple different projects that interact with each other and have difficulty keeping versions aligned?
If you said yes to either of those things (or even if you're just anticipating encountering them in the future) then this tutorial is for you.
The purpose of this tutorial is to learn about some of the different ways that you can structure a large project which is composed primarily of smaller projects and modules.
Monorepos
One method of grouping code from multiple projects into one is called a monorepo. A monorepo is simply the practice of placing multiple different projects that are related in some way into the same repository.
The biggest benefit is that you do not need to worry about version mismatch issues between the different pieces of your project. If you update an API route in the server of your monorepo, that commit will be associated with the version of the front end that consumes it. With two different repositories you could find yourself in a situation where your v1.2 front-end is asking for data from your v1.1 backend that somebody forgot to push the latest update for.
Another big benefit is the ability to import and share code and modules between projects. Sharing types between the back-end and front-end is a common use case. Your can define the shape of the data on your server and have the front-end consume it in a typesafe way.
Git Submodules
In addition to monorepos, we also have the concept of submodules.
Let's say that we want to add a feature to our app that we have in another separate project. We don't want to move the entire project into our monorepo because it remains useful as its own independent project. Other developers will continue to work on it outside of our monorepo project.
We would like a way to include that project inside our monorepo, but not create a separate copy. Simply have the ability to pull the most recent changes from the original repository, or even make our own contributions to it from inside our monorepo. Git submodules allows you to do exactly that.
This tutorial will teach you how to create your own project that implements both of these features.
Table of Contents
- Prerequisites and Setup
- Initializing the Project
- Create the React App
- Create the Monorepo
- Create Your Repository
- Sharing Code and Adding Dependencies
- Create a Shared Package
- Add a Git Submodule
- Namespacing
- Wrapping Up
Prerequisites and Setup
This tutorial assumes you have a basic familiarity with the following. Beginner level experience is fine for most as the code can be simply copy/pasted. For git you should know how to clone, pull, commit and push.
- Git
- React
- Node.js
- Typescript
- NPM
This tutorial requires yarn v1 installed (we use v1.22).
Initializing the Project
To start, we need a packages directory to hold the different projects in our monorepo. Your structure should begin looking like this:
. packages simple-express-app server.tsFrom within the `packages/simple-express-app` directory, run:yarn inityarn add expressyarn add -D typescript @types/expressnpx tsc --initThe final command will create a tsconfig.json file. Add the following to it:
packages/simple-express-server/tsconfig.json
{ ... "outDir": "./dist",}Now create your server file if you haven't yet:
packages/simple-express-server/server.ts
const express = require("express");const app = express();const port = 3001;app.get("/data", (req, res) => { res.json({ foo: "bar" });});app.listen(port, () => { console.log(`Example app listening at http://localhost:${port}`);});At this point your directory structure should look like:
. packages simple-express-app server.ts yarn.lock package.json tsconfig.jsonWe'll create a simple script in package.json called start that we can run with yarn:
packages/simple-express-server/package.json
{ "name": "simple-express-server", "version": "1.0.0", "main": "dist/server.js", "license": "MIT", "scripts": { "start": "tsc && node dist/server.js" }, "devDependencies": { "@types/express": "^4.17.13", "typescript": "^4.5.4" }, "dependencies": { "express": "^4.17.1" }}Open your browser to and you will see your data successfully queried:

Create the React App
Next we move onto our React app. Navigate to the packages directory and run this command:
yarn create react-app simple-react-app --template typescriptBefore we do anything else we want to confirm that we can communicate with our server and get the JSON data that we are serving up.
Open up the App.tsx file in the src directory of the project generated by create-react-app. We are going to add a simple button that uses the browser fetch API to grab the data from our server and log it to the console.
packages/simple-react-app/src/App.tsx
import React from "react";import logo from "./logo.svg";import "./App.css";function App() { return ( <div className="App"> <header className="App-header"> <img src={logo} className="App-logo" alt="logo" /> <p> Edit <code>src/App.tsx</code> and save to reload. </p> <a className="App-link" href="https://reactjs.org" target="_blank" rel="noopener noreferrer" > Learn React </a> { /* NEW */ } <button onClick={() => { fetch("http://localhost:3001/", {}) .then((response) => response.json()) .then((data) => console.log(data)); }} > GET SOME DATA </button> </header> </div> );}export default App;When we open the browser's development console (F12) and then click our button, we will see our server data fetched and logged in the browser:

This is great! We've accidentally created a template for a full stack React and Typescript app! But that's not the reason we're here, so let's start pushing further into scenarios we might encounter in real projects that would lead us to consider options like a monorepo and git submodules.
Before you continue take a moment to verify your project structure:
. packages simple-express-server server.ts yarn.lock package.json tsconfig.json simple-react-app [default setup]Create the Monorepo
To manage our monorepo we are going to use two tools:
Lerna: For running scripts across multiple projects and adding new dependencies. Lerna is also built to manage publishing your packages (though we will not be doing that as part of this tutorial)
Yarn workspaces: For hoisting all shared dependencies into a single
node_modulesfolder in the root directory. Each project can still define its own dependencies, so that you don't confuse which dependencies are required for which (client vs. server) for example, but it will pool the installed packages in the root.
For yarn we are using the still most commonly used yarn v1 (current version as of this writing is v1.22).
Navigate to the root directory and run the following commands:
yarn inityarn add -D lerna typescriptnpx lerna initEdit your Lerna configuration file:
{ "packages": ["packages/*"], "version": "0.0.0", "npmClient": "yarn", "useWorkspaces": true}We need to specify that yarn is our NPM client and that we are using workspaces.
Next we need to define the location of those workspaces in the root package.json:
package.json
{ "name": "monorepo-example", "version": "1.0.0", "main": "index.js", "license": "MIT", "private": true, "workspaces": [ "packages/*" ], "scripts": { "start": "lerna run --parallel start" }, "devDependencies": { "lerna": "^4.0.0" }}We have made three changes above:
Set
privatetotruewhich is necessary for workspaces to functionsDefined the location of the workspaces as
packages/*which matches any directory we place inpackagesAdded a script that uses Lerna to run. This will allow us to use a single command to run the equivalent of
yarn startin both our Express server and React app simultaneously. This way they are coupled together so that we don't accidentally forget to run one, knowing that currently they both rely on each other. The--parallelflag allows them to run at the same time.
Now we are ready to install the dependencies in root:
(Note: At this point before you run the install command, I would recommend you synchronize your Typescript version between your simple-express-server and the one that comes bundled with your simple-react-app. Make sure both versions are the same in each project's package.json and both are listed in devDependencies. Most likely the React app version will be older, so that is the one that should be changed.)
Next run the following command:
npx lerna clean -yyarn installThe first command will clean up the old node_modules folders in each of your two packages. This is the equivalent of simply deleting them yourself.
The second command will install all dependencies for both projects in a node_modules folder in the root directory.
Go ahead and check it out! You'll see that node_modules in the root is full of packages, while the node_modules folders in simple-express-server and simple-react-app only have a couple (these are mostly symlinks to binaries that are necessary due to the way yarn/npm function).
Before we go on we should create a .gitignore file in the root to make sure we don't commit our auto-generated files:
.gitignore
node_modules/dist/(If you're using VS Code you'll see the folder names in the side bar go grey as soon as you sae the file, so you know it worked)
Verify your monorepo and workspaces are setup properly by running (from the root folder):
yarn startYou will see that both your Express app and React app start up at the same time! Click the button to verify that your server data is available and logs to the console.
Lastly we need to initialize Typescript in the root of the project so that our different packages can import and export between one another. Run the command:
npx tsc --initIn the root directory and it will create your .tsconfig.json. You can delete all the defaults values from this file (your individual projects will se their own configuration values.) The only field you need to include is:
tsconfig.json
{ "compilerOptions": { "baseUrl": "./packages" }}Our project now looks like:
. packages| simple-express-server| server.ts| yarn.lock| package.json| tsconfig.json| simple-react-app| [default setup] lerna.json tsconfig.json package.json yarn.lockCreate Your Repository
This is also a good time to commit your new project to your repository. I'll be doing that now as well, you can see the final version here.
Note that in order to learn submodules effectively, we are going to be adding a submodule from a repository that already exists, we don't want to use the one that create-react-app generated automatically.
So for that reason I am going to delete the that repository by deleting the .git directory inside packages/simple-react-app. This step is VERY IMPORTANT. Make sure there is no .git directory inside simple-react-app.
Now from the root directory you can run:
git add .git commit -am 'first commit'git remote add origin YOUR_GIT_REPO_ADDRESSgit push -u origin YOUR_BRANCH_NAMESharing Code and Adding Dependencies
So let's quickly take a look at some of the benefits we get from our monorepo.
Let's say that there's a utility library that we want to use in both our React app and on our Express server. For simplicity let's choose lodash which many people are familiar with.
Rather than adding it to each project individually, we can use lerna to install it to both. This will help us make sure that we keep the same version in sync and require us to only have one copy of it in the root directory.
From the root run the following command:
npx lerna add lodash packages/simple-*npx lerna add @types/lodash packages/simple-* --devThis will install lodash in any of the projects in the packages directory that match the simple-* pattern (which includes both of ours). When using this command you can install the package to dev and peer dependencies by adding --dev or --peer at the end. More info on this command here.
If you check the package.json file in both your packages you'll see that lodash has been added with the same version to both files, but the actual package itself has a single copy in the node_modules folder of your root directory.
So we'll update our server.ts file in our Express project to do a couple of new things. We'll import the shared lodash library and use one of its functions (_.snakeCase()) and we'll define a type interface that defines the shape of the data we are sending and export it so that we can also use that interface in our React app to typesafe server queries.
Update your server.ts file to look like the following:
packages/simple-express-server.ts
import express from "express";import _ from "lodash";const app = express();const port = 3001;export interface QueryPayload { payload: string;}app.use((_req, res, next) => { // Allow any website to connect res.setHeader("Access-Control-Allow-Origin", "*"); // Continue to next middleware next();});app.get("/", (_req, res) => { const responseData: QueryPayload = { payload: _.snakeCase("Server data returned successfully"), }; res.json(responseData);});app.listen(port, () => { console.log(`Example app listening at http://localhost:${port}`);});(Note I have changed the key on the object from data to payload for clarity)
Next we will update our App.tsx component in simple-react-app. We'll import lodash just for no other reason to show that we can import the same package in both client and server. We'll use it to apply _.toUpper() to the "Learn React" text.
We will also import our QueryPayload interface from our simple-express-server project. This is all possible through the magic of workspaces and Typescript.
packages/simple-react-app/src/App.tsx
import React from "react";import logo from "./logo.svg";import "./App.css";import _ from "lodash";import { QueryPayload } from "simple-express-server/server";function App() { return ( <div className="App"> <header className="App-header"> <img src={logo} className="App-logo" alt="logo" /> <p> Edit <code>src/App.tsx</code> and save to reload. </p> <a className="App-link" href="https://reactjs.org" target="_blank" rel="noopener noreferrer" > {_.toUpper("Learn React")} </a> <button onClick={() => { fetch("http://localhost:3001/", {}) .then((response) => response.json()) .then((data: QueryPayload) => console.log(data.payload)); }} > GET SOME DATA </button> </header> </div> );}export default App;I find this is one of the trickiest parts to get right (the importing between packages). The key to this is the installation of Typescript in the root of the project, and "baseUrl": "./packages" value in the the tsconfig.json in the root directory.
If you continue to have difficulty this is one of the best explanations I have ever come across for sharing Typescript data between projects in a monorepo.
Once everything is setup, press the button on your React application and you'll be greeted with:

Notice the snake_case response that matches the correct shape we defined. Fantastic!
Now there is one issue with our setup -- currently we are importing the QueryPayload directly from our server. That is fairly harmless, but what if we
Create a Shared Package
Using the lerna create command we can quickly and easily create new projects within our monorepo. Run the following commands from the root directory:
npx lerna create simple-shared-datanpx lerna add typescript --devyarn installThis will create a directory called simple-shared-data in your packages. We've already added the same version of Typescript as a dev dependency.
You can remove the lib directory that includes the default JS entrypoint as we will not be using it.
Create an index.ts file inside of packages/simple-shared-data where we will place any types or data that either our front-end, back-end or both can have access to.
packages/simple-shared-data/index.ts
export interface QueryPayload { payload: string;}And then import from this file in both our server and React app:
packages/simple-express-server/server.ts
import { QueryPayload } from 'simple-shared-data';...packages/simple-react-app/src/App.tsx
import { QueryPayload } from 'simple-shared-data';...The benefit of creating this shared project is that your front-end for example won't have a strict dependency on the existence of your server. You could deploy as:
Front-End
simple-react-apsimple-shared-data
Back-End
simple-express-serversimple-shared-data
Now that we have all these different projects setup, lets take a look at git submodules.
Add a Git Submodule
Recently I wrote a blog post on a very simple component for a React app that adds a dark mode, a <DarkMode /> component. The component is not part of a separate library we can install with an NPM command, it exists as part of a React application that has its own repository.
Let's add it to our project, while still keeping it as its own separated repo that can be updated and managed independent of our monorepo.
From the packages/simple-react-app/src directory we'll run this command:
git submodule add [email protected]:alexeagleson/react-dark-mode.gitThat will create the react-dark-mode directory (the name of the git repository, you can add another argument after the above command to name the directory yourself).
To import from the submodule it's as simple as... importing from the directory. If we're going to add the <DarkMode /> component it's as simple as adding:
packages/simple-react-app/src/App.tsx
...import DarkMode from "./react-dark-mode/src/DarkMode";function App() { return ( <div className="App"> ... <DarkMode /> </div> );}export default App;I've omitted some of the repetitive stuff above. Unfortunately the default background-color styles in App.css are going to override the body styles, so we need to update App.css for it to work:
packages/simple-react-app/src/App.css
....App-header { /* background-color: #282c34; */ min-height: 100vh; display: flex; flex-direction: column; align-items: center; justify-content: center; font-size: calc(10px + 2vmin); /* color: white; */}.App-link { /* color: #61dafb; */}...Comment out those color values and you're good to go!

Now you might be thinking -- couldn't I just have cloned that repo into that folder and done this? What's the difference with submodules?
Well now that we have this in place, let's look for the answer to exactly that. Run the following command:
git statusIn the output you'll see new file: ../../../.gitmodules. That's something new if you've never used submodules before. It's a hidden file that has been added to the project root. Let's take a look inside it:
[submodule "packages/simple-react-app/src/react-dark-mode"] path = packages/simple-react-app/src/react-dark-mode url = [email protected]:alexeagleson/react-dark-mode.gitIt stores a mapping to the directories in our project that map to other repositories.
Now if you commit your changes in the root of the monorepo and push, you'll see on Github that rather than being a regular directory inside this project -- it's actually a link to the real repository:
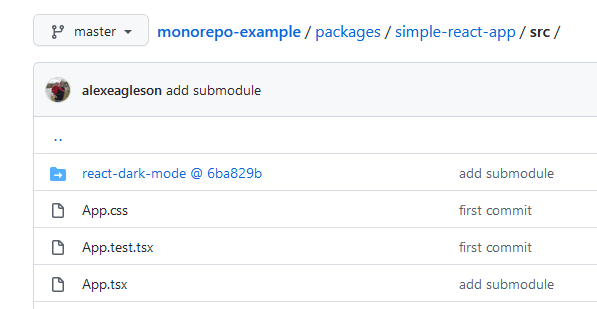
So you can continue to update and make changes to this monorepo without impacting that other repository. Great!
But can you update the dark mode repository from inside this one? Sure you can! (As long as you have write permission).
Let's make a trivial change to the dark mode repository from inside this one and see what happens. Navigate to:
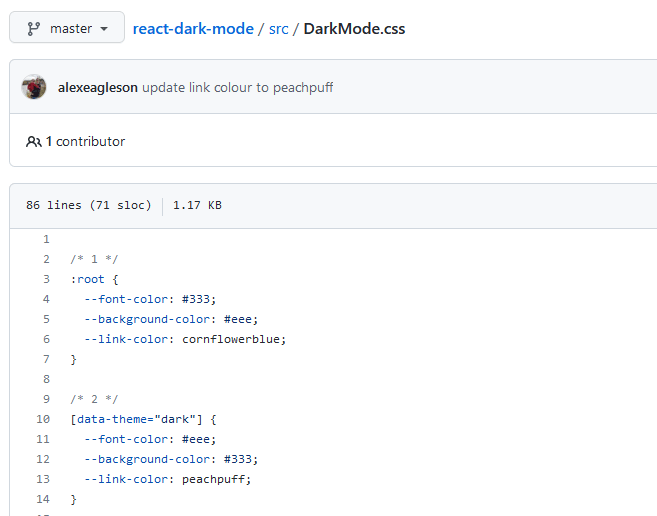
packages/simple-react-app/src/react-dark-mode/src/DarkMode.css
...[data-theme="dark"] { --font-color: #eee; --background-color: #333; --link-color: peachpuff;}I'm going to update the colour of the link when the app is in dark mode, from lightblue to peachpuff.
Now obviously you won't be able to update my repository, but if you're following you can continue reading to see where this is going (or you can use your own repository of course).
From this directory I make a commit and push. When I check the repository there are no new commits to the monorepo-example repository, but there IS a new commit to react-dark-mode. Even though we are still inside our monorepo project!
When working with submodules it's important to keep them up to date. Remember that other contributors could be making new commits to the submodules. The regular git pull and git fetch to your main root monorepo aren't going to automatically pull new changes to submodules. To do that you need to run:
git submodule updateTo get the latest updates.
You also have new command you'll need to run when cloning a project or pulling when new submodules have been added. When you use git pull it will pull the information about relevant submodules, but it won't actually pull the code from them into your repository. You need to run:
git submodule initTo pull the code for submodules.
Lastly, in case you prefer not to run separate commands, there is a way to pull submodule updates with your regular commands you're already using like clone and pull. Simply add the --recurse-submodules flag like so:
git pull --recurse-submodulesorgit clone --recurse-submodulesNamespacing
Although I didn't use it in the tutorial, it is good practice to use namespacing for your packages. This is commonly done by prefixing with the @ character. Below I will quickly show how to update this tutorial to add a @my-namespace namespace:
Prefix the name value in each of your three package.json files with @my-namespace. For example simple-express-server/package.json will now be:
{ "name": "@my-namespace/simple-express-server", ...}Do that for each of the three packages.
Next you need to update your imports:
packages/simple-express-server/server.ts
import { QueryPayload } from '@my-namespace/simple-shared-data';...packages/simple-react-app/src/App.tsx
import { QueryPayload } from '@my-namespace/simple-shared-data';...Finally run yarn install to update those packages inside your root node_modules directory and you're good to go!
Wrapping Up
I hope you learned something useful about monorepos and submodules. There are tons of different ways to setup a new project, and there's no one-size-fits-all answer for every team.
I'd encourage you to play around with small monorepos (even clone this example) and get get comfortable with the different commands.
Please check some of my other learning tutorials. Feel free to leave a comment or question and share with others if you find any of them helpful:
For more tutorials like this, follow me @eagleson_alex on Twitter
Original Link: https://dev.to/alexeagleson/how-to-create-a-node-and-react-monorepo-with-git-submodules-2g83
Dev To
More About this Source Visit Dev To