
Some of Our Sources
- Technology Review
- The Logo Smith
- Spoon Graphics
- Abduzeedo
- Vandelay Design
- You The Designer
- Reencoded
- Wal You
- CSS Tricks
- Dev To
Help Webnuz
Referal links:
How to build a customer-facing roadmap with React
A product roadmap summarizes how a product strategy leads to the actual implementation and charts out your product's vision and direction.
This article will guide you through each step you need to build a roadmap tool using React for your SaaS startup.
Let's get started
Step 1: Installing React
We'll start by creating a new react project using create-react-app.
npx create-react-app roadmapStep 2: Create a roadmap component
We'll create a component - Roadmap - that'll contain our display and API logic - src/components/Roadmap.
Create respective Roadmap.js, index.js and Roadmap.css files. Add following code in respective order.
import React from "react";import "./Roadmap.css";function Roadmap() { const columnMap = [ { title: "\"Exploring\"," tickets: [], }, { title: "\"In Progress\"," tickets: [], }, { title: "\"Done\"," tickets: [], }, { title: "\"Leaving it for now\"," tickets: [], }, ]; return ( <div className="roadmap"> {columnMap.map((column, i) => ( <div className="roadmap-column" key={`${column.title}-${i}`}> <div className="roadmap-column-heading">{column.title}</div> <div className="roadmap-cards"> {column.tickets.map((t, i) => ( <div key={`exploring-${i}`} className="roadmap-cards-item"> <div className="roadmap-cards-item-heading">{t.title}</div> <div className="roadmap-cards-item-content" dangerouslySetInnerHTML={{ __html: t.description }} /> <svg xmlns="http://www.w3.org/2000/svg" x="0px" y="0px" viewBox="0 0 100 125" style={{ enableBackground: "new 0 0 100 100", maxWidth: "18px", cursor: "pointer", }} > <g> <g> <path d="M81.7,40.4H64.6l3.6-17.9c0.5-2.5,0.1-5-1.2-7.1l0,0c-1.5-2.5-4.9-3-7-1.1L29.8,38.7c-1.2,1.1-1.8,2.6-1.8,4.1v33.1 c0,2.4,1.5,4.5,3.7,5.3l12.9,3.4c3.1,1.1,6.4,1.6,9.7,1.6h18c6.6,0,12.5-4.2,14.7-10.5l6.9-20c0.3-0.9,0.4-1.9,0.4-2.9v0 C94.3,46,88.7,40.4,81.7,40.4z" /> <path d="M22.2,40.4H7.8c-1.5,0-2.8,1.2-2.8,2.8v34c0,1.5,1.2,2.7,2.7,2.8h14.5c1.5,0,2.8-1.2,2.8-2.8v-34 C25,41.6,23.7,40.4,22.2,40.4z" /> </g> </g> </svg> </div> ))} </div> </div> ))} </div> );}export default Roadmap;export { default } from "./Roadmap";.roadmap { display: flex; width: 100%; max-width: 900px; min-height: 400px;}.roadmap > div:not(:last-child) { margin-right: 16px;}.roadmap-column { display: flex; flex-direction: column; flex: 1; background: #eef0fc; border-radius: 4px; padding: 6px 10px;}.roadmap-column-heading { color: #4d5273; font-size: 14px; font-weight: 500; padding: 10px; margin-bottom: 10px; text-align: center;}.roadmap-cards { display: flex; flex-direction: column;}.roadmap-cards > div:not(:last-child) { margin-bottom: 12px;}.roadmap-cards-item { background: #fff; border-radius: 4px; padding: 12px; box-shadow: 0 1px 0 #091e4240;}.roadmap-cards-item-heading { font-size: 14px; font-weight: 500;}.roadmap-cards-item-upvote { display: flex; font-size: 12px; line-height: 18px;}.roadmap-cards-item-upvote-count { margin-left: 6px;}.roadmap-cards-item p { font-size: 12px; margin-top: 7px; line-height: 1.5;}svg.not-filled path { fill: #fff; stroke: #000; stroke-width: 8px;}@media (max-width: 600px) { .roadmap { flex-direction: column; } .roadmap > div:not(:last-child) { margin-right: 0; margin-bottom: 26px; }}Now that our display component is created, let's app it to App.js and see how our component looks.
Step 3: Add component to App
We import our component in App.js and remove all the unnecessary files and code. Our code - App.js, App.css and component should look like below.
Add following code to App.js and App.css respectively.
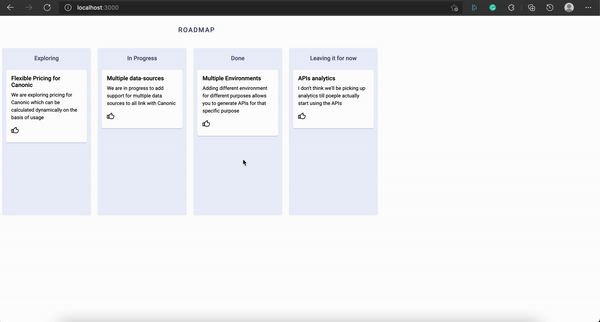
import React from "react";import Roadmap from "./components/Roadmap";import "./App.css";function App() { return ( <div> <div className="wrapper-heading">Roadmap</div> <Roadmap /> </div> );}export default App;@import url("https://fonts.googleapis.com/css2?family=Roboto:wght@400;500&display=swap");html,body { font-family: "Roboto", sans-serif;}.wrapper-heading { padding: 16px; text-align: center; margin-bottom: 18px; max-width: 900px; color: #4d5273; font-weight: 500; text-transform: uppercase; letter-spacing: 1.6px;}Now run yarn start in root of our project and our component should look like this.

Now it's time to integrate this with a backend to fetch our roadmap tickets and display them.
Step 4: Get your APIs
Follow the below-stated pointers and get your APIs!
- Cloning the sample project - To get the APIs, you can visit this link and click on the top right button to clone the project.
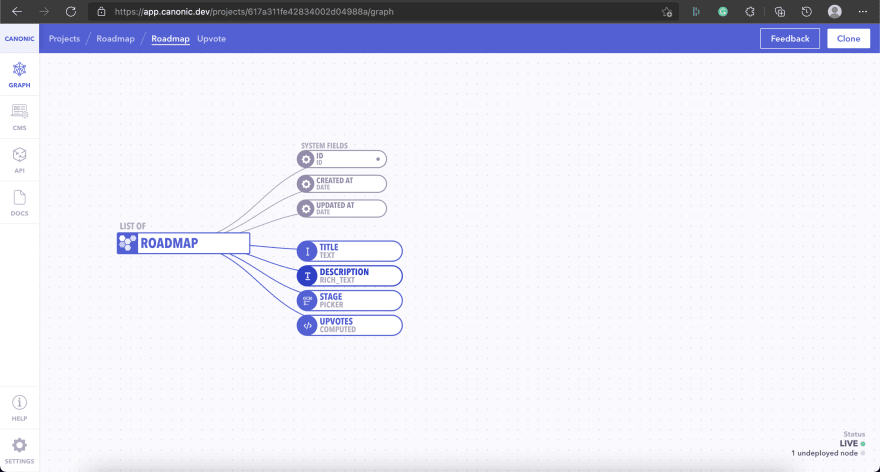
Deploy and get the backend URL - Having cloned the project, it's now time to deploy it so that we can get our APIs and backend hosted. Open the cloned project if you are not already there and youll see a
Deploybutton on the top right.Click
DeploySelect an environment Hit deploy.Upon completing the project, it will provide an API URL.

Checking the documentation
Before we get started with backend integration, let's move to the documentation by clicking on docs on the left sidebar so that we get a better understanding of the APIs involved.

Backend integration with GraphQL
Once you have your APIs ready, we can start by installing graphql.
Step 5: Install GraphQL packages
We will need two packages for this step since we'll be using graphql to pull our data from the backend - Apollo Client and GraphQL.
yarn add @apollo/client graphqlStep 6: Configure graphql
Configure the Apollo Client in the project directory, inside App.js so it would communicate with the backend.
Be sure to replace the uri with the one you'll get from Canonic.
import React from "react";import { ApolloProvider, InMemoryCache, ApolloClient } from "@apollo/client";import Roadmap from "./components/Roadmap";import "./App.css";/** * Connecting with the backend using apollo client */const client = new ApolloClient({ // make sure you update the URI here to point to your backend uri: "https://roadmap-35a418.can.canonic.dev/graphql", cache: new InMemoryCache(),});function App() { return ( <ApolloProvider client={client}> <div> <div className="wrapper-heading">Roadmap</div> <Roadmap /> </div> </ApolloProvider> );}export default App;Step 7: Querying the data
We store our graphql queries inside a directory src/gql. Inside which we create a file and name it queries.js.
This is where we will write the graphql queries for querying the data.
import { gql } from "@apollo/client";/** * gql query to get roadmap * The query parameters we got straight from Canonic autogenerated documentation */export const GET_ROADMAP = gql` query { roadmaps { _id title description upvotes { count } stage { value } } }`;The next step is Querying data and displaying our roadmap tickets. We'll execute the graphql query in the Roadmap component and display the tickets fetched according to their status.
We modify Roadmap.js to achieve the above mentioned logic and get the tickets.
import React from "react";import { useQuery } from "@apollo/client";import { GET_ROADMAP } from "../../gql/queries";import "./Roadmap.css";function Roadmap() { const { data = {}, loading } = useQuery(GET_ROADMAP); const { roadmaps = [] } = data; // dividing tickets into their respective categories const exploringTickets = roadmaps.filter( (t) => t.stage.value === "EXPLORING" ); const inProgressTickets = roadmaps.filter( (t) => t.stage.value === "IN_PROGRESS" ); const doneTickets = roadmaps.filter((t) => t.stage.value === "DONE"); const leavingItForNowTickets = roadmaps.filter( (t) => t.stage.value === "LEAVING_IT_FOR_NOW" ); const columnMap = [ { title: "Exploring", tickets: exploringTickets, }, { title: "In Progress", tickets: inProgressTickets, }, { title: "Done", tickets: doneTickets, }, { title: "Leaving it for now", tickets: leavingItForNowTickets, }, ]; return ( <div className="roadmap"> {loading ? ( <svg xmlns="http://www.w3.org/2000/svg" style={{ margin: "auto", background: "none", display: "block", shapeRendering: "auto", maxWidth: "30px", marginTop: "-20px", }} width="200px" height="200px" viewBox="0 0 100 100" preserveAspectRatio="xMidYMid" > <circle cx="50" cy="50" fill="none" stroke="#4d5273" strokeWidth="10" r="35" strokeDasharray="164.93361431346415 56.97787143782138" > <animateTransform attributeName="transform" type="rotate" repeatCount="indefinite" dur="1s" values="0 50 50;360 50 50" keyTimes="0;1" ></animateTransform> </circle> </svg> ) : ( <> {columnMap.map((column, i) => ( <div className="roadmap-column" key={`${column.title}-${i}`}> <div className="roadmap-column-heading">{column.title}</div> <div className="roadmap-cards"> {column.tickets.map((t, i) => ( <div key={`exploring-${i}`} className="roadmap-cards-item"> <div className="roadmap-cards-item-heading">{t.title}</div> <div className="roadmap-cards-item-content" dangerouslySetInnerHTML={{ __html: t.description }} /> <svg xmlns="http://www.w3.org/2000/svg" x="0px" y="0px" viewBox="0 0 100 125" style={{ enableBackground: "new 0 0 100 100", maxWidth: "18px", cursor: "pointer", }} > <g> <g> <path d="M81.7,40.4H64.6l3.6-17.9c0.5-2.5,0.1-5-1.2-7.1l0,0c-1.5-2.5-4.9-3-7-1.1L29.8,38.7c-1.2,1.1-1.8,2.6-1.8,4.1v33.1 c0,2.4,1.5,4.5,3.7,5.3l12.9,3.4c3.1,1.1,6.4,1.6,9.7,1.6h18c6.6,0,12.5-4.2,14.7-10.5l6.9-20c0.3-0.9,0.4-1.9,0.4-2.9v0 C94.3,46,88.7,40.4,81.7,40.4z" /> <path d="M22.2,40.4H7.8c-1.5,0-2.8,1.2-2.8,2.8v34c0,1.5,1.2,2.7,2.7,2.8h14.5c1.5,0,2.8-1.2,2.8-2.8v-34 C25,41.6,23.7,40.4,22.2,40.4z" /> </g> </g> </svg> </div> ))} </div> </div> ))} </> )} </div> );}export default Roadmap;
BONUS: Adding upvote to Roadmap tickets
As a bonus, let's add a feature for the users to upvote the tickets. By doing so, we can gain a deeper understanding of what our users are thinking and what they expect from us. Find out more about the benefits of having a public roadmap here.
Step 8: Mutating Data
We create a new file to store our mutations in src/gql/mutations.js. Taking a reference from auto-generated documentation, we can specify the mutation parameters.
import { gql } from "@apollo/client";/** * gql query to get roadmap * The query parameters we got straight from Canonic autogenerated documentation */export const UPVOTE = gql` mutation Upvote($ticketId: ID!) { createUpvote(input: { ticket: $ticketId }) { _id } }`;Step 9: Add upvote logic in the Component
We can now connect our mutation in Roadmap component. In this case, we will save the upvote not only on the backend but also in the local storage since we will not be creating a user on the backend and we want to retain the upvote information.
We make the following changes in Roadmap.js and add the mutation logic. Our final file looks like below.
import React from "react";import { useQuery, useMutation } from "@apollo/client";import { GET_ROADMAP } from "../../gql/queries";import { UPVOTE } from "../../gql/mutations";import "./Roadmap.css";function Roadmap() { const { data = {}, loading } = useQuery(GET_ROADMAP); const [upvoteTicket] = useMutation(UPVOTE, { context: { headers: { Authorization: "617bdcfc530d0d0009c04985-c2ca6caf-485c-4bc1-8ac8-4b9defe2707e", }, }, }); const { roadmaps = [] } = data; const [upvotes, setUpvotes] = React.useState([]); // dividing tickets into their respective categories const exploringTickets = roadmaps.filter( (t) => t.stage.value === "EXPLORING" ); const inProgressTickets = roadmaps.filter( (t) => t.stage.value === "IN_PROGRESS" ); const doneTickets = roadmaps.filter((t) => t.stage.value === "DONE"); const leavingItForNowTickets = roadmaps.filter( (t) => t.stage.value === "LEAVING_IT_FOR_NOW" ); const columnMap = [ { title: "Exploring", tickets: exploringTickets, }, { title: "In Progress", tickets: inProgressTickets, }, { title: "Done", tickets: doneTickets, }, { title: "Leaving it for now", tickets: leavingItForNowTickets, }, ]; const handleUpvoteTicket = React.useCallback( async (id) => { setUpvotes((upvotes) => [...upvotes, id]); localStorage.setItem(`${id}`, true); upvoteTicket({ variables: { ticketId: id } }); }, [upvoteTicket] ); const isTicketUpvoted = React.useCallback( (id) => !!upvotes.find((t) => t === id) || localStorage.getItem(id), [upvotes] ); return ( <div className="roadmap"> {loading ? ( <svg xmlns="http://www.w3.org/2000/svg" style={{ margin: "auto", background: "none", display: "block", shapeRendering: "auto", maxWidth: "30px", marginTop: "-20px", }} width="200px" height="200px" viewBox="0 0 100 100" preserveAspectRatio="xMidYMid" > <circle cx="50" cy="50" fill="none" stroke="#4d5273" strokeWidth="10" r="35" strokeDasharray="164.93361431346415 56.97787143782138" > <animateTransform attributeName="transform" type="rotate" repeatCount="indefinite" dur="1s" values="0 50 50;360 50 50" keyTimes="0;1" ></animateTransform> </circle> </svg> ) : ( <> {columnMap.map((column, i) => ( <div className="roadmap-column" key={`${column.title}-${i}`}> <div className="roadmap-column-heading">{column.title}</div> <div className="roadmap-cards"> {column.tickets.map((t, i) => ( <div key={`exploring-${i}`} className="roadmap-cards-item"> <div className="roadmap-cards-item-heading">{t.title}</div> <div className="roadmap-cards-item-content" dangerouslySetInnerHTML={{ __html: t.description }} /> <svg xmlns="http://www.w3.org/2000/svg" x="0px" y="0px" viewBox="0 0 100 125" style={{ enableBackground: "new 0 0 100 100", maxWidth: "18px", cursor: "pointer", }} className={!isTicketUpvoted(t._id) && "not-filled"} onClick={() => handleUpvoteTicket(t._id)} > <g> <g> <path d="M81.7,40.4H64.6l3.6-17.9c0.5-2.5,0.1-5-1.2-7.1l0,0c-1.5-2.5-4.9-3-7-1.1L29.8,38.7c-1.2,1.1-1.8,2.6-1.8,4.1v33.1 c0,2.4,1.5,4.5,3.7,5.3l12.9,3.4c3.1,1.1,6.4,1.6,9.7,1.6h18c6.6,0,12.5-4.2,14.7-10.5l6.9-20c0.3-0.9,0.4-1.9,0.4-2.9v0 C94.3,46,88.7,40.4,81.7,40.4z" /> <path d="M22.2,40.4H7.8c-1.5,0-2.8,1.2-2.8,2.8v34c0,1.5,1.2,2.7,2.7,2.8h14.5c1.5,0,2.8-1.2,2.8-2.8v-34 C25,41.6,23.7,40.4,22.2,40.4z" /> </g> </g> </svg> </div> ))} </div> </div> ))} </> )} </div> );}export default Roadmap;Note be sure to create access_tokens for your canonic APIs for mutating the data. Read more about it here
And that's it, you've built the roadmap!
Conclusion:
Roadmaps for your products offer several advantages, including a better understanding of the strategy and vision, guidance for executing the strategy, facilitation of discussion and opinions, etc.
Follow this step to step guide and build Roadmaps for your own SaaS startups.
Check out the live demo link here
and you can checkout the sample code here
You can also check out our other guideshere.
Join us on discord to discuss or share with our community. Write to us for any support requests at[email protected]. Check out ourwebsiteto know more about Canonic. Let us know in the comments below what you think about the guide. Thank you!
Original Link: https://dev.to/canonic/how-to-build-a-customer-facing-roadmap-with-react-1gal
Dev To
More About this Source Visit Dev To