
Some of Our Sources
- Simplebits
- Spoon Graphics
- Fuel Your Creativity
- Reencoded
- CSS Globe
- 24 Ways
- Specky Boy
- Freelance Switch
- Design Modo
- Daily Now
Help Webnuz
Referal links:
A Guide to Building, Testing, and Deploying your First DApp with Truffle, Ethers.js, Ganache, and React.
If youre new to Ethereum development and wonder how to put the pieces together to build a decentralized application, this guide is for you. There are some great combinations of tools for building a decentralized application; however, Well be using a variant that includes:
- Truffle: This comes with a development environment, a testing framework, and a development blockchain.
- Ethers.js: A library for interacting with deployed smart contracts on the frontend.
- Ganache: A development blockchain for deploying smart contracts and inspecting state during development,
- React.js: A framework for building user interfaces.
- Metamask: A wallet for user private keys management.
In this guide, well be building a tiny DApp that allows a homeowner to auction their home, accepting bids from users in Ether (The native cryptocurrency for the Ethereum blockchain), and withdrawing the highest bid into their wallet once the auction ends. The goal is to demonstrate how these tools can come together nicely to create a decentralized application. Although the Ganache development blockchain should be enough for this guide, We will go ahead and deploy our smart contract to the Rinkeby testnet just so that we can see how easy that can be. Finally, creating a beautiful user interface isnt the focus of this guide, so a very bare-bones user interface will be used.
To be able to follow through with this guide, Youll need to have:
- Node.js.
- Truffle.
- Ganache development blockchain.
- Metamask chrome extension.All installed on your machine, follow the links to install these tools depending on your operating system.
Note that we wont need real Ether tokens to follow through as we will be using test Ether tokens from our development blockchain and the Rinkeby testnet. The complete code for this guide can be found here.
Creating a truffle project and writing our smart contract
Once youve installed Truffle, create a new folder and call it tiny-dapp, navigate into the root of the folder and run the truffle init command, this would create a basic project template with all the necessary config files and directories like this:
contracts/: Directory for Solidity contracts.
migrations/: Directory for scriptable deployment files.
test/: Directory for test files for testing your application and contracts.
truffle-config.js: Truffle configuration file.
Update the truffle configuration file to look like this:
module.exports = { networks: { development: { host: "127.0.0.1", port: 7545, network_id: "*", }, }, compilers: { solc: { version: "0.8.9" } }};Make sure to specify the same solidity compiler version 0.8.9 to prevent running into issues due to version changes as the solidity programming language is still under development. In the contracts directory, create a new file Auction.sol and define the contract properties like so:
// SPDX-License-Identifier: MITpragma solidity 0.8.9;contract Auction { // Properties address private owner; uint256 public startTime; uint256 public endTime; mapping(address => uint256) public bids; struct House { string houseType; string houseColor; string houseLocation; } struct HighestBid { uint256 bidAmount; address bidder; } House public newHouse; HighestBid public highestBid;}Weve defined an owner property with the private access modifier; this means that the owner property can only be accessed from within the defining contract, in this case our contract. You can read more on access modifiers in solidity from the official doc. Weve also defined the auction startTime, endTime, and bids as public properties meaning they can be accessed anywhere. Weve added two structs, House and HighestBid, that define the houses properties and hold the highest bid, respectively. Finally, weve initialized both structs, creating two new public variables, newHouse and highestBid.
With those out of the way, lets go ahead and define some modifiers for our smart contract. In solidity, modifiers are functions used to alter the behavior of other functions; they are typically used to enforce security and ensure certain conditions are met before a function can be called. You can read up more on modifiers here
// SPDX-License-Identifier: MITpragma solidity 0.8.9;contract Auction {.... // Modifiers modifier isOngoing() { require(block.timestamp < endTime, 'This auction is closed.'); _; } modifier notOngoing() { require(block.timestamp >= endTime, 'This auction is still open.'); _; } modifier isOwner() { require(msg.sender == owner, 'Only owner can perform task.'); _; } modifier notOwner() { require(msg.sender != owner, 'Owner is not allowed to bid.'); _; }}Here, weve defined four modifiers; isOngoing ensures that the auction is still on by comparing the current time with the auction endTime property, notOngoing does the opposite of isOngoing, isOwner verifies that the calling user is the owner of the contract (The address that deployed the contract) and notOwner is the opposite of isOwner. All four modifiers use the require() check, which throws a revert exception using the message passed in as the second argument if the conditions passed as the first argument returns a false.
Well need to define some events that would be emitted by our smart contract on contract state change; this is important because it allows our frontend code to attach callbacks which would be triggered when our contract state changes. With this, we can give our users some sense of interactiveness, seeing that the Ethereum blockchain takes time to process transactions (typically 15 secs or more). You can read up more on events in solidity here. Next, add the below events to your smart contract:
// SPDX-License-Identifier: MITpragma solidity 0.8.9;contract Auction {.... // Events event LogBid(address indexed _highestBidder, uint256 _highestBid); event LogWithdrawal(address indexed _withdrawer, uint256 amount);}To wrap up our smart contract, well need to define a constructor function that would be called during contract deployment, well also assign values to some of the properties we defined earlier, and then finally, well define our smart contract functions.
// SPDX-License-Identifier: MITpragma solidity 0.8.9;contract Auction { ....// Assign values to some properties during deployment constructor () { owner = msg.sender; startTime = block.timestamp; endTime = block.timestamp + 1 hours; newHouse.houseColor = '#FFFFFF'; newHouse.houseLocation = 'Lagos, Nigeria'; newHouse.houseType = 'Duplex'; } function makeBid() public payable isOngoing() notOwner() returns (bool) { uint256 bidAmount = bids[msg.sender] + msg.value; require(bidAmount > highestBid.bidAmount, 'Bid error: Make a higher Bid.'); highestBid.bidder = msg.sender; highestBid.bidAmount = bidAmount; bids[msg.sender] = bidAmount; emit LogBid(msg.sender, bidAmount); return true; } function withdraw() public notOngoing() isOwner() returns (bool) { uint256 amount = highestBid.bidAmount; bids[highestBid.bidder] = 0; highestBid.bidder = address(0); highestBid.bidAmount = 0; (bool success, ) = payable(owner).call{ value: amount }(""); require(success, 'Withdrawal failed.'); emit LogWithdrawal(msg.sender, amount); return true; } function fetchHighestBid() public view returns (HighestBid memory) { HighestBid memory _highestBid = highestBid; return _highestBid; } function getOwner() public view returns (address) { return owner; }}Notice how we assigned values to some properties inside our constructor function; this is so that those values are set during deployment. Weve also added four new functions to our smart contract:
- makeBid: A public payable function that accepts Ether. Whenever a user wants to make a fresh bid or add to their current offer, this function is called. It uses the
isOngoingandnotOwnermodifiers to allow bidding only while the auction is still ongoing and prevent the auction owner from placing a bid, respectively. - withdraw: A public function that allows the contract owner to withdraw funds into their wallet; it uses the
notOngoingandisOwnermodifiers to prevent premature withdrawal while the auction is still on and restrict access to only the auction owner, respectively. - fetchHighestBid and getOwner are both public view functions, which means unlike
makeBidandwithdrawfunctions, they do not modify state; this is also why they do not log any events. Both functions return the auctions highest bid and the auction owners address, respectively.
With our smart contract ready to be tested and deployed, lets verify that there are no errors in our code; we can do that by compiling our contract using the truffle compile command. It should compile successfully, and a new build folder with our contract ABI should appear on the projects root directory. Note that well need to change the location where our contract ABI live to use them in our frontend code, but that will be later as we begin to develop the user interface.
To deploy our smart contract code to any Ethereum network, well need a migration script. So, in the migrations directory, create a new file and call it 2_initial_migrations.js, notice the prefix 2_; this tells Truffle which migration to run first and should be incremented as we add new migration scripts.
const Auction = artifacts.require("Auction");module.exports = function (deployer) { deployer.deploy(Auction);};The code above tells Truffle to fetch our Auction smart contract and deploy it to whatever network we set in our truffle.config.js file.
Testing our smart contract with Javascript, mocha, and chai
As mentioned earlier, Truffle comes bundled with an automated testing environment built on Mocha and Chai; this means we wont be downloading any additional packages, head to the /test directory, create an Auction.test.js file and add the following code:
const Auction = artifacts.require("Auction");contract("Auction", async accounts => { let auction; const ownerAccount = accounts[0]; const userAccountOne = accounts[1]; const userAccountTwo = accounts[2]; const amount = 5000000000000000000; // 5 ETH const smallAmount = 3000000000000000000; // 3 ETH beforeEach(async () => { auction = await Auction.new({from: ownerAccount}); }) it("should make bid.", async () => { await auction.makeBid({value: amount, from: userAccountOne}); const bidAmount = await auction.bids(userAccountOne); assert.equal(bidAmount, amount) }); it("should reject owner's bid.", async () => { try { await auction.makeBid({value: amount, from: ownerAccount}); } catch (e) { assert.include(e.message, "Owner is not allowed to bid.") } }); it("should require higher bid amount.", async () => { try { await auction.makeBid({value: amount, from: userAccountOne}); await auction.makeBid({value: smallAmount, from: userAccountTwo}); } catch (e) { assert.include(e.message, "Bid error: Make a higher Bid.") } }); it("should fetch highest bid.", async () => { await auction.makeBid({value: amount, from: userAccountOne}); const highestBid = await auction.fetchHighestBid(); assert.equal(highestBid.bidAmount, amount) assert.equal(highestBid.bidder, userAccountOne) }); it("should fetch owner.", async () => { const owner = await auction.getOwner(); assert.equal(owner, ownerAccount) });})We only tested for success cases for simplicity, but the same principle applies when testing for exceptions and events. You can read up more about testing with Truffle here. To run these test cases, navigate to the project root and run: truffle develop; this should create an interface for interacting with Truffle, finally run: test.
Building the user interface with React
To begin writing out our frontend code, well need to set up a react development environment, and to help us do that with ease, well be using the create-react-app command-line tool. First, in the projects root directory, type the following command: npx create-react-app client; this will set up a react project with all the dependencies needed to write modern javascript inside a folder called client. Then, navigate into the client directory and run yarn start; you should have a react app running on port 3000. Since we're still putting the code together for the user interface, use CTRL + C to kill the process.
With the react project set up, lets install ethers.js and the ethersprojects unit package (for manipulating numbers out of Javascript range) by running the following command: yarn add ethers @ethersproject/units. Open the src/App.js file and update it with the following code:
import './App.css';import { useEffect, useState } from 'react';import { ethers } from 'ethers';import { parseEther, formatEther } from '@ethersproject/units';import Auction from './contracts/Auction.json';const AuctionContractAddress = CONTRACT ADDRESS HERE;const emptyAddress = '0x0000000000000000000000000000000000000000';function App() { // Use hooks to manage component state const [account, setAccount] = useState(''); const [amount, setAmount] = useState(0); const [myBid, setMyBid] = useState(0); const [isOwner, setIsOwner] = useState(false); const [highestBid, setHighestBid] = useState(0); const [highestBidder, setHighestBidder] = useState(''); // Sets up a new Ethereum provider and returns an interface for interacting with the smart contract async function initializeProvider() { const provider = new ethers.providers.Web3Provider(window.ethereum); const signer = provider.getSigner(); return new ethers.Contract(AuctionContractAddress, Auction.abi, signer); } // Displays a prompt for the user to select which accounts to connect async function requestAccount() { const account = await window.ethereum.request({ method: 'eth_requestAccounts' }); setAccount(account[0]); } async function fetchHighestBid() { if (typeof window.ethereum !== 'undefined') { const contract = await initializeProvider(); try { const highestBid = await contract.fetchHighestBid(); const { bidAmount, bidder } = highestBid; // Convert bidAmount from Wei to Ether and round value to 4 decimal places setHighestBid(parseFloat(formatEther(bidAmount.toString())).toPrecision(4)); setHighestBidder(bidder.toLowerCase()); } catch (e) { console.log('error fetching highest bid: ', e); } } } async function fetchMyBid() { if (typeof window.ethereum !== 'undefined') { const contract = await initializeProvider(); try { const myBid = await contract.bids(account); setMyBid(parseFloat(formatEther(myBid.toString())).toPrecision(4)); } catch (e) { console.log('error fetching my bid: ', e); } } } async function fetchOwner() { if (typeof window.ethereum !== 'undefined') { const contract = await initializeProvider(); try { const owner = await contract.getOwner(); setIsOwner(owner.toLowerCase() === account); } catch (e) { console.log('error fetching owner: ', e); } } } async function submitBid(event) { event.preventDefault(); if (typeof window.ethereum !== 'undefined') { const contract = await initializeProvider(); try { // User inputs amount in terms of Ether, convert to Wei before sending to the contract. const wei = parseEther(amount); await contract.makeBid({ value: wei }); // Wait for the smart contract to emit the LogBid event then update component state contract.on('LogBid', (_, __) => { fetchMyBid(); fetchHighestBid(); }); } catch (e) { console.log('error making bid: ', e); } } } async function withdraw() { if (typeof window.ethereum !== 'undefined') { const contract = await initializeProvider(); // Wait for the smart contract to emit the LogWithdrawal event and update component state contract.on('LogWithdrawal', (_) => { fetchMyBid(); fetchHighestBid(); }); try { await contract.withdraw(); } catch (e) { console.log('error withdrawing fund: ', e); } } } useEffect(() => { requestAccount(); }, []); useEffect(() => { if (account) { fetchOwner(); fetchMyBid(); fetchHighestBid(); } }, [account]); return ( <div style={{ textAlign: 'center', width: '50%', margin: '0 auto', marginTop: '100px' }}> {isOwner ? ( <button type="button" onClick={withdraw}> Withdraw </button> ) : ( "" )} <div style={{ textAlign: 'center', marginTop: '20px', paddingBottom: '10px', border: '1px solid black' }}> <p>Connected Account: {account}</p> <p>My Bid: {myBid}</p> <p>Auction Highest Bid Amount: {highestBid}</p> <p> Auction Highest Bidder:{' '} {highestBidder === emptyAddress ? 'null' : highestBidder === account ? 'Me' : highestBidder} </p> {!isOwner ? ( <form onSubmit={submitBid}> <input value={amount} onChange={(event) => setAmount(event.target.value)} name="Bid Amount" type="number" placeholder="Enter Bid Amount" /> <button type="submit">Submit</button> </form> ) : ( "" )} </div> </div> );}export default App;That was a lot of code but its straightforward what were trying to achieve. To clarify whats happening in our code:
- We are establishing a client connection to the deployed contract using the contract address and the smart contract ABI; the
initializeProviderfunction achieves this. - We are connecting to the users Metamask and pulling their wallet address. This is achieved by the
requestAccount()function. - We are fetching and displaying the active users current bid amount; this is achieved with the
fetchMyBid()function. - We are also fetching and displaying the highest bidders current bid amount and wallet address. This is achieved with the
fetchHigestBid()function. - We provide an input field for users to enter their bid amount and submit; this is achieved by the
submitBid()function. - Finally, we create a withdraw button that will only be displayed to the auction owner and can be used for withdrawing funds to their wallet when the auction closes. This is achieved with the
withdraw()andisOwner()functions.
Deploying Our Smart Contract to Ganache
As weve successfully written out the code for both the smart contract and the user interface, we will go ahead and deploy our smart contract to Ganache, making it available to be called from within the react code. To do that, update the truffle.config.js file to look like this:
module.exports = { contracts_build_directory: './client/src/contracts', networks: { development: { host: "127.0.0.1", port: 7545, network_id: "*", }, }, compilers: { solc: { version: "0.8.9" } }};Notice weve added a new contracts_build_directory key, and weve pointed that to ./client/src/contracts; this means that whenever we compile our contract code, the ABI is going to be placed inside this folder, thus making it easier to interact with our contract from the react code.
Launch the Ganache application and click the QUICKSTART option to get a development blockchain running; this provides us with 10 test Ethereum accounts stashed with 100 Ether tokens each for playing around and testing our DApp. When we deploy smart contracts to the Ganache development blockchain, Ganache uses the first account out of the ten test accounts as the owners account; keep that in mind as well be using the owners account to perform tasks that only the auction owner can perform.
Truffle has a bunch of handy commands, and you can learn more about them here, but well be using the migrate command truffle migrate --network <NETWORK_NAME> which tells Truffle to compile and deploy our contract to the specified network configured in our truffle config file, it defaults to the development network when no network is specified. Now navigate to the project root directory and run the command truffle migrate; if successful, you will see that a new contracts directory has been created inside the client/src folder; you can inspect the files to see what an ABI looks like. In addition to the newly compiled ABI, notice that the command also returns some significant output about our deployment like the amount of gas used, gas price, contract address, etc.; you should copy out your unique contract address and update this line in the react code (App.js).
const AuctionContractAddress = CONTRACT ADDRESS HERE;Note: After running the migration command for the first time, subsequent migration (after changes have been made to the contract code) will need to include the --reset flag; this tells Truffle that changes have been made to the contract code and it needs to be recompiled, this comes with a caveat though, it redeploys the contract code to a new Ethereum address so you should remember to constantly update the contract address in the react code whenever a new deployment is made to avoid facing hard to debug issues.
Manual testing with MetaMask
To interact with a decentralized application like the one we just created, well need to connect our Metamask wallet; well use some of the accounts given to us for free by Ganache, to be precise, the first two accounts (the Auction owner and one random account). So lets go ahead and import those into our Metamask wallet.
Launch the Metamask Chrome extension we downloaded earlier and follow these instructions to import accounts:
- Click the dropdown and select the
Custom RPCoption, fill in the required details, and save. See image below for hint:

If you get an error that says This Chain ID is currently used by the localhost network., try deleting theLocalhost 8545 network and try again. If you're unable to delete the network (recent version of Metamask extension for Chrome has a tiny bug) then consider using the Microsoft Edge browser instead.
Get the first test account private key from Ganache:


Import the first test account into Metamask:


Repeat steps 2 and 3 to import the second test account to Metamask.
With both accounts imported and ready for use, let's start playing with our app. In Metamask, switch from the Ethereum Mainnet to the newly added Ganache network (ensure Ganache is running), navigate into the client directory and start the react app with yarn start, then proceed to localhost:3000; notice that Metamask prompts you to connect your account; go ahead and select the two newly added accounts like so: 
Now depending on which account youre currently connected to, you should be able to:
- User Account: Make a fresh bid and add to your current offer; the UI would show the current highest bid, the bidder, your current bid, and your connected account address. Keep in mind the contract stops accepting bids one hour after contract deployment.
- Owner Account: See what address made the highest bid, what the highest bid amount is and withdraw the current highest bid to your wallet address once the auction endTime (auction startTime + 1 hour) reaches.
Deploying to the Rinkeby testnet
This section walks us through the deployment of our smart contract to the Rinkeby testnet. To help us achieve this, well be using the Infura Ethereum API. Infura provides a suite of high availability APIs and developer tools that provides quick access to the Ethereum network. You can learn more about them here. The deployment process can be broken down into the following steps:
Get an account funded with test Ether from the Rinkeby testnet: Start by switching Metamask from the Ganache network to Rinkeby testnet, copy the account address and follow the instructions here to get some test Ether.

Get the private key of the funded account: Navigate to the account details page and copy the private key.

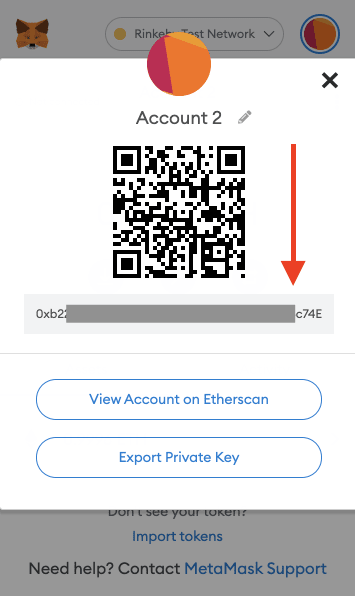
Securely store and retrieve the private key using Truffles HDWalletProvider: In the root of the truffle project, run
yarn add @truffle/hdwallet-providerto install the HDWalletProvider library. Next, create a.secretfile in the root of the truffle project and place the private key inside. Make sure to add this secret file to.gitignoreso that it doesnt get published.Create an Infura project: Sign up and create a new project here. Infura should provide you with different endpoints for each Ethereum network, switch to the Rinkeby testnet and copy the HTTPS endpoint.
Update the
truffle-config.jsfile to use the HDWalletProvider library and define a Rinkeby network connection option:
const HDWalletProvider = require('@truffle/hdwallet-provider');const fs = require('fs');const privateKey = fs.readFileSync(".secret").toString().trim();const infuraURL = "<HTTPS ENDPOINT HERE>";module.exports = { contracts_build_directory: './client/src/contracts', networks: { development: { host: "127.0.0.1", port: 7545, network_id: "*", }, rinkeby: { provider: () => new HDWalletProvider(privateKey, infuraURL), network_id: 3, gas: 5500000, confirmations: 2, timeoutBlocks: 200, skipDryRun: true }, }, compilers: { solc: { version: "0.7.1", } },};Compile and deploy the contract by navigating to the project root and running truffle compile followed by truffle migrate --network rinkeby. This should take some time and Rinkeby Ether to complete, monitor the console and upon successful completion, you should get a new contract address.
Thats it! If youve followed through to this point, then congratulations, youve written, tested, and deployed your first decentralized application.
Original Link: https://dev.to/heydamali/a-guide-to-building-testing-and-deploying-your-first-dapp-with-truffle-ethersjs-ganache-and-react-1mh0
Dev To
More About this Source Visit Dev To