
An Interest In:
Web News this Week
- April 22, 2024
- April 21, 2024
- April 20, 2024
- April 19, 2024
- April 18, 2024
- April 17, 2024
- April 16, 2024
Some of Our Sources
- Engadget
- Vandelay Design
- Inspiredology
- FanExtra - PSD
- Fudge Graphics
- Web Design Ledger
- Codrops
- Android Headlines
- Dev To
- The Verge
Help Webnuz
Referal links:
Nodejs And Express CRUD

Now we are going to learn how to create a Nodejs and express CRUD application. A CRUD application is the simplest web application that we can create. The term CRUD comes from "Create," "Read," "Update", and "Delete." We create CRUDs Applications using the HTTP Verbs. In this tutorial we are also going to learn how to connect and use a MongoDB Database in a Nodejs application. In this tutorial we assume that you have some JavaScript knowledge. We also assume that you have read something about MongoDB. You can take this tutorial as a second part for our Nodejs and Express Tutorial. Now let us start learning.
What are we going to build?
In this tutorial we are going to build the simplest Nodejs and express application. Applications like this serve as part of more complex applications. The application will be a list of users where we can read the list, add users, update users, and delete users. Similar to the one below. Besides Nodejs and express, we are also using some Bootstrap for styling purposes. Let us start building our new application.
HTTP Verbs
| GET | The GET Method redirects you to a new URL |
| POST | The POST Method Creates a new file |
| PUT | The PUT Method serves to update files |
| PATCH | The PATCH Method also serves to update files |
| DELETE | The DELETE Method deletes files |
Setting Up our Application
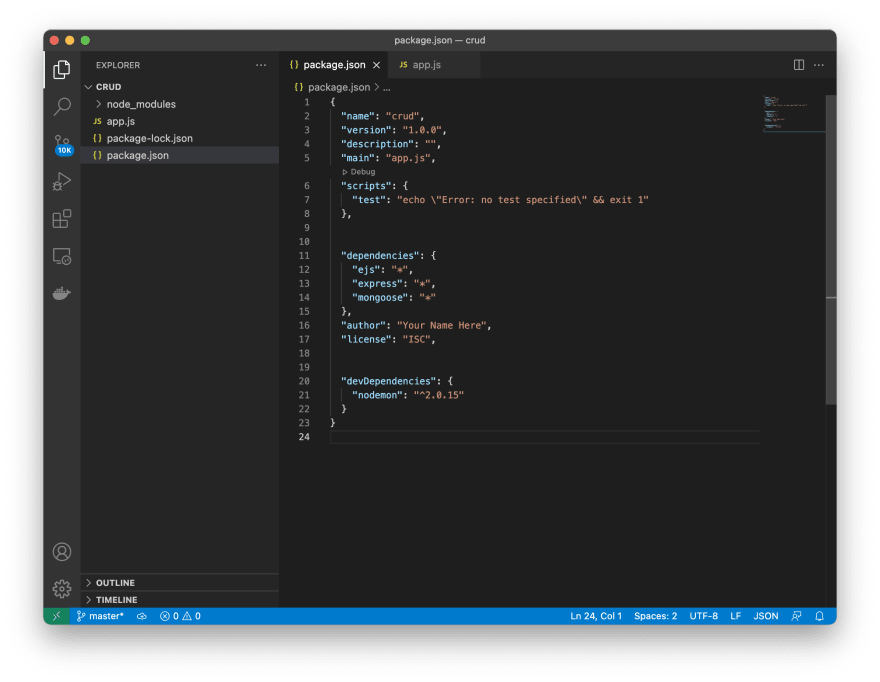
As you may already know, we set up all Nodejs applications in our terminal. We can create our folder and name it as we want. After we create the folder we type the npm init command in order to create our package.json. Once we have our package.json we create our app.js or index.js file. Then we proceed to install our dependencies. The dependencies we are using in this tutorial are express, ejs, mongoose, and also nodemon as a development dependency.
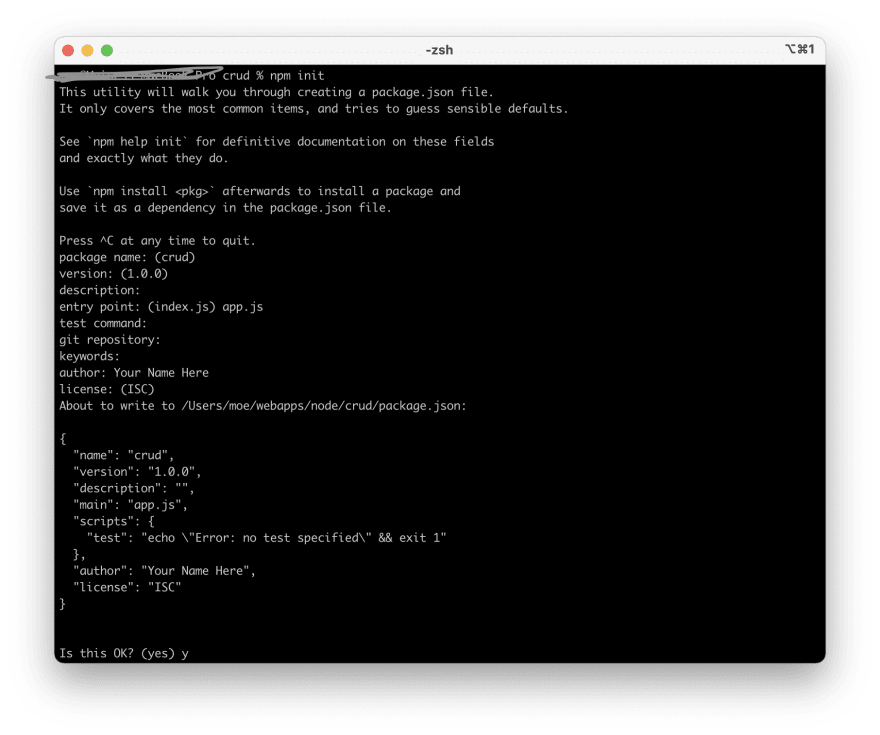
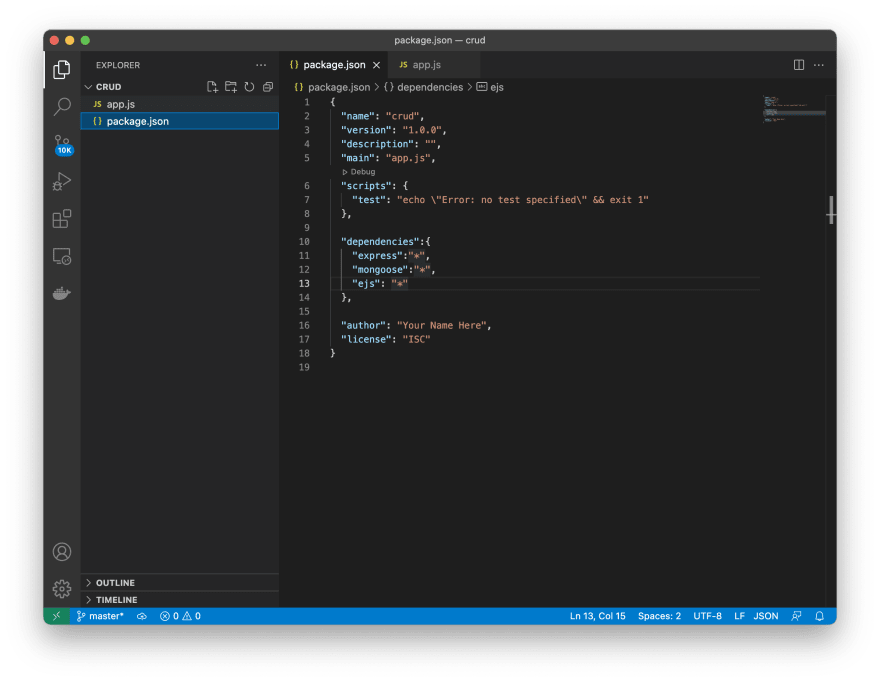
The image above shows you the terminal after you type the npm init command. Once you follow the instructions, you can open the folder you just created in your favorite text editor. We are using Visual Studio Code. Then you can add dependencies to your package.json. After adding dependencies you proceed to create the app.js file. It's called index.js by default; but I prefer to call it app.js. As we stated before we are going to use three dependencies. they are express, mongoose, and ejs. We can place them in our package.json Then our package.json should look like the one we show you in the picture below.
Installing Dependencies
We just added three dependencies to our package.json; but they are not installed. If you recall the Introduction to Nodejs tutorial you know there are two ways to install them. We can install each one of them individually, or install all of them at once using the npm install command. As we are using the asterisk (*), After we install them they are going to be the latest version. We are also going to install another dependency individually. That dependency is nodemon. We are going to install it individually because we are going to install it as a dev dependency. The example below shows you how to install dependencies and "dev" dependencies.
npm installnpm install -D nodemon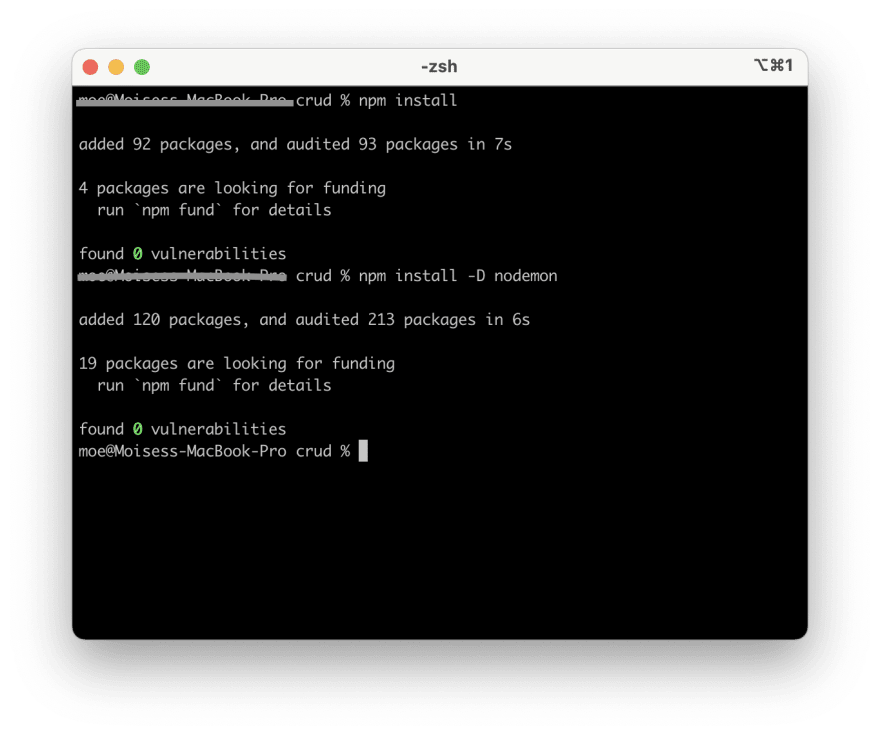
You can see the commands that we can use to install dependencies and dev dependencies. There is also an image that shows you how to do it in real life. Now our package.json should look like the one we show you in the following image. You can also see that package.lock.json was created.
Creating Our Application
We just set up our application in the previous sections. Now we are going to creating our application. You know that we created the app.js file. In order to create our applications we need to put some code in it. As you should already know we first start the packages we installed in our app.js file. We add the following code to the file.
let express = require('express');let mongoose = require('mongoose');let app = express(); // The express application let PORT = process.env.PORT || 3000;app.listen(PORT, ()=>{ console.log(`Connected on ${PORT}`);});Connecting our application to Database
Before you saw that we installed three dependencies; but we are only requiring two. We required express because that is the framework for our application. Also, we are requiring mongoose. That is because we are going to use mongoose as our MongoDB ODM. In order to connect our application to our database, we only need to use the mongoose.connect() function. Then we use the default port of MongoDB that is 27017 along with our local host as connection string. We also add the name we want for our database. The code below shows you how to connect a MongoDB Database to your express application.
mongoose.connect('mongodb://localhost:27017/crud'); //crud is the name of the database let db = mongoose.connection;db.on('connected', ()=>{ console.log('connected to Database');});db.on('error', ()=>{ console.log('Database error');});The code above shows you how to connect a MongoDB database to local installed MongoDB. You can also use any MongoDB Atlas string as your connection string. We show you in our MongoDB tutorial how to set up MongoDB Atlas. Examples in this tutorial only show the locally installed database. If you set a MongoDB Atlas environment, you can work with it. Now your app.js file should look like the one you see below.

Testing the application in the console
You can see that the application is still empty. We it's a good practice to start testing our application from the beginning. As we installed nodemon, we just need to type nodemon in our console and see the results. Remember that we still don't have any routes or views; but if your result is similar to the image below, you know that your application is running and ready to connect to your database.
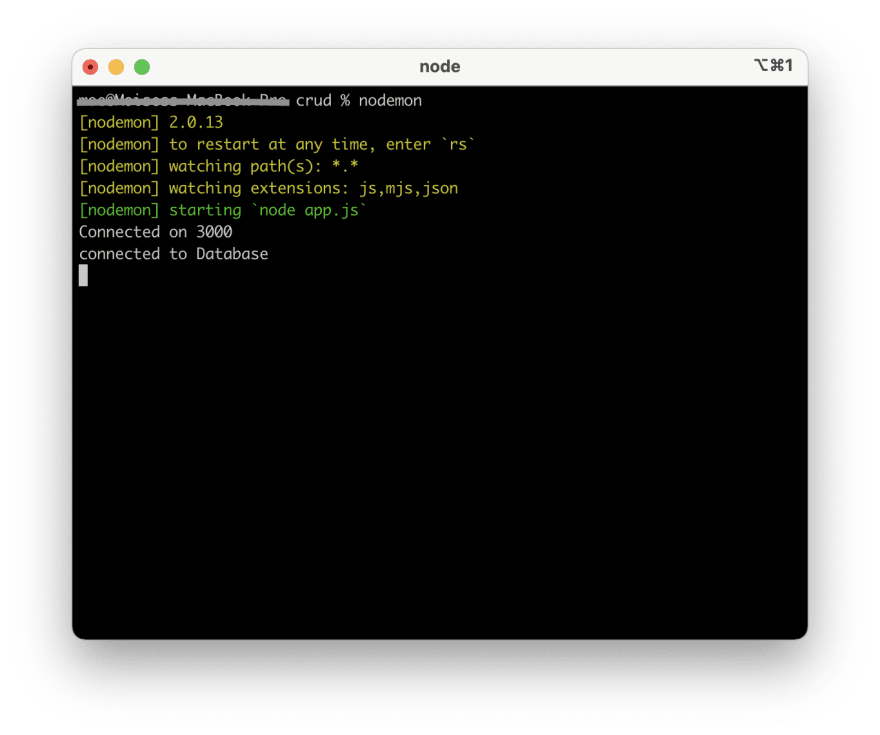
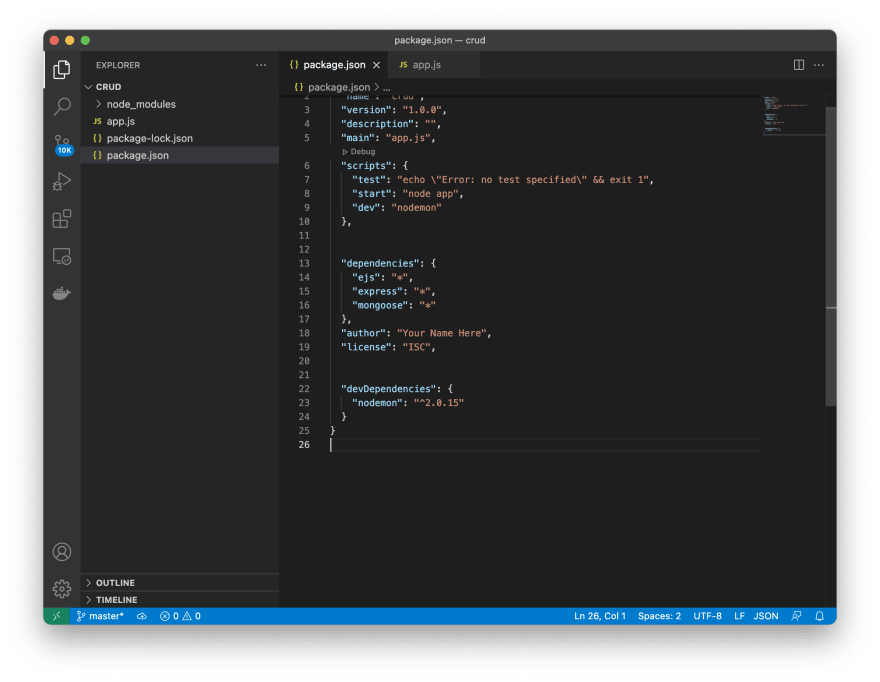
Adding Scripts to our package.json file ###
The image above shows you how to test your application using the nodemon command. In the introduction tutorial we show you how to use scripts; so it's better to create some scripts for ease and deployment purposes. The two scripts we are going to add are the dev and start. After you add these scripts you only need to type npm run and the script name in your terminal. Then scripts will run. The dev script is going to start the application via nodemon; while the start script is going to start the application using node app. Once we add the scripts, our package.json should look like the following one.
Setting the View Engine
As you already know, the third dependency we added was ejs. From the Introduction tutorial we can see that ejs is used as a view engine. Now we can set up our view engine in our app.js file. We only need to add the following code to our file.
app.set('view engine', 'ejs');app.set('views', 'views');The code you just added to your app.js is to sett your view engine and views folder. After the creation of your view engine you proceed to create the folder.
Creating your public folder
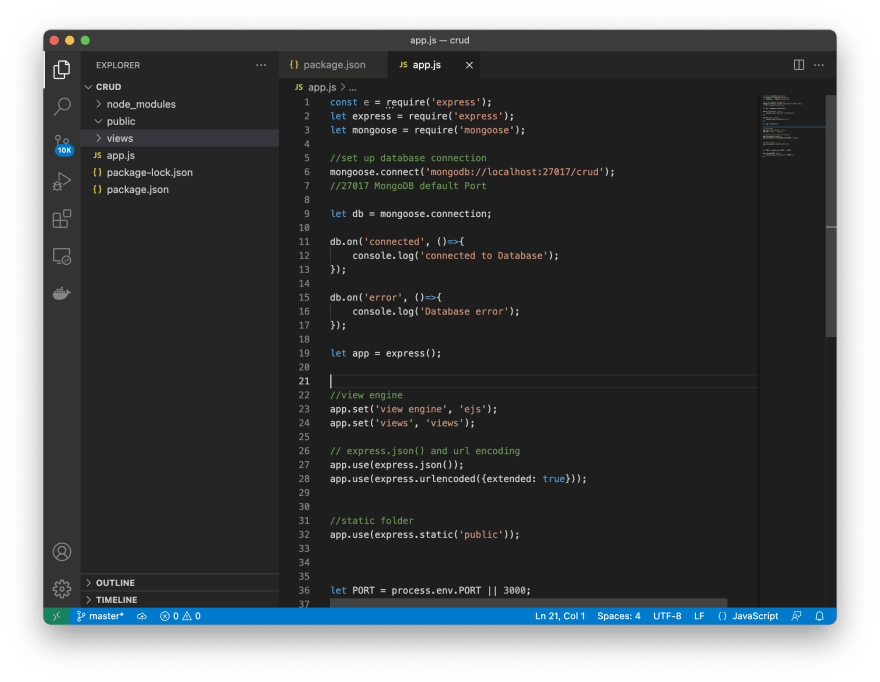
Although we are using a view engine it's very good practice to set up a public folder. That is useful for adding scripts and stylesheets. Even though in this tutorial we are only going to use the "Bootstrap CDN," it's a good practice to have then public folder. In case you want to add more style or more features to your app, you can add some in your public folder. As you may know from the introduction tutorial; it's very good to add in our app.js express.json and also settings for url encoding. For that reason we add the following lines of code to our app.js.
// express.json() and url encodingapp.use(express.json());app.use(express.urlencoded({extended: true}));//static folderapp.use(express.static('public')); After we add all these changes to our app.js our file should look like the one we show in the following picture. If you are using visual studio code, you can also see on the side the views and public folders that we recently created.
Creating Routes
The introduction tutorial also shows you how to create routes in express. Now we are going to add some routes for CRUD operations. We first need to add the routes in our app.js file. We are going to add a home route (/) and a (/users) route. Once we add the routes, we create the routes folder and its files. We are going to work more with the /users route in this tutorial. That is because we are going to create a "users list." We first need to add the following code to our app.js file. Then we create our routes folder and its files.
app.use('/', require('./routes/index')); //index routeapp.use('/users', require('./routes/users')); //users routeThe code above shows you the routes (/) That is the home route, and another route (/users) that is the users route. Now we create a folder called routes. In the folder we create two files; One of them called users.js and the other called index.js. You can create as many route files as you want; but in this tutorial we are only using two. You can also see that we use the require() function as callback function; requiring the files of the routes.
Using the express router
After the creation of routes and files for your app.js, we need to place some code in our files. We are going to start first with the index.js. In that file we are only going to create the home route (/). In order to create the home route, we first call express and the express.Router() then we create the route. After route has been created, we export the router as you can see in the following code.
let express = require('express');let router = express.Router();router.get('/', (req, res)=>{ res.render('index');});module.exports = router;You can see that we created the router and get the home route. The home route redirects you to a view called index.ejs. By now you can create that view and add the welcome message you want; that is your Home Screen. Now we are going to add some routes to our users.js file. We are going to add the users CRUD routes. Also we are going to create the CRUD views for our application. The code below shows you how we can add CRUD routes to the users.js file.
let express = require('express');let router = express.Router();//CRUD Routesrouter.get('/create', (req, res)=>{ res.render('users/create'); });router.get('/list', (req, res)=>{ res.render('users/list');});router.get('/update', (req, res)=>{ res.render('/users/update');});module.exports = router;Now you created some of the CRUD routes and their views. By now you can add the basics HTML to your views. We are going to work with views in a few minutes. We created the CRUD views inside another folder called users that is inside the views. That is why we are rendering in the format ('/users/views') if you want to skip that folder is up to you. You can create your views right into your views folder. In case of that you only need to render the view itself res.render('view'). Now the order of your files should look like the image below. Note that we installed an icons theme in Visual Studio Code; with this theme it's easier to see every folder and file in our project.

Creating Database Schema
As you already know we are working with MongoDB. A very useful MongoDB ODM is mongoose. We already installed mongoose as an npm package. Now it's time to start working with mongoose. We are now going to create another folder called "models". Inside that folder we are going to create a file called "User.js". Take note that we are using a capital letter in the file. That is because we are going to use it as a User model. Now we need to create the mongoose schema in the new file. After we create the mongoose schema we are going to export it as a mongoose model. To accomplish this task we need to place the following code in our file.
let mongoose = require('mongoose');let Schema = mongoose.Schema;let userSchema = new Schema({ firstName: String, lastName: String, age: Number, gender: String});let User = mongoose.model('User', userSchema);module.exports = User;The code above shows you how to create a simple schema. You can see in that we created many fields in the schema. These fields are the ones that MongoDB will have in a collection called users in our database. We called the model User because MongoDB is going to create a collection pluralizing the model.
Importing the model in our routes
Now it's time to import the model we just created into our routes. As you may guess, we are going to import the model into the users route. We only need a line of code to import the model into any route. For our model that would be the following line of code.
let User = require('../models/User');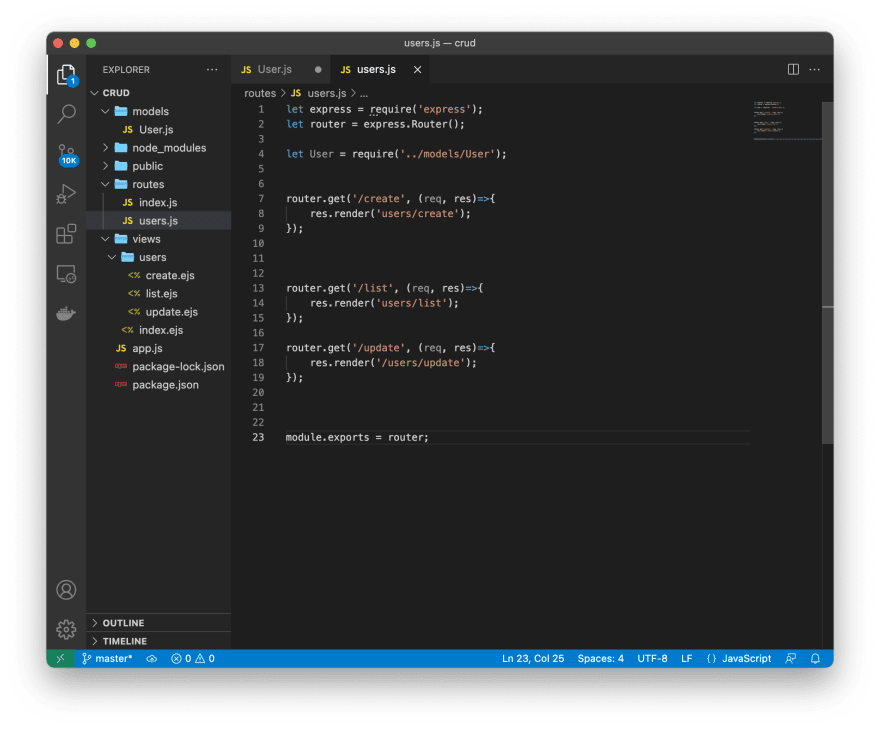
Starting CRUD Operations
Once you import the model to your routes, it's time to start the CRUD operations. Now we are going to start creating users in the database using our routes. The system will automatically create the database and collection. We are only going to create the users in our application. Now it's time to work with the views we created before. In case you did not create them you can create them now. We are going to create a form in our users/create view. that form is going to create the user. So we need to type the following code in our create.ejs file.
<html lang="en"><head> <meta charset="UTF-8"> <meta http-equiv="X-UA-Compatible" content="IE=edge"> <meta name="viewport" content="width=device-width, initial-scale=1.0"> <title>Create User</title></head><body> <h2> Add Users</h2> <form method="POST" action="/users/create"> <input type="text" name="firstname" placeholder=" Enter First Name"> <input type="text" name="lastname" placeholder=" Enter Last Name"> <input type="text" name="gender" placeholder="Gender"> <input type="number" name="age" placeholder="Your Age"> <input type="submit" value ="submit"> </form></body></html> Now if you go to your browser and type localhost:3000/users/create you can see the following form. That is the form we are going to use to add users to our database. Make sure you have the name attribute for each input, and the action for the form. The action is the redirects to the function we are going to implement in the server side. In this case we are going to create a user.

Creating Users
Right now this form is not going to create anything. That is because we need to create the users on the server side. So we need to go back to our routes and add a method to create users. We are going to add a router.post method to create the user. The router.get method that we already have, is only going to redirect us to the form. Now we can go back to our users.js file and add the following code.
router.post('/create', (req, res)=>{ let newUser = new User({ firstName: req.body.firstname, lastName: req.body.lastname, age: req.body.age, gender: req.body.gender }); newUser.save(); res.redirect('/users/list');});The code we just added creates a new user newUser from the User Model. As you can see we used the post method to create the user. The previously created form has the method POST and its action redirects you to this function. You see that we use the req.body method to get the data from the form. The part before the req.body method is the field on the mongoose Schema. After getting data from the form, you can also see that we used the save() form to save the newUser. Then we use a res.redirect() method to redirect us to the users list. If you already created a users list by now it's going to be empty. In case you did not created the system will redirect you to a CANNOT GET page.
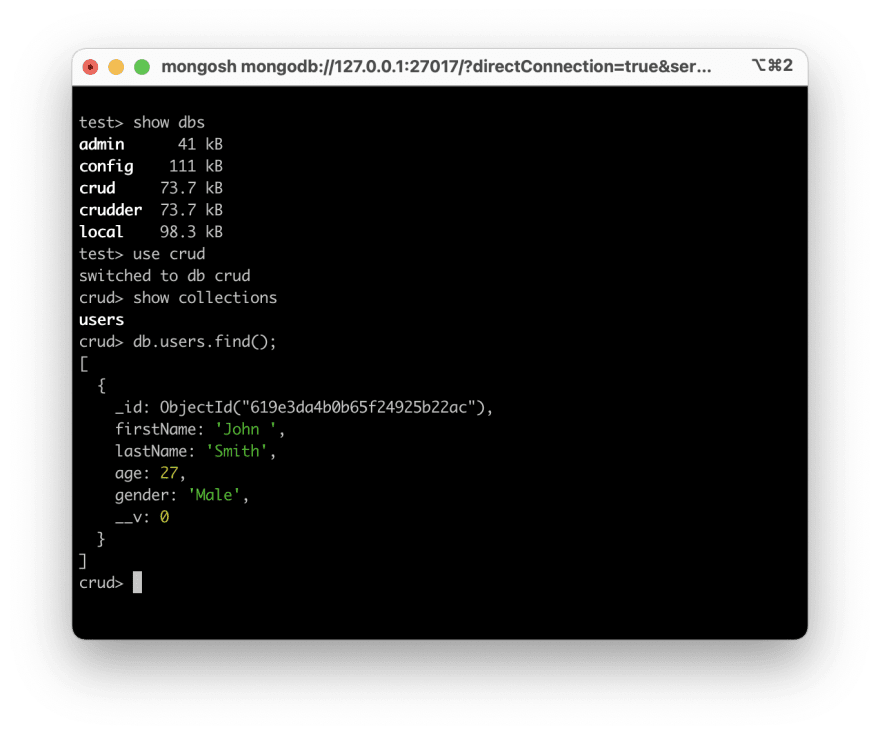
In case you need to confirm the user creation on MongoDB after the creation of a user, you can go to your mongo shell mongosh and confirm it. For this example we created a user with name John Smith using our form. If you have MongoDB installed on your system the result will be similar to the image below. In case you use a MongoDB Atlas cluster you can go to your cluster and confirm.
Reading the Users List
The previous section shows you how to create users in a MongoDB Database; but it redirects you to an empty list. You could confirm the creation of the user going to your database shell. The problem with it is that in the real world users do not have access to the database. For that reason we need to work on our list of users. In order to work on our users list we need to go back again to our routes and work on the /list route. We need to modify it in the following way.
router.get('/list', async (req, res)=>{ let users = await User.find(); res.render('users/list', { users: users });});You can see that we modified our /list route. The code we just added declares a variable called users that is an object we get using the MongoDB find() function. After we created that variable we passed it to our render method as an object. That is going to result in an array of objects. That is because we. can create all the users we want using our form, and all of them will be passed through this object. You can also see that we used JavaScript promises words async that creates an asynchronous function, and the await that awaits for the results. Now it's time to create or modify our view.
Modifying our view
After we modified our route for the list of users we can modify our view. As you may already know, our view engine is ejs. Its's similar to HTML with the difference that we can embed JavaScript in it. We are going to create a table using the HTML table syntax. After the table creation we are going to embed every user on a table row
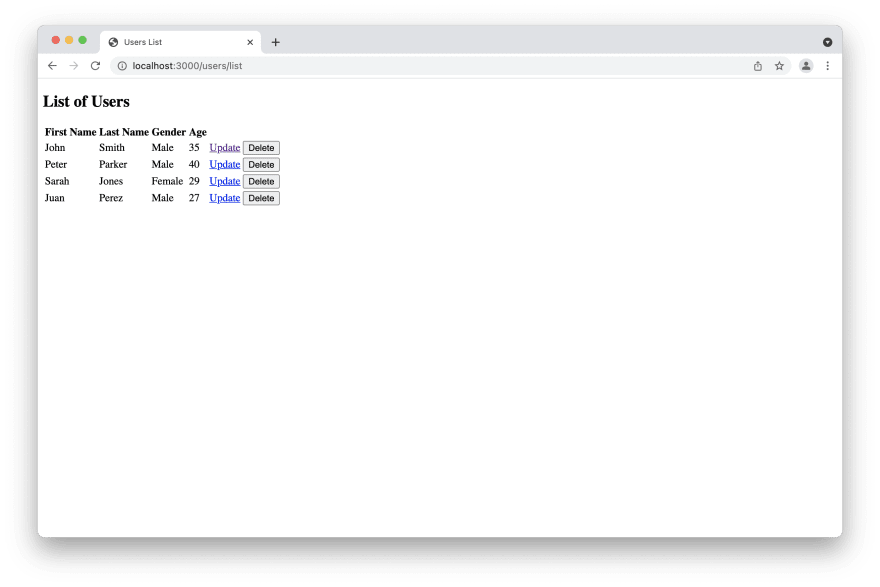
<!DOCTYPE html><html lang="en"><head> <meta charset="UTF-8"> <meta http-equiv="X-UA-Compatible" content="IE=edge"> <meta name="viewport" content="width=device-width, initial-scale=1.0"> <title>Users List</title></head><body> <h2>List of Users</h2> <table> <tr> <th>First Name</th> <th> Last Name</th> <th> Gender</th> <th>Age</th> </tr> <% users.forEach(function(user){ %> <tr> <td><%= user.firstName %></td> <td><%= user.lastName %></td> <td><%= user.gender %></td> <td><%= user.age %></td> </tr> <% });%> </table></body></html>List Results
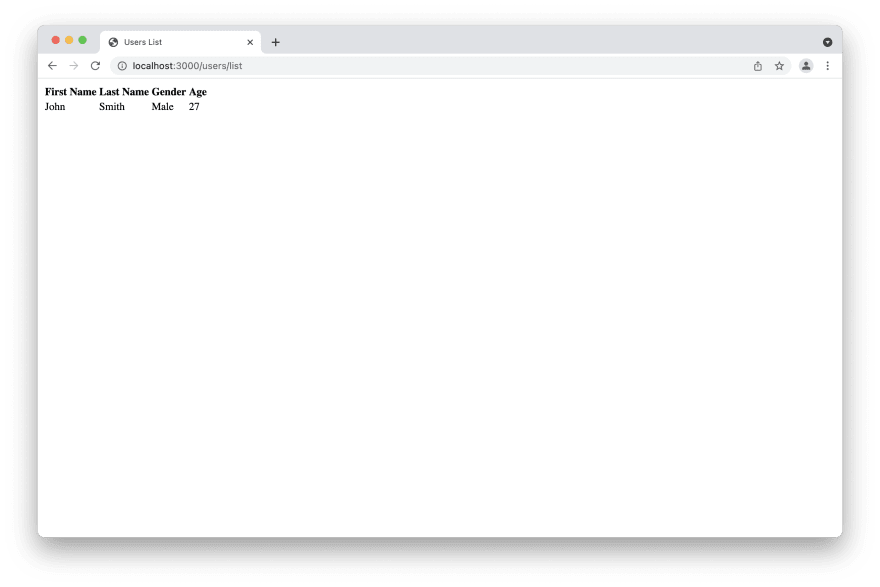
After you modify your view you can type the address localhost:3000/users/list in your browser. Then you are going to see the results. Note we are using the PORT 3000 and locally installed MongoDB. The result would be the same with a MongoDB Atlas cluster. The results would be similar to the following image.
Updating Users
At this time you have seen how to create users in the database and read them on your browser. We are going to learn how to update users using the updateOne() MongoDB function. That is an easy task. As you may already know we need to create a post route in order to update any user. We have the ability to create put routes in express; but update is easier with post routes because the method form of the view is a POST method. Now we can create a router.post('/update') route, and modify our router.get('/update') route.router.get('/update/:id', async (req, res)=>{ let user = await User.findById(req.params.id); res.render('users/update', { user: user });});router.post('/update/:id', async (req, res)=>{ let user = await User.findById(req.params.id); await user.updateOne({ firstName: req.body.firstname, lastName: req.body.lastname, gender: req.body.gender, age: req.body.age, }); res.redirect('/users/list');});Creating the Update Form
In the code above you can see that we modified the get method and added the ID for the user. We also used the findByID() function from MongoDB to create a user variable. Then we added the variable to our render method. After that we created a post route to update our user. As you can see we also add the ID of the user and then we use the req.body method to get values from our ejs form. Now we can modify the views in order to update users. We first are going to modify the update view by creating an update form.
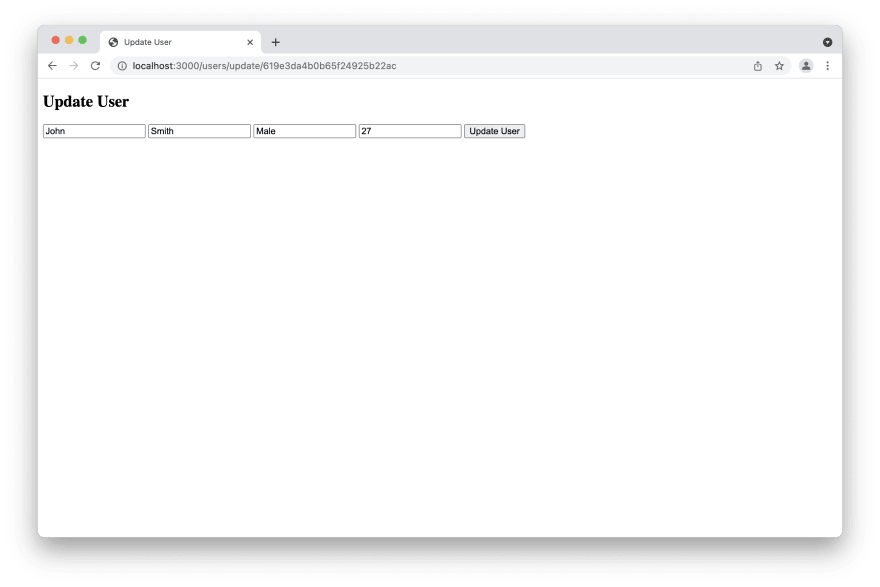
<!DOCTYPE html><html lang="en"><head> <meta charset="UTF-8"> <meta http-equiv="X-UA-Compatible" content="IE=edge"> <meta name="viewport" content="width=device-width, initial-scale=1.0"> <title>Update User</title></head><body> <h2>Update User</h2> <form method="POST" action="/users/update/<%=user.id %>"> <input type="text" placeholder="Update First Name" name="firstname" value="<%=user.firstName %>"> <input type="text" placeholder="Update Last Name" name="lastname" value="<%=user.lastName %>"> <input type="text" placeholder="Update Gender" name="gender" value="<%=user.gender %>"> <input type="text" placeholder="Update Age" name="age" value="<%=user.age %>"> <input type="submit" value="Update User" > </form></body></html>You can see that in the update form we have the value attribute. That is the value of the field of the user that we are going to update. After the creation of the update form we can go back to our list view and add two links for each of the users we add. These two links are the "Update" and the "Delete" links. We are going to add both of them; but now we are working only with the update. The following code details how to add the two links.
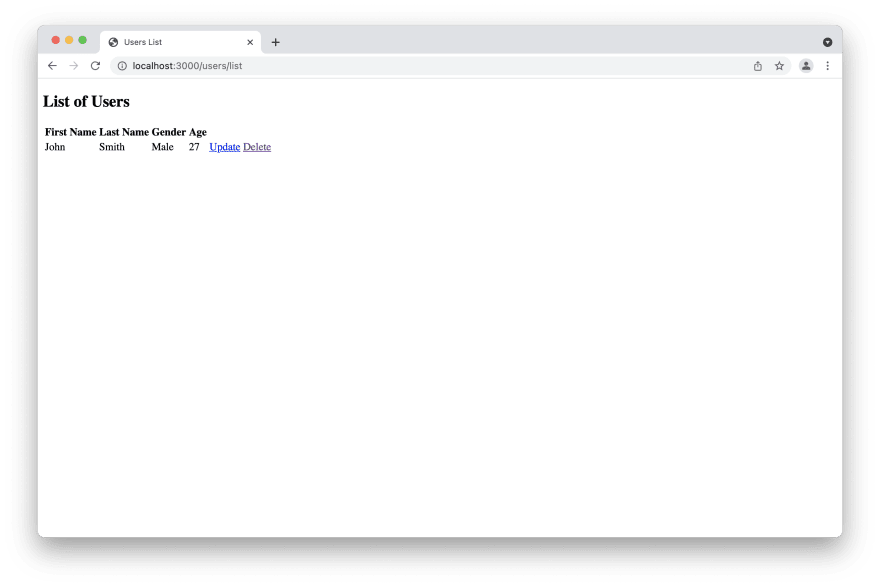
<tr> <td><%= user.firstName %></td> <td><%= user.lastName %></td> <td><%= user.gender %></td> <td><%= user.age %></td> <td> <a href="/users/update/<%=user.id%>">Update</a></td> <td> <a href="">Delete</a></td> </tr>Now if you go to your browser and type again localhost:3000/list the result is going to be similar to the one you see in the image below. If you click the update link, the link is going to redirect you to the update form and you can update the user.
Once you click on the link you can see the update form similar to the one below. After that you can modify the data and check your MongoDB Database again and see that your user was modified. In this example we are going to update the age to 35.
Deleting Users
By now you have seen how to create, read, and update users. In order to complete our CRUD Operations we are now going to learn to delete users from the database in your view. The delete method is not going to redirect you to any other view; that is only going to redirect you to the list view again. Once you see the list view again you can see that user will not be there. You can also check the database and see that user won't be in the database; it's going to be deleted. We only need to add one more route to the users routes. That is going to be a with the post method. You can use a delete method; but it's easier using a post method because we are going to be using a form to delete users.
router.post('/delete/:id', async (req, res)=>{ await User.deleteOne({ _id: req.params.id }); res.redirect('/users/list');});Once we add the above code we can go back to the users lists view and replace the delete link you just created with the following form. That form is an empty form; it only have the submit button. We changed the value of submit to delete. In the table that is only going to show you the delete button. We are also showing you a commented "delete" method in case you want to use a delete route instead of a post. That is up to you to use the method you want.
<form method="POST" action="/users/delete/<%= user.id %>" id="delete-form"> <!--<input type="hidden" name="_method" value="DELETE"> --> <input type="submit" class="btn btn-danger btn-sm" value="Delete"></form>As we added some more users to the users list, the resulting list is as the following one. If you created the list you can now create, read, update, and delete users. Now we have a full CRUD application like the one you see below.
Adding Route Links and Styles
By now you completed a users list CRUD application. One extra thing is that you can add some links with your routes in order to avoid typing the routes every time. You can add some links to redirect you to the list of users and the index. You can also add the style you decide to your application. In a similar application we used some Bootstrap to style our application. You can see the screen shot of a styled application below. That is up to you to add the style and the links you wish.

Conclusion
We have just created a simple CRUD application using Nodejs and express. This application is only a simple list of users. By now you can see it as a simple list; but it serves as part for more complex applications you can create later. This is only part of the great things you create using Nodejs Express and MongoDB. We hope you learned a lot in this tutorial. You can find more information about express in their website. There is also an Express MDN that contains great information. You can also find information about Mongoose and EJS on their websites. If you need to get the source code for this application, feel free to download it from its GitHub Repository.
More at Moe's Link
Original Link: https://dev.to/moreno8423/nodejs-and-express-crud-2g8j
Dev To
More About this Source Visit Dev To