
An Interest In:
Web News this Week
- April 24, 2024
- April 23, 2024
- April 22, 2024
- April 21, 2024
- April 20, 2024
- April 19, 2024
- April 18, 2024
Some of Our Sources
- Just Creative
- Joshua Blankenship
- Spoon Graphics
- Six Revisions
- Naldz Graphics
- Noupe
- Web Design Ledger
- Web Resource Source
- Willems Lab
- Daily Now
Help Webnuz
Referal links:
Let's create a Pixel Art maker with JavaScript
In one of my previous article I have showed you how to create a paint app using JavaScript. And in this article we will learn how to create a pixel art generator using HTML, CSS and vanilla JS.
Pixel art app is also a drawing/paint app but you have big pixels so they are less in number so your drawing won't be that detailed
Video tutorial available here
Our app will have:
- Color picker/input to change the color of our brush
- A reset button to reset our grid
- A input through which we can set the size of our pixels/grid
Let's start
So lets create the index.html
<!DOCTYPE html><html lang="en"><head> <meta charset="UTF-8"> <meta http-equiv="X-UA-Compatible" content="IE=edge"> <meta name="viewport" content="width=device-width, initial-scale=1.0"> <link rel="stylesheet" href="style.css"> <title>Document</title></head><body> <div class="navbar"> <button class="btn">Reset</button> <input type="color" value="#00eeff" class="color"> <input type="number" value="30" class="size"> </div> <div class="container"> <!-- Here we will add divs representing our pixels --> </div> <script src="main.js"></script></body></html>and now lets style them in our style.css
*{ margin: 0; padding: 0; box-sizing: border-box;}html, body{ height: 100%;}body{ background-color: blueviolet; display: flex; justify-content: center; align-items: center; flex-direction: column;}.navbar, .container{ background-color: rgb(28, 28, 29); width: 800px; border-radius: 3px;}.navbar{ padding: 1em; margin-bottom: 1em; display: flex; justify-content: center; align-items: center;}.btn, input{ height: 35px; padding: 0 1em;}.color{ padding: 0 .25em; width: 100px; margin: 0 1em;}.container{ --size: 4; height: 800px; display: grid; grid-template-columns: repeat(var(--size), 1fr); grid-template-rows: repeat(var(--size), 1fr); gap: 3px; padding: 3px;}.pixel{ background-color: rgb(61, 61, 61); border-radius: 2px;} Notice that we are using --size variable. We will be updating that in our JavaScript
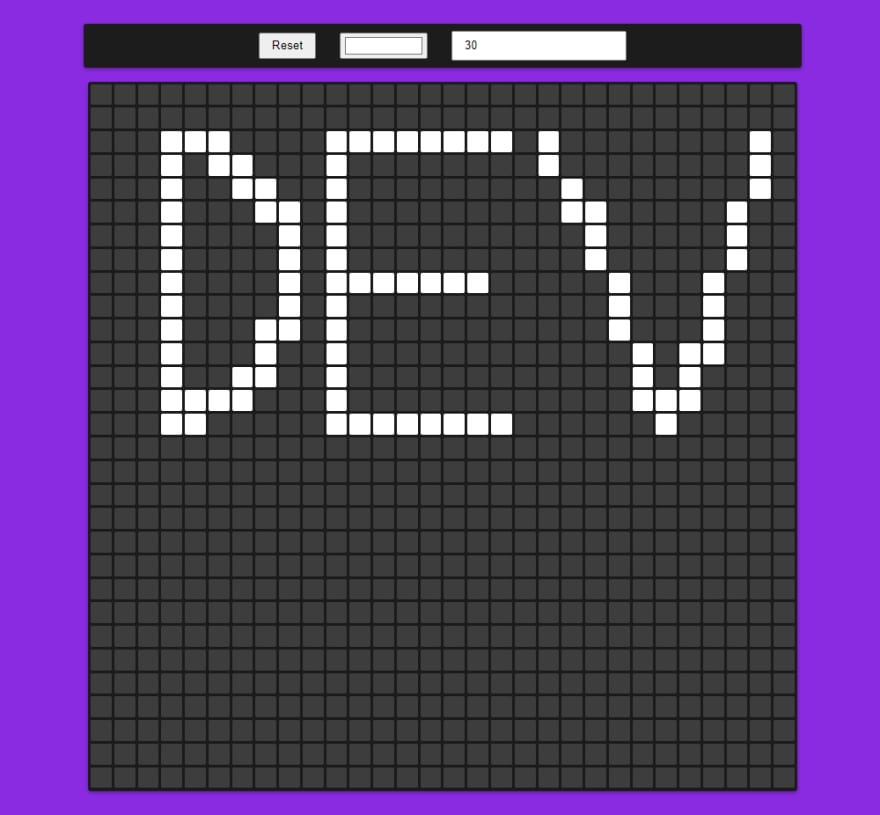
Anyways now if we open it up in our browser we should see something like this
Now in our JavaScript lets populate the container with divs which will be our pixels.
We will create a helper function called populate for that
const container = document.querySelector('.container')const sizeEl = document.querySelector('.size')const color = document.querySelector('.color')const resetBtn = document.querySelector('.btn')// Getting the value of the size inputlet size = sizeEl.valuefunction populate(size) { // Updating the --size CSS variable container.style.setProperty('--size', size) for (let i = 0; i < size * size; i++) { const div = document.createElement('div') div.classList.add('pixel') container.appendChild(div) }}populate(size)Now you should see a grid displayed
Okay so now when we press down our mouse and move it, we want to color the div that is under our cursor.
So lets add mouseover and mousdown event on our pixels
const container = document.querySelector('.container')const sizeEl = document.querySelector('.size')const color = document.querySelector('.color')const resetBtn = document.querySelector('.btn')let size = sizeEl.value// We will only color our pixels if draw is set to truelet draw = falsefunction populate(size) { container.style.setProperty('--size', size) for (let i = 0; i < size * size; i++) { const div = document.createElement('div') div.classList.add('pixel') div.addEventListener('mouseover', function(){ if(!draw) return div.style.backgroundColor = color.value }) div.addEventListener('mousdown', function(){ // We don't need to check if draw is true here // because if we click on a pixel that means we want to draw that pixel div.style.backgroundColor = color.value }) container.appendChild(div) }}// Set draw to true when the user press down the mousewindow.addEventListener("mousedown", function(){ draw = true})// Set draw to false when the user release the mousewindow.addEventListener("mouseup", function(){ draw = false})populate(size)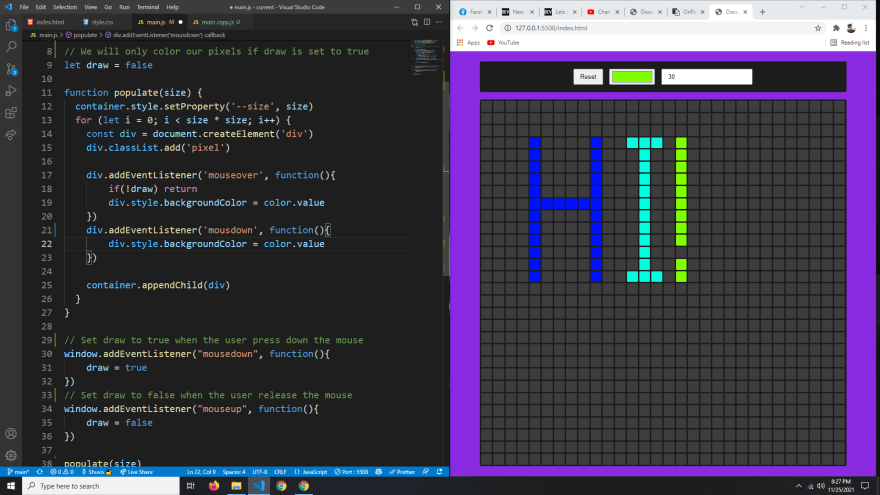
Now lets make the reset button work. When the reset button is clicked we simply have to empty out the inner html of our container and call the populate function again.
const container = document.querySelector('.container')const sizeEl = document.querySelector('.size')const color = document.querySelector('.color')const resetBtn = document.querySelector('.btn')let size = sizeEl.valuelet draw = falsefunction populate(size) { container.style.setProperty('--size', size) for (let i = 0; i < size * size; i++) { const div = document.createElement('div') div.classList.add('pixel') div.addEventListener('mouseover', function(){ if(!draw) return div.style.backgroundColor = color.value }) div.addEventListener('mousdown', function(){ div.style.backgroundColor = color.value }) container.appendChild(div) }}window.addEventListener("mousedown", function(){ draw = true})window.addEventListener("mouseup", function(){ draw = false})function reset(){ container.innerHTML = '' populate(size)}resetBtn.addEventListener('click', reset)populate(size)And finally when we change the value of our input we want to create a new grid with the entered size.
const container = document.querySelector('.container')const sizeEl = document.querySelector('.size')const color = document.querySelector('.color')const resetBtn = document.querySelector('.btn')let size = sizeEl.valuelet draw = falsefunction populate(size) { container.style.setProperty('--size', size) for (let i = 0; i < size * size; i++) { const div = document.createElement('div') div.classList.add('pixel') div.addEventListener('mouseover', function(){ if(!draw) return div.style.backgroundColor = color.value }) div.addEventListener('mousdown', function(){ div.style.backgroundColor = color.value }) container.appendChild(div) }}window.addEventListener("mousedown", function(){ draw = true})window.addEventListener("mouseup", function(){ draw = false})function reset(){ container.innerHTML = '' populate(size)}resetBtn.addEventListener('click', reset)sizeEl.addEventListener('keyup', function(){ size = sizeEl.value reset()})populate(size)
And just like that we have successfully created a Pixel Art creator using vanilla JavaScript.
You can find the finished codes here.
Make sure you checkout my other articles and YouTube channel

Was it helpful? Support me on Patreon

Original Link: https://dev.to/0shuvo0/lets-create-a-pixel-art-maker-with-javascript-4016
Dev To
More About this Source Visit Dev To