
An Interest In:
Web News this Week
- April 24, 2024
- April 23, 2024
- April 22, 2024
- April 21, 2024
- April 20, 2024
- April 19, 2024
- April 18, 2024
Some of Our Sources
- Web Designer Wall
- Joshua Blankenship
- The Logo Smith
- Six Revisions
- Fuel Your Creativity
- CSS Tricks
- Spyre Studios
- Codrops
- Willems Lab
- The Verge
Help Webnuz
Referal links:
Writing an NFT Collectible Smart Contract

Introduction
In my previous tutorials, we showed you how to use our generative art library to create a collection of avatars, generate compliant NFT metadata, and upload the metadata JSON and media files to IPFS.
However, we havent minted any of our avatars as NFTs yet. Therefore, in this tutorial, we will write a smart contract that will allow anyone to mint an NFT from our collection by paying gas and a price that weve set for each NFT piece.
Prerequisites
- Intermediate knowledge of Javascript. (In case you need a refresher, Id suggest this YouTube tutorial)
- Intermediate knowledge of Solidity and OpenZeppelin Contracts. (I will be releasing tutorials on this very soon! For the time being, I strongly recommend CryptoZombies and Buildspace)
- node and npm installed on your local computer
- A collection of media files and NFT metadata JSON uploaded to IPFS. (In case you dont have this, we have created a toy collection for you to experiment with. You can find the media files here and the JSON metadata files here).
While it may be possible for readers who do not satisfy the prerequisites to follow along and even deploy a smart contract, we strongly recommend getting a developer who knows what s/he is doing if youre serious about your project. Smart contract development and deployment can be incredibly expensive and unforgiving w.r.t security flaws and bugs.
Setting up our local development environment
We will be using Hardhat, an industry-standard ethereum development environment, to develop, deploy, and verify our smart contracts. Create an empty folder for our project and initialize an empty package.json file by running the following command in your Terminal:
mkdir nft-collectible && cd nft-collectible && npm init -yYou should now be inside the nft-collectible folder and have a file named package.json.
Next, lets install Hardhat. Run the following command:
npm install --save-dev hardhatWe can now create a sample Hardhat project by running the following command and choosing Create a basic sample project.
npx hardhatAgree to all the defaults (project root, adding a .gitignore, and installing all sample project dependencies).
Lets check that our sample project has been installed properly. Run the following command:
npx hardhat run scripts/sample-script.jsIf all goes well, you should see output that looks something like this:

We now have our hardhat development environment successfully configured. Let us now install the OpenZeppelin contracts package. This will give us access to the ERC721 contracts (the standard for NFTs) as well as a few helper libraries that we will encounter later.
npm install @openzeppelin/contractsIf we want to share our projects code publicly (on a website like GitHub), we wouldnt want to share sensitive information like our private key, our Etherscan API key, or our Alchemy URL (dont worry if some of these words dont make sense to you yet). Therefore, let us install another library called dotenv.
npm install dotenvCongratulations! We are now in a good place to start developing our smart contract.
Writing the Smart Contract

In this section, we are going to write a smart contract in Solidity that allows anyone to mint a certain number of NFTs by paying the required amount of ether + gas.
In the contracts folder of your project, create a new file called NFTCollectible.sol.
We will be using Solidity v8.0. Our contract will inherit from OpenZeppelins ERC721Enumerable and Ownable contracts. The former has a default implementation of the ERC721 (NFT) standard in addition to a few helper functions that are useful when dealing with NFT collections. The latter allows us to add administrative privileges to certain aspects of our contract.
In addition to the above, we will also use OpenZeppelins SafeMath and Counters libraries to safely deal with unsigned integer arithmetic (by preventing overflows) and token IDs respectively.
This is what the skeleton of our contract looks like:
//SPDX-License-Identifier: MITpragma solidity ^0.8.0;import "@openzeppelin/contracts/utils/Counters.sol";import "@openzeppelin/contracts/access/Ownable.sol";import "@openzeppelin/contracts/utils/math/SafeMath.sol";import "@openzeppelin/contracts/token/ERC721/extensions/ERC721Enumerable.sol";contract NFTCollectible is ERC721Enumerable, Ownable { using SafeMath for uint256; using Counters for Counters.Counter; Counters.Counter private _tokenIds;}Storage constants and variables
Our contract needs to keep track of certain variables and constants. For this tutorial, we will be defining the following:
- Supply: The maximum number of NFTs that can be minted in your collection.
- Price: The amount of ether required to buy 1 NFT.
- Maximum number of mints per transaction: The upper limit of NFTs that you can mint at once.
- Base Token URI: The IPFS URL of the folder containing the JSON metadata.
In this tutorial, we will set 13 as constants. In other words, we wont be able to modify them once the contract has been deployed. We will write a setter function for baseTokenURI that will allow the contracts owner (or deployer) to change the base URI as and when required.
Right under the _tokenIds declaration, add the following:
uint public constant MAX_SUPPLY = 100;uint public constant PRICE = 0.01 ether;uint public constant MAX_PER_MINT = 5;string public baseTokenURI;Notice that Ive used all caps for the constants. Feel free to change the values for the constants based on your project.
Constructor
We will set the baseTokenURI in our constructor call. We will also call the parent constructor and set the name and symbol for our NFT collection.
Our constructor, therefore, looks like this:
constructor(string memory baseURI) ERC721("NFT Collectible", "NFTC") { setBaseURI(baseURI);}Reserve NFTs function
As the creator of the project, you probably want to reserve a few NFTs of the collection for yourself, your team, and for events like giveaways.
Lets write a function that allows us to mint a certain number of NFTs (in this case, ten) for free. Since anyone calling this function only has to pay gas, we will obviously mark it as onlyOwner so that only the owner of the contract will be able to call it.
function reserveNFTs() public onlyOwner { uint totalMinted = _tokenIds.current(); require( totalMinted.add(10) < MAX_SUPPLY, "Not enough NFTs" ); for (uint i = 0; i < 10; i++) { _mintSingleNFT(); }}We check the total number of NFTs minted so far by calling tokenIds.current(). We then check if there are enough NFTs left in the collection for us to reserve. If yes, we proceed to mint 10 NFTs by calling _mintSingleNFT ten times.
It is in the _mintSingleNFT function that the real magic happens. We will look into this a little later.
Setting Base Token URI
Our NFT JSON metadata is available at this IPFS URL: ipfs://QmZbWNKJPAjxXuNFSEaksCJVd1M6DaKQViJBYPK2BdpDEP/
When we set this as the base URI, OpenZeppelins implementation automatically deduces the URI for each token. It assumes that token 1s metadata will be available at ipfs://QmZbWNKJPAjxXuNFSEaksCJVd1M6DaKQViJBYPK2BdpDEP/1, token 2s metadata will be available at ipfs://QmZbWNKJPAjxXuNFSEaksCJVd1M6DaKQViJBYPK2BdpDEP/2, and so on.
(Please note that there is no .json extension to these files)
However, we need to tell our contract that the baseTokenURI variable that we defined is the base URI that the contract must use. To do this, we override an empty function called _baseURI() and make it return baseTokenURI.
We also write an only owner function that allows us to change the baseTokenURI even after the contract has been deployed.
function _baseURI() internal view virtual override returns (string memory) { return baseTokenURI;}function setBaseURI(string memory _baseTokenURI) public onlyOwner { baseTokenURI = _baseTokenURI;}Mint NFTs function
Let us now turn our attention to the main mint NFTs function. Our users and customers will call this function when they want to purchase and mint NFTs from our collection.
Since theyre sending ether to this function, we have to mark it as payable.
We need to make three checks before we allow the mint to take place:
- There are enough NFTs left in the collection for the caller to mint the requested amount.
- The caller has requested to mint more than 0 and less than the maximum number of NFTs allowed per transaction.
- The caller has sent enough ether to mint the requested number of NFTs.
function mintNFTs(uint _count) public payable { uint totalMinted = _tokenIds.current(); require( totalMinted.add(_count) <= MAX_SUPPLY, "Not enough NFTs!" ); require( _count > 0 && _count <= MAX_PER_MINT, "Cannot mint specified number of NFTs." ); require( msg.value >= PRICE.mul(_count), "Not enough ether to purchase NFTs." ); for (uint i = 0; i < _count; i++) { _mintSingleNFT(); }}Mint Single NFT function
Lets finally take a look at the private _mintSingleNFT() function thats being called whenever we (or a third party) want to mint an NFT.
function _mintSingleNFT() private { uint newTokenID = _tokenIds.current(); _safeMint(msg.sender, newTokenID); _tokenIds.increment();}This is what is happening:
- We get the current ID that hasnt been minted yet.
- We use the
_safeMint()function already defined by OpenZeppelin to assign the NFT ID to the account that called the function. - We increment the token IDs counter by 1.
The token ID is 0 before any mint has taken place.
When this function is called for the first time, newTokenID is 0. Calling safeMint() assigns NFT with ID 0 to the person who called the contract function. The counter is then incremented to 1.
The next time this function is called, _newTokenID has value 1. Calling safeMint() assigns NFT with ID 1 to the person who I think you get the gist.
Note that we dont need to explicitly set the metadata for each NFT. Setting the base URI ensures that each NFT gets the correct metadata (stored in IPFS) assigned automatically.
Getting all tokens owned by a particular account
If you plan on giving any sort of utility to your NFT holders, you would want to know which NFTs from your collection each user holds.
Lets write a simple function that returns all IDs owned by a particular holder. This is made super simple by ERC721Enumerables balanceOf and tokenOfOwnerByIndex functions. The former tells us how many tokens a particular owner holds, and the latter can be used to get all the IDs that an owner owns.
function tokensOfOwner(address _owner) external view returns (uint[] memory) { uint tokenCount = balanceOf(_owner); uint[] memory tokensId = new uint256[](tokenCount); for (uint i = 0; i < tokenCount; i++) { tokensId[i] = tokenOfOwnerByIndex(_owner, i); } return tokensId;}Withdraw balance function
All the effort weve put in so far would go to waste if we are not able to withdraw the ether that has been sent to the contract.
Let us write a function that allows us to withdraw the contracts entire balance. This will obviously be marked as onlyOwner.
function withdraw() public payable onlyOwner { uint balance = address(this).balance; require(balance > 0, "No ether left to withdraw"); (bool success, ) = (msg.sender).call{value: balance}(""); require(success, "Transfer failed.");}Final Contract
Were done with the smart contract. This is what it looks like. (By the way, if you havent already, delete the Greeter.sol file.)
//SPDX-License-Identifier: MITpragma solidity ^0.8.0;import "@openzeppelin/contracts/utils/Counters.sol";import "@openzeppelin/contracts/access/Ownable.sol";import "@openzeppelin/contracts/utils/math/SafeMath.sol";import "@openzeppelin/contracts/token/ERC721/extensions/ERC721Enumerable.sol";contract NFTCollectible is ERC721Enumerable, Ownable { using SafeMath for uint256; using Counters for Counters.Counter; Counters.Counter private _tokenIds; uint public constant MAX_SUPPLY = 100; uint public constant PRICE = 0.01 ether; uint public constant MAX_PER_MINT = 5; string public baseTokenURI; constructor(string memory baseURI) ERC721("NFT Collectible", "NFTC") { setBaseURI(baseURI); } function reserveNFTs() public onlyOwner { uint totalMinted = _tokenIds.current(); require(totalMinted.add(10) < MAX_SUPPLY, "Not enough NFTs left to reserve"); for (uint i = 0; i < 10; i++) { _mintSingleNFT(); } } function _baseURI() internal view virtual override returns (string memory) { return baseTokenURI; } function setBaseURI(string memory _baseTokenURI) public onlyOwner { baseTokenURI = _baseTokenURI; } function mintNFTs(uint _count) public payable { uint totalMinted = _tokenIds.current(); require(totalMinted.add(_count) <= MAX_SUPPLY, "Not enough NFTs left!"); require(_count >0 && _count <= MAX_PER_MINT, "Cannot mint specified number of NFTs."); require(msg.value >= PRICE.mul(_count), "Not enough ether to purchase NFTs."); for (uint i = 0; i < _count; i++) { _mintSingleNFT(); } } function _mintSingleNFT() private { uint newTokenID = _tokenIds.current(); _safeMint(msg.sender, newTokenID); _tokenIds.increment(); } function tokensOfOwner(address _owner) external view returns (uint[] memory) { uint tokenCount = balanceOf(_owner); uint[] memory tokensId = new uint256[](tokenCount); for (uint i = 0; i < tokenCount; i++) { tokensId[i] = tokenOfOwnerByIndex(_owner, i); } return tokensId; } function withdraw() public payable onlyOwner { uint balance = address(this).balance; require(balance > 0, "No ether left to withdraw"); (bool success, ) = (msg.sender).call{value: balance}(""); require(success, "Transfer failed."); }}Deploying the contract locally
Let us now make preparations to deploy our contract to the Rinkeby test network by simulating it in a local environment.
In the scripts folder, create a new file called run.js and add the following code:
const { utils } = require("ethers");async function main() { const baseTokenURI = "ipfs://QmZbWNKJPAjxXuNFSEaksCJVd1M6DaKQViJBYPK2BdpDEP/"; // Get owner/deployer's wallet address const [owner] = await hre.ethers.getSigners(); // Get contract that we want to deploy const contractFactory = await hre.ethers.getContractFactory("NFTCollectible"); // Deploy contract with the correct constructor arguments const contract = await contractFactory.deploy(baseTokenURI); // Wait for this transaction to be mined await contract.deployed(); // Get contract address console.log("Contract deployed to:", contract.address); // Reserve NFTs let txn = await contract.reserveNFTs(); await txn.wait(); console.log("10 NFTs have been reserved"); // Mint 3 NFTs by sending 0.03 ether txn = await contract.mintNFTs(3, { value: utils.parseEther('0.03') }); await txn.wait() // Get all token IDs of the owner let tokens = await contract.tokensOfOwner(owner.address) console.log("Owner has tokens: ", tokens);}main() .then(() => process.exit(0)) .catch((error) => { console.error(error); process.exit(1); });This is some Javascript code that utilizes the ethers.js library to deploy our contract, and then call functions of the contract once it has been deployed.
Here is the series of whats going on:
- We get the address of the deployer/owner (us)
- We get the contract that we want to deploy.
- We send a request for the contract to be deployed and wait for a miner to pick this request and add it to the blockchain.
- Once mined, we get the contract address.
- We then call public functions of our contract. We reserve 10 NFTs, mint 3 NFTs by sending 0.03 ETH to the contract, and check the NFTs owned by us. Note that the first two calls require gas (because theyre writing to the blockchain) whereas the third simply reads from the blockchain.
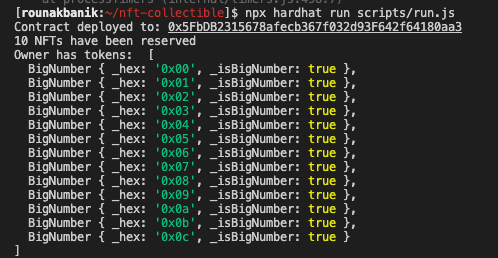
Lets give this a run locally.
npx hardhat run scripts/run.jsIf all goes well, you should see something like this:
Deploying the contract to Rinkeby
To deploy our contract to Rinkeby, we will need to set up a few things.
First, we will need an RPC URL that will allow us to broadcast our contract creation transaction. We will use Alchemy for this. Create an Alchemy account here and then proceed to create a free app.

Make sure that the network is set to Rinkeby.
Once youve created an app, go to your Alchemy dashboard and select your app. This will open a new window with a View Key button on the top right. Click on that and select the HTTP URL.
Acquire some fake Rinkeby ETH from the faucet here. For our use case, 0.5 ETH should be more than enough. Once youve acquired this ETH, open your Metamask extension and get the private key for the wallet containing the fake ETH (you can do this by going into Account Details in the 3-dots menu near the top-right).
Do not share your URL and private key publicly.
We will use the dotenv library to store the aforementioned variables as environment variables and will not commit them to our repository.
Create a new file called .env and store your URL and private key in the following format:
API_URL = "<--YOUR ALCHEMY URL HERE-->"PRIVATE_KEY = "<--YOUR PRIVATE KEY HERE-->"Now, replace your hardhat.config.js file with the following contents.
require("@nomiclabs/hardhat-waffle");require('dotenv').config();const { API_URL, PRIVATE_KEY } = process.env;// This is a sample Hardhat task. To learn how to create your own go to// https://hardhat.org/guides/create-task.htmltask("accounts", "Prints the list of accounts", async (taskArgs, hre) => { const accounts = await hre.ethers.getSigners(); for (const account of accounts) { console.log(account.address); }});// You need to export an object to set up your config// Go to https://hardhat.org/config/ to learn more/** * @type import('hardhat/config').HardhatUserConfig */module.exports = { solidity: "0.8.4", defaultNetwork: "rinkeby", networks: { rinkeby: { url: API_URL, accounts: [PRIVATE_KEY] } },};Were almost there! Run the following command:
npx hardhat run scripts/run.js --network rinkebyThis should give you output very similar to what you got earlier, except that this has been deployed to the real blockchain.
Make a note of the contract address. Ours was 0x355638a4eCcb777794257f22f50c289d4189F245.
You can check this contract out on Etherscan. Go to Etherscan and type in the contract address. You should see something like this.

Viewing our NFTs on OpenSea
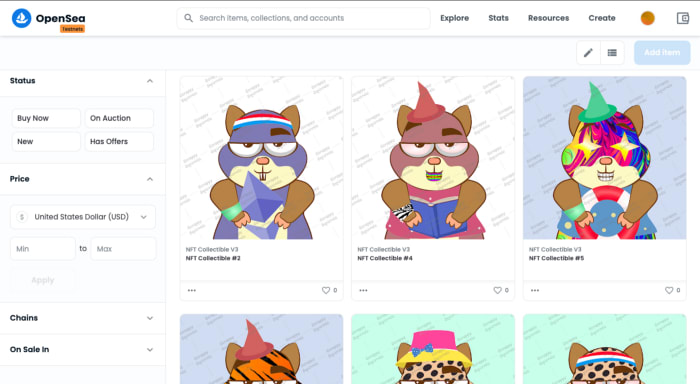
Believe it or not, our NFT collection is now already available on OpenSea without us having to upload it explicitly. Go to testnets.opensea.io and search for your contract address.
This is what our collection looks like:
Verifying our contract on Etherscan
We have come a LONG way in this article but there is one final thing wed like to do before we go.
Lets verify our contract on etherscan. This will allow your users to see your contracts code and ensure that there is no funny business going on. More importantly, verifying your code will allow your users to connect their Metamask wallet to etherscan and mint your NFTs from etherscan itself!
Before we can do this, we will need an Etherscan API key. Sign up for a free account here and access your API keys here.
Lets add this API key to our .env file.
ETHERSCAN_API = "<--YOUR ETHERSCAN API KEY-->"Hardhat makes it really simple to verify our contract on Etherscan. Lets install the following package:
npm install @nomiclabs/hardhat-etherscanNext, make adjustments to hardhat.config.js so it looks like this:
require("@nomiclabs/hardhat-waffle");require("@nomiclabs/hardhat-etherscan");require('dotenv').config();const { API_URL, PRIVATE_KEY, ETHERSCAN_API } = process.env;// This is a sample Hardhat task. To learn how to create your own go to// https://hardhat.org/guides/create-task.htmltask("accounts", "Prints the list of accounts", async (taskArgs, hre) => { const accounts = await hre.ethers.getSigners(); for (const account of accounts) { console.log(account.address); }});// You need to export an object to set up your config// Go to https://hardhat.org/config/ to learn more/** * @type import('hardhat/config').HardhatUserConfig */module.exports = { solidity: "0.8.4", defaultNetwork: "rinkeby", networks: { rinkeby: { url: API_URL, accounts: [PRIVATE_KEY] } }, etherscan: { apiKey: ETHERSCAN_API }};Now, run the following two commands:
npx hardhat cleannpx hardhat verify --network rinkeby DEPLOYED_CONTRACT_ADDRESS "BASE_TOKEN_URI"In our case, the second command looked like this:
npx hardhat verify --network rinkeby 0x355638a4eCcb777794257f22f50c289d4189F245 "ipfs://QmZbWNKJPAjxXuNFSEaksCJVd1M6DaKQViJBYPK2BdpDEP/"
Now, if you visit your contracts Rinkeby Etherscan page, you should see a small green tick next to the Contract tab. More importantly, your users will now be able to connect to web3 using Metamask and call your contracts functions from Etherscan itself!

Try this out yourself.
Connect the account that you used to deploy the contract and call the withdraw function from etherscan. You should be able to transfer the 0.03 ETH in the contract to your wallet. Also, ask one of your friends to connect their wallet and mint a few NFTs by calling the mintNFTs function.
Conclusion
We now have a deployed smart contract that lets users mint NFTs from our collection. An obvious next step would be to build a web3 app that allows our users to mint NFTs directly from our website. This will be the subject of a future tutorial.
If youve reached this far, congratulations! You are on your way to becoming a master Solidity and blockchain developer. Weve covered some complex concepts in this article and coming this far is truly incredible. Were proud. :)
We would love to take a look at your collection. Come say hi to us on our Discord. Also, if you liked our content, we would be super grateful if you tweet about us, follow us(@ScrappyNFTs and @Rounak_Banik), and invite your circle to our Discord. Thank you for your support!
Final code repository: https://github.com/rounakbanik/nft-collectible-contract
Scrappy Squirrels
Scrappy Squirrels is a collection of 10,000+ randomly generated NFTs on the Ethereum Blockchain. Scrappy Squirrels are meant for buyers, creators, and developers who are completely new to the NFT ecosystem.
The community is built around learning about the NFT revolution, exploring its current use cases, discovering new applications, and finding members to collaborate on exciting projects with.
Join our community here: https://discord.gg/8UqJXTX7Kd
Original Link: https://dev.to/rounakbanik/writing-an-nft-collectible-smart-contract-2nh8
Dev To
More About this Source Visit Dev To