
An Interest In:
Web News this Week
- April 18, 2024
- April 17, 2024
- April 16, 2024
- April 15, 2024
- April 14, 2024
- April 13, 2024
- April 12, 2024
Some of Our Sources
- Simplebits
- Just Creative
- Six Revisions
- Naldz Graphics
- Fudge Graphics
- 24 Ways
- Spyre Studios
- Design Modo
- Codrops
- Dev To
Help Webnuz
Referal links:
Build an escrow contract on the Ethereum blockchain with Solidity and Replit
Since Satoshi Nakamoto released the first version of Bitcoin in early 2009, digital currencies and blockchain technology have been the site of frenzied innovation, excitement and speculation. In addition to Bitcoin itself, hundreds of competing and complementary blockchains and currencies have come and gone. In this tutorial, we will be looking at Ethereum, the second most popular and widely used cryptocurrency after Bitcoin.
Ethereum's main innovation is to provide a Turing complete environment for on-chain computation, which means we can run code on the blockchain. This opens up an immense field of possibilities for creating decentralized finance (DeFi) platforms, which can act as open alternatives to traditional financial services such as loans, investment, insurance and the sale of artworks.
In this tutorial, we will be building a simple escrow smart contract, which will include deploying our own non-fungible token (NFT). By the end of this tutorial, you will:
- Have experience with developing Ethereum smart contracts using the Solidity programming language.
- Know the basics of deploying contracts to a blockchain and interacting with them.
- Have an understanding of some of the key considerations for secure blockchain development.
Getting started
We need two things to get started with this project: a Solidity repl and a browser wallet.
Solidity repl
Sign in to Replit or create an account if you haven't already. Once logged in, create a Solidity starter repl.

The Solidity starter repl works a little differently from other repls you may have used in the past. Rather than running our repl every time we want to test out a new piece of code, we can run our repl once, to start it up, and it will automatically reload when changes are made to our Solidity code in contract.sol.
The Solidity starter repl comes with a friendly web interface, built using the web3 Ethereum JavaScript API, which we will use to deploy and interact with our contracts. We will deploy to Replit's testnet, a custom version of the Ethereum blockchain managed by Replit and optimised for testing.
Browser wallet
We will need a browser-based web3 wallet to interact with the Replit testnet and our deployed contracts. MetaMask is a popular and feature-rich wallet implemented as a WebExtension. You can install it from MetaMask's download page. Make sure you're using a supported browser -- either Chrome, Firefox, Brave or Edge.
Once you've installed MetaMask, follow the prompts to create a wallet and sign in. MetaMask will give you a 12-word secret recovery phrase -- this is your wallet's private key, and must be kept safe and secret. If you lose this phrase, you will not be able to access your wallet, and if someone else finds it, they will.
If you're already using MetaMask, we recommend creating a new account for testing with Replit. You can do this from the account menu, which appears when you click on the account avatar in the top right corner of MetaMask interface.
Introduction to smart contract development
Now that we've got our repl and wallet set up, we can start developing. We will be writing contracts, which are the basic building blocks of Ethereum programs. An individual contract can have state variables and functions, and can inherit from multiple other contracts. Contracts in Solidity are equivalent to classes in a language like Python or Java.
Contracts on Ethereum and Ethereum-based networks (such as the Replit testnet and Binance Chain) are compiled to bytecode which runs on the Ethereum Virtual Machine (EVM). This is similar to how Java code compiles to bytecode for the JVM.
A list of opcodes for EVM is provided here. Many of the opcodes dealing with arithmetic and logical operations should be familiar if you've worked with any kind of assembly before. The EVM also has opcodes for blockchain-specific operations, such as getting information about the current block or chain.
An additional consideration, unique to blockchain development, is that each opcode has an associated price (listed here). Users of smart contracts pay a fee (known as gas) to invoke state-changing functions. This fee is determined by the opcodes used, and so it is in the interest of developers to keep their code as simple as possible.
Solidity, which we will be using below, is the most popular language for developing smart contracts on Ethereum. Alternatives such as Vyper exist, but are not as widely used.
Escrow protocol design
Before we jump into the code, let's make sure we have a plan for what we're going to build.
An escrow is a contractual agreement in which a third party receives money from one party and pays it to another party after a certain condition has been met. In traditional finance, this third party needs to be a trusted individual or organization, such as a bank, but in DeFi, it can be a smart contract.
We will build a simple escrow protocol that holds funds until a specified duration has passed. This could be used to give a friend some Ethereum for their birthday, or to save money for a specific occasion.
Our escrow protocol will consist of two contracts:
Escrow, which will provide the end-user interface for escrowing and redeeming funds. This contract will also store all of the escrowed funds.EscrowNFT, which will store the details of individual escrows as NFTs. This will allow users to transfer immature escrows between one another.
While the most famous use of NFTs involves buying and selling artworks and other collectibles on marketplaces like OpenSea, we can use them for all kinds of other purposes, such as to represent escrows.
Escrow NFT
Let's start coding with the EscrowNFT contract. Open contract.sol, delete the file's contents, and add the following:
// SPDX-License-Identifier: MITpragma solidity ^0.8.2;import "@openzeppelin/contracts/access/Ownable.sol";import "@openzeppelin/contracts/token/ERC721/extensions/ERC721Burnable.sol";import "@openzeppelin/contracts/token/ERC721/extensions/ERC721Enumerable.sol";contract EscrowNFT is ERC721Burnable, ERC721Enumerable, Ownable { uint256 public tokenCounter = 0; // NFT data mapping(uint256 => uint256) public amount; mapping(uint256 => uint256) public matureTime; constructor() ERC721("EscrowNFT", "ESCRW") { }}The first line of our contract is the license identifier. Smart contracts are usually open source, and reuse of other projects' code is common in DeFi, so it's a good idea to include a license that indicates how you would like others to use (or not use) your code. Supported licenses are listed here.
In the next line, we define the version of Solidity we're using (in this case, any version newer than 0.8.2 up to 0.9.0). Solidity is an evolving language and often introduces breaking changes, so our code may not compile under older or newer versions of the language.
Following the pragma statement, we import some contracts from the OpenZeppelin contract library. This library includes inheritable base contracts for a wide variety of common smart contract development needs, including base implementations of Ethereum token standards.
The Ethereum token standard for NFTs is ERC-721. Rather than implementing it ourselves, we can import and use OpenZeppelin's version. Note that while OpenZeppelin has a base ERC721 contract, we will use a couple of extensions:
ERC721Burnable, which will allow us to destroy NFTs that have been redeemed.ERC721Enumerable, which will allow us to list which NFTs belong to which owners.
Both of these extension contracts inherit from ERC721.
We also use OpenZeppelin's Ownable contract, which will allow us to enforce access control on sensitive functionality.
As Solidity supports multiple inheritance, the contract definition line uses all of our imports:
contract EscrowNFT is ERC721Burnable, ERC721Enumerable, Ownable {In the contract body, we define a few state variables:
tokenCounter: this will provide us with unique, incrementing IDs for tokens as they are minted.amountandmatureTime: these mappings will store data for each token we mint.
Note the use of uint256 as the type for these values: because most of the values we deal with in Solidity programs are monetary, we use unsigned integers to avoid storing negative numbers. In versions of Solidity prior to 0.8.0, this sometimes led to dangerous overflows, but overflow protection is now built into the language.
We do not need to initialize any of these variables, as Solidity will automatically set uninitialized variables to 0.
The final part of the code we added above is the constructor() method, which calls a parent constructor to define our NFT's name and symbol/stock ticker.
Now we need to define a mint function, so that we can create NFTs. We'll start with the function definition, which we will add just below the body of constructor():
function mint(address _recipient, uint256 _amount, uint256 _matureTime) public onlyOwner returns (uint256) { }We're defining a function named mint which takes three arguments:
address _recipient: The address we will send the NFT to. This can be a user's wallet or another contract.uint256 _amount: The amount of Ether escrowed by this NFT.uint256 _matureTime: The time (represented as a Unix Timestamp) at which the NFT's funds will be redeemable.
This function will return a single uint256 -- the numeric ID of the minted NFT.
This is a public function, which means it can be called by both external users and by other functions in this contract, or any contracts that inherit from it. Solidity provides granular function and variable visibility options, which are explained here.
Finally, onlyOwner refers to a modifier defined in Ownable. Modifiers are generally used to restrict functions for purposes of access control or state logic. This modifier will ensure that only the owner of the NFT contract is allowed to mint NFTs.
Now that we've read and understood the function definition, let's add the function body:
function mint(address _recipient, uint256 _amount, uint256 _matureTime) public onlyOwner returns (uint256) { _mint(_recipient, tokenCounter); // set values amount[tokenCounter] = _amount; matureTime[tokenCounter] = _matureTime; // increment counter tokenCounter++; return tokenCounter - 1; // return ID }Here we use ERC721's internal _mint() function to mint a new token to the recipient with the current value of tokenCounter as its ID. We then set the amount and matureTime mappings for our new token. Finally, we increment tokenCounter and return the ID of our token.
Next, we need to make a function that will return the details of a given token. Add the following code below the body of the mint() function:
function tokenDetails(uint256 _tokenId) public view returns (uint256, uint256) { require(_exists(_tokenId), "EscrowNFT: Query for nonexistent token"); return (amount[_tokenId], matureTime[_tokenId]); }We declare this as a view function. This declaration asserts that the function does not modify state, and thus its invocation does not need to be recorded on-chain. This means it will be callable for free.
Our function body starts with a require statement. This is an error-handling function in Solidity: if the condition in the first argument is not met, the current transaction will revert (undoing all previous actions) and the error message in the second argument will be displayed.
If invoked with an existing token ID, this function will return two uint256 values, the amount and matureTime for that ID. Note the syntax for multiple return.
We're almost done with our NFT contract! Before we move on, we need to add a few boilerplate functions. Add the following code below the body of your tokenDetails() function:
function contractAddress() public view returns (address) { return address(this); } function _beforeTokenTransfer(address _from, address _to, uint256 _amount) internal override(ERC721, ERC721Enumerable) { } function supportsInterface(bytes4 _interfaceId) public view virtual override(ERC721, ERC721Enumerable) returns (bool) { }Our first function will return the contract's address. This will make it easier to work with in the Replit web interface.
The last two functions resolve ambiguities introduced by Solidity's multiple inheritance. Because we're using two different ERC-721 extensions, the base ERC721 contract is inherited twice with different functions added and overridden. To resolve the compiler's confusion, we specify that the versions of _beforeTokenTransfer() and supportsInterface() provided by ERC721Enumerable should be preferred.
Escrow contract
Now we need to create our Escrow contract, which will act as an interface for creating and redeeming escrows. Add the following contract block to the bottom of contract.sol, below the EscrowNFT contract:
contract Escrow is Ownable { EscrowNFT public escrowNFT; bool public initialized = false; event Escrowed(address _from, address _to, uint256 _amount, uint256 _matureTime); event Redeemed(address _recipient, uint256 _amount); event Initialized(address _escrowNft);}This contract inherits from Ownable. We define two state variables:
escrowNFT: This is the instance of theEscrowNFTcontract that ourEscrowcontract will use.initialized: This variable will help us to implement the initializable design pattern.
We also define a number of events. Events provide a user-friendly form of logging on the blockchain and are commonly used by dApps (decentralized apps -- i.e. web frontends for smart contracts). It's considered best practice to emit events whenever a state change is made, so we've defined events for our contract's three state-changing actions:
- Creation of escrow NFTs.
- Redeeming of escrowed funds.
- Initialization of the contract.
Let's implement initialization now. Add the following code below your event definitions:
modifier isInitialized() { require(initialized, "Contract is not yet initialized"); _; } function initialize(address _escrowNftAddress) external onlyOwner { require(!initialized, "Contract already initialized."); escrowNFT = EscrowNFT(_escrowNftAddress); initialized = true; emit Initialized(_escrowNftAddress); }Here we define a custom modifier, isInitialized, which will revert if initialized is false. If initialized is true, the function we apply this modifier to will execute at _.
Next, we define our initialize() function, which takes a single argument: the address of the EscrowNFT contract to use. We've given this function external visibility, so it can only be called by an external user, and applied the onlyOwner modifier, so only the contract's owner can initialize it.
In the function body, we ensure that the contract is not already initialized, and then we initialize our escrowNFT state variable, set initialized to true, and emit an event.
Now we need a function that allows us to create escrow NFTs. Add the following code below the initialize function:
function escrowEth(address _recipient, uint256 _duration) external payable isInitialized { require(_recipient != address(0), "Cannot escrow to zero address."); require(msg.value > 0, "Cannot escrow 0 ETH."); uint256 amount = msg.value; uint256 matureTime = block.timestamp + _duration; escrowNFT.mint(_recipient, amount, matureTime); emit Escrowed(msg.sender, _recipient, amount, matureTime); }Our escrowEth function is payable, which means it can receive Ether, and it uses the isInitialized modifier. It takes a recipient address and an escrow duration, specified in seconds.
In the function body, we ensure that the recipient is not the zero address, to prevent users from accidentally minting NFTs without specifying the receiver, and that the amount of Ether to be escrowed (accessible from msg.value) is greater than zero.
We then set the amount and matureTime values for our NFT, using block.timestamp to get the current time (approximately). These values are provided to escrowNFT.mint, which will mint our NFT to the specified recipient.
Finally, we emit an event, using msg.sender to retrieve the address of the user who called the function.
Now that we can create escrow NFTs, we need a way for the recipient to redeem the funds in a matured NFT. Let's create a function for that now, below the definition of our escrowEth function:
function redeemEthFromEscrow(uint256 _tokenId) external isInitialized { require(escrowNFT.ownerOf(_tokenId) == msg.sender, "Must own token to claim underlying Eth"); (uint256 amount, uint256 matureTime) = escrowNFT.tokenDetails(_tokenId); require(matureTime <= block.timestamp, "Escrow period not expired."); escrowNFT.burn(_tokenId); (bool success, ) = msg.sender.call{value: amount}(""); require(success, "Transfer failed."); emit Redeemed(msg.sender, amount); }Our redemption function first checks whether msg.sender is the owner of the token, to prevent users from attempting to redeem tokens they don't own. It then retrieves the amount and matureTime for the specified token ID, and checks whether the matureTime has passed.
If the token is owned by msg.sender and its matureTime has passed, it is burned using the burn() function from ERC721Burnable. This destroys the token, ensuring that it cannot be redeemed again.
Once the token is destroyed, we transfer its underlying Ether to msg.sender. As the creator of the escrow NFT originally paid this amount of Ether into the contract, it should still be available. There are a few different ways of sending Ether in Solidity -- using call is the best one. call returns two values, but we only want the first one, so we leave out the second variable declaration in our multiple return syntax.
If the Ether transfer fails, we revert, undoing the destruction of the token. Otherwise we emit an event to record the escrow redemption.
Our contract now does the main things it needs to, but we can make some improvements. For example, rather than requiring users to specify the ID of the token they want to redeem, we can create a function that redeems all matured tokens in their possession. Let's do this now, by adding a new function beneath the definition of redeemEthFromEscrow:
function redeemAllAvailableEth() external isInitialized { uint256 nftBalance = escrowNFT.balanceOf(msg.sender); require(nftBalance > 0, "No escrow NFTs to redeem."); uint256 totalAmount = 0; for (uint256 i = 0; i < nftBalance; i++) { uint256 tokenId = escrowNFT.tokenOfOwnerByIndex(msg.sender, i); (uint256 amount, uint256 matureTime) = escrowNFT.tokenDetails(tokenId); if (matureTime <= block.timestamp) { escrowNFT.burn(tokenId); totalAmount += amount; } } require(totalAmount > 0, "No Ether to redeem."); (bool success, ) = msg.sender.call{value: totalAmount}(""); require(success, "Transfer failed."); emit Redeemed(msg.sender, totalAmount); }We start by querying escrowNFT.balanceOf() to find out the number of escrow NFT tokens msg.sender owns. If they own none, we revert.
We then create a variable named totalAmount and loop through the user's NFTs. We can get the ID for each one using tokenOfOwnerByIndex, a function defined in ERC721Enumerable. We then retrieve the amount and matureTime for the token using escrowNFT.tokenDetails(). If a given token's matureTime has passed, we burn it and add its value to totalAmount.
Once the for loop has completed, we check whether totalAmount is greater than zero, and revert if it isn't. We then send the totalAmount in Ether to msg.sender. At this point, you may wonder why we didn't just loop through the user's NFTs and called redeem on each one, to avoid repeating code. While this would make our code simpler to read, it would lead to a lot of extra checks and transfers, which would make this function more expensive for users to call. When developing smart contracts, keeping the cost of each function invocation to a minimum is paramount.
Let's add one more function before we deploy our contracts. You should recognize contractAddress() from EscrowNFT above. Add it below the definition of redeemAllAvailableEth().
function contractAddress() public view returns (address) { return address(this); }And with that, our code is complete!
Testing our protocol
Now that we've written our contracts, it's time to deploy them to the Replit testnet and test them out. We'll use our repl's web interface to do this.
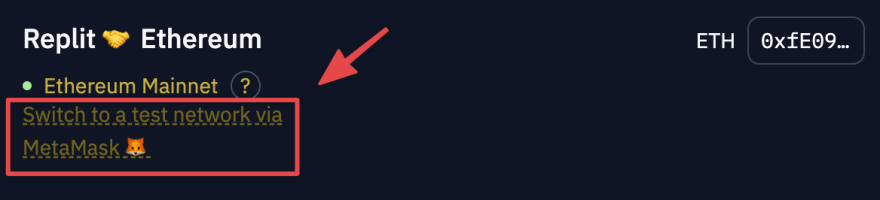
First, run your repl. Once all of the dependencies are installed, you should see the Replit Ethereum web interface in your repl's browser. It looks like this:

Connect your MetaMask wallet to the web interface and switch to the Replit testnet. Then click the link to get 1 ETH for testing. Wait until 1 ETH shows up in your wallet balance on the top right of the page.

Now you can deploy your contracts. Select "Escrow" from the drop-down box and click Deploy. Approve the MetaMask pop-up that appears. Then do the same with "EscrowNFT".
Once both of these contracts have been deployed, they will show up as expandable boxes below the drop-down box. Expand both and take a look at all the different functions available.

Before we can use either of these contracts, we need to do some setup. First, let's initialize Escrow.
- In
EscrowNFT, run the view functioncontractAddress. Click on the output to copy it to your clipboard. - In
Escrow, find theinitializefunction. Paste the contents of your clipboard into the value for_escrowNftAddress. - Run the
initializefunction and confirm the MetaMask pop-up that appears.
Our Escrow contract is now initialized and linked to EscrowNFT. But before we can use it, there's an additional complication. You'll recall that we added the onlyOwner modifier to the mint() function in EscrowNFT. When a contract that inherits from Ownable is deployed, its owner is set to the address that deployed it, which will be your wallet address. But we need it to be owned by Escrow so that escrowEth() can call mint().
Luckily, Ownable provides functionality for transferring ownership, so we can transfer EscrowNFT to Escrow in the following steps:
- In
Escrow, run the view functioncontractAddress. Click on the output to copy it to your clipboard. - In
EscrowNFT, find thetransferOwnershipfunction. Paste the contents of your clipboard into the value fornewOwner. - Run the
transferOwnershipfunction and confirm the MetaMask pop-up that appears.
Now Escrow owns EscrowNFT and our system will work. Let's test it out by doing the following:
- Find the
escrowEthfunction inEscrow. - Specify your own address, a short duration and a small amount of Ether.
- Run the
escrowEthfunction and approve the MetaMask pop-up that appears.
If you attempt to claim your escrowed Ether using either of the redemption functions in Escrow before the duration has passed, the transaction should fail with the expected error message. However, if you wait for the duration to pass and then call either of the redemption functions, the transaction will fail for a different reason.
Both redemption functions call EscrowNFT's burn() function to burn tokens. This is an access-controlled function, available only to the token owner and addresses approved by the token owner. If this weren't the case, anyone could burn any token just by calling the function.
To allow Escrow to burn our NFT, we need to give it approval. We can do this in the following steps:
- In
EscrowNFT, find thesetApprovalForAllfunction. - Copy the address from
Escrow'scontractAddressfunction output. - Paste in the address as the value for
operatorand specifytrueas the value forapproved. - Run the
setApprovalForAllfunction and confirm the MetaMask pop-up that appears.
Once approval is set, you should be able to successfully redeem the escrowed Ether from your mature tokens.
Security and trust considerations for smart contract development
We've written our escrow system as a way to learn about Solidity development and interacting with smart contracts on the blockchain. To facilitate these outcomes, our contracts make use of a design that is partially insecure and would not be recommended in practice.
A key part of earning user trust as a smart contract developer is to ensure that you have minimal control over the contracts you deploy. That's why, for example, we designed the initialize() function in Escrow to only be callable once. If a contract has a large number of privileged functions that make significant changes to its state and behavior, there is a risk that the owner -- or a hacker who manages to compromise the owner's wallet -- will use these functions to steal user funds.
An unscrupulous developer could create a malicious version of our escrow protocol by doing the following:
- After deploying
EscrowNFTbut before transferring its ownership, they could callmint()to create an Escrow token with an amount of 100. - They could then transfer
EscrowNFT's ownership toEscrow, and wait for users to start paying Ether toEscrowin order to create tokens. - Once
Escrowhad a balance of 100 Ether or more, the developer could redeem their token, successfully stealing all user funds. - Redemption of any subsequent escrow tokens would fail, as the
Escrowcontract would contain insufficient funds.
While the evidence of all of this happening would be visible on the blockchain, through events, users may not want or easily be able to look at that information before using the protocol.
Another, less serious, consideration is that block.timestamp is not always accurate. As this value is derived from when Ethereum miners report it, it can be manipulated slightly. This will have a negligible effect on escrow periods of multiple days, weeks or months, but could affect very short escrow periods quite significantly.
What next?
Now that you've got your feet wet with Solidity development, here are some ideas for further development:
- Modify the architecture of the protocol to make it impossible to create a malicious version in the manner described above.
- Create a view function in
Escrowthat tells the user how much Ether is available for redemption. - Determine whether the user has approved
Escrowbefore attempting to burn tokens. Add a nice error message if they haven't. - Create an ERC-20 token and allow users to escrow it instead of Ether.
- See if you can rewrite any of the contract functions to use less gas.
Original Link: https://dev.to/ritza/build-an-escrow-contract-on-the-ethereum-blockchain-with-solidity-and-replit-5175
Dev To
More About this Source Visit Dev To