
An Interest In:
Web News this Week
- April 25, 2024
- April 24, 2024
- April 23, 2024
- April 22, 2024
- April 21, 2024
- April 20, 2024
- April 19, 2024
Some of Our Sources
- Slashdot
- BoingBoing
- Technology Review
- Pearsonified
- The Logo Smith
- Smashing Magazine
- My Ink Blog
- Fudge Graphics
- Codrops
- TechPowerUp
Help Webnuz
Referal links:
Integrating Percy and Cypress to your Next.js application.
In this blog post, we will be seeing how to integrate Percy and Cypress to your Next.js application.
Outline:
- Visual Testing
- End to End Testing
- Intro on Percy
- Intro on Cypress
- Writing your first E2E test with Cypress.
- Connecting Percy with Cypress.
- Integrating Visual Testing with CI pipeline
- Conclusion
Visual testing :
Visual testing makes sure that UI looks the same for all the users. At the end of the build, a visual testing tool takes a screenshot so that it can check , analyse and give us information as how our application gets rendered on multiple environments like browsers, devices and how screen size can affect the layout of the application.
Below are some of the visual testing tools
- Percy (BrowserStack)
- Kobiton
- Applitools
- LambdaTest
- CrossBrowserTesting (SMARTBEAR)
- Chromatic
- Screener by SauceLabs (Sauce Visuals)
End to End Testing :
E2E or End-to-end testing is a test strategy where we subject our application to test scenario which will closely impersonate how an end user will interact with application.
- WebdriverJS.
- Protractor.
- WebdriverIO.
- NightwatchJS.
- Cypress.
- TestCafe.

Alright now we know about the two high level testing strategies. Let's see short intro about the tools which we are going to use.
Percy:
Percyhelps teams automate visual testing. It captures screenshots, compares them against the baseline, and highlights visual changes.
Cypress:
Cypress is a JavaScript-based end-to-end testing framework built on top of Mocha which runs on the browser. It's make the testing process more reliable and faster.
Let's code.

Note: I will not be going in depth about writing E2E test. Please refer to the cypress documentation on writing your first test.
Bootstrapping your Next.js application:
We will be using the create-next-app cli to bootstrap our demo application. Go to your terminal and type the following command.
npx create-next-app cypress-next-demo --tscd cypress-next-demoyarn devThe above command will start up a brand new next.js application and spin up in your local machine.
You can now visit localhost:3000 in your browser.
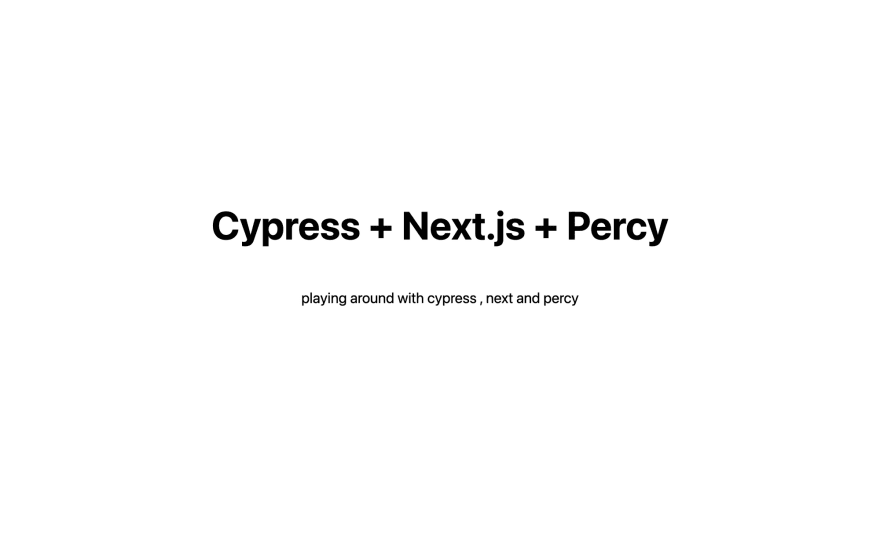
Before writing our first test. Let's clean up the boilerplate code in the index.tsx file. Paste the following in your pages/index.tsx file.
import type { NextPage } from 'next'import Head from 'next/head'import Image from 'next/image'import styles from '../styles/Home.module.css'const Home: NextPage = () => { return ( <div className={styles.container}> <Head> <title>Create Next App</title> <meta name="description" content="Generated by create next app" /> <link rel="icon" href="/favicon.ico" /> </Head> <main className={styles.main}> <h1 className={styles.title}> Cypress + Next.js + Percy </h1> <p className={styles.description}> playing around with cypress , next and percy </p> </main> </div> )}export default HomeWe are having a simple h1 and p tags in our demo app. Save it and check in your browser to verify the changes.
Writing your first E2E test with Cypress:
Let's first install cypress. Head over to the terminal and run the following command.
yarn add cypress --devOnce the installation is done , open the package.json add the following line to the script
"cypress:open": "cypress open"and run the following command in your terminal
yarn run cypress:openThis is will open up the cypress and generate the examples with recommended folder structure
cypress git:(main) ls -ltratotal 0drwxr-xr-x 3 karthikeyan.shanmuga 253301862 96 Nov 16 22:11 pluginsdrwxr-xr-x 6 karthikeyan.shanmuga 253301862 192 Nov 16 22:11 .drwxr-xr-x 3 karthikeyan.shanmuga 253301862 96 Nov 16 22:11 fixturesdrwxr-xr-x 4 karthikeyan.shanmuga 253301862 128 Nov 16 22:11 supportdrwxr-xr-x 3 karthikeyan.shanmuga 253301862 96 Nov 16 22:12 integrationdrwxr-xr-x 19 karthikeyan.shanmuga 253301862 608 Nov 17 00:22 ..You can run the sample test in the Cypress UI to see how it is working.

Now let's remove the example test and create our own. Do the following,
cd integrationstouch app.spec.tsAdd the following content to the app.spec.ts file
// app.spec.ts describe('home page', () => { it('checking for tags', () => { cy.visit('/') cy.get('h1').should('be.visible') cy.get('p').should('be.visible') });});Make sure to add the "baseUrl": "http://localhost:3000"to cypress.jsonconfiguration file.
Code Walkthrough:
describeanditcome fromMocha.expectcomes fromChai.- Since we have configured the baseUrl to our local development url. We will be replacing We can just straight away visit the root of our application with
cy.visit('/'). - In next two consecutive lines , we are checking to see if
h1andpwe added to ourindex.tsxfile is visible in the DOM
Running your Cypress tests:
Since Cypress is testing a real Next.js application, it requires the Next.js server to be running prior to starting Cypress.
Runnpm run buildandnpm run start, then runnpm run cypressin another terminal window to start Cypress.
Alright before automating by connecting it with Github actions CI. Let's connect it with Percy.
Connecting with Percy :
Install@percy/cypressand@percy/cli:
$ yarn add --dev @percy/cli @percy/cypressIn order to add Percy snapshots to your Cypress tests, you'll need to first import the@percy/cypresspackage into yourcypress/support/index.jsfile:
import '@percy/cypress';Head over to the app.spec.ts file and add the following line.
// for visual diffingcy.percySnapshot('Home page')Once done your app.spec.ts file should look something like this.
describe('home page', () => { it('checking for the tags', () => { cy.visit('/') cy.get('h1').should('be.visible') cy.get('p').should('be.visible') // Take a snapshot for visual diffing cy.percySnapshot(); });});Note: Since our project is using typescript, please include the following types in the tsconfig.json.
"types": ["cypress","@percy/cypress"]Since we have not connected to the CI yet , let's see how we can run the test in our local and send the screenshot to Percy for visual diffing. We need PERCY_TOKEN for this.
Create an account in Browserstack if you don't have one and navigate to Percy.
- Create a new project and give the name as
percy-cypress-demoand connect it your github repository.

- Copy
PERCY_TOKENfrom the new project screen, then run:
export PERCY_TOKEN=your_token_herenpx percy exec -- cypress runThis will run the Percy test in your local environment and send the build to Percy. since it is the first build it will be considered as the base build and used for comparison.
Let's automate the process shall we.
Connecting with CI - Github Action
Let's connect it with our CI pipeline. We will be using Github actions to achieve this. Create a workflow file in our root directory.
From Next.js docs
You can install thestart-server-and-testpackage and add it to thepackage.json . In the scripts field:"test": "start-server-and-test start http://localhost:3000 cypress"to start the Next.js production server in conjunction with Cypress. Remember to rebuild your application after new changes.
We will also be doing the same. After updating the package.json as mentioned it should look something like this
{ "name": "cypress-percy-demo", "private": true, "scripts": { "dev": "next dev", "build": "next build", "start": "next start", "lint": "next lint", "cypress:open": "cypress open", "cypress:run": "cypress run", "percy:cypress": "percy exec -- cypress run", "start:server": "serve -l 3000 .", "test": "start-server-and-test start http://localhost:3000 percy:cypress" }, "dependencies": { "next": "12.0.4", "react": "17.0.2", "react-dom": "17.0.2" }, "devDependencies": { "@percy/cli": "^1.0.0-beta.70", "@percy/cypress": "^3.1.1", "@types/node": "16.11.7", "@types/react": "17.0.35", "cypress": "^9.0.0", "eslint": "7", "eslint-config-next": "12.0.4", "serve": "^13.0.2", "start-server-and-test": "^1.14.0", "typescript": "4.4.4" }}we will using the above configured command yarn run test in our CI.
# .github/workflows/main.ymlname: CIon: push: branches: - main pull_request: branches: - mainjobs: build: runs-on: ubuntu-latest steps: - name: Checkout uses: actions/checkout@v2 - name: Install run: yarn - name: Build Next.js run: yarn run build - name: Run tests uses: percy/[email protected] with: custom-command: "npm test" env: PERCY_TOKEN: ${{ secrets.PERCY_TOKEN }}Walkthrough:
- Whenever we push the code to the main branch or send a pull request test will be triggered.
- Install the dependencies and build your Next.js application
- Run the test.
Note: Please add the PERCY_TOKEN to your Github secrets.
What is the need to run the test when code gets pushed to main branch ?
Percy needs a base screenshot which it can use it to compare with fixes which will be sent it's way. If it does not have the screenshots to compare to , then you will have only one screenshot of your pull-request branch.
From Percy docs
We encourage you to run Percy builds for every commit on the main branch, as these provide the baseline builds for the pull request and feature builds.
More info on docs .
You can alsoadd Percy to your pull/merge requeststo be notified when visual changes are detected, and when those changes are approved and ready to merge.
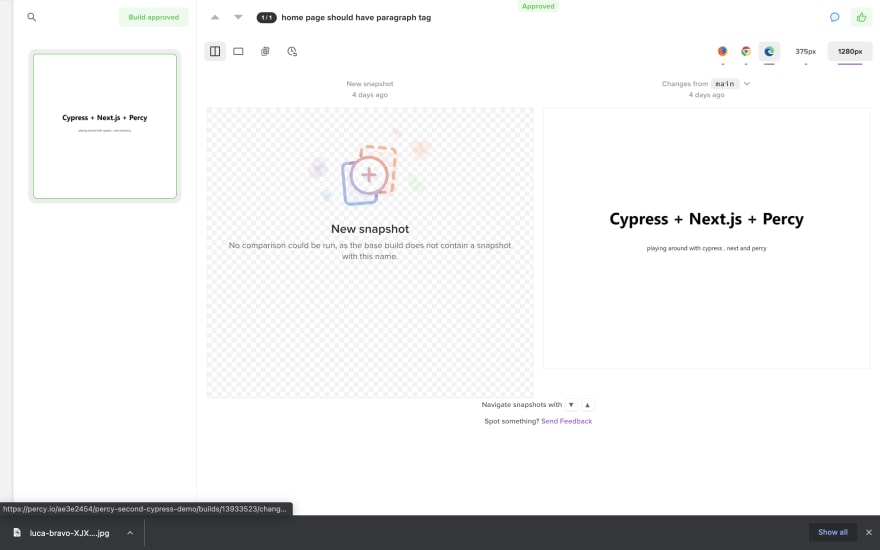
Head to your settings to give Percy access toGitHuborGitLab. Once youve given access, connect your project on Percy to your projects source repository. Then the next time you commit, Percy will show up in your pull/merge request checks:
Since the there is no visual difference , you don't have to approve the build in percy. Now head over to the pages/index.tsx file and change the p tag content and send in the pull request.
Once the test run, you will get the screenshot appearing on Percy.

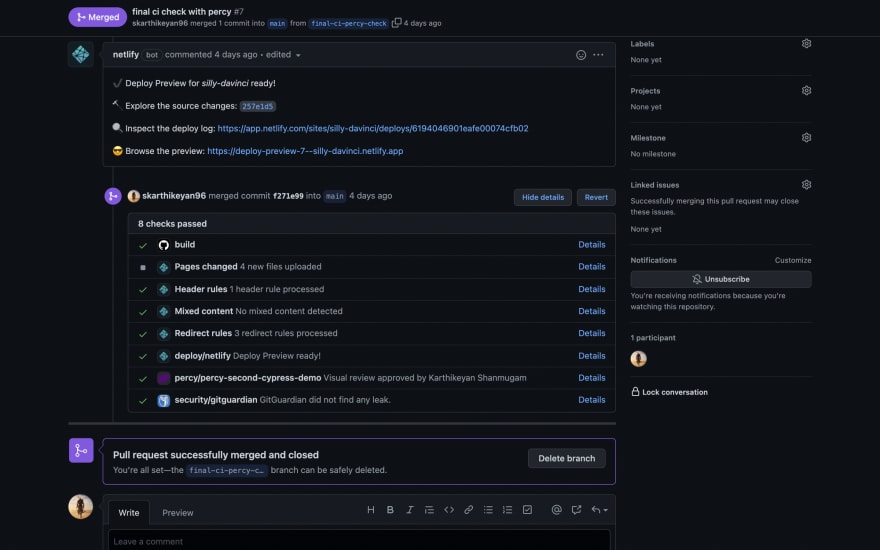
Once you approve it , you will be able to merge the Pull request and then it will trigger another action to compare the new and old main branch screenshot. Since the new main branch screenshot is the latest one , it will auto-approved and considered as the base screenshot for the further comparison

What have we achieved so far ?
- Learnt about visual and e2e testing.
- How to write your first e2e test using Cypress.
- How to connect Percy with Cypress.
- Automating visual test with CI pipeline.
I have attached some reference blog post to get more familiar on Github actions and creating your own workflow.
Conclusion:
That's pretty much it. Thank you for taking the time to read the blog post. If you found the post useful , add to it and let me know if I have missed something in the comments section. Feedback on the blog are most welcome.
Link to the repository: https://github.com/skarthikeyan96/cypress-next-demo
Let's connect on twitter : (https://twitter.com/karthik_coder)

Resources:
Original Link: https://dev.to/imkarthikeyan/integrating-percy-and-cypress-to-your-nextjs-application-3fj0
Dev To
More About this Source Visit Dev To