
An Interest In:
Web News this Week
- April 19, 2024
- April 18, 2024
- April 17, 2024
- April 16, 2024
- April 15, 2024
- April 14, 2024
- April 13, 2024
Some of Our Sources
- Slashdot
- Simplebits
- Smashing Magazine
- Vandelay Design
- Line 25
- Wal You
- Freelance Switch
- Codrops
- Daily Now
- The Verge
Help Webnuz
Referal links:
Introduction to Kubernetes Storage
As Kubernetes Pods don't store data persistently, it offers different storage components to prevent this data loss. In this blog, learn how Volume works in Kubernetes, how to create it, and how to attach it to the Pod.

Before exploring Kubernetes volumes, lets first understand Docker. Docker containers are meant to be transient, which means they will only last for a short period. They are called upon when required to process data and are destroyed once finished.
The same is true for the data within the container. The data is destroyed along with the container. To persist data processed by the container, we attach a volume to the containers created. Now even if the container is deleted, the data generated or processed by it remains.
Now lets look at how it works in the case of Kubernetes. In Kubernetes, when a pod is created to process data and then deleted, the data processed by it gets deleted as well. Kubernetes offers many storage components to prevent this data loss. These components are Volume, Persistent Volume, Persistent Volume Claim, and Storage Class. In this blog, we will learn how Volume works in Kubernetes, how to create it, and how to attach it to the Pod.
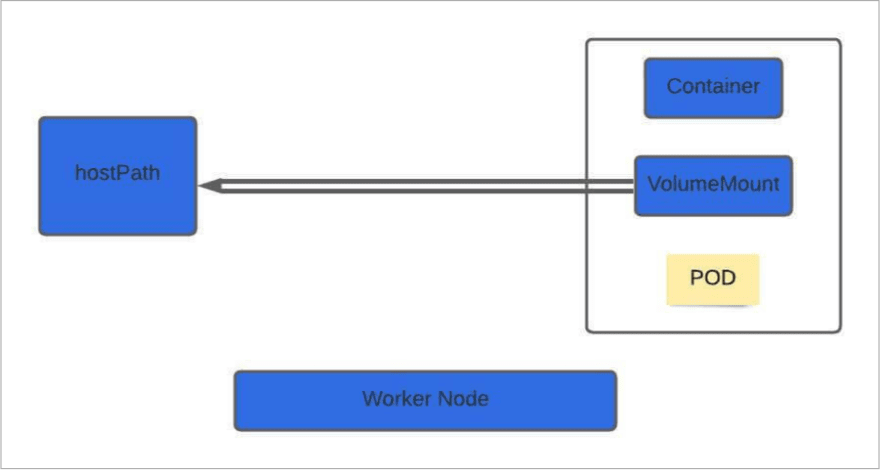
Let's understand how volume works with the help of a simple example using hostPath.
apiVersion: v1kind: Podmetadata: name: my-test-podspec: containers: - image: nginx name: my-test-container volumeMounts: - mountPath: /my-test-pd name: my-test-volume volumes: - name: my-test-volume hostPath: path: /data type: DirectoryIn this example, we are creating a pod named my-test-pod and mounting a volume using hostPath. To create the Pod, there are four mandatory fields, apiVersion, which is set to V1, kind refers to the resource we are creating in this case, it's Pod (other resources can be deployments, services, daemonset, etc.). We have metadata where we are giving a name to the Pod. Finally, we have a spec where we define the properties of a container like an image name, nginx in this case, and the container's name. When we create a volume, you can choose to configure storage in different ways. Kubernetes supports several volumes such as awsElasticBlockStore, azureDisk, cephfs, gcePersistentDisk, emptyDir, NFS, hostPath, etc. For this example, we are going to choose a hostPath volume.
volumeMounts: - mountPath: /my-test-pd name: my-test-volumemountPath: mountPath is the folder inside the pod whose data is mapped to the worker node.
volumes: - name: my-test-volume hostPath: path: /data type: Directoryvolumes: Defines in which location the pod data is stored in the worker node.
Lets dig more into it with the help of the above example. In the above example, hostPath mounts a file or directory(in this case /data) from the host node file system into your pod using volumeMounts(in this case, we are mounting it under /my-test-pd, but this can be any path). In this way, files created in the volume would be stored in the /data directory on your node. Now, if your pod is deleted, the data inside it persists on your host node.
NOTE: hostPath works fine with a single node cluster, but its not recommended to use with a multi-cluster environment. That is because POD will expect the /data directory to be present in every node in the cluster. If /data directory is not present in any node, then the POD creation will fail. Either you can create /data directory in every worker node in the cluster, or a better approach to dealing with these types of problems is to use storage classes discussed later.
Save the above code in a file volume.yaml and execute the below command. Kubectl create command is used to create a resource either by using file or file stdin.
kubectl create -f volume.yamlSimilarly, if you want to use AWS EBS volume in your pod, you need to use awsElasticBlockStore volume mounts. Then we need to define the volumeID which is the id EBS volume(for e.g. vol-efcd1234) and filesystem type(for e.g. ext4 or xfs).
volumes: - name: test-volume awsElasticBlockStore: volumeID: "<volume id>" fsType: ext4NOTE: EBS Volume must already exist, and its volume zone must match the zone where you bring up the cluster.
Persistent Volume(PV) and Persistent Volume Claim(PVC)
The volumes that we have created so far have been defined under the Pod definition file. In case of a large environment, users need to configure the storage every time for each pod when dealing with multiple pods. A better solution is to manage storage centrally where an administrator can create a large pool of storage and then carve out pieces from it as and when required. This is where Persistent Volume(PV) can help us.
A persistent volume is a cluster-wide pool of storage volumes configured by the administrator to be used by users deploying applications on the cluster. The main idea behind Persistent Volume is to provide an API for users and administrators that abstracts details of how storage is provided from how it is consumed. Persistent Volume acts as a resource in a cluster just like a node in a cluster resource. The users can then select storage from this pool using Persistent Volume Claim(PVC). Save the below code in the pv.yaml file(File name can be anything e.g. persistentvol.yaml), but it must end with .yaml extension.
apiVersion: v1kind: PersistentVolumemetadata: name: mypvspec: capacity: storage: 5Gi accessModes: - ReadWriteOnce hostPath: path: "/mnt/data"The template for persistent volume is similar to the Pod definition, with some changes based on the resource. We can start with the base template and update the apiVersion set to v1, and kind to PersistentVolume. Under metadata, name it as mypv, under spec, specify the accessModes which defines how the volume will be mounted on the host.
The access modes are:
- ReadWriteOnce -- the volume can be mounted as read-write by a single node
- ReadOnlyMany -- the volume can be mounted read-only by many nodes
- ReadWriteMany -- the volume can be mounted as read-write by many nodes
- ReadWriteOncePod -- the volume can be mounted as read-write by a single Pod. This is only supported for CSI volumes and Kubernetes version 1.22+.
In the CLI, the access modes are abbreviated to:
- RWO - ReadWriteOnce
- ROX - ReadOnlyMany
- RWX - ReadWriteMany
- RWOP - ReadWriteOncePod
Reference: https://kubernetes.io/docs/concepts/storage/persistent-volumes/
Then specify the capacity, which is the amount of storage to be reserved for this persistent volume. Next comes the volume type, which is hostPath, which uses storage from the node's local directory.
To create a volume use the kubectl create command and specify the persistent volume file we have created earlier(pv.yaml)
# kubectl create -f pv.yamlpersistentvolume/mypv created- To list the persistent volume use kubectl get and pass the resource name(persistent volume in this case)
# kubectl get persistentvolumeNAME CAPACITY ACCESS MODES RECLAIM POLICY STATUS CLAIM STORAGECLASS REASON AGEmypv 5Gi RWO Retain Available 7sNow we have Persistent Volume in place. In the next step, we will use Persistent Volume Claim(PVC) to make the storage available to a node. Persistent Volume and Persistent Volume Claim are two separate objects in the Kubernetes namespace.
An administrator creates a set of Persistent Volumes, and a user creates Persistent Volume Claims to use the storage. Once the Persistent Volume Claims are created, Kubernetes binds the Persistent Volumes to claims based on the request and properties set on the volume. Every Persistent Volume Claims is bound to a single Persistent Volume.
During the binding process, Kubernetes tries to find a persistent volume with sufficient capacity as requested by the claim and any other request properties such as access modes, volume modes, storage class, etc. In case, if there are multiple matches, you can use labels and selectors to bind to a specific volume. In case if there is no volume available persistent volume claim will remain in pending state until the newer volume is made available. Save the below code in the pvc.yaml file.
apiVersion: v1kind: PersistentVolumeClaimmetadata: name: my-pv-claimspec: accessModes: - ReadWriteOnce resources: requests: storage: 3GiThis Persistent Volume Claim manifest looks similar to Persistent Volume but the difference is, kind is PersistentVolumeClaim, and in this case, we are requesting storage of 3Gi.
- To create Persistent Volume Claim use kubectl create command and pass the persistent volume claim filename created earlier(pvc.yaml)
# kubectl create -f pvc.yamlpersistentvolumeclaim/my-pv-claim created- To list the persistent volume claim use kubectl get command.
# kubectl get persistentvolumeclaimsNAME STATUS VOLUME CAPACITY ACCESS MODES STORAGECLASS AGEmy-pv-claim Bound mypv 5Gi RWO 7sWhen the claim is created, Kubernetes looks at the volume created previously. The accessmode should match(ReadWriteOnce) and the capacity requested is 3Gi, but the volume is configured with 5Gi. Since there are no other volumes available, the Persistent Volume Claim is bound to Persistent Volume.
For your Pod to use this persistent volume claim, under volumes, specify the claimName under persistentVolumeClaim parameter.
apiVersion: v1kind: Podmetadata: name: my-podspec: volumes: - name: my-pv-storage persistentVolumeClaim: claimName: my-pv-claim containers: - name: my-container image: nginx volumeMounts: - mountPath: "/usr/share/nginx/html" name: my-pv-storageStorage Classes
Earlier, when we discussed EBS Volumes, we mentioned that we could create volume like below, which applied to create a persistent volume using EBS.
volumes: - name: test-volume awsElasticBlockStore: volumeID: "<volume id>" fsType: ext4The problem with the approach is that, we first need to provision EBS volume manually before we create volume or persistent volume. To create an EBS volume use aws ec2 create-volume command and pass the parameter like availability zone which us-west-2a(depending upon the region where you are creating the resource), size of the volume (depend upon your requirement) 10GB in this case and volume type gp2(other possible options are io1, gp3, st1, sc1 etc.)
aws ec2 create-volume --availability-zone=us-west-2a --size=10 --volume-type=gp2For more info refer to below link
https://docs.aws.amazon.com/cli/latest/reference/ec2/create-volume.html
This is called static provisioning volumes. It will have been nice if the volume gets provisioned automatically when the application requires it, where storage classes come in. Using storage classes, provisional storage such as AWS EBS that can automatically provision and attach it to a pod when a claim is made. That is called dynamic provisioning of volumes. To create a storage class, we can start with apiVersion set to storage.k8s.io/v1, kind to StorageClass, name to aws-ebs, provisioner to kubernetes.io/aws-ebs, and type to gp2(or io1 depending upon your requirement).
apiVersion: storage.k8s.io/v1kind: StorageClassmetadata: name: aws-ebsprovisioner: kubernetes.io/aws-ebsparameters: type: gp2Now, as we have a storage class, we no longer need a PV because the PV and associated storage will be created automatically. For Persistent Volume Claim to use the storage class, we need to define the storage class(aws-ebs) under PVC metadata definition. This is how PVC knows which storage class to use. Then we can specify the amount of storage we need to request 3Gi in this case.
apiVersion: v1kind: PersistentVolumeClaimmetadata: name: my-pvc-aws-claimspec: accessModes: - ReadWriteOnce storageClassName: aws-ebs resources: requests: storage: 3GiFor more information please refer to https://kubernetes.io/docs/concepts/storage/storage-classes/
Below are some other examples of Storage Classes using Google Cloud Persistent Disk and Azure Disk.
Google Cloud Persistent Disk
Google Cloud Persistent disk provides durable network storage for your instances. Their lifecycle is independent of the VM instance and can be moved or detached to persist the data even if it is deleted. The storage class definition is almost similar to AWS EBS, with provisioner value now changed to kubernetes.io/gce-pd and with all the other changes as discussed below.
apiVersion: storage.k8s.io/v1kind: StorageClassmetadata: name: my-gce-pdprovisioner: kubernetes.io/gce-pdparameters: type: pd-standard fstype: ext4 replication-type: none- type: Can be pd-standard or pd-ssd(default is pd-standard)
- fstype: Can be ext4 or xfs (default is ext4)
- replication-type: Can be none or regional-pd. In case its set to none, regular(zonal) PD will be provisioned.
Azure Disk Storage
Azure Disk Storage is the shared block storage provided by Azure which supports both Windows and Linux-based instances.The storage class definition is almost similar to AWS EBS and Google Cloud Persistent Disk, with provisioner value now changed to kubernetes.io/azure-disk and with all the other changes as discussed below.
apiVersion: storage.k8s.io/v1kind: StorageClassmetadata: name: my-azure-pdprovisioner: kubernetes.io/azure-diskparameters: storageaccounttype: Standard_LRS kind: managed- storageaccounttype: This is the Azure storage account Sku tier. Default value is empty.
- kind: Can be managed, dedicated or shared. Default value is managed.
To create the storage class, let say for ebs (the procedure will remain the same for google persistent disk and azure storage disk), save the file, for example, to storageclass.yaml(it can be any name but it should end with .yaml extension) and run the below command:
kubectl create -f storageclass.yamlstorageclass.storage.k8s.io/aws-ebs createdTo verify if the storage class is created successfully, run this command:
kubectl get storageclasses.storage.k8s.ioNAME PROVISIONER RECLAIMPOLICY VOLUMEBINDINGMODE ALLOWVOLUMEEXPANSION AGEaws-ebs kubernetes.io/aws-ebs Delete Immediate false 7sConclusion
In this blog, we have learned that Kubernetes Pod doesnt store data persistently. If the Pod is deleted or restarted, there will be a data loss. To address this problem, Kubernetes offers different storage components like Volume, Persistent Volume, Persistent Volume Claim, and Storage Class. Persistent Volume is helpful if we want to manage storage centrally outside the pod lifecycle, and then we can use Persistent Volume Claim to carve out the Volume of it. Then we looked at Storage Classes which is helpful in case of dynamic provisioning of storage.
Squadcast is an incident management tool thats purpose-built for SRE. Your team can get rid of unwanted alerts, receive relevant notifications, work in collaboration using the virtual incident war rooms, and use automated tools like runbooks to eliminate toil.
Original Link: https://dev.to/squadcast/introduction-to-kubernetes-storage-p3n
Dev To
More About this Source Visit Dev To