
An Interest In:
Web News this Week
- April 20, 2024
- April 19, 2024
- April 18, 2024
- April 17, 2024
- April 16, 2024
- April 15, 2024
- April 14, 2024
Some of Our Sources
- Web Designer Wall
- Spoon Graphics
- Abduzeedo
- Creative Curio
- Inspiredology
- Noupe
- My Ink Blog
- CSS Globe
- Stylized Web
- Android Headlines
Help Webnuz
Referal links:
Develop a Spam Filtering Model in Python & Deploy it with Django
Introduction
Spam is a fact of life on the internet. If you enable comments or contact sections on your website, you will have to deal with spammers. To prevent your site from making a poor first impression, youll need to find a way to stop spam in its tracks. This is especially important if you are developing a website without a content management system like Wordpress as they come bundled with spam filtering plugins. You could also use an API like Akismet, however this comes at a cost, which can be avoided by implementing a relatively accurate model of your own.
Kaggle and other data science bootcamps are great for learning how to build and optimize models, but they dont teach you how to actually use this models in real world scenarios, where theres a major difference between building a model, and deploying it to be used by end users on the internet.
In this tutorial, youre going to build an SMS spam detection web application. This application will be built in Python using the Django framework, and will include a deep learning model that you will train to detect SMS spam by leveraging the Naive Bayes theorem.
Naive Bayes classification
The classification of Naive Bayes is a simple probability algorithm based on the fact that all model characteristics are independent. We assume that every word in the message is independent of all other words in the context of the spam filters, and we count them with the ignorance of the context.
By the state of the current set of terms, our classification algorithm generates probabilities of the message to be spam or not spam. The probability estimation is based on the Bayes formula, and the formula components are determined on the basis of the word frequencies in the whole message package.
Model Building
The data is a collection of SMS messages tagged as spam or ham that can be found here. First, we will use this dataset to build a prediction model that will accurately classify which texts are spam and which are not, then save the model to be used later for predictions.
Exploration of dataset
The first thing that should be done is to import dependencies. If you do not have the libraries installed, kindly do so before proceeding.
import pandas as pdimport numpy as npfrom sklearn.feature_extraction.text import CountVectorizerfrom sklearn.model_selection import train_test_splitfrom sklearn.naive_bayes import MultinomialNBfrom sklearn.metrics import classification_reportimport joblibimport pickleNext, we load the dataset using pandas:
df = pd.read_csv('https://raw.githubusercontent.com/paulwababu/datasets/main/spam.csv', encoding = 'latin-1')print(df.head())Drop the unwanted columns, like so:
df.drop(['Unnamed: 2', 'Unnamed: 3', 'Unnamed: 4'], axis=1, inplace=True)We have to convert the non-numerical column 'spam' and 'ham' into numerical values using pandas map() function
df['label'] = df['v1'].map({'ham': 0, 'spam': 1})Then we have to separate the feature columns(independent variables) from the target column(dependent variable).
The feature columns are the columns that we try to predict from, and the target column is the column with the values we try to predict.
X = df['v2'] y = df['label']ML Model Building
Let us now proceed to building our actual model.
cv = CountVectorizer()X = cv.fit_transform(X) X_train, X_test, y_train, y_test = train_test_split(X, y, test_size=0.33, random_state=42)model = MultinomialNB()model.fit(X_train,y_train)#model.score(X_test,y_test)y_pred = model.predict(X_test)print(classification_report(y_test, y_pred)) precision recall f1-score support 0 0.99 0.99 0.99 1587 1 0.93 0.92 0.92 252 accuracy 0.98 1839 macro avg 0.96 0.95 0.96 1839weighted avg 0.98 0.98 0.98 1839Not only Naive Bayes classifier easy to implement but also provides very good result.
In the code above, we create a vectorize function that transforms a given text into a vector on the basis of the frequency (count) of each word that occurs in the entire text. We then proceed to splitting the data into train and test variables which we use to get the classification report of the model. We then call the multinomial Naive Bayes model which is suitable for classification with discrete features (e.g., word counts for text classification)
Model and Vectorizer Persistence.
After training the model, we should to have a way to persist the model for future use without having to retrain. To achieve this, need to save the model for the later use. Add the following lines of code:
# Save the modeljoblib_file = "MultinomialNaiveBayesModel.joblib"joblib.dump(clf, joblib_file) We also need to save the vectorize function that we created earlier otherwise you throw it away because a vectorizer once created, doesn't exist past the lifetime of your vectorize function.
# Save the vectorizervec_file = 'MultinomialNaiveBayesModelVectorizer.pickle'pickle.dump(cv, open(vec_file, 'wb'))If we intend to retrain the model, we can use the partial_fit function in order to keep improving the model incase of model degradation over time. I will post a blog later that addresses how to identify and correct dataset shift in machine learning
Turning the Spam Message Classifier into a Django Web Application
Having trained and saved the model for classifying SMS messages in the previous section, we will develop a web application that consists of a simple web page with a form field that lets us enter a message. After submitting the message to the web application, it will render it on a new page which gives us a result of spam or not spam.
Below is snapshot of the final implementation
Following Python best practices, we will create a virtual environment for our project, and install the required packages.
First, create the project directory.
$ mkdir djangoapp$ cd djangoappNow, create a virtual environment and install the required packages.
For macOS and Unix systems:
$ python3 -m venv myenv$ source myenv/bin/activate(myenv) $ pip install django requests numpy joblib scikit-learnFor Windows:
$ python3 -m venv myenv$ myenv\Scripts\activate(myenv) $ pip install django requests numpy joblib scikit-learnSetting Up Your Django Application
First, navigate to the directory djangoapp we created and establish a Django project.
(myenv) $ django-admin startproject mainappThis will auto-generate some files for your project skeleton:
mainapp/ manage.py mainapp/ __init__.py settings.py urls.py asgi.py wsgi.pyNow, navigate to the directory you just created (make sure you are in the same directory as manage.py) and create your app directory.
(myenv) $ python manage.py startapp monitorThis will create the following:
monitor/ __init__.py admin.py apps.py migrations/ __init__.py models.py tests.py views.pyOn the mainapp/settings.py file, look for the following line and add the app we just created above.
INSTALLED_APPS = [ 'django.contrib.admin', 'django.contrib.auth', 'django.contrib.contenttypes', 'django.contrib.sessions', 'django.contrib.messages', 'django.contrib.staticfiles', 'monitor', #new line]Ensure you are in the monitor directory then create a new directory called templates then a new file called urls.py. Your directory structure of monitor application should look like this
monitor/ __init__.py admin.py apps.py migrations/ templates/ __init__.py models.py tests.py urls.py views.pyEnsure your mainapp/urls.py file, add our monitor app URL to include the URLs we shall create next on the monitor app:
from django.contrib import adminfrom django.urls import path, includeurlpatterns = [ #path('admin/', admin.site.urls), path('', include('monitor.urls')),#monitor app url]Now, on the monitor/urls.py file, add our website there:
from django.urls import pathfrom .views import *urlpatterns = [ path('', views.sms, name = 'sms'), path('inbox/', views.inbox, name='inbox')]Lets create another directory to store our machine learning model. Ill also add the dataset to the project for those who want to achieve the whole dataset. (It is not compulsory to create a data folder.) Be sure to move the vectorizer file and the joblib file we created earlier to ml/model folder
(venv)$ mkdir ml(venv)$ mkdir ml/models(venv)$ mkdir ml/dataWe also need to tell Django where our machine learning model and our vectorizer file is located. Add these lines to settings.py file:
import osMODELS = os.path.join(BASE_DIR, 'ml/models')Load Model and Vectorizer through apps.py
Load your machine learning models and your vectorizer in apps.py so that when the application starts, the trained model is loaded only once. Otherwise, the trained model is loaded each time an endpoint is called, and then the response time will be slower.
Lets update apps.py
import osimport joblibfrom django.apps import AppConfigfrom django.conf import settingsclass ApiConfig(AppConfig): name = 'api' MODEL_FILE = os.path.join(settings.MODELS, "MultinomialNaiveBayesModel.joblib") model = joblib.load(MODEL_FILE)class VectorizerConfig(AppConfig): name = 'api2' MODEL_FILE = os.path.join(settings.MODELS, "MultinomialNaiveBayesModelVectorizer.pickle") model = joblib.load(MODEL_FILE)Edit models.py
Create our database models which we shall use to store our classified models. On the monitor/models.py file:
from django.db import models# Create your models here.class Monitor2(models.Model): message = models.CharField(max_length=50, blank=True, null=True) SPAM = 1 HAM = 0 IS_SPAM_OR_NAH = [(SPAM, 'spam'), (HAM, 'not_spam')] messageClassified = models.IntegerField(choices=IS_SPAM_OR_NAH, null=True) contact = models.CharField(max_length=50, blank=True, null=True)Edit views.py
The views will be mainly responsible for two tasks:
- Process incoming POST requests.
- Make a prediction with the incoming data and give the result as a Response.
- Display the classified text into a HTML template.
import osfrom datetime import datetimefrom .models import *from django.shortcuts import render, redirectdef sms(request): if request.method == 'POST': number = request.POST['contact'] message = request.POST['message']# datetime object containing current date and time now = datetime.now() now = now.strftime("%d/%m/%Y %H:%M:%S") naiveModel = ApiConfig.model naiveVect = VectorizerConfig.model convertString = str(message) message = convertString data = [message] vect = naiveVect.transform(data).toarray() my_prediction = naiveModel.predict(vect) print(my_prediction) saveNow = Monitor2( message=message, messageClassified=my_prediction, contact=number ) saveNow.save() return render(request, 'sms.html')#inbox viewdef inbox(request): dataSaved = Monitor2.objects.all() data = { "dataSaved": dataSaved, } print(data) return render(request, 'inbox.html', data)On the monitor/templates folder, create sms.html and inbox.html web page and add the lines below:
monitor/templates/sms.html file:
<!DOCTYPE html><html lang="en"><head> <meta charset="UTF-8"> <meta http-equiv="X-UA-Compatible" content="IE=edge"> <meta name="viewport" content="width=device-width, initial-scale=1.0"> <title>Document</title></head><body> <form id="myform" method="POST"> {% csrf_token %} <div class="row"> <div class="col-6 form-group"> <input type="text" name="name1" class="form-control p-4" placeholder="Your Name" required="required"> </div> <div class="col-6 form-group"> <input type="text" name="contact" class="form-control p-4" placeholder="Your Contact" required="required"> </div> </div> <div class="form-group"> <textarea class="form-control py-3 px-4" name="message" rows="5" placeholder="Message" required="required"></textarea> </div> <div> <button class="btn btn-primary py-3 px-5" type="submit">Send Message</button> </div> </form></body></html>monitor/templates/inbox.html file:
<!DOCTYPE html><html><style>table, th, td { border:1px solid black;}</style><body><h2>A basic HTML table</h2><table style="width:100%"> <tr> <th>#</th> <th>From</th> <th>Body</th> <th>Classification</th> </tr> {% for x in dataSaved %} <tr> <td>{{ loop.index }}</td> <td>{{ x.contact }}</td> <td>{{ x.message }}</td> {% if x.messageClassified == 1 %} <td>Spam</td> {% else %} <td>Non Spam</td> {% endif %} </tr> {% endfor %}</table></body></html>Make the necessary migrations like so:
(myenv) $ python manage.py makemigrations(myenv) $ python manage.py migrate(myenv) $ python manage.py runserverTesting if it works!
Head over http://127.0.0.1:8000 and complete the form with both spam and non spam
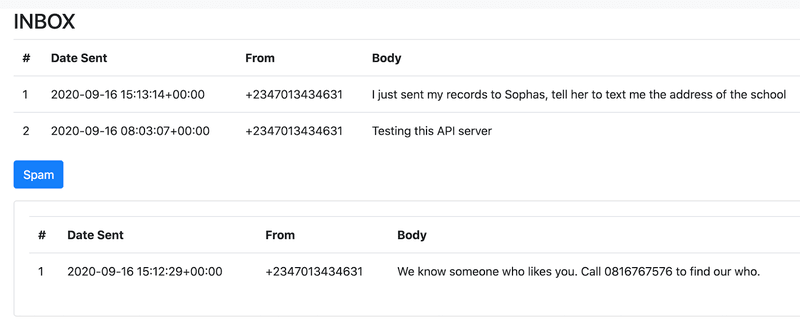
Proceed to http://127.0.0.1:8000/inbox to check out the classified data! Below is a snapshot of my implementation, sorry I couldn't make the CSS;(

Thanks for staying tuned!
Original Link: https://dev.to/paulwababu/develop-a-spam-filtering-model-in-python-deploy-it-with-django-2pco
Dev To
More About this Source Visit Dev To