
An Interest In:
Web News this Week
- April 17, 2024
- April 16, 2024
- April 15, 2024
- April 14, 2024
- April 13, 2024
- April 12, 2024
- April 11, 2024
Some of Our Sources
- Smashing Apps
- TutsPlus - Design
- FanExtra - PSD
- Web Design Ledger
- Reencoded
- 24 Ways
- Stylized Web
- CSS Tricks
- Freelance Switch
- Web Resource Source
Help Webnuz
Referal links:
A beginner's guide to Javascript development using Firebase V9. Part 1 - project configuration
Introduction
A previous post, (A Path through the Jungle), showed in outline how a smart enthusiast, armed with nothing more than a knowledge of basic html and javascript could achieve very useful results in IT through the use of Google's Firebase Cloud development system. The result of their efforts would be a "webapp", hosted for free on the web by Google, accessed via a browser on any type of web-enabled device and capable of performing really serious tasks. Sounds interesting?
As an example of what can be achieved this way you might like to check out my own 'hobbyhorse' webapp pilot at https://bablite.web.app (use userid [email protected] with password babliteguest). Not interested in Scottish Gaelic? Oh, well, never mind, just take note of the scope of this application and keep reading.
Major changes consequent on the release of Firebase V9 this summer (Aug '21) have meant that the web is now cluttered with much out-of-date documentation. The general principles are getting obscured and so it seemed that this might be a good time to flesh out the brief introduction in the original post.
But if you're an experienced developer who's just looking for a quick description of the changes, please accept my apologies now. This is a loooong post because it's intended for absolute beginners and concentrates more on the "why" and "wherefore" than the bald "how".
Anyway - for those new to this game - if you've been following my suggestions thus far, you'll have got a basic grip of coding programming instructions using the html and javascript language. You'll also have got yourself familiar with the idea of using an IDE such as VSCode to create and edit the source files for these instructions. Very good. The next step is to consider how you might actually go about using Google Cloud services to build a webapp - executable code and shared data "hosted" (ie stored) remotely on the web and available to anyone who might wish to access it via the internet.
In simple terms, what we're about here is arranging a mechanism to transfer our local project (ie, the collection of files that we've developed on our own hardware) up into the Cloud. Google refers to this process as "deployment". 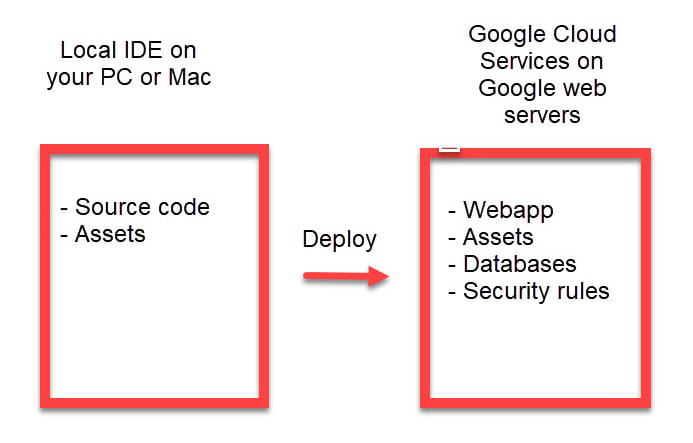
In the diagram above, "Assets" refers to the collection of resources - icon files and graphic images etc - that you reference in your code and which therefore need to accompany your webapp into the cloud. Once you get your head round the concept, the process is actually pretty routine. With everything correctly configured, you can "redeploy" changes to your application with just a couple of keystrokes. But getting your head round the multitudinous components of Google Cloud services and setting them up correctly in the first place represents quite a steep learning curve. So buckle up for a bumpy initial ride. Don't worry - it'll be worth it!
If you've never used Google's services before you'll need to negotiate four separate steps:
- Obtain a Google gmail account
- Create a Firebase project under this account
- Use the "Hosting tool" to register the webapp
- Set up your local "Deployment" environment
Step 1 - Obtain a Google gmail account
You may have a gmail account already of course. If not, follow instructions at Create a Google Account to get one.
Step 2- Create a Firebase project and reserve your webapp's URL
Launch the Google Firebase console to create your Firebase Project. Click "add project" and note the advice about Google Cloud projects in general. Google Firebase projects are just a special case of a wider class of Google projects that can be viewed at the parent Google Cloud console. We can safely ignore the cloud console for now.
The next stage is to specify a project-id for the webapp - the "root" of its url (which will actually take the form 'project-id'.web.app). It's important that you get this right as, once the project-id is registered, you can't change it. Worse, once you've "claimed" a project id, nobody else can claim it either, even though you may subsequently have deleted it!
Matters are complicated by Google first asking you to supply a "Project name" for the parent project and then proposing a Project-id based on this (ie, rather than the other way around). It's odd that they should do this as the Project Name is the least of your worries (it serves only to distinguish projects within your Google account and can be edited at any time). But this is how things work at November 2021. As an example, you might enter "My New Webapp" as the project name, for which Google would then propose a Project-id such as my-new-webapp-39959. However, you're then free to edit the proposed project Id and massage it into a more acceptable form - subject to the constraint, as mentioned above, that nobody else has used your proposed id. The Project-id must also be at least six characters long and can only use numbers, lower-case characters and hyphens.
In the examples that follow I've used a project I registered with a Project-id of "fir-expts-app" for a project named "Firebase Experiments"
Once you've finished wrestling with Google over your Project-id, click "Continue" to reveal a page that talks about "Google analytics". This is something you can safely ignore at this stage (it's only generally relevant to the investigation of performance issues on live apps), so decline this and continue.
The lights now dim a little as Google registers your project. Then, after you've clicked a final "continue", you'll find yourself in the main Firebase Console window for your project. You'll spend quite a lot of time on this page and its sub-pages during the development process, so best get used to it. Here's a screenshot

The left-hand side of the screen is devoted to tool tabs and I've increased the screen character size a little so we can concentrate on the Project Overview gearwheel and the "Build" tool stack below this As you may imagine the full tool stack is a lot more extensive but, for the present, this is all we need.
Note also that the Test Firebase Project is automatically registered at this stage for the "Spark plan". I've said previously that using Google's Cloud Services is free, and the "Spark plan" does indeed give you access to most services free of charge. However, once your usage strays outside certain (extremely generous) limits you will be asked to register for paid plans. See Firebase Pricing Plans for details.
Firebase, as you'll slowly come to appreciate, is made up of a number of distinct "modules", each addressing different aspects of the system. Not all of these are necessarily relevant to any given application and in this post I'm just going to concentrate on the following three:
- Authentication - specification of the way that users identify themselves to the application, and management of individual registrations
- Firestore Database - the specification and management of a "NoSQL" database for the application and the specification of security rules to protect it.e
- Hosting - registration of the type of application that's being developed (a webapp in this case).
Step 3 - use the "Hosting tool" to register the webapp
Click the "Hosting" tab in the Firebase console to reveal the following window:

Click the </> icon to tell Firebase you're developing a webapp, supply a nickname in the screen that follows (I suggest you just use your Project-id to avoid further confusion) and then click "Register" to complete the Firebase side of the hosting setup.
You might as well close down the Firebase console now. Though the Hosting window still has plenty of advice about what to do next, in practice you're on your own here. The Firebase advice, while very good at telling you "what" to do, isn't so helpful when it comes to "why" and "wherefore". If you're not too familiar with the tools you are now expected to use, all of this could leave you seriously confused if things start to go wrong. Let's take things a bit more thoughtfully.
Step 4- set up your local "Deployment" environment
The aim of this step is to use Google utilities to create files and folders, both in your "project" (ie the folder of files that you're going to build up in your PC or Mac to hold the code for your webapp) and elsewhere. These will ultimately allow you to run the "deployment process. This is a big step, so best take a deep breath now.
Let's imagine that you've already created your project folder (say firexptsapp) and added this to the VSCode workspace. Once you've completed Step 4 you'll be able to start a "Terminal" session (I'll explain just what ths is in a moment) in VSCode that targets the firexptsapp project and enables you to issue a one-line command "deploy" command to copy your webapp onto the Google servers.
firebase deploy
Once you've done this, anybody, anywhere in the world will be able to run your webapp by typing its name into their web browser. Wow! But getting to this point will require quite a bit of effort.
If your experience of IT to date has been entirely through the use of "click and point" Windows (Microsoft) and iOS (Mac)screens, Step 4 with its reliance on "Terminal" sessions is likely to represent a big challenge.
The word "terminal" in this context takes us back to the early days of computing, long before the appearance of the "graphical user interfaces" that we use today to drive IT applications. Developers then used "terminal" devices such as teletypes or "vdu" visual display units and gave their operating system instructions by typing them in as in "commands" rather than clicking button prompts. These "command shell" interfaces have great advantages for system programmers as they're easy to set up and highly flexible. The Google developers have chosen to use this approach for configuring and applying Firebase project deployment. While this may seem a retrograde step, please accept my assurance that once you become familiar with the concept, the arrangement is perfectly practical and, in any case, will add another useful building block to your growing range of development skills. Command shell interfaces are currently widely used in this sort of situation
If you're using an IDE like VSCode, you'll find that it provides a facility to start a terminal session focussed on your firexptsapp project. Once you've opened your terminal window, it displays a "command prompt" confirming the current directory and waits for you to type in a command.
TThe command we wish to perform is the firebase deploy command I introduced above. But if you tried this now you'd just get an error because, at this stage, the system doesn't know what firebase means. The first thing we need to do, therefore, is add the Google files and folders required to supply this meaning. To achieve this we'll use the following command in the terminal session:
npm install -g firebase-tools
But now we hit another snag as it's likely that the system doesn't know what npm is either - possibly you yourself are in the same position. And then because npm is a Javascript program, we need an application called Node.js to run it. So you'll have to install this too.
Right, you are probably now wishing that you'd never heard of Firebase, but stick with me, because this is as deep as we're going to dive and all of this is yet more useful experience.
Let's start with an explanation of what Node.js and npm are. The Google software that you need to run in order to configure your firexptsapp folder is distributed from central web-based libraries in the form of "packages" - carefully structured files of code to perform particular tasks. Because many of the tasks that your package needs to perform are tasks that are common to other similar packages, a package will likely call upon other packages to perform these rather then coding them afresh. These packages in turn may call upon other packages, and so on. At the end of the day, therefore, in order for your package to run in your terminal session, all the necessary bit must be hauled down from the central repository and assembled in folders on your local computer. For this, you need a "package manager". npm is the package manager we're going to use in this particular exercise.
A new problem now arises. As already mentioned, npm is written in javascript and so needs an environment in which it can run. The only such environment you've encountered thus far is a computer browser and this is not something that's considered appropriate for this particular application. Node.js is the environment of choice for systems developers in these circumstances. This can be installed from the web, just like you might install any other Windows or OS app. Once it's installed, you can then start it up in a terminal session and type in javascript commands. In this sense, it's just like the facility you saw in the browser system tools console that you were introduced to in the "debugging" section of the original "Path" post.
So, all that said , here we go with Step 4 (see Firebase CLI reference for further background, if you feel you need it):
4.1 Install Node and npm - see OpenJs Home Page for instructions (I think that it's generally best if I refer you to source documents for procedures like this so you can be sure you're always looking at the latest information). Conveniently, you'll find that currently you don't have to install npm itself explicitly - installing Node.js automatically installs npm as well.
4.2 Install firebase-tools - we're now in a position to install the Firebase CLI. So, open a terminal session for your project and type in the command first described above
npm install -g firebase-tools
If this is your first time with npm, you may find this particular ride a somewhat alarming experience. Unpacking a complex package like the CLI is an extremely complex process because npm is at every stage faced with multiple versions of sub-packages and has to deal with possible incompatibilities. The process may take some time and may, indeed, occasionally appear to have died! But stick with it until it redisplays the command prompt and don't be too alarmed by any warnings that may be displayed. As long as you're using the most up to date version of npm (see Try the latest version of npm if you're having problems), everything should be fine.
4.3 Log into Firebase using your Google account
Type the following command into the terminal
firebase login
Unless you're already logged in, this should open up a browser window requesting your Google account details. Type these in to proceed.
4.4 Configure your project as a Firebase project
This is where we add all the necessary files and folders to enable us, finally, to achieve our aim of running a firebase deploy command.
With your terminal window focussed on your project directory, type the following command:
firebase init
Now take another deep breath. We're nearly done but this is another intimidating step.
What we're doing now is running the Firebase CLI ((Command Line Interface) in a way that allows us to tell it how we want to configure our project.
As we've already seen in the firebase console, firebase is made up of numerous modules - Firestore (the NoSQL database manager), Hosting (the services that support "deployment") and so on. Many of these are modules that at some point we might want to operate on the local machine (ie as well as on the Live Firebased console). A good example is the Firebase emulator that will allow you to run a webapp locally against a local Firestore database - quite a handy thing if you need to test a fix to a webapp that's already gone live.
But at this stage, the only local service we really need is "hosting". Adding anything else just now is only going to further confuse your already overloaded brain. You can always run firebase init again another time to add further services.
So, once you've launched the init process and confirmed that "yes", you do want to proceed (by typing Y and hitting the return key), select Hosting from the table of installation options that now appears.
Because terminal windows don't respond to "point and click" instructions, this is a rather cumbersome procedure. You have to proceed by using the arrow keys on your keyboard. Press the down-arrow key to highlight the line that says "Hosting: Configure files for Firebase Hosting" , press the spacebar and then activate your request by pressing the return key.
The first thing the CLI now asks you is the name of the Firebase project to be associated with this local installation. Selecting the "use an existing project" option should reveal a table containing the name of your Firebase project ("Firebase Experiments" in this example). Select this using the arrow key and proceed to "Hosting setup" wherein the CLI will ask you yet more questions.
Press the return key to select "public" as your public directory (more on this in a moment) and "Y" to have "hosting" configured as a "single-page app" (more, ditto) and, finally, "N" in response to "Set up automatic builds and deploys with Github".
And now - cue fanfare of trumpets - the CLI should respond by saying "Firebase initialization complete!" and returning you to the command prompt line.
Believe it or not, you're now ready to perform your first "deploy". I know you haven't actually written a line of code yet, but the CLI installation procedure will have created a demo index.html script in your project and so we can trial the deployment procedure right now. All you have to do is enter the following command:
firebase deploy
in response to which, you should see the CLI return something like the following:
PS C:\Users\webappdeveloper\firexptsapp> firebase deploy> === Deploying to 'fir-expts-app'...i deploying hostingi hosting[fir-expts-app]: beginning deploy...i hosting[fir-expts-app]: found 1 files in public+ hosting[fir-expts-app]: file upload completei hosting[fir-expts-app]: finalizing version...+ hosting[fir-expts-app]: version finalizedi hosting[fir-expts-app]: releasing new version...+ hosting[fir-expts-app]: release complete+ Deploy complete!Project Console: https://console.firebase.google.com/project/fir-expts-app/overviewHosting URL: https://fir-expts-app.web.appPS C:\Users\webappdeveloper\fir-expts-app>That line Hosting URL: https://fir-expts-app.web.app should look familiar - yes it's the name of the webapp. Copy this to the clipboard and paste it into your favourite browser. When you press the return key, the browser should display something like the following:

Great - you've just deployed an app into the Google cloud. Let's look into your project folder to see where this code has come from. The structure of your folder should look like the following:
fir-expts-app public index.html .firebasesrc .gitignore firebase.json The project directory was empty to start with so all of these files must have been created by firebase init. What are they all?
Well, the .firebasesrc file is mainly just there to mark the directory as a firebase project, and the .gitignore is a file in which we can specify any files that we would not wish to see copied to our git project (a version-control/open-source-sharing system) if we were using one - which,in this case, we're not. So, moving on to more interesting things, you might look at the content of the firebase.json file.
The firebase.json file is used by firebase deploy to guide the deployment process (see Configure Hosting Behaviour for details). In the default configuration - which is what we have just created - this will upload all files in the public directory to our Google Cloud project (except for those explicitly directed to be ignored, as above).
But for the present, the main thing you'll be interested in is the auto-generated index.html file in the public folder. This is what you've just deployed to generate the screen you saw above and this is where you will create your own webapp code.
Onward and upward to my next post then - A beginner's guide to Javascript development using Firebase V9. Part 2 - coding a simple webapp.
Original Link: https://dev.to/mjoycemilburn/a-beginners-guide-to-javascript-development-using-firebase-v9-part-1-project-configuration-5bo3
Dev To
More About this Source Visit Dev To