
An Interest In:
Web News this Week
- April 19, 2024
- April 18, 2024
- April 17, 2024
- April 16, 2024
- April 15, 2024
- April 14, 2024
- April 13, 2024
Some of Our Sources
- TutsPlus - Code
- The Logo Smith
- Vandelay Design
- Creative Curio
- Fuel Your Creativity
- FanExtra - PSD
- Crazy Leaf Design
- Wal You
- Codrops
- TechPowerUp
Help Webnuz
Referal links:
Learn Git in an afternoon (Beginners)
Do you want to be able to have the control of your code and have a trustworthy and easy to make history of it? If yes, this quick tutorial is for you!. First of all, we have to know some concepts:
Git
Git
Acording to Git scm. Git is a free and open source distributed version control system designed to handle everything from small to very large projects with speed and efficiency.

Git is easy to learn and has a tiny footprint with lightning fast performance.
GithubGithub
Is a platform where you can put your code in a cloud git repository completely free and where other developers could see your code and contribute or use it.

Github is very useful and is used by a lot of developers in the world. This tool could allow you to improve as developer and be atractive to software companies.
We won't learn about Github in this tutorial, but it's still important to know the diference between Git/Github.
How to install Git
First of all, we need to download Git and install it in our pc . The install process is easy, you only need to open the installer and leave default options (if you want), then click next, next, install up to finish the installation
How to use Git
Git doesn't has a graphic user interface, so we have to use the terminal (cmd, powershell, bash, etc). Don't worry, the use of git is very intuitive and colorfuly .
Here are the basics about Git, I'll try to explain each one in the easier way possible
Create a repository
First thing that you need to do, is create a repository, for this you have to open your terminal and find/create the folder where your project is.

Now, we have to type in the terminal this:
git init
You'll get something like this:

And the job is done! we have our git repository initialized , Go to the later steps.
Add your files to the repositoryIn Git, you have to specify what files will be added on your repository. To know what files can be added you can type:
git status
And get something like this: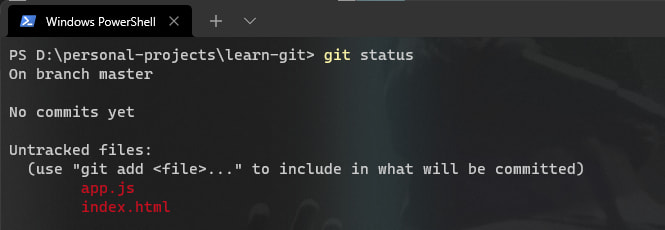
The command shows the status of all project files, In this case the red ones are untracked files, that means these files will be ignored by git, unless we add them to the repository, for this, we can type:git add app.js
and git add index.html
useful tip
There is a way to add all untracked/modified files to the repo. in one line, you just have to type a dot instead of the file name:git add .
Now, we have our files added to the project, so if we run a git status again we'll have:

But, what does mean this? Well, as we can see, the green color filenames with "new file:" tag indicates that these files have been added succesfully to the repo.
So, we can start to use these files and make our history of changes and other interesting things.
For that, continue with the next step .
Commit our changes
In the last step, we added the files to the repository. When we add some file, the file is handled by git, but it isn't part of the history of changes, for this we need to "commit" our changes.
For commit the pending changes (in this case, the added files), we can type a command like the following:git commit -m "Initial files"
In this command, the structure is the following:
git commit: Indicates that you'll commit the pending changes (all green files getted on "git status" will be committed).-m "Initial files": These are optional, but is strongly recommended put it because the text between quotes is the message, and servers to set the reason/sense/description of the commit. Good commit descriptions allows you (and others) understand better your code .This commit message should have the what? and why? of your code changes.
We type "Inital files" because we are adding the app.js and index.html for first time, and its are the first files in our project.
After entering that last command we'll get:
(When you enter this command first time, git will ask you for an username and email, this is for author register only)

Now, if we type again git status, we'll get:

That means we have done the commit successfully and the repository doesn't have pending changes.
Now, since we have made our first commit, it means that we can see it in the repository history, for this we just have to type:git log

There, you could see all commits made in this repository (we'll see git log command more detailed in the other step).
Now, we'll modify the file app.js

If we modify some file, git will detect the changes automatically (the file must have been added with git add before).
Now, we can type git status again to see the changes:

The important thing here, is the red label modified: app.js. The difference between this result and the first git status is the "modified:" instead of "new:" tag.
This is beacause we have already added and commited the app.js file for first time, but now we have made modifications, then we need to add and commit again this changed file
Now we can commit this new change typing:
git add app.jsgit commit -m "change welcome text" or
git commit app.js -m "change welcome text"Both work fine, but if you want to add more files in one commit you should use git add way.
Now, we can type git log again to see the new history:

In the next step, we'll see more details about git log command, it will be a short section.
Repository historyHere, we'll see some tips for
git log command, and I'll try to explain a couple of important things about it.git log structure:
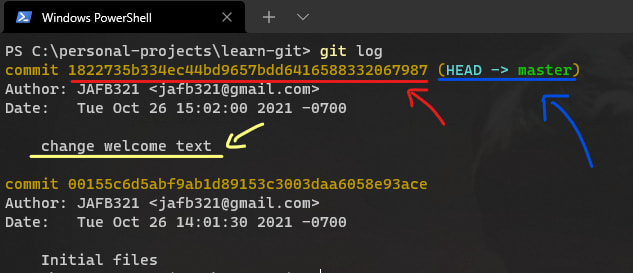
- Red mark: Commit ID
This is auto-generated for git and identify a specific commit
- Yellow mark: Commit message
Is the text wich we putted in git commit -m "message"
- Blue mark: HEAD -> branch
This can sound confusing, but indicates in wich "branch" of the repo we are, don't worry, you don't need to know this for now, will be nice in the future, but not for the basics
Useful Tip :
You can type git log --oneline and you'll get a better and more readable output of your commit history:

Now we have a more simple log, (note that ID is reduced to it's 7 last characters).
There are a lot of other interesting things that you can do with git, but this tutorial is more focused on the basics, so feel free to practice and learning more about it!
I'll write more useful posts about Git, Github and stuff. So follow me if you want to learn

(If you want to understand the meme, don't forget follow me to learn about git branches, gitignore, merge, remote, github, etc )
Original Link: https://dev.to/jafb321/learn-git-in-an-afternoon-beginners-200m
Dev To
More About this Source Visit Dev To