
An Interest In:
Web News this Week
- April 25, 2024
- April 24, 2024
- April 23, 2024
- April 22, 2024
- April 21, 2024
- April 20, 2024
- April 19, 2024
Some of Our Sources
- BoingBoing
- Mashable
- TutsPlus - Code
- Team Treehouse
- Pearsonified
- Spoon Graphics
- Creative Curio
- FanExtra - PSD
- CSS Tricks
- Android Dissected
Help Webnuz
Referal links:
Building a react application from absolute scratch !
In this blog tutorial, we are going to set up and build react applications absolutely from scratch. So, before we start. Let's take a brief tour about "What is React js?"
What is React JS?
React is a javascript library for building very fast and interactive interfaces. It was developed at Facebook in 2011 and currently, it is the most popular and famous library for creating user interfaces. Its popularity is increasing day by day. It is currently dominating the space of various libraries and frameworks for building user interfaces.
At the core of all the react applications, there are components. A component is essentially a piece of the UI so when building the application with react we build a bunch of independent, isolated and reusable components and then compose them t build a complex user interface.

Every react application has at least one component which we refer to as the root of the component, this particular component represents the internal applications and contains other child components. So, every react application is essentially a tree of components. React embraces the use of JSX but though it is not mandatory to use JSX to write React applications, simple JS will suffice. But JSX makes it a whole lot easier to create a React application.
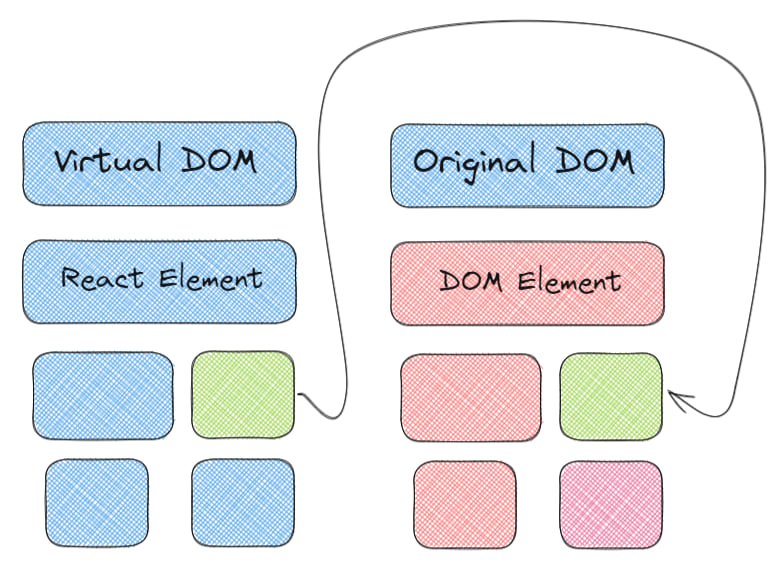
In terms of implementation, a component is typically implemented as a JavaScript class that has some state and render method. The state helps to display the data when the components are rendered and the render method is responsible for describing what the UI should look like. The output provided from that render method is the React Element which is a simple plain JavaScript object that maps to a DOM element. Note that its not a DOM element, it is just a plain JavaScript object that represents that DOM element in memory.

Hence, react keeps a very lightweight representation of the DOM in memory which is referred to as the virtual DOM. Unlike the browser or the real Document Object Model, this Virtual Document Object Model(DOM) is very easy to create. So, whenever we change the state of the component we receive a new react element, react will then compare this element and its children. It figures out what is changed and then it will update a part of the real DOM to keep it updated and in sync with the virtual DOM.
Hence, unlike vanilla javascript or Jquery, when we build an application with react, we no longer have to work with the DOM API in the browser. That is, instead of writing code in query and manipulating the DOM or attaching an event handler to the DOM elements, we can simply change the state of our components and react will automatically update the DOM to match that state.
React gets its name from the fact that it reacts to state changes and updates the DOM whenever the changes occur.
Installing react application
Lets get started with our first react application. So the first thing you need to do is install Node.js if you dont have it already installed on your system. So for that visit Node.js official site which is nodejs.org/en/download and install the correct and appropriate version. We need node js because we can utilize the node package manager or NPM feature.

Now, create a blank folder and open it inside the code editor of your choice. For this tutorial, I will be using VScode. Next step, lets open the integrated terminal using ctrl + (tilde) and type npx create-react-app . this command will create the app inside the current directory.

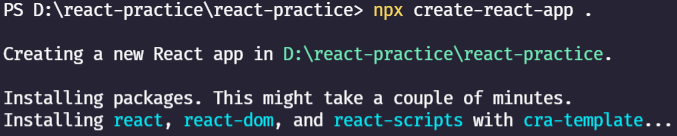
It usually only takes a few minutes to install. Normally, when downloading packages, we would use npm to download them into the project, but here we are using npx, the package runner, which will download and configure everything for us so that we can begin with an amazing template. If everything is downloaded, the folder structure should look something like this.
Its time to start our development server, so for that simply type npm start and thats going to automatically open react-app in the browser.
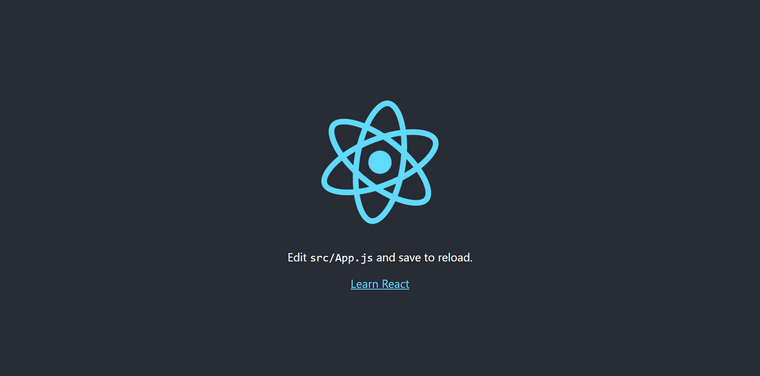
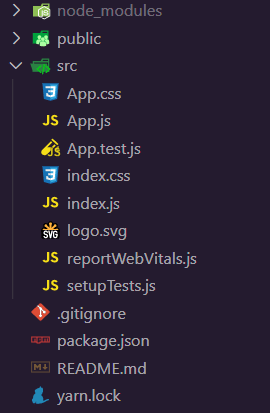
So, this is how the boilerplate template looks right out of the box. Now it's time to delve deep into the file and folder structure provided by create-react-app. There is a node_module folder, which contains all of our node dependencies. Then there is a public folder, and the only thing that matters in this folder is the index.html file. So this appears to be a standard HTML file, with head, body, and meta tags available to us. Inside our body tag, you'll notice a div with the id root, followed by the fallback noscript tag, which will be visible only if the users browser has javascript disabled.
<!DOCTYPE html><html lang="en"> <head> <meta charset="utf-8" /> <link rel="icon" href="%PUBLIC_URL%/favicon.ico" /> <meta name="viewport" content="width=device-width, initial-scale=1" /> <meta name="theme-color" content="#000000" /> <meta name="description" content="Web site created using create-react-app" /> <link rel="apple-touch-icon" href="%PUBLIC_URL%/logo192.png" /> <link rel="manifest" href="%PUBLIC_URL%/manifest.json" /> <title>React practice</title> </head> <body> <noscript>You need to enable JavaScript to run this app.</noscript> <div id="root"></div> </body></html>So you might be wondering where the content is coming from.NOTE: all of our source code is inside our source or src folder and react is going to inject our content into the root div element.
Let's take a look at our src folder, which contains some stylesheets, javascript files, and SVG files.

Now, head over to our App.js file
// App.jsimport logo from './logo.svg';import './App.css';function App() { return ( <div className="App"> <header className="App-header"> <img src={logo} className="App-logo" alt="logo" /> <p> Edit <code>src/App.js</code> and save to reload. </p> <a className="App-link" href="https://reactjs.org" target="_blank" rel="noopener noreferrer" > Learn React </a> </header> </div> );}export default App;So, in this case, we're simply using standard javascript to import react from react and logo from our logo. After that, we have a normal javascript function called APP and this function in react is known as functional component and this function is returning a react-element that looks like HTML but is actually a jsx as you can see there is a div tag with a className of APP and now we can't say class by itself because the class is a reserved word in javascript so in jsx we have to use className.After that, we have the header and then the image, and notice on the image source that we have our logo, which is actually a javascript variable that we imported at the top, so in order to use the javascript within JSX, we have to surround it with curly brackets, and then we have a paragraph, an anchor tag, and that is everything for this component.
So, how are we going to get this component onto the webpage?
There is export at the bottom of the app.js file, which means we are exporting the App function.
So, Now let's look at the index.js file.
// index.jsimport React from 'react';import ReactDOM from 'react-dom';import './index.css';import App from './App';import reportWebVitals from './reportWebVitals';ReactDOM.render( <React.StrictMode> <App /> </React.StrictMode>, document.getElementById('root'));reportWebVitals();So, in this case, we're importing react from react again, and this time we're also importing react-dom, and then we're importing the CSS stylesheet file, and finally, we're importing App from App.js, which is the file that we just previously discussed and then there is service worker, which is used to make your application work completely offline. Then we call ReactDom.render, which takes two parameters. The first parameter is the jsx object, and inside jsx we can include our user defined components as well, so react. strictmode is a react defined component, whereas App is a user-defined component, and the second parameter is document.getElementById('root'), which targets the root div in our index.html file and this is how we access the content in our webpage.
In short, ReactDom renders our content into our root div located at our index.html file.
Note: We should always begin with an uppercase letter because this is how JSX distinguishes between user-defined components and standard DOM elements.
Creating a simple grocery shopping-list application.
Let's create a simple grocery shopping-list application in react from the ground up, but first, let's create a prototype or mindmap of our final application.
So, our final app will look something like this.

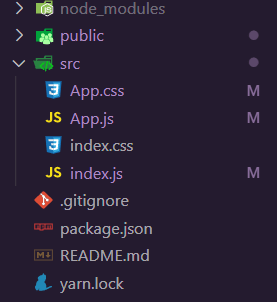
Before we begin building our projects, we must first clean them up by removing some of the files provided by create-react-app.
Your src files should look like this after you've cleaned them up.
Now, within the src folder, make another folder called components, and within that folder, make three components: GroceryItems, GroceryForm, and GroceryList.

GroceryItems component will be used for displaying the item. This will be a presentational component that takes the item as a prop and displays it.
//GroceryItems.jsimport React from 'react';const GroceryItems = ({ item }) => { return ( <div> <span>{item}</span> </div> );};export default GroceryItems;GroceryList component will contain a list of all the items. This will take the items as a prop and display them as an ordered list. It will make use of the GroceryItems component that we just created for displaying individual elements.
//GroceryList.jsimport React from 'react';import Item from './GroceryItems';const GroceryList = ({ items }) => { return ( <div className="items-container"> <ul> {items.map((item) => ( <li> <Item key={item} item={item} /> </li> ))} </ul> </div> );};export default GroceryList;Now, lets do some initial setup on App.js file.
// App.jsimport React from "react";import GroceryList from "./components/GroceryList";const App = () => { const items = ["item 1", "item 2"]; return ( <div className="App"> <header className="App-header"> To Do items <GroceryList items={items} /> </header> </div> );};export default App;React Hook: useState()

Now that we've completed our initial setup, let's dive into React.useState(). The first hook we'll employ is the useState hook. It will enable us to integrate the state into our functional component. useState(), unlike state in class components, does not work with object values. If necessary, we can use primitives directly and create multiple react hooks for multiple variables.
const [state, setState] = useState(initialState);
Hooks in React must always be declared at the top of a function. This also aids in the preservation of state between all rendering for the component. Now change the item initialization to: const [items, setItems] = useState(['item 1', 'item 2']);
Adding Item functionality
Now that we have the items as a state variable, we can use the setter function to modify them in functions. So, let us build the second section of the application that allows us to create lists. We'll make a separate component for this(GroceryForm component). This component will include a form with an input field where the user can enter the content of the new item to be added. It will also include a button for adding the item to the list. A variable is also required to store the item as the user types in the input text box. To accomplish this, we will create an item state that is unique to this component.The GroceryForm component will then look like:
//GroceryForm.jsimport React, { useState } from "react";const GroceryForm = ({ addItem }) => { const [item, setItem] = useState(""); //or React.useState const handleSubmit = (e) => { e.preventDefault(); addItem(item); setItem(""); }; return ( <div> <p>Shopping List</p> <form onSubmit={handleSubmit}> <div className="form-grp"> <input className="field" placeholder="Name" name="name" id="name" value={item} onChange={(e) => setItem(e.target.value)} /> <label for="name" class="label"> Item Name </label> </div> <br /> <button className="myButton"> {" "} Add in Bag <span role="img" aria-label="bag"> {" "} </span> </button> </form> </div> );};export default GroceryForm;Now that we have the functionality to add an item, we can modify our App component to declare the addItem function and also import the GroceryForm function that we just created.
const addItem = (item) => { // assuming no duplicates setItems([...items, item]); };Finally, we destructured the existing items array, appended the newly created item to the end of the array, and passed this new array to our previously learned setItems function. We can also remove the default values from the useState initialization now that we have everything set up to add new items to the application.
Deleting item functionality
Similarly to adding item functionality, we will pass a remove item function from the parent component to the item list component, which will be passed down to the item component. When the user clicks the "clear" button on the item component, the function is called and the item is deleted.
//GroceryItems.jsimport React from "react";const GroceryItem = ({ item, removeItem }) => { return ( <div> <span>{item}</span> <button className="redButton" onClick={() => removeItem(item)}>Delete</button> </div> );};export default GroceryItem;The GroceryList component has a similar change of taking the remove item prop in and passing it to the GroceryItem component.
//GroceryList.jsimport React from "react";import GroceryItem from "./GroceryItems";const GroceryList = ({ items, removeItem }) => { return ( <div className="grid-container "> <ol> {items.map((item) => ( <li> <GroceryItem key={item} item={item} removeItem={removeItem} /> </li> ))} </ol> </div> );};export default GroceryList;Then, we will define the remove item function in the parent component as:
const removeItem = (itemToBeDeleted) => { setItems(items.filter((item) => itemToBeDeleted !== item)); };React Hook: useEffect()

Let's use the useEffect() hooks in our project. By using this Hook, you tell React that your component needs to do something after render. React will remember the function you passed (well refer to it as our effect), and call it later after performing the DOM updates. To this effect, we set the document title, but we could also perform data fetching or call some other imperative API. Placing useEffect() inside the component lets us access the count state variable (or any props) right from the effect. We dont need a special API to read it its already in the function scope. Hooks embrace JavaScript closures and avoid introducing React-specific APIs where JavaScript already provides a solution.useEffect() hook is somewhat similar to the life-cycle methods that we are aware of for class components. It runs after every render of the component including the initial render. Hence it can be thought of as a combination of componentDidMount, componentDidUpdate, and componentWillUnmount.If we want to control the behavior of when the effect should run (only on initial render, or only when a particular state variable changes), we can pass in dependencies to the effect to do so. This hook also provides a clean-up option to allow cleaning up of resources before the component is destroyed. basic syntax of the effect:
useEffect(didUpdate);
Here, didUpdate is a function that performs mutations, subscriptions, timers, logging, etc. It will get triggered after the component is rendered to the screen as well as on every subsequently completed render. Now, getting back to our Grocery application, let us put this in use to set the grocery item list data to local storage whenever we update the items in the grocery list. Add the following code in the app component:
useEffect(() => { localStorage.setItem('items', JSON.stringify(items)); });This sets a key-value pair in local storage with the key being items and the value being a JSON representation of the Grocery items. Next, check if there are any values in local storage. So add the following piece of code:
const [items, setItems] = useState([]);transformed to:const saveditems = JSON.parse(localStorage.getItem('items'));const [items, setItems] = useState(saveditems || []);Since loading from local storage is synchronous process, the code should work perfectly fine.
const [items, setItems] = useState([]);useEffect(() => { const items = JSON.parse(localStorage.getItem('items')); if (items) { setItems(items); } });The above code doesnt work because useEffect runs every time a component is rendered and we are calling setItems inside the effect, it will trigger another render of the component, which triggers useEffect again. And the cycle goes on.
Firing useEffect()
The useEffect hook takes in a second argument which is an array of values that the effect depends on. This way useEffect is only triggered again if one of these values changes. Calling useEffect only when necessary or when value changes. Using the dependency array, we can pass in the state variable to useEffect to make it fire useEffect only when the variables value changes.
useEffect(() => { const items = JSON.parse(localStorage.getItem('items')); if (items) { setItems(items); } }, [items]);Calling useEffect only once on component
Pass an empty array to useEffect as the second parameter to tell React to only run that effect only once.
useEffect(() => { const items = JSON.parse(localStorage.getItem('items')); if (items) { setItems(items); } }, []);Now that we know about the dependency array, it will be a good practice to add it to the effect that we were using to save the items to save to local storage as well.
useEffect(() => { localStorage.setItem('items', JSON.stringify(items)); }, [items]);Finally, the App component is locked and ready. The final code inside the app component should look something like this.
//App.jsimport React, { useEffect, useState } from "react";import GroceryForm from "./components/GroceryForm";import "./App.css";import GroceryList from "./components/GroceryList";function App() { const [items, setItems] = useState([]); const addItem = (item) => { setItems([...items, item]); }; const removeItem = (itemToBeDeleted) => { setItems(items.filter((item) => itemToBeDeleted !== item)); }; useEffect(() => { const items = JSON.parse(localStorage.getItem("items")); if (items) { setItems(items); } }, []); useEffect(() => { localStorage.setItem("items", JSON.stringify(items)); }, [items]); return ( <div className="App"> <header className="App-header"> <GroceryList items={items} removeItem={removeItem} /> <GroceryForm addItem={addItem} /> Grocery Items </header> </div> );}export default App;Happy Coding!!
Full article available here => https://aviyel.com/post/1190
Follow @aviyelHQ or sign-up on Aviyel for early access if you are a project maintainer, contributor, or just an Open Source enthusiast.
Join Aviyel's Discord => Aviyel's world
Twitter =>[https://twitter.com/AviyelHq]
Original Link: https://dev.to/aviyel/building-a-react-application-from-absolute-scratch-1684
Dev To
More About this Source Visit Dev To