
An Interest In:
Web News this Week
- March 21, 2024
- March 20, 2024
- March 19, 2024
- March 18, 2024
- March 17, 2024
- March 16, 2024
- March 15, 2024
Some of Our Sources
- Engadget
- TutsPlus - Design
- You The Designer
- Noupe
- Crazy Leaf Design
- CSS Tricks
- Web Resource Source
- Android Dissected
- Dev To
- Hashedout
Help Webnuz
Referal links:
Generate realtime GitHub contribution chart using puppeteer and update it realtime in your twitter banner.
Generate realtime GitHub contribution chart using puppeteer and update it realtime in your twitter banner.
Build such amazing dynamic realtime updated images, with the help of Node JS and puppeteer.

Introduction
We usually tend to like dynamically generated content more, it has a bit more features and it feels cool.
Just an example of such image is the one below, this is directly being generated from a cloud function.
P.S: Note it may take some time to generate, it depends on multiple factors.
https://relaxed-joliot-41cdfa.netlify.app/.netlify/functions/unmeta
We will be learning on how to use Puppeteer, customising the content and many more.
Let's dive right into the content.
Pre-requisites
- Basic NodeJS
- TypeScript
- Twitter Developer account (if you want real time banner automation)
- 15 mins of your time :)
What are we going to build?
We are going to build a script that generates such images.
You can see my live Github contribution graph along with the image in my twitter header.
Twitter : gillarohith
If we observe this image is mixture of two images and some custom writing on them.
Development
This section has been divided into multiple sub sections so that it would be easier to follow.
You can use npm or yarn or pnpm as your package manager, just need to replace the commands appropriately.
For the rest of the steps I will be using yarn as my package manager.
Setup the application
Let's create a folder, initialise an empty node application.
mkdir github-live-bannercd github-live-banneryarn init -yWe would need puppeteer , dotenv as "dependencies"
Psst! We will be adding a couple more dependencies by end of the post, stay tuned.
Since we will be using typescript, we will need typescript , ts-node and nodemon as the devDependencies
yarn add puppeteer dotenvyarn add -D typescript ts-node @types/node nodemonOnce we them installed we are now ready to configure our scripts
"scripts": { "start": "node dist/index.js", "watch": "tsc -w", "dev": "nodemon dist/index.js", "build": "tsc", "postinstall": "npm run build"},The watch script runs ts-node to run in watch mode, that is it listens to changes in typescript file and complies them to .js files as soon as we save them, for the development time you can keep it running in the background.
The dev script using nodemon to run the dist/index.js file as soon as it gets changed.
postinstall , build and start will be needing during and after the deploy.
Since we are using typescript, we need tsconfig.json file.
You can generate one using a command line utility function.
npx tsconfig.json
incase if the above command doesn't work, you can find the config file below.
{ "compilerOptions": { "target": "es2017", "module": "commonjs", "lib": ["dom", "es6", "es2017", "esnext.asynciterable"], "skipLibCheck": true, "sourceMap": true, "outDir": "./dist", "moduleResolution": "node", "removeComments": true, "noImplicitAny": true, "strictNullChecks": true, "strictFunctionTypes": true, "noImplicitThis": true, "noUnusedLocals": true, "noUnusedParameters": true, "noImplicitReturns": true, "noFallthroughCasesInSwitch": true, "allowSyntheticDefaultImports": true, "esModuleInterop": true, "emitDecoratorMetadata": true, "experimentalDecorators": true, "resolveJsonModule": true, "baseUrl": "." }, "exclude": ["node_modules"], "include": ["./src/**/*.ts"]}With this we are good to start the development journey.
Environment file
We will be needing twitter credentials if you want to update your banner dynamically.
You would need to follow the exact same steps to generate required credentials, in this article you can check Twitter Developer Account section for detailed instructions with images.
Develop and Deploy a server less python application that updates Twitter banner in real time
After the above steps you will be ready with the following values
- CONSUMER_KEY
- CONSUMER_SECRET
- ACCESS_TOKEN
- ACCESS_TOKEN_SECRET
In your .env file update the details as below.
CONSUMER_KEY="your key"CONSUMER_SECRET="your key"ACCESS_TOKEN="your key"ACCESS_TOKEN_SECRET="your key"Taking screenshot using puppeteer
First things first, we need to initialise a headless chrome instance before we take a screenshot, for that the following command would initiate the instance.
const browser = await puppeteer.launch({ // the flags are useful when we deploy args: ["--no-sandbox", "--disable-setuid-sandbox"], });After opening the browser, we need to open a page, that can be done using the following command.
const page = await browser.newPage();
We can set viewport size for the clarity and other purposes.
await page.setViewport({ width: 1000, height: 800, deviceScaleFactor: 1 });
TL;DR of deviceScaleFactor
The more the deviceScaleFactor more the clarity
Then once the page is opened, we need to visit the required page.
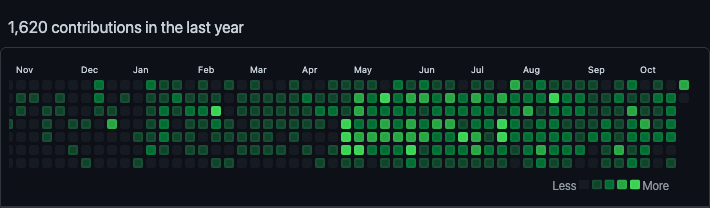
In our tutorial since we are making GitHub contribution graph as banner let's go to our GitHub profile page.
await page.goto(`https://github.com/${GITHUB_USERNAME}`, { waitUntil: "networkidle2",});Now we need to wait until the GitHub contribution chart gets populated, that can be achieved using selectors.
For getting the required CSS selector
- Go to developer console
- Select the element which you want to select
- Right click on the element Copy Copy Selector
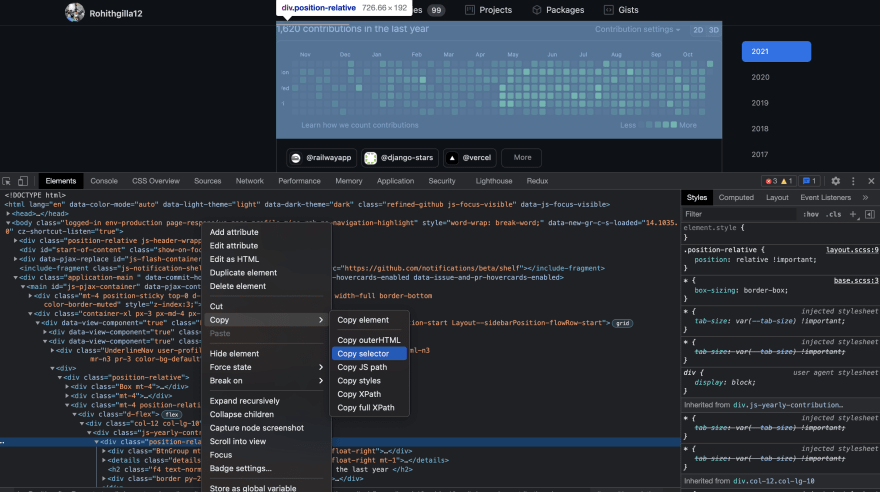
The selector would be
const GITHUB_CONTRIBUTION_SELECTOR = "#js-pjax-container > div.container-xl.px-3.px-md-4.px-lg-5 > div > div.flex-shrink-0.col-12.col-md-9.mb-4.mb-md-0 > div:nth-child(2) > div > div.mt-4.position-relative > div > div.col-12.col-lg-10 > div.js-yearly-contributions > div:nth-child(1)";Now we say puppeteer to wait until the selector is loaded.
await page.waitForSelector(GITHUB_CONTRIBUTION_SELECTOR);
After this is generated we select the selector and then take screenshot.
const element = await page.$(GITHUB_CONTRIBUTION_SELECTOR); if (element) { await element.screenshot({ path: "contributions.png" }); }Boom! now you can see contributions.png in your local file system.
Putting all together
import puppeteer from "puppeteer";const GITHUB_USERNAME = "Rohithgilla12";const GITHUB_CONTRIBUTION_SELECTOR = "#js-pjax-container > div.container-xl.px-3.px-md-4.px-lg-5 > div > div.flex-shrink-0.col-12.col-md-9.mb-4.mb-md-0 > div:nth-child(2) > div > div.mt-4.position-relative > div > div.col-12.col-lg-10 > div.js-yearly-contributions > div:nth-child(1)";const main = async () => { const browser = await puppeteer.launch({ args: ["--no-sandbox", "--disable-setuid-sandbox"], }); const page = await browser.newPage(); await page.setViewport({ width: 1000, height: 800, deviceScaleFactor: 1 }); await page.goto(`https://github.com/${GITHUB_USERNAME}`, { waitUntil: "networkidle2", }); await page.waitForSelector(GITHUB_CONTRIBUTION_SELECTOR); const element = await page.$(GITHUB_CONTRIBUTION_SELECTOR); if (element) { await element.screenshot({ path: "contributions.png" }); } await browser.close(); console.log("Done creating the screenshot");}main();Puppeteer Customisations
But now if we observe, there are a few things which we want to change in the screenshot.
- Dark mode
- Remove the text
Learn how we count contributionsfrom the image. - Add some padding and margins around the chart.
Dark Mode
For the dark mode we need to emulate dark mode, for that the running following command emulates it.
We need to run the command after we visit the website.
await page.emulateMediaFeatures([ { name: "prefers-color-scheme", value: "dark", },]);Hide the unwanted line
We do the similar method that we have performed in step one to get the CSS selector of the line.
To help you save trouble I have already got the CSS selector for you.
const REMOVE_SELECTOR = "#js-pjax-container > div.container-xl.px-3.px-md-4.px-lg-5 > div > div.flex-shrink-0.col-12.col-md-9.mb-4.mb-md-0 > div:nth-child(2) > div > div.mt-4.position-relative > div > div.col-12.col-lg-10 > div.js-yearly-contributions > div:nth-child(1) > div > div > div > div.float-left";Once we select the element, we customise the css styles and make the display to none
// puppeteer hide the selected elementawait page.evaluate((selector) => { const element = document.querySelector(selector); element.style.display = "none";}, REMOVE_SELECTOR);Adding margins and paddings
We need to add margins and padding around the contribution selector.
const CONTRIBUTION_SELECTOR = "#js-pjax-container > div.container-xl.px-3.px-md-4.px-lg-5 > div > div.flex-shrink-0.col-12.col-md-9.mb-4.mb-md-0 > div:nth-child(2) > div > div.mt-4.position-relative > div > div.col-12.col-lg-10 > div.js-yearly-contributions > div:nth-child(1) > h2";await page.evaluate((selector) => { const element = document.querySelector(selector); element.style.margin = "8px"; element.style.paddingTop = "16px";}, CONTRIBUTION_SELECTOR);Now the customisations can go endless, like customising the colors, sizes and more.
Putting everything together.
import puppeteer from "puppeteer";const GITHUB_USERNAME = "Rohithgilla12";const GITHUB_CONTRIBUTION_SELECTOR = "#js-pjax-container > div.container-xl.px-3.px-md-4.px-lg-5 > div > div.flex-shrink-0.col-12.col-md-9.mb-4.mb-md-0 > div:nth-child(2) > div > div.mt-4.position-relative > div > div.col-12.col-lg-10 > div.js-yearly-contributions > div:nth-child(1)";const REMOVE_SELECTOR = "#js-pjax-container > div.container-xl.px-3.px-md-4.px-lg-5 > div > div.flex-shrink-0.col-12.col-md-9.mb-4.mb-md-0 > div:nth-child(2) > div > div.mt-4.position-relative > div > div.col-12.col-lg-10 > div.js-yearly-contributions > div:nth-child(1) > div > div > div > div.float-left";const CONTRIBUTION_SELECTOR = "#js-pjax-container > div.container-xl.px-3.px-md-4.px-lg-5 > div > div.flex-shrink-0.col-12.col-md-9.mb-4.mb-md-0 > div:nth-child(2) > div > div.mt-4.position-relative > div > div.col-12.col-lg-10 > div.js-yearly-contributions > div:nth-child(1) > h2";const main = async () => { const browser = await puppeteer.launch({ args: ["--no-sandbox", "--disable-setuid-sandbox"], }); const page = await browser.newPage(); await page.setViewport({ width: 1000, height: 800, deviceScaleFactor: 1 }); await page.goto(`https://github.com/${GITHUB_USERNAME}`, { waitUntil: "networkidle2", }); // Dark Mode await page.emulateMediaFeatures([ { name: "prefers-color-scheme", value: "dark", }, ]); await page.waitForSelector(GITHUB_CONTRIBUTION_SELECTOR); // puppeteer hide the selected element await page.evaluate((selector) => { const element = document.querySelector(selector); element.style.display = "none"; }, REMOVE_SELECTOR); await page.evaluate((selector) => { const element = document.querySelector(selector); element.style.margin = "8px"; element.style.paddingTop = "16px"; }, CONTRIBUTION_SELECTOR); const element = await page.$(GITHUB_CONTRIBUTION_SELECTOR); if (element) { await element.screenshot({ path: "contributions.png" }); } await browser.close(); console.log("Done creating the screenshot");}main();Now once we made the changes, the screenshot already looks beautiful.
Node Canvas & Sharp
Now its time for some transformations, merging fine tuning.
For this section we would be needing canvas and sharp packages.
yarn add canvas sharpyarn add -D @types/sharpNow if we see the generated image in the introduction section, it includes merging of the two following images.

You can get such amazing background image from https://www.headers.me/
First things first, we need to resize the chart image to certain size so that it fits in the background image.
With sharp we can also do many things, one of which is rounding the corners of the image so that it looks nice.
So do that let's first import the sharp package.
import sharp from "sharp";
then do some of the magic transformations with it.
const beforeResize = await loadImage(filename);const toResizeWidth = beforeResize.width - 48;const toResizeHeight = beforeResize.height - 16;const roundedCorners = Buffer.from( `<svg><rect x="0" y="0" width="${toResizeWidth}" height="${toResizeHeight}" rx="16" ry="16"/></svg>`);await sharp(filename) .resize(toResizeWidth, toResizeHeight) .composite([ { input: roundedCorners, blend: "dest-in", }, ]) .toFile(__dirname + `/../rounded_corner.png`);Just as a reference the rounded_corner image would look similar to this

Now to finish the banner, we need to do the following tasks
- Merge the images
- Write text on the image
- Return the buffer
Merge the images
We don't exactly merge them, we create a canvas and put one image over the other, for this we use node-canvas
Usually twitter banners are around 1000 X 420 so let's create a canvas of such size
import { createCanvas, loadImage } from "canvas";const canvas = createCanvas(1000, 420);const ctx = canvas.getContext("2d");Load the images which we have into the canvas
const img = await loadImage(__dirname + `/../rounded_corner.png`);const base = await loadImage(__dirname + `/../resize_base.png`);Draw (insert) the images on the canvas at the respective positions you like.
Note that if you are using some custom sizes, you may need to do some trail and error stuff here.
ctx.drawImage(base, 0, 0);ctx.drawImage(img, 0, 230);Note that 0,0 and 0,230 are the co ordinates of the images
Write text on the image
Writing text on image is the simplest of all the steps.
We choose font, font size and write :)
ctx.font = "24px Arial";ctx.fillStyle = "white";ctx.fillText("(The GitHub contribution chart updated in realtime *)", 0, 60);Here 0,60 is the co ordinate where the text has to start.
Then we return the buffer.
return canvas.toBuffer();
Tip: If you want a png file or jpeg file you can use createPNGStream and fs module to do it.
The code would look something like this
canvas.createPNGStream().pipe(fs.createWriteStream(__dirname +/../output.png));
Wrapping all things together, the function would look like this
import { createCanvas, loadImage } from "canvas";import sharp from "sharp";export const addTextToImage = async (filename: string) => { // resize is required only for first time // await sharp("base.png").resize(1000, 420).toFile("resize_base.png"); const beforeResize = await loadImage(filename); const toResizeWidth = beforeResize.width - 48; const toResizeHeight = beforeResize.height - 16; const roundedCorners = Buffer.from( `<svg><rect x="0" y="0" width="${toResizeWidth}" height="${toResizeHeight}" rx="16" ry="16"/></svg>` ); await sharp(filename) .resize(toResizeWidth, toResizeHeight) .composite([ { input: roundedCorners, blend: "dest-in", }, ]) .toFile(__dirname + `/../rounded_corner.png`); const img = await loadImage(__dirname + `/../rounded_corner.png`); const base = await loadImage(__dirname + `/../resize_base.png`); const canvas = createCanvas(1000, 420); const ctx = canvas.getContext("2d"); ctx.drawImage(base, 0, 0); ctx.drawImage(img, 0, 230); ctx.font = "24px Arial"; ctx.fillStyle = "white"; ctx.fillText("(The GitHub contribution chart updated in realtime *)", 0, 60); return canvas.toBuffer();};Updating twitter banner
Now the fun part where we update our twitter banner with the image which we have generated.
First things first, let us install the twitter package.
yarn add twitterInitiate the Twitter client.
const TwitterV1 = require("twitter");const credentials = { consumer_key: process.env.CONSUMER_KEY, consumer_secret: process.env.CONSUMER_SECRET, access_token_key: process.env.ACCESS_TOKEN, access_token_secret: process.env.ACCESS_TOKEN_SECRET,};const clientV1 = new TwitterV1(credentials); Twitter API accepts the banner in base64 format, so we need to convert the buffer returned from the canvas to base64 format.
const base64 = await addTextToImage(__dirname + `/../contributions.png`);console.log("Done editing the screenshot!");clientV1.post( "account/update_profile_banner", { banner: base64.toString("base64"), }, (err: any, _data: any, response: { toJSON: () => any }) => { console.log("err", err); const json = response.toJSON(); console.log(json.statusCode, json.headers, json.body); });Now open your twitter account and Voila!
Run it periodically
To run the script periodically, we use JavaScript setInterval function.
main();setInterval(() => { main();}, 1000 * 60 * 2);Now this would run main function once in every 120 seconds.
Putting it all together
import puppeteer from "puppeteer";import { addTextToImage } from "./imageUtils";const TwitterV1 = require("twitter");require("dotenv").config();const credentials = { consumer_key: process.env.CONSUMER_KEY, consumer_secret: process.env.CONSUMER_SECRET, access_token_key: process.env.ACCESS_TOKEN, access_token_secret: process.env.ACCESS_TOKEN_SECRET,};const clientV1 = new TwitterV1(credentials);const GITHUB_USERNAME = "Rohithgilla12";const GITHUB_CONTRIBUTION_SELECTOR = "#js-pjax-container > div.container-xl.px-3.px-md-4.px-lg-5 > div > div.flex-shrink-0.col-12.col-md-9.mb-4.mb-md-0 > div:nth-child(2) > div > div.mt-4.position-relative > div > div.col-12.col-lg-10 > div.js-yearly-contributions > div:nth-child(1)";const REMOVE_SELECTOR = "#js-pjax-container > div.container-xl.px-3.px-md-4.px-lg-5 > div > div.flex-shrink-0.col-12.col-md-9.mb-4.mb-md-0 > div:nth-child(2) > div > div.mt-4.position-relative > div > div.col-12.col-lg-10 > div.js-yearly-contributions > div:nth-child(1) > div > div > div > div.float-left";const CONTRIBUTION_SELECTOR = "#js-pjax-container > div.container-xl.px-3.px-md-4.px-lg-5 > div > div.flex-shrink-0.col-12.col-md-9.mb-4.mb-md-0 > div:nth-child(2) > div > div.mt-4.position-relative > div > div.col-12.col-lg-10 > div.js-yearly-contributions > div:nth-child(1) > h2";const main = async () => { try { const browser = await puppeteer.launch({ args: ["--no-sandbox", "--disable-setuid-sandbox"], }); const page = await browser.newPage(); await page.setViewport({ width: 1000, height: 800, deviceScaleFactor: 1 }); await page.goto(`https://github.com/${GITHUB_USERNAME}`, { waitUntil: "networkidle2", }); // Dark Mode await page.emulateMediaFeatures([ { name: "prefers-color-scheme", value: "dark", }, ]); await page.waitForSelector(GITHUB_CONTRIBUTION_SELECTOR); // puppeteer hide the selected element await page.evaluate((selector) => { const element = document.querySelector(selector); element.style.display = "none"; }, REMOVE_SELECTOR); await page.evaluate((selector) => { const element = document.querySelector(selector); element.style.margin = "8px"; element.style.paddingTop = "16px"; }, CONTRIBUTION_SELECTOR); const element = await page.$(GITHUB_CONTRIBUTION_SELECTOR); if (element) { await element.screenshot({ path: "contributions.png" }); } await browser.close(); console.log("Done creating the screenshot"); const base64 = await addTextToImage(__dirname + `/../contributions.png`); console.log("Done editing the screenshot!"); clientV1.post( "account/update_profile_banner", { banner: base64.toString("base64"), }, (err: any, _data: any, response: { toJSON: () => any }) => { console.log("err", err); const json = response.toJSON(); console.log(json.statusCode, json.headers, json.body); } ); } catch (e) { console.error(e); }};main();setInterval(() => { main();}, 1000 * 60 * 2);Deployment
We can simply deploy this into heroku with worker type.
In the root project create a Procfile and update it's contents as below
worker: npm startheroku createheroku buildpacks:add jontewks/puppeteergit push heroku mainheroku ps:scale worker=1Make sure to add .env variables to your heroku project inside config variables section.
Please let me know if you encounter any issues with the deployment, will make a video if needed :)
Code
The code resides inside heroku branch of this repository
GitHub - Rohithgilla12/puppeteer-github-banner at heroku
The other branches corresponds to different deployment methods, which I will be updating soon, so please stay tuned to it.
Star the repository and follow me in GitHub, it really motivates me to write such amazing content.
Next Blog Post
The next blog posts are going to be really interesting, I have amazing content planned down the road.
Just a few of them include
- Making docker container on your own and deploying it for free!!
- Creating Open Graph image generator.
- Serverless puppeteer functions :)
Follow me to not to miss any update :D
You can find me on twitter https://twitter.com/gillarohith to stay updated.
Thanks
Rohith Gilla
Original Link: https://dev.to/gillarohith/generate-realtime-github-contribution-chart-using-puppeteer-and-update-it-realtime-in-your-twitter-banner-3l32
Dev To
More About this Source Visit Dev To