
An Interest In:
Web News this Week
- March 21, 2024
- March 20, 2024
- March 19, 2024
- March 18, 2024
- March 17, 2024
- March 16, 2024
- March 15, 2024
Some of Our Sources
- Mashable
- Web Designer Wall
- Just Creative
- The Logo Smith
- Smashing Apps
- Vandelay Design
- Crazy Leaf Design
- CSS Globe
- Spyre Studios
- Design Modo
Help Webnuz
Referal links:
How to Build a Blazing-Fast Astro Blog with Cosmic CMS
In this tutorial, I'm going to show you how to create a simple Blog application using Astro, and Cosmic CMS. Without further ado, grab some coffee & let's build a cool app!
TL;DR
Prerequisites
You need to have installed the latest stable version of Node JS and NPM. You will have no problem following the tutorial if you have a basic understanding of:
- HTML, CSS, and JavaScript
- import and export syntax (ES6 modules)
- concepts like components
- the fetch API
Let's get started with our technology stack.
What is Astro?
Astro is nothing but a yet another new Static Site Generator (SSG) which means it produces a static pages as in output. Its a new framework for building a websites. Astro give you us flexibility to use any JavaScript framework/library. The big advantage of using astro is it ships 0% Javascript by default and it will load on demand it we need it.
Note: Astro is still an early beta state.
What about Cosmic?
Cosmic is a headless CMS that will enable us to build our application surprisingly quickly and deploy it to Netlifly in moments. Unlike traditional CMS, Cosmic offers us as the developers a lot of flexibility to develop this application how we please and take it to whatever hosting platform we wish. It is also very easy to store and retrieve data, which makes it perfect for building apps like this.
Creating Your Blog Bucket in Cosmic
To create a blog app we will require data. To manage and manipulate this data, we will be using the power of Cosmic buckets and objects. To get started:
Create a free account on Cosmic. If this is your first time using Cosmic, you'll see a short tutorial which will introduce some of the data types we'll be using - buckets, objects, and metafields.
Create a new empty bucket & name it coffee-blog. For each blog post, we will have three object types:
Title
Content
Image
So, go ahead and add these properties in your buckets along with some data for those objects. If you're having trouble with Buckets, Objects, or Metafields, go ahead and read the Getting Started page really quickly for some startup instructions, then come on back to
this article.
Now we have created our Cosmic CMS and its get time to create a Astro project and integrate Cosmic CMS into it.
Create a Astro application
To create Astro project, we have to first create a folder and navigate to it.
> mkdir astro-cosmic-app && cd astro-cosmic-appNow run following command to install astro:
> npm init astroAfter that select the template "Starter Kit (Generic)" as shown in below image:

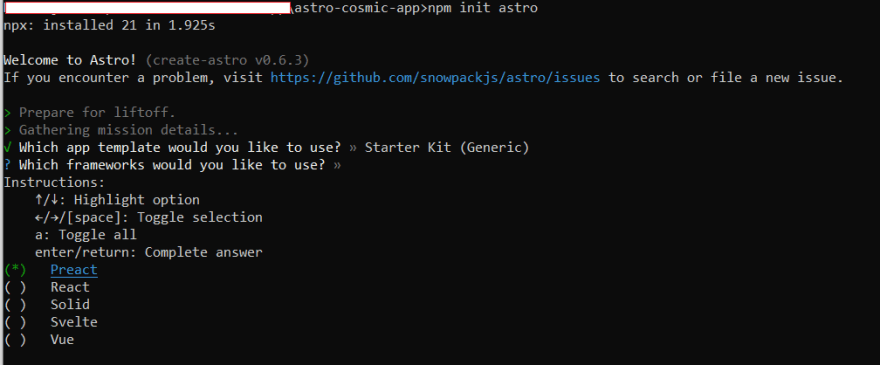
After that select framework you would like to use so I will select Preact but you can select whichever you want as shown below:
Now wait for a minutes to finish the project creation.
After that install all the packages by running below command:
> npm installTo run the application execute below command:
> npm run devNow open http://localhost:3000/ and see the output:

So open the application into VS Code editor and check folder structure:

/public : Any static assets, like images, can be placed in the public/ directory
src/components: components are reusable piece of code. You put any Astro/React/Vue/Svelte/Preact components.
src/pages : this folder contains all the pages for your website which are .md or .astro files. Each page is exposed as a route based on its file name.
For this blog application we are using a Start Bootstarp Clean-blog template. Download the template from here.
After downloading, extract the files and copy the style.css file under /css folder of template into public folder in our project.
Also copy data of /assets from template into assets folder in our project.
Create a .env file
we are using .env file to stored the cosmic bucket and read key data. So install below package:
npm install --D dotenvAfter that create a .env file in root level of project and add update with your details:
COSMIC_BUCKET_SLUG=<replace your bucket name>COSMIC_READ_KEY=<replace your read key>Create different components
- So delete all the files in components folder. First we will create a component called 'BlogPostPreview.astro' which takes input as single post data and display it. So in components folder create a new component as 'BlogPostPreview.astro'
- Create another components called "BaseHead.astro" which contains all metadata urls, links to external css/js files.
- Create a component called "footer.astro" to display the footer in all pages.
- Create a component called "Navigation.astro" to display the footer in all pages.
Display all the posts in landing page
- First we will create a folder in src called
liband inside that create a file called 'config.js' which exports our env variables as belows:
- Open a index.astro file and replace below code to display all the posts in landing page:
Now run the application using npm run dev and see the output in http://localhost:3000/.

- Create another page inside pages folder called "about.astro" as below:
- Click on About option in navigation bar to see the output:

- Now we have to create a page which create separate static page for all our posts and when user clicks on single post it will display that page. To achieve that create a folder in pages called "posts" and inside that create a page called "[slug].astro" as belows:
- Now run the app again and click on post to see the post details:
To build application in production mode you just need to run
> npm run buildDeploy it
We can now deploy our application on any hosting platform. I recommend deploying it on Netlify because it supports project structures like this and can quickly create deployments.
Checkout this article to deploy Astro app into Netlify.
Conclusion
In this article, I have demonstrated you how to create a blogging application using Astro and Cosmic. The Cosmic Community has a lot of examples on how to handle integration with email functions, download functions, and third-party platforms. If you're interested in building your own applications like this, get started by setting up your free account.
I really hope that you enjoyed this little app, and please do not hesitate to send me your thoughts or comments about what could I have done better.
If you have any comments or questions about building apps with
Cosmic, reach out to us on Twitter and join the conversation on Slack.
You can follow me on twitter @sumitkharche01 or LinkedIn
Original Link: https://dev.to/sumitkharche/how-to-build-a-blazing-fast-astro-blog-with-cosmic-cms-4e4
Dev To
More About this Source Visit Dev To