
An Interest In:
Web News this Week
- March 21, 2024
- March 20, 2024
- March 19, 2024
- March 18, 2024
- March 17, 2024
- March 16, 2024
- March 15, 2024
Some of Our Sources
- BoingBoing
- Techcrunch
- Smashing Apps
- Abduzeedo
- Naldz Graphics
- Noupe
- 24 Ways
- Stylized Web
- Web Resource Source
- Willems Lab
Help Webnuz
Referal links:
Build a file storage system with Cloudinary Auth0
File hosting and synchronization services like Google Drive, OneDrive, iCloud, e.t.c allow users to store files in the cloud, synchronize files across devices, and share files. They help save space on devices by digitizing files, integrating storage, and supporting remote access.
In this post, we will discuss how to build a personalized and secure file storage system using Cloudinary, Auth0, and Next.js. At the end of this tutorial, we would have learnt how to host files on Cloudinary by tag, serve files and secure the web application using Auth0.
By way of introduction, Cloudinary is a platform on which you can quickly and easily upload, store, manage, transform, and deliver images and videos for websites and apps. The platform also offers a vast collection of SDKs for frontend frameworks and libraries.
Auth0 is a platform that offers systems to rapidly integrate authentication and authorization for web, mobile, and legacy applications.
Next.js is a React-based front-end development framework that enables functionalities like server-side rendering, static site generation, file-system routing (with no need to manually configure react-router-dom), and API endpoints for backend features.
Source code
You can find the source code of this project here.
Prerequisites
The next steps in this post require JavaScript and React.js experience. Experience with Next.js isnt a requirement, but its nice to have.
We also need the following:
- A Cloudinary account for file hosting. Signup is completely free.
- An Auth0 account for authentication. Signup is completely free.
Getting Started
We need to create a Next.js starter project by navigating to the desired directory and running the command below in our terminal
npx create-next-app mini_drive && cd mini_driveThis command creates a Next.js project called mini_drive and navigates into the project directory.
We proceed to install the required dependencies with:
npm install react-helmet cloudinary-react @auth0/nextjs-auth0 axiosreact-helmet is a library that takes plain HTML tags and outputs plain HTML tags. It will help us avoid the Reference error: Window is not Defined error when using client-side only packages in Next.js.
cloudinary-react is a library that handles rendering of media files.
@auth0/nextjs-auth0 is a library for implementing user authentication in Next.js applications.
axios is a library that handles http calls.
File storage and management with Cloudinary
With the project dependencies installed, we can leverage Next.js CSS Module support to style our page by replacing the content in Home.module.css in the styles folder with the gist below:
With that done, we can update index.js file in the pages folder by importing the styles created and configure Cloudinary Upload Widget to upload files to Cloudinary. We also include state variables to handle:
- Changing tabs between images, videos and files
- The filetype to be uploaded(images, videos or files). We will use this to tag our upload
- The returned url.
import { Helmet } from 'react-helmet'; import styles from '../styles/Home.module.css'; import { useState } from 'react'; export default function Home() { const [tab, setTab] = useState(1); const [filetype, setFiletype] = useState(''); const [url, setURL] = useState(null); const handleChange = (e) => { setFiletype(e.target.value); }; const openWidget = () => { window.cloudinary .createUploadWidget( { cloudName: 'dtgbzmpca', uploadPreset: 'tca2j0ee', tags: [filetype], }, (error, result) => { if (!error && result && result.event === 'success') { setURL(result.info.url); } } ) .open(); }; const handleSubmit = (e) => { e.preventDefault(); openWidget(); }; return ( <div> <Helmet> <script src='https://upload-widget.cloudinary.com/global/all.js' /> </Helmet> {/* remaining JSX comes here */} </div> ); }The Cloudinary Upload Widget also configures cloudName uploadPreset and tag. The cloudname is the name of our Cloudinary account, uploadPreset is a parameter that enables us to centrally define a set of asset upload options instead of specifying them in each upload call and tags (highlighted above) are keywords to make files more searchable. tags will come in handy when separating our files into tabs and updated the url with returned URL. Finally, we used react-helmet to add Cloudinary Upload Widget CDN to the application.

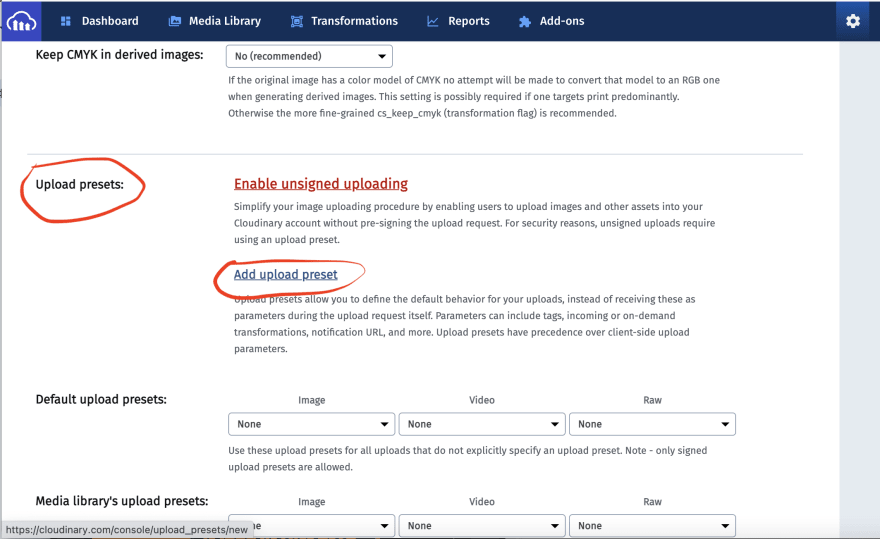
To create a new upload preset, click on the Settings Icon, select the Upload tab, navigate to the Upload presets section, click on the Add Upload preset.

Find out more about Cloudinary Upload Widget here.
Then we need to include our markup for form and tabs as shown below.
With that done, we can start a development server using the command below:
npm run dev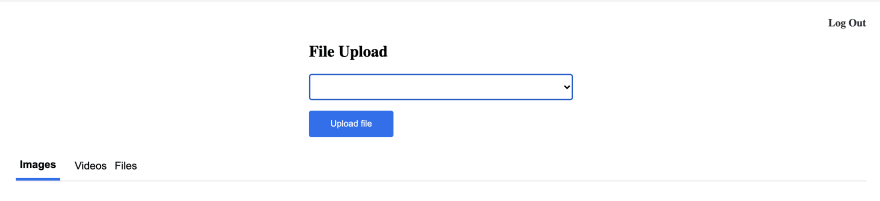
Adding components to handle images, videos and files
To display our files, we need to create a components folder in the root directory and, in the folder, create an ImageList.js, VideoList.js, and FileList.js files and add the code snippet below respectively.
ImageList.js
VideoList.js
FileList.js
The above snippets perform these tasks respectively:
- Import the required dependencies.
- Create a component that takes
urlas a prop. - Create states to manage loading, error and returned list.
- Use the
useEffecthooks to get list of resources matching the specified tag and update state accordingly.The Cloudinary URL follows this format
http://res.cloudinary.com/<your_cloud_name>/<resource_type>/list/<tag>.json
<your_cloud_name> is the name of our Cloudinary account.<resource_type> is the resource type. image, video, and raw in our case.<tag> is to get the list of resources matching the tag. images, videos, and files in our case
- Conditionally render the returned list of Images and Videos using
cloudinary-reactand list of files.
Finally, we need to import the components and include them inside the index.js
Updated Index.js
Cloudinary Restricted Media Types
In other to protect our account and quotas from being abused or misused by others. Cloudinary restricts creation of new resources via unsigned requests. Before we start testing our application, we need to disable Resource List in our Cloudinary console.
To do this, we need to login into our Cloudinary account, click on the settings icon, select the Security tab, and uncheck the Resource List option, then scroll down to the bottom of the page and Save

Finally, we can test our application by selecting the media type, uploading files and view them on different tabs.
Adding Authentication with Auth0
Setup a Developer Account
To get started, we need to log into our Auth0 dashboard. Click on Applications

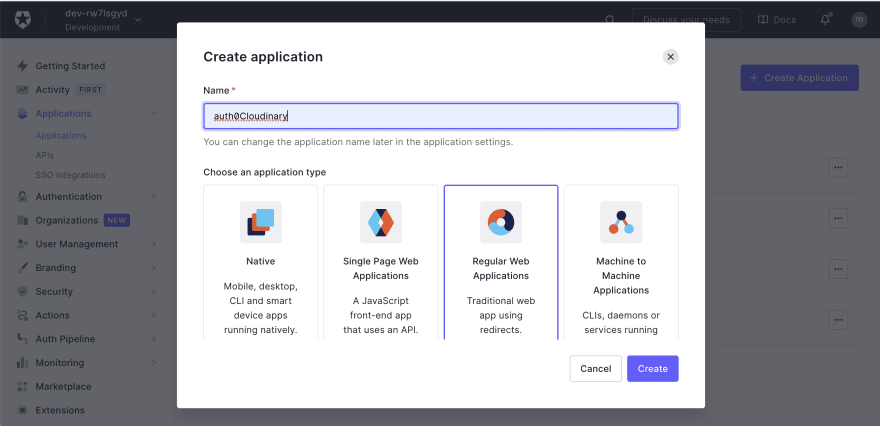
In the application page, click on the Create Application button, input application name auth0Cloudinary in our case, select Regular Web Application as the application type and Create
Click on the Settings tab and copy the Domain, Client ID, and Client Secret.

Then scroll down to the Applications URIs section and fill in the details below for Allowed Callback URLs and Allowed Logout URLs, respectively.
- Allowed Callback URLs
http://localhost:3000/api/auth/callback
- Allowed Logout URLs
http://localhost:3000/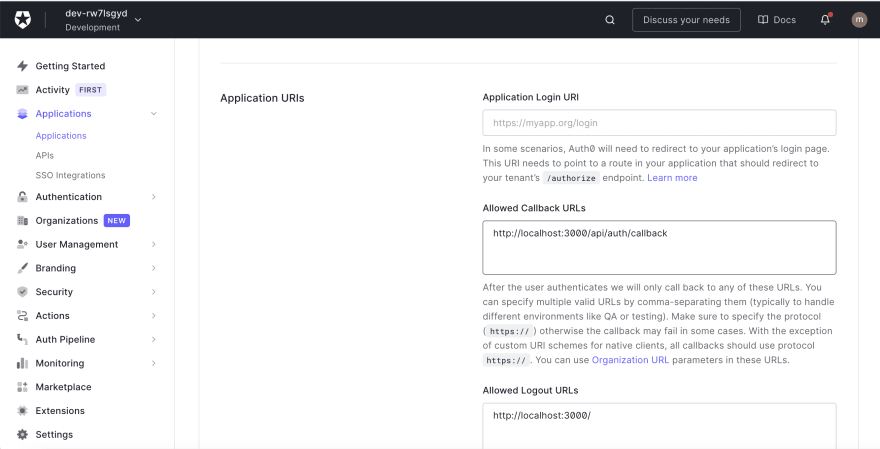
Then scroll down to the bottom of the page and click on the Save Changes button*.*
Integrating Auth0 with Next.js
To integrate Auth0 in our application, we need to create an .env.local file in our root directory and fill in the required parameters(Domain, Client ID and Client Secret) as shown below:
AUTH0_SECRET='LONG_RANDOM_VALUE'AUTH0_BASE_URL='http://localhost:3000'AUTH0_ISSUER_BASE_URL='https://YOUR_AUTH0_DOMAIN.auth0.com'AUTH0_CLIENT_ID='YOUR_AUTH0_CLIENT_ID'AUTH0_CLIENT_SECRET='YOUR_AUTH0_CLIENT_SECRET'We can run the snippet below on our terminal to generate a random secret for the AUTH0_SECRET
node -e "console.log(crypto.randomBytes(32).toString('hex'))"Next, we need to create a dynamic route file for our APIs. We need to navigate to the pages folder, inside this folder, navigate to the api folder, in the folder, create an auth folder, and inside this folder, create an [auth0].js file and add the snippet below:
import { handleAuth } from '@auth0/nextjs-auth0'; export default handleAuth();The handleAuth() function will generate APIs for:
- Login
/api/auth/login
- Logout
/api/auth/logout
- Fetch user data
/api/auth/me
- Redirect user on successful login.
/api/auth/callback
Next, we need to update _app.js file inside the pages folder as shown below:
import { UserProvider } from '@auth0/nextjs-auth0'; export default function App({ Component, pageProps }) { return ( <UserProvider> <Component {...pageProps} /> </UserProvider> ); }Finally, we need to update index.js as shown below
//other imports here import { withPageAuthRequired } from '@auth0/nextjs-auth0'; export default function Home({ user }) { //update this with destructure props //state goes here //functions goes here return ( <div> <Helmet> <script src='https://upload-widget.cloudinary.com/global/all.js' /> </Helmet> <main className={styles.files}> <header className={styles.header}> <a href='/api/auth/logout' className={styles.logout}> {/* add href to this*/} Log Out </a> </header> <p className={styles.name}>Hi {user.name}</p> {/*add this*/} {/*remaining code snippet goes here*/} </main> </div> ); } export const getServerSideProps = withPageAuthRequired({ returnTo: '/', });In the snippet above, we imported withPageAuthRequired and also modified the log out link. We used Next.js inbuilt method getServerSideProps to call the withPageAuthRequired method, specified the URL to redirect to after login, accessed the user props it returned and then displayed the users name.
Complete index.js
We can test our application by starting the development server again, sign up, and then log in to access our application.
Conclusion
This post discussed how to build a personalized and secure file storage system using Cloudinary, Auth0, and Next.js.
You may find these resources useful:
Content created for the Hackmamba Jamstack Content Hackathon.
Original Link: https://dev.to/hackmamba/build-a-file-storage-system-with-cloudinary-auth0-kn
Dev To
More About this Source Visit Dev To