
An Interest In:
Web News this Week
- April 19, 2024
- April 18, 2024
- April 17, 2024
- April 16, 2024
- April 15, 2024
- April 14, 2024
- April 13, 2024
Some of Our Sources
- BoingBoing
- Just Creative
- Pearsonified
- Spoon Graphics
- Smashing Magazine
- Naldz Graphics
- Noupe
- My Ink Blog
- Stylized Web
- Android Headlines
Help Webnuz
Referal links:
How to automate WhatsApp messages
WhatsApp is without a doubt the most popular smartphone application on our devices. With restrictions in place all around the world, it became one of our primary means of communication.
Are you the type of person who prefers not to be distracted from your work by the thought of wishing someone a happy birthday or reminding someone of anything at a specific time? If that's the case, this automation is for you!
You can automate this process by using python by writing just 2-3 lines of code.
Prerequisites
- Python3
- Chrome browser*
- You must be logged into WhatsApp web (does not matter if it is closed)
*If you do not have chrome browser, then you can follow the following steps:
1. Download and extract the current stable release of chrome driver from https://chromedriver.chromium.org/
2. Open the downloaded file and search for an application named chrome drive, copy its path, for windows, it should look like this - C:/Users/.../chromedriver.exe.
3. Then call pywhatkit.add_driver_path(path) and pass the copied path as an argument, if the path is valid, a black window along with chrome will open and close.
4. Now call pywhatkit.load_QRcode() function and scan the QR code.
Overview
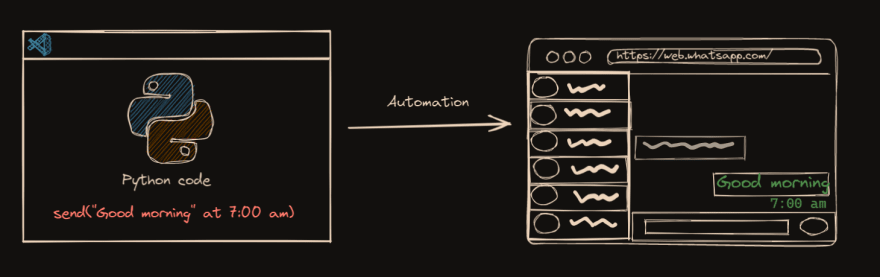
To automate the transmission of messages, we'll write a Python script. Whatsapp web would open at the appointed time and deliver the message to the specified contact number.
Install PyWhatkit
- Create a new python file, name it
wa_automation.pyor anything of your choice. - We would use a python library PyWhatKit, which comes with various whatsapp features like send text messages, images, gifs to a personal contact or even a group chat.
 Ankit404butfound / PyWhatKit
 Send WhatsApp message at certain time and many other things.
PyWhatKit is a Python library with various helpful features. It's easy-to-use and does not require you to do any additional setup. Currently, it has about 200k+ downloads and counting. New updates are released frequently with new features and bug fixes.
Links
Have some query or suggestions or want to become a beta tester, join our discord server - Discord invite link
Help us test an upcoming feature - here
Documentation - Wiki
Contributing
Pull requests are welcome. For major changes, please open an issue first to discuss what you would like to change.For more detailed information see this.
License
MIT. For more information see this
- This library takes care of everything behind the scenes, so all we have to do is write a few lines of Python code describing it what message to send and when to send it, along with some other parameters.
Installation
Install the library in your Python environment
pip3 install pywhatkitIf you face errors:
python -m pip install-upgrade pippython -m pip install upgrade Pillow Import the package
# wa_automation.pyimport pywhatkitWrite Code
After we have installed the package, let us write our python code for automation.
We will use the function sendwhatmsg() to send our message to the contact.
The function asks for the following parameters:
sendwhatmsg(phone_no: str, message: str, time_hour: int, time_min: int, wait_time: int = 20, tab_close: bool = False, close_time: int = 3)Mandatory Parameters:
phone_no:
- Enter phone number as a string
- It is mandatory to add the country code, otherwise you would get error
- Example: "+911234567891"
message:
- Message to be sent as a string.
- Ex: "One hour to go for the deadline"
time_hour:
- The hour when you want to send message
- Please note that the time should be given in 24 hour format.
time_min:
- The minutes when you want to send message.
# wa_automation.pyimport pywhatkitpywhatkit.sendwhatmsg("+911234567891","Reminder to go to market" ,17, 00)Customizations:
# wa_automation.pyimport pywhatkitpywhatkit.sendwhatmsg("+911234567891","Reminder to go to market" ,17, 00, 20, True, 10)- wait_time: After the appointed time, this is the time when your messages will be sent. It is set to 20 seconds by default, but you can alter it to suit your needs.
- tab_close: Specifies that whether the previous tab should be closed or not after sending the message. It will remain open after sending the message by default. You can change it by marking it
True. - close_time: You can control the time after which the tab should be closed after delivering the message by specifying the
close_timeparameter in seconds.
Other features
Send messages to groups
- Using the
sendwhatmsg_to_group()method we can send messages to group chats. - Everything else is the same as the earlier case including the customizations, the only difference is that instead of
phone_numthere isgroup_id. - You can identify the group_id of your group through the invite link. Highlighted text is your group id.

Example:
pywhatkit.sendwhatmsg_to_group("AB123CDEFGHijklmn", "One hour to the deadline", 23, 00, 10, True, 10)Send Instant Messages
Here only difference is that there is no time_hour or time_min to be scheduled.
sendwhatmsg_instantly(phone_no: str, message: str, wait_time: int = 20, tab_close: bool = False, close_time: int = 3)Example:
pywhatkit.sendwhatmsg_instantly("+911234567891", "Can you call me? It is urgent!", 15, True, 4)Send Images/gifs
sendwhats_image(phone_no: str, img_path: str, caption: str = " ", wait_time: int = 15, tab_close: bool = False, close_time: int = 3) -> NoneExample:
pywhatkit.sendwhats_image("+911234567891", "C:\\Image.png", "Question-1", 10, True, 5)Send multiple messages
The feature would be launched soon:
Sending multiple messages to multiple numbers #126

I think you are already working on sending multiple messages to the same person (one after another), if not, this feature is needed.Also I would like to send a message (or multiple) to multiple numbers.
Thanks
Possible pitfalls:
- Make sure your WhatsApp web is connected properly and you have a stable internet connection.
- When running the code, you should try to give at least 4-5 minutes from the present time; otherwise, if you set the time 1-2 minutes prior to the current time, the module may throw an error.
- Do not add 0 as a prefix when specifying time.
- Windows users can send Images (all formats) and GIF's. For Linux based distributions, only
JPEGandPNGare supported. For MacOS users, onlyJPEGis supported currently.
Limitations
- This would only work when you are working on the machine, connected to a stable connection.
- So for example, you want to send your parents good morning every day at 7:00 AM while sleeping, this won't work.
Use cases
- If you are busy doing your work and you have to remind someone, or even schedule a text for meetings, announcements then this would do your work.
- Make aware your study group about the project deadline submission, wish someone a happy birthday on time while not being bothered about it doing work.
Alternative
If you want to send messages while being offline and away from your machine, then there is an alternative method for this using Twilio, python and Heroku. It is not that convenient and works on the basis of a hack, but it is for free and it works.
Check out these resources to implement it:

Original Link: https://dev.to/vibalijoshi/how-to-automate-whatsapp-messages-3cpl
Dev To
More About this Source Visit Dev To