
An Interest In:
Web News this Week
- April 25, 2024
- April 24, 2024
- April 23, 2024
- April 22, 2024
- April 21, 2024
- April 20, 2024
- April 19, 2024
Some of Our Sources
- BoingBoing
- Mashable
- Spoon Graphics
- TutsPlus - Design
- FanExtra - PSD
- Crazy Leaf Design
- My Ink Blog
- Fudge Graphics
- Freelance Switch
- TechPowerUp
Help Webnuz
Referal links:
React Typescript Microfrontend Monorepo with single-spa Lerna
Repository with full code if you want to follow like that
https://github.com/KevBeltrao/microfrontend-monorepo-article
What do I expect from you
You should know React to follow the article. I didn't explain how hooks and routes work, for example. But if you want to learn more about React, you can follow my Youtube channel: https://www.youtube.com/KevBeltrao
If you want to contact me, all my social media is available on https://kevbeltrao.com.br/
Single SPA
"Framework for bringing together multiple JavaScript microfontends in a frontend application." https://single-spa.js.org/
Lerna
Tool we're gonna use to handle multiple JavaScript projects in the same repo. https://lerna.js.org/
Why microfrontend?
- Scaling preventing the application from growing complex (as having a components folder with 100 others folders inside)
- Each project might use the technology that best fits its needs (the same project might have a React, Angular and a Vue app, for example)
- Possible to allocate different teams for each application
- Updating different apps at different times without having to build the whole thing everytime
Why monorepo?
- Easier to manage, since you don't need to worry about updating every other repo when changing one's version
- Sharing code is easier, we can add a project as another project's dependency
- Sharing the same node_modules for dependencies will save you a little space on your computer
Setting up monorepo project
First, you need to have lerna installed globally:
npm i -g lernaCreate a new repository:
git init my-project && cd my-projectAnd initialise lerna inside the repo:
lerna initOnce you did it, your folder should look like this:
my-project/ packages/ lerna.json package.jsonThe packages folder is where we'll leave our applications.
We are using Yarn and Yarn workspaces. Yarn workspaces will make our life easier by linking projects and allowing them to consume each other living in the same repository. For more info about Yarn workspaces check the docs https://yarnpkg.com/features/workspaces
We need to tell Lerna we're using Yarn with workspaces, so add these two lines to lerna.json:
{ "packages": [ "packages/*" ], "version": "0.0.0",+ "npmClient": "yarn",+ "useWorkspaces": true}You also need to tell package.json the folders we're gonna take as workspaces by adding the following:
{ "name": "root", "private": true, "devDependencies": { "lerna": "^4.0.0" },+ "workspaces": [+ "packages/*"+ ]}Creating Root Config
To create a microfrontend app, use the command:
npx create-single-spaAnd answer it like the following, and then I'll explain about it:
Directory for new project | packages/app-rootSelect type to generate | single-spa root configWhich package manager do you want to use? | yarnWill this project use Typescript? | yWould you like to use single-spa Layout Engine | nOrganization name | kevbeltrao(Don't mind if there's a husky warning)
You might have noticed that we have 3 options when selecting the type of application:
- single-spa application / parcel
- Application - Just a regular SPA, but without HTML file
- Parcel - Framework agnostic component. Like applications, but you don't have to worry about the framework you're using in the application and must be called by a manual call
- in-browser utility module (styleguide, api cache, etc) - The name is intuitive enough!
- single-spa root config - App that contains the HTML (EJS) shared between the whole application and register apps. Is the one that orchestrates the microfrontend.
For more info, check the docs https://single-spa.js.org/
Let's start by deleting some stuff we'll not use! Single-spa creates your project as if it was a repository.
- Delete the .husky folder and the .prettierignore, .gitignore and .eslintrc files.
- In the app-root/package.json, delete the "lint", "format", "check-format" and "prepare" scripts. And remove the eslint, prettier and husky related dependencies.
- Delete the .git/ folder running the command:
rm -rf packages/app-root/.gitThe most important stuff for you to notice are the index.ejs and kevbeltrao-root-config.ts files.
In the index.ejs, you can see:
<script type="systemjs-importmap"> { "imports": { "single-spa": "https://cdn.jsdelivr.net/npm/[email protected]/lib/system/single-spa.min.js" } }</script>There's where you'll put the dependencies you want to share with other applications.
A little further you'll be able to see:
<% if (isLocal) { %> <script type="systemjs-importmap"> { "imports": { "@kevbeltrao/root-config": "//localhost:9000/kevbeltrao-root-config.js" } } </script><% } %>Which gives a nickname to an app (@kevbeltrao/root-config) and adds where it's running (localhost:9000) + the output js file (kevbeltrao-root-config.js). That's where you're gonna add the applications related to your project.
Where do we point to this nickname? In the kevbeltrao-root-config.ts file:
registerApplication({ name: "@single-spa/welcome", app: () => System.import( "https://unpkg.com/single-spa-welcome/dist/single-spa-welcome.js" ), activeWhen: ["/"],});That's the syntax we'll use to register applications to our microfrontend project. The name is the one we choose on the ejs file, the app points to the built version of the app and the active when the route where our app should be rendered.
Add a version to the /app-root/package.json:
{ "name": "@kevbeltrao/root-config",+ "version": "1.0.0", "scripts": {...Add your organization name to the root's package.json file and add the following scripts:
{- "name": "root",+ "name": "@kevbeltrao/root", "private": true,+ "scripts": {+ "bootstrap": "lerna bootstrap",+ "start": "lerna run start --stream" },...Run the bootstrap command to fetch packages and link dependencies. If the node_modules of your projects ever have packages installed, just run this command again in the root directory.
yarn bootstrapThe lerna run command chooses the command that the packages will receive to run. As the command to run the project in the app-root/package.json is "start", we put lerna run start. Adding --stream allow us to see the output of our different packages following its names.
Run
yarn startStop running the server and let's keep going.
Creating our first application
Let's, again, from the root directory, run:
npx create-single-spaThis time our answers will be:
Directory for new project | packages/todoSelect type to generate | single-spa application / parcelWhich framework do you want to use? | reactWhich package manager do you want to use? | yarnWill this project use Typescript? | yOrganization name | kevbeltraoProject name | todoLet's do the same process again as the other by deleting the husky, eslint and prettier stuff, removing the .git folder and .gitignore file from the new created folder and adding a version to the new package.json.
Then, run yarn boostrap in the root again.
You'll notice 2 important files in the packages/todo/src/
- kevbeltrao-todo.tsx - Which points to the root component (like the regular index.tsx of a regular application)
- root.component.tsx - Which is like a App.tsx from a regular application, components that exports the whole application
Let's also modify the start script of the new package.json to include the port:
"scripts": {- "start": "webpack serve",+ "start": "webpack serve --port 9001",...Now we have to inform our app-root that it should run this project. For that, we'll add this line to the packages/app-root/src/index.ejs:
<% if (isLocal) { %> <script type="systemjs-importmap"> { "imports": { "@kevbeltrao/root-config": "//localhost:9000/kevbeltrao-root-config.js",+ "@kevbeltrao/todo": "//localhost:9001/kevbeltrao-todo.js" } } </script><% } %>Notice that the output js file is always orgname-appname.js.
So we'll reference this nickname in the packages/app-root/src/kevbeltrao-root-config.ts file by adding:
import { registerApplication, start } from "single-spa";registerApplication({ name: "@single-spa/welcome", app: () => System.import( "https://unpkg.com/single-spa-welcome/dist/single-spa-welcome.js" ), activeWhen: ["/"],});+registerApplication({+ name: "@kevbeltrao/todo",+ app: () => System.import("@kevbeltrao/todo"),+ activeWhen: ["/todo"]+});start({ urlRerouteOnly: true,});So we would be able to see our new app by accessing http://localhost:9000/todo, but we actually face 2 problems.
1 - We can still see the content of the "/" path
2 - We cannot see our new app
Let's fix it one at a time!
For the first problem, here's the deal:
The activeWhen includes everything that matches the path, so if we are at /todo, we also match the / path.
For that, we can pass a function that returns a boolean instead of an array, so it only matches if our function returns true. So follow my lead:
registerApplication({ name: '@kevbeltrao/todo', app: () => System.import('@kevbeltrao/todo'), -activeWhen: ['/'], +activeWhen: (location) => location.pathname === '/',});Refresh your page aaand..... You see nothing! Perfect! 50% fixed.
If you open the browser console, you'll see that: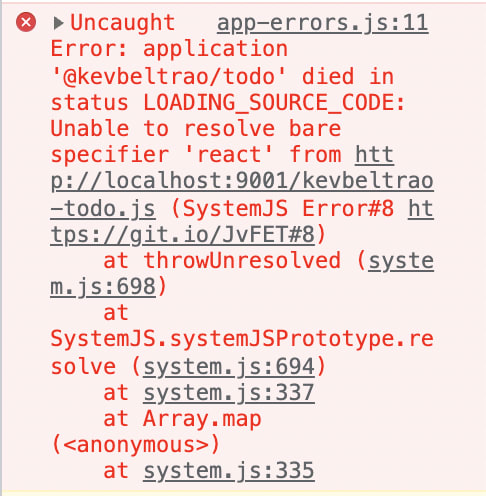
Oh no! Our todo app is not finding "react"!
Good news, we can export our common dependencies to the other projects that use them!
We'll add react and react-dom to our packages/app-root/src/index.ejs file.
For that, we're getting the CDN links for both react and react-dom minified here: https://reactjs.org/docs/cdn-links.html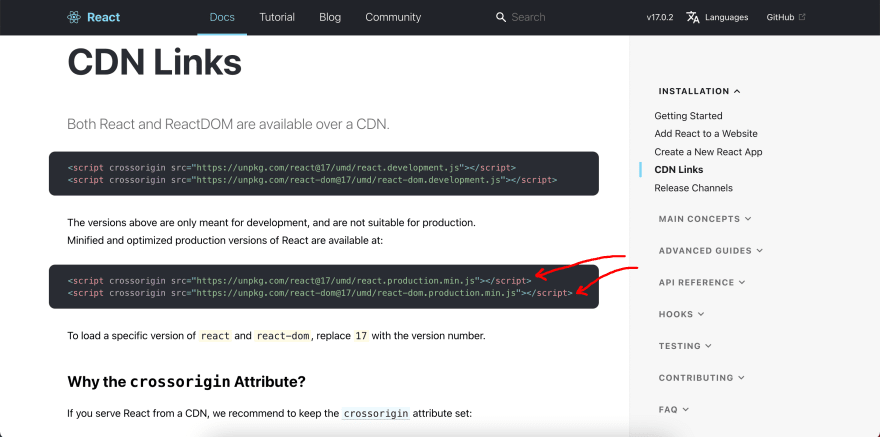
So, with no more smalltalking, let's add them:
<script type="systemjs-importmap"> { "imports": { "single-spa": "https://cdn.jsdelivr.net/npm/[email protected]/lib/system/single-spa.min.js",+ "react": "https://unpkg.com/react@17/umd/react.production.min.js",+ "react-dom": "https://unpkg.com/react-dom@17/umd/react-dom.production.min.js" } } </script>Aaaand now, if you did everything right, you should be able to see your todo page!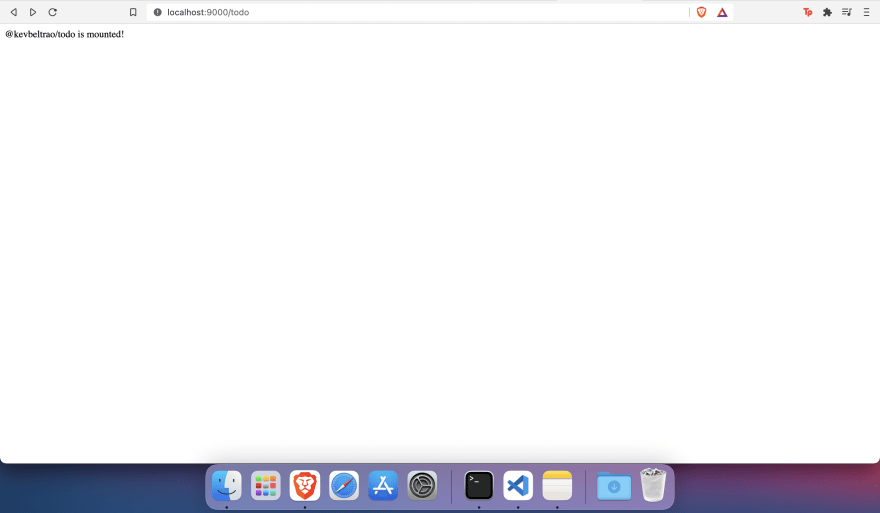
So, to make it faster, I just build a simple todo list component and you should just copy and paste it (of course I consider that you already have the React basics, so I won't explain line per line what's happening). But if you are not good with react hooks yet, you can check the playlist I did with the main ones: https://www.youtube.com/playlist?list=PLooFOXIfdaM3M_xoy2eZg9PvuR-2NJcLj
PS: It's in Portuguese but I intend to add subtitles in a soon future!
First, in the packages/todo/ folder (very important), run the command:
yarn add uuidWe'll use it to create ids for the todo list.
Notice that even tough you're running the command in a specific project and it'll be added to its package.json, the module will be added to the node_modules folder.
Create a packages/todo/src/components/Todo.tsx file with the following:
import { FC, useState } from 'react';import { v4 as uuid } from 'uuid';const Todo: FC = () => { const [tasks, setTasks] = useState([]); const [inputValue, setInputValue] = useState(''); const handleSubmit = (event) => { event.preventDefault(); if (!inputValue) return; setTasks((previousTasks) => [ ...previousTasks, { name: inputValue, id: uuid }, ]) setInputValue(''); } return ( <div> <h2>What will you do?</h2> <form onSubmit={handleSubmit}> <input value={inputValue} onChange={(event) => setInputValue(event.target.value)} /> <button type="submit">Submit</button> </form> <ul> {tasks.map((task) => ( <li key={task.id}>{task.name}</li> ))} </ul> </div> );};export default Todo;And change your /packages/todo/src/root.component.tsx like that:
+import Todo from './components/Todo';+export default function Root(props) { -return <section>{props.name} is mounted!</section>;+ return (+ <section>+ <h1>{props.name} is mounted!</h1>++ <Todo />+ </section>+ );}And like that, you should have a functioning todo list component at http://localhost:9000/todo!
Adding routes
Let's create a navbar app using the same method as before.
First, in the root:
npx create-single-spaThis should be your input:
Directory for new project | packages/navbarSelect type to generate | single-spa application / parcelWhich framework do you want to use? | reactWhich package manager do you want to use? | yarnWill this project use Typescript? | yOrganization name | kevbeltraoProject name | navbarDelete the eslint/prettier/husky/git stuff from the new directory and package.json.
Add a version to the new package.json and the port you wish to have the navbar application running:
{ "name": "@kevbeltrao/navbar", +"version": "1.0.0", "scripts": { -"start": "webpack serve", +"start": "webpack serve --port 9002",...Add the new app to the packages/app-root/src/index.ejs file
<% if (isLocal) { %> <script type="systemjs-importmap"> { "imports": { "@kevbeltrao/root-config": "//localhost:9000/kevbeltrao-root-config.js", "@kevbeltrao/todo": "//localhost:9001/kevbeltrao-todo.js",+ "@kevbeltrao/navbar": "//localhost:9002/kevbeltrao-navbar.js" } } </script><% } %>registerApplication({ name: '@kevbeltrao/navbar', app: () => System.import('@kevbeltrao/navbar'), activeWhen: ['/'],});If it's not working, try again yarn bootstrap in the root directory.
Now you should be able to see the navbar aoo with the "@kevbeltrao/navbar is mounted!" text everywhere.
Let's create the navbar component! First, in the packages/navbar, install react-router-dom:
yarn add react-router-domand its types:
yarn add -D @types/react-router-domI also taught how to use react router dom on my Youtube channel:
https://youtu.be/9pB_lwmLc74?list=PLooFOXIfdaM2Y3wqkq-jLZrMRst9KIb3B
And add this to your packages/navbar/src/root.component.tsx
import { Link, BrowserRouter } from 'react-router-dom';export default function Root(props) { return ( <BrowserRouter> <header> <h1>{props.name} is mounted!</h1> <nav> <ul> <li> <Link to="/">Home</Link> </li> <li> <Link to="/todo">Todo</Link> </li> </ul> </nav> </header> </BrowserRouter> );}Now we can browse through different applications!
Routes Inside Specific Application
First, last create one more application!
As usual:
npx create-single-spaThis should be your input:
Directory for new project | packages/info-appSelect type to generate | single-spa application / parcelWhich framework do you want to use? | reactWhich package manager do you want to use? | yarnWill this project use Typescript? | yOrganization name | kevbeltraoProject name | info-appDelete husky/git/eslint/prettier stuff from directory and package.json, add a port... Ok, you already know it by heart!
Add version and port (on start command) to package.json:
{ "name": "@kevbeltrao/info-app",+ "version": "1.0.0", "scripts": {- "start": "webpack serve",+ "start": "webpack serve --port 9003",Add the new app to the index.ejs file:
<% if (isLocal) { %> <script type="systemjs-importmap"> { "imports": { "@kevbeltrao/root-config": "//localhost:9000/kevbeltrao-root-config.js", "@kevbeltrao/todo": "//localhost:9001/kevbeltrao-todo.js", "@kevbeltrao/navbar": "//localhost:9002/kevbeltrao-navbar.js", "@kevbeltrao/info-app": "//localhost:9003/kevbeltrao-info-app.js" } } </script><% } %>And then to packages/app-root/src/kevbeltrao-root-config.ts
registerApplication({ name: '@kevbeltrao/info-app', app: () => System.import('@kevbeltrao/info-app'), activeWhen: ['/info'],});And let's also add the new link to our navbar component:
<nav> <ul> <li> <Link to="/">Home</Link> </li> <li> <Link to="/todo">Todo</Link> </li>+ <li>+ <Link to="/info">Info</Link>+ </li> </ul></nav>Run
yarn bootstrapAnd run your project again
yarn startIn the packages/info-app directory:
install react-router-dom:
yarn add react-router-domand its types:
yarn add -D @types/react-router-domInside the info-app/src, we'll create a folder with the following files:
src|_ routes.tsx|_ pages/||__ Home.tsx||__ AboutUs.tsx||__ Contact.tsx|_ components/ |_ Nav.tsxThe content of each file inside pages/ will be:
import { FC } from 'react';const Home: FC = () => <h2>Home</h2>export default Home;But, of course, each one will get a different name and title according to the file name!
The packages/info-app/src/components/Nav.tsx will contain:
import { FC } from 'react';import { Link } from 'react-router-dom';const Routes: FC = () => ( <ul> <li> <Link to="/">Home</Link> </li> <li> <Link to="/about-us">About Us</Link> </li> <li> <Link to="/contact">Contact</Link> </li> </ul>);export default Routes;In the packages/info-app/src/routes.tsx file, we'll add:
import { FC } from 'react';import { BrowserRouter, Switch, Route } from 'react-router-dom';import AboutUs from './pages/AboutUs';import Contact from './pages/Contact';import Home from './pages/Home';import Nav from './components/Nav';const Routes: FC = () => ( <BrowserRouter basename="/info"> <> <Nav /> <Switch> <Route exact path="/" component={Home} /> <Route path="/about-us" component={AboutUs} /> <Route path="/contact" component={Contact} /> </Switch> </> </BrowserRouter>);export default Routes;Notice that the prop basename that we pass in the BrowserRouter component is the game change! Every time we click on a link, for example:<Link to="/about-us">About Us</Link>
We'll be actually redirected to /info/about-us.
So we are actually working with subpaths and your app can have its own independent paths!
If you don't add it, you'll be just redirected to /about-us, and there are no apps running in this path.
Original Link: https://dev.to/kevbeltrao/react-typescript-microfrontend-monorepo-with-single-spa-lerna-m60
Dev To
More About this Source Visit Dev To