
An Interest In:
Web News this Week
- April 19, 2024
- April 18, 2024
- April 17, 2024
- April 16, 2024
- April 15, 2024
- April 14, 2024
- April 13, 2024
Some of Our Sources
- Team Treehouse
- Smashing Magazine
- Creative Curio
- FanExtra - PSD
- My Ink Blog
- Reencoded
- Line 25
- Design Modo
- Willems Lab
- TechPowerUp
Help Webnuz
Referal links:
React Authentication with Twitter, Google, Facebook and Github
To interact with an OAuth provider you need API keys. For security reasons, those keys must be kept private on a server. However, if you are following modern development practices your React app is likely completely decoupled from your server and running on a different port or domain.
So how can we solve this communication gap between an OAuth provider that needs the keys and the React client that cant keep those keys private?
A (very) Brief History of Authentication
If you have worked with OAuth authentication in the past this diagram will seem familiar:
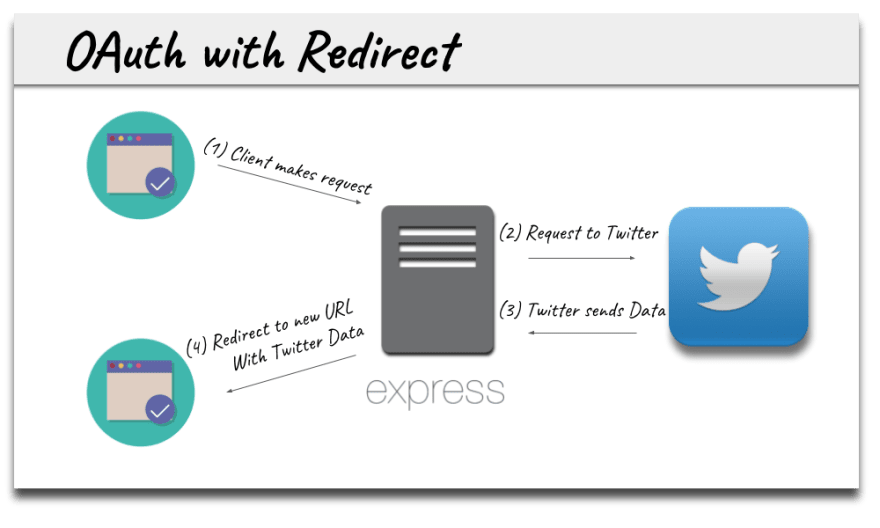
Here the server is spitting out the html the user sees on the client when they use an application, this is referred to as server side rendering.
Since the client and the server are the same entity operating on the same port or domain, we can keep the keys private and simply redirect the user after a successful authentication to a new url on the same application with the users personal data.
But with modern application architecture now decoupling the client from a server (or services) it is getting data from, how can a React client that cant keep API keys private authenticate with an OAuth provider that needs a private API key?
There are solutions out there to this problem.
Some, like Firebase are steeped in black magic and abstract away all the inner workings. Others, like React Auth Twitter, seem over engineered (see workflow below).

Lots of relay points for things to go wrong there, surely there must be a better way
I believe a good approach is to use sockets:

Here, the client communicates with the server via a request to start the authentication process (2) and via a socket response to ultimately receive the users information (5).
Fortunately, because of the reusable nature of React components and the overlap in PassportJS strategies this can happen with a small amount of code for multiple OAuth providers including Twitter, Facebook, Google, Github and many others.
Lets take a look on how to pull that off.
Client
This project is bootstrapped with Create React App. I am assuming you already have some experience with CRA. If not, here is a great tutorial.
The first file we are going to look at is the drop in point for any React app, App.js:
import React, { Component } from 'react'import io from 'socket.io-client'import OAuth from './OAuth'import { API_URL } from './config'import './App.css'const socket = io(API_URL)const providers = ['twitter', 'google', 'facebook', 'github']export default class App extends Component { render() { return ( <div className={'wrapper'}> <div className={'container'}> {providers.map(provider => <OAuth provider={provider} key={provider} socket={socket} /> )} </div> </div> ) }}Note that the socket is connected in the parent App.js component on line 6 and then passed into the child OAuth.js components as a prop on line 19.
The providers variable is just an array of strings of the OAuth providers names. That is good news! Adding another provider on the client is as easy as including the appropriate string in our array.
Super extensible.
Next, lets take a look at the child OAuth.js component:
import React, { Component } from 'react'import FontAwesome from 'react-fontawesome'import { API_URL } from './config'export default class OAuth extends Component { state = { user: {}, disabled: '' } componentDidMount() { const { socket, provider } = this.props socket.on(provider, user => { this.popup.close() this.setState({user}) }) } // custom methods to follow // render method to follow}OAuth.js is the meat of the client, so we are going to break it into pieces to ensure we have an understanding of each part.
We need a bit of state to help manage whether to show the user or to show the login button. On line 15 we are also listening for any response via sockets from the server that matches our provider prop in componentDidMount.
Next, we have to set up custom methods on the OAuth class to start the authentication process and ensure the state updates appropriately if the user aborts the process of authentication.
export default class OAuth extends Component { // previous lifecycle methods // Routinely checks the popup to re-enable the login button // if the user closes the popup without authenticating. checkPopup() { const check = setInterval(() => { const { popup } = this if (!popup || popup.closed || popup.closed === undefined) { clearInterval(check) this.setState({ disabled: ''}) } }, 1000) } // Launches the popup by making a request to the server and then // passes along the socket id so it can be used to send back user // data to the appropriate socket on the connected client. openPopup() { const { provider, socket } = this.props const width = 600, height = 600 const left = (window.innerWidth / 2) - (width / 2) const top = (window.innerHeight / 2) - (height / 2) const url = `${API_URL}/${provider}?socketId=${socket.id}` return window.open(url, '', `toolbar=no, location=no, directories=no, status=no, menubar=no, scrollbars=no, resizable=no, copyhistory=no, width=${width}, height=${height}, top=${top}, left=${left}` ) } // Kicks off the processes of opening the popup on the server and listening // to the popup. It also disables the login button so the user can not // attempt to login to the provider twice. startAuth(e) { if (!this.state.disabled) { e.preventDefault() this.popup = this.openPopup() this.checkPopup() this.setState({disabled: 'disabled'}) } } closeCard() { this.setState({user: {}}) } // render method to follow}There is a bit of functionality here, so lets go through it in more detail.
checkPopup() Checks the popup every second to re-enable the login button if the user closes the popup without authenticating.
openPopup() Launches the popup and makes a request to the server that includes the socket id as a query parameter so it can be used to send back user data to the appropriate socket on the connected client. That happens on line 25 when the url is built and is the key to allowing us to relay information over sockets securely.
startAuth() Kicks off the processes of opening the popup on the server and listening to the popup. It also disables the login button so the user can not attempt to login to the provider multiple times.
closeCard() Pretty sure you can figure out what that does :)
With the functionality in place, lets have a look at the render() method:
export default class OAuth extends Component { // previous lifecycle methods // previous custom methods render() { const { name, photo} = this.state.user const { provider } = this.props const { disabled } = this.state return ( <div> {name ? <div className={'card'}> <img src={photo} alt={name} /> <FontAwesome name={'times-circle'} className={'close'} onClick={this.closeCard.bind(this)} /> <h4>{name}</h4> </div> : <div className={'button-wrapper fadein-fast'}> <button onClick={this.startAuth.bind(this)} className={`${provider} ${disabled} button`} > <FontAwesome name={provider} /> </button> </div> } </div> ) }}Not too much to this one.
The state of the user is used to selectively render either their social profile if it exists or the appropriate login button so the user can login. Using font awesome and some CSS we create authentic buttons using the provider prop as a className.
Thats all for the client. Time to move on to the server.
Server
Since the server is where we are going to store the API keys, we will need to get those keys from the providers that we are working with. Here are the instructions to get your keys for Twitter, Google, Facebook and Github.
Make sure that callback URL you provide when registering an app is in the form:
https://localhost:8080/__provider__/callbackAfter signing up for each provider we need to plug those keys into a .env file on the server. If you need a little help with that, please read this.
We are now ready to move on to writing the server:
// server.jsrequire('dotenv').config()const express = require('express')const path = require('path')const fs = require('fs')const https = require('https')const passport = require('passport')const session = require('express-session')const cors = require('cors')const socketio = require('socket.io')const authRouter = require('./lib/auth.router')const passportInit = require('./lib/passport.init')const { SESSION_SECRET, CLIENT_ORIGIN } = require('./config')const app = express()const certOptions = { key: fs.readFileSync(path.resolve('certs/server.key')), cert: fs.readFileSync(path.resolve('certs/server.crt'))}const server = https.createServer(certOptions, app)// Setup for passport and to accept JSON objectsapp.use(express.json())app.use(passport.initialize())passportInit()// Accept requests from the clientapp.use(cors({ origin: CLIENT_ORIGIN})) // saveUninitialized: true allows us to attach the socket id to the session// before we have athenticated the userapp.use(session({ secret: process.env.SESSION_SECRET, resave: true, saveUninitialized: true }))// Connecting sockets to the server and adding them to the request // so that we can access them later in the controllerconst io = socketio(server)app.set('io', io)// Direct all requests to the auth routerapp.use('/', authRouter)server.listen(process.env.PORT || 8080, () => { console.log('listening...')})Server.js is pretty lightweight as a lot of the functionality for the application will be shelled off to other files.
The key bits to note are that the application is started in HTTPS mode on line 22 (more on that below) and that the sockets are set directly on the app on line 45. By attaching the socket to the app, the socket can be accessed in the routes at a future point in time when we need to communicate with the client.
On to the PassportJS setup:
// lib/passport.init.jsconst passport = require('passport')const { Strategy: TwitterStrategy } = require('passport-twitter')const { OAuth2Strategy: GoogleStrategy } = require('passport-google-oauth')const { Strategy: FacebookStrategy } = require('passport-facebook')const { Strategy: GithubStrategy} = require('passport-github')const { TWITTER_CONFIG, GOOGLE_CONFIG, FACEBOOK_CONFIG, GITHUB_CONFIG} = require('../config')module.exports = () => { // Allowing passport to serialize and deserialize users into sessions passport.serializeUser((user, cb) => cb(null, user)) passport.deserializeUser((obj, cb) => cb(null, obj)) // The function that is called when an OAuth provider sends back user // information. Normally, you would save the user to the database here // in a callback that was customized for each provider. const callback = (accessToken, refreshToken, profile, cb) => cb(null, profile) // Adding each OAuth provider's strategy to passport passport.use(new TwitterStrategy(TWITTER_CONFIG, callback)) passport.use(new GoogleStrategy(GOOGLE_CONFIG, callback)) passport.use(new FacebookStrategy(FACEBOOK_CONFIG, callback)) passport.use(new GithubStrategy(GITHUB_CONFIG, callback))}We are pulling in the strategies for the different providers that we are working with and adding those to the Passport singleton so they can be used throughout the application. If you have worked with Passport before this will feel familiar.
If you havent worked with Passport before, this is a great tutorial.
What is a little unusual above is that the callback on line 21 is the same for all the OAuth providers. Normally that callback is where you would save the user to a database and would need to be configured for every provider individually.
Because saving user data is not a focus of this tutorial, the callback is intentionally generic in this example.
With Passport all set up and ready to go, lets take a look at the router:
// lib/auth.router.jsconst express = require('express')const router = express.Router()const passport = require('passport')const authController = require('./auth.controller')// Setting up the passport middleware for each of the OAuth providersconst twitterAuth = passport.authenticate('twitter')const googleAuth = passport.authenticate('google', { scope: ['profile'] })const facebookAuth = passport.authenticate('facebook')const githubAuth = passport.authenticate('github')// This custom middleware allows us to attach the socket id to the session.// With the socket id attached we can send back the right user info to // the right socketconst addSocketIdtoSession = (req, res, next) => { req.session.socketId = req.query.socketId next()}// Routes that are triggered by the React clientrouter.get('/twitter', addSocketIdtoSession, twitterAuth)router.get('/google', addSocketIdtoSession, googleAuth)router.get('/facebook', addSocketIdtoSession, facebookAuth)router.get('/github', addSocketIdtoSession, githubAuth)// Routes that are triggered by callbacks from OAuth providers once // the user has authenticated successfullyrouter.get('/twitter/callback', twitterAuth, authController.twitter)router.get('/google/callback', googleAuth, authController.google)router.get('/facebook/callback', facebookAuth, authController.facebook)router.get('/github/callback', githubAuth, authController.github)module.exports = routerWe have some setup to incorporate the PassportJS middleware and then have written a small piece of middleware on line 17 to attach the socket id of the connected client that comes in on req.query to req.session.
addSocketIdToSession Attaches the socket id to the session and allows the server to send back the correct user info to the correct socket when the authentication process is complete with an OAuth provider.
I like to break up routes and callbacks into different files on the server to keep code modularized. But the previous file and the next file could be combined.
Time to look at the next (and final!) file:
// lib/auth.controller.jsexports.twitter = (req, res) => { const io = req.app.get('io') const user = { name: req.user.username, photo: req.user.photos[0].value.replace(/_normal/, '') } io.in(req.session.socketId).emit('twitter', user)}exports.google = (req, res) => { const io = req.app.get('io') const user = { name: req.user.displayName, photo: req.user.photos[0].value.replace(/sz=50/gi, 'sz=250') } io.in(req.session.socketId).emit('google', user)}exports.facebook = (req, res) => { const io = req.app.get('io') const { givenName, familyName } = req.user.name const user = { name: `${givenName} ${familyName}`, photo: req.user.photos[0].value } io.in(req.session.socketId).emit('facebook', user)}exports.github = (req, res) => { const io = req.app.get('io') const user = { name: req.user.username, photo: req.user.photos[0].value } io.in(req.session.socketId).emit('github', user)} Because we used app.set(io, io) in server.js we now have access to the sockets from anywhere in the application that has a request in scope. This is super handy as we can now accept a callback from an OAuth provider and then relay the users info to the client via sockets.
Although this code is quite repetitive, at some point we have to build a user Object to send to the client and every OAuth provider sends their data in a different shape. Given that, there does not appear to be a way to avoid what feels like unnecessary boilerplate.
I would normally move configuration functionality like this into the callbacks of the passportInit function as mentioned above and move the user into a database at that point in time. But this seemed more straightforward given we are not saving any user data in this tutorial.
And thats it!
The server is not as easily extensible as the client, but we have established a solid pattern where adding an additional OAuth provider requires installing/configuring the PassportJS package for that provider, setting up a couple routes and writing a controller method.
Not too bad.
HTTPS
Now that we have set up the client and server there is one final piece, we need to run our application in a secure environment.
And you may want to get a cup of coffee before we start. This could take a hot minute.
Because of Facebooks requirement that any application interacting with the Facebook API (even in development) must serve requests over HTTPS we are going to need to run both the client and server in HTTPS mode.
For the create-react-app client it is as simple as using this command to start your development server:
HTTPS=true react-scripts start (OS X)orset HTTPS=true&&npm start (Windows)Your client application is now started with HTTPS. However, a secure client can only make requests to a secure server and that setup is a bit more complicated.
The following are OS X instructions to get a local server and HTTPS certificates up and running:
- How to get HTTPS working on your local development environment in 5 minutes
- Importing and exporting your Email or Personal Authentication certificate using Chrome on Mac OS X
- How do I deal with NET:ERR_CERT_AUTHORITY_INVALID in Chrome?
So the process is to make the certificates on your local machine and then tell your machine that it is ok to accept those self-signed certificates.
I am not a Windows fella myself, so have not attempted this... But here is a video for how to set up HTTPS on a local Windows server that looks pretty good.
I know setting up a local server in HTTPS can be a pain point, if you are struggling with these instructions consider starting with the Twitter only (non-HTTPS) tutorial.
Takeaways
The trend towards decoupled modern application architecture can reopen previously solved problems like authentication. But the overall advantages of building applications in this decoupled services paradigm are too significant to turn back on.
This setup works because React components are reusable and the huge amount of overlap in PassportJS strategies. Once it is up and running, it can be extended to add additional OAuth providers with a small amount of overhead.
So what do you think about this workflow? Do you have a different strategy for OAuth authentication with React? I would love to hear about it.
Original Link: https://dev.to/sagarbarapatre/react-authentication-with-twitter-google-facebook-and-github-149n
Dev To
More About this Source Visit Dev To