
An Interest In:
Web News this Week
- April 24, 2024
- April 23, 2024
- April 22, 2024
- April 21, 2024
- April 20, 2024
- April 19, 2024
- April 18, 2024
Some of Our Sources
- Engadget
- Just Creative
- The Logo Smith
- Abduzeedo
- Inspiredology
- My Ink Blog
- Android Headlines
- Daily Now
- Hashedout
- The Verge
Help Webnuz
Referal links:
Build a Node.js API in Under 30 Minutes
Node.js can be intimidating to beginners. But its flexible structure and lack of strict guidelines makes it seem more complicated than it is.
This tutorial is a quick and simple guide to Node.js, the Express framework, and MongoDB, focusing on the fundamental REST routes and basic database interaction. Youll build a simple API boilerplate that can then be used as the foundation for any app.
Who This Tutorial Is For: You should have a basic understanding of REST APIs and CRUD operations, plus basic JavaScript knowledge. I use ES6 (mainly fat-arrow functions), but nothing too complex.
For this tutorial, youll create the skeleton of a back-end for a note-taking application think Google Keep. You want to be able to do all four CRUD actions on your notes: create, read, update, and delete.
Setting Up
If you dont have Node installed, see here.
In a new directory, run npm init, and follow along with the prompts, giving your app the name of notable (or whatever else you might like).
npm initOnce thats done, you should have a package.json ready to go in your directory. This means you can start installing the dependencies you need for your project.
Youre going to use Express as your framework, MongoDB as the database, and a package called body-parser to help deal with JSON requests.
npm install --save express mongodb@2.2.16 body-parserI also highly recommend installing Nodemon as a dev dependency. Its a simple little package that automatically restarts your server when files change.
If you run:
npm install --save-dev nodemonYou can then add the following script to package.json:
// package.json "scripts": { "dev": "nodemon server.js" },Your complete package.json should look like this:
// package.json{ "name": "notable", "version": "1.0.0", "description": "", "main": "server.js", "scripts": { "dev": "nodemon server.js" }, "author": "", "license": "ISC", "dependencies": { "body-parser": "^1.15.2", "express": "^4.14.0", "mongodb": "^2.2.16" }, "devDependencies": { "nodemon": "^1.11.0" }}Now you can create your server.js file and start building your API.
Our Server
Lets start by requiring all your dependencies in server.js.
// server.jsconst express = require('express');const MongoClient = require('mongodb').MongoClient;const bodyParser = require('body-parser');const app = express();Youre going to use the MongoClient to interact with your database. Note that you also initialize your app as an instance of Express, your framework.
The last thing you need to do to get your server up and running is to tell your app to start listening for HTTP requests.
You can specify a port, and start the listening like so:
// server.jsconst port = 8000;app.listen(port, () => { console.log('We are live on ' + port);});Now if you run npm run dev (or node server.js if you didnt install Nodemon) you should see We are live on port 8000 in the terminal.
Your server is live. But it doesnt do a whole lot. Or anything, really.
Lets fix that.
CRUDdy Routes
For this example, you want to build 4 routes; to CREATE a note, to READ your notes, to UPDATE a note, and to DELETE a note.
This will give you a good idea of how to structure almost any basic route with Node.
To test your API, though, you need to mimic a client side making requests. To do so, youll use a great app called Postman. It allows you to make simple HTTP requests with custom bodies and parameters.
Install Postman, and lets start setting up your routes.
Super Organized
Most Node.js tutorials (and many real apps) put all their routes in one big routes.js file. This makes me a wee bit uncomfortable. In contrast, splitting up your files into separate folders leads to good readability, and makes big apps more manageable.
You dont have a big app, but lets do this right. Make the following directories: an app folder with a routes folder inside it, with an index.js and a note_routes.js file inside it.
In other words: root > app > routes > index.js and note_routes.js.
mkdir appcd appmkdir routescd routestouch index.jstouch note_routes.jsThese directories may seem like overkill for your simple small app, but its always good to start with best practices.
Your First Route
Lets start with the C in CRUD- create. How would you create a note?
Well, before you do that, you have to build a bit more infrastructure. In Express, routes are wrapped in a function, which takes the Express instance and a database as arguments.
Like this:
// routes/note_routes.jsmodule.exports = function(app, db) {};You can then export this function through your index.js:
// routes/index.jsconst noteRoutes = require('./note_routes');module.exports = function(app, db) { noteRoutes(app, db); // Other route groups could go here, in the future};Then import it for use in server.js:
// server.jsconst express = require('express');const MongoClient = require('mongodb').MongoClient;const bodyParser = require('body-parser');const app = express();const port = 8000;**require('./app/routes')(app, {});**app.listen(port, () => { console.log('We are live on ' + port);});Note that since you dont have a database yet set up, youre just passing in an empty object.
Okay, now you can make your CREATE route.
The syntax is simple:
// note_routes.jsmodule.exports = function(app, db) { **app.post('/notes', (req, res) => {** **// You'll create your note here.** **res.send('Hello')** });};When the app receives a post request to the /notes path, it will execute the code inside the callback- passing in a request object (which contains the parameters or JSON of the request) and a response object (used to reply).
You can test this by using Postman to send a POST request to localhost:8000/notes.

Nice! You created your first real route.
Next step is to add some parameters to your request and process them in your API and, finally, add in your database.
Request Parameters
In Postman, go to the Body tab and add some key-value pairs, after selecting the x-www-form-urlencoded radio button.
This will add encoded form data to your request, which youll be able to process with your API.
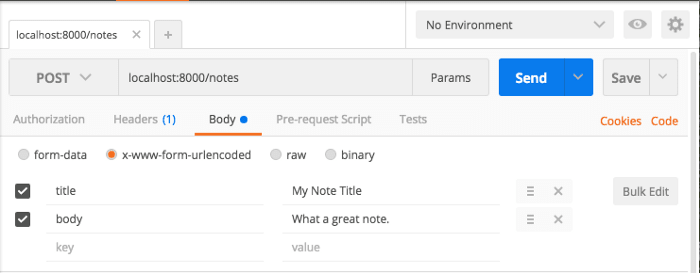
Now in your note_routes.js, lets just log out the body.
// note_routes.jsmodule.exports = function(app, db) { app.post('/notes', (req, res) => { console.log(req.body) res.send('Hello') });};Try sending the Postman request and youll see undefined.
Unfortunately, Express cant process URL encoded forms on its own. But you did install that body-parser package
// server.const express = require('express');const MongoClient = require('mongodb').MongoClient;const bodyParser = require('body-parser');const app = express();const port = 8000;app.use(bodyParser.urlencoded({ extended: true }));require('./app/routes')(app, {});app.listen(port, () => { console.log('We are live on ' + port);});Now you should see the body as an object in the terminal.
{ title: 'My Note Title', body: 'What a great note.' }Last step to your preliminary route: set up the database, and then add your data in.
The easiest way to set up a Mongo database is through mLab: its free for the smallest size, and quite fast to setup.
Once you create an account and a MongoDB deployment, add a user to the database with a username and password:
then grab the URL here (the second one):
And in a directory config in the root of your project, create a db.js file.
mkdir config cd configtouch db.jsInside, add the URL:
module.exports = { url : YOUR URL HERE};Dont forget to add your username and password (the ones from the database user, not your mLab account) into the URL. (If youre committing this project to Github, be sure to include a .gitignore file like so, so you dont share your password with everyone.)
Now in your server.js, you can use the MongoClient to connect to your DB, and use this to wrap your app setup:
// server.jsconst express = require('express');const MongoClient = require('mongodb').MongoClient;const bodyParser = require('body-parser');const db = require('./config/db');const app = express();const port = 8000;app.use(bodyParser.urlencoded({ extended: true }));MongoClient.connect(db.url, (err, database) => { if (err) return console.log(err) require('./app/routes')(app, database); app.listen(port, () => { console.log('We are live on ' + port); }); })If youre using the latest version of the MongoDB (3.0+), modify it like so:
// server.jsconst express = require('express');const MongoClient = require('mongodb').MongoClient;const bodyParser = require('body-parser');const db = require('./config/db');const app = express();const port = 8000;app.use(bodyParser.urlencoded({ extended: true }));MongoClient.connect(db.url, (err, database) => { if (err) return console.log(err) // Make sure you add the database name and not the collection name const database = database.db("note-api") require('./app/routes')(app, database); app.listen(port, () => { console.log('We are live on ' + port); }); })Thats the last of your infrastructure setup! Its all route-building from here.
Adding to your Database
MongoDB stores data in collections- which are exactly how they sound. In your case, you want to store your notes in a collection called you guessed it notes.
Since you pass in your database as the db argument in your routes, you can then access it like so:
db.collection('notes')Creating a note is as simple as calling insert on your collection:
const note = { text: req.body.body, title: req.body.title} db.collection('notes').insert(note, (err, results) => {}Once the insert is complete (or has failed for whatever reason), you want to either send back an error or send back the newly created note object. Heres the full note_routes.js:
// note_routes.jsmodule.exports = function(app, db) { const collection = app.post('/notes', (req, res) => { const note = { text: req.body.body, title: req.body.title }; db.collection('notes').insert(note, (err, result) => { if (err) { res.send({ 'error': 'An error has occurred' }); } else { res.send(result.ops[0]); } }); });};Try it out! Send an x-www-form-urlencoded POST request with Postman, with a title and body set under the Body tab.
The response should look like this:

If you log into mLab, you should also see the created note in the database.
Your READ Route
Now you can pick up the pace a bit.
Say you wanted to get back the note you just created, by navigating to localhost:8000/notes/{the id}. In this case, that would be localhost:8000/notes/585182bd42ac5b07a9755ea3.
(If you dont have the ID for one of your notes, you can check on mLab or just create a new one).
Heres what this would look like in note_routes.js:
// note_routes.jsmodule.exports = function(app, db) { app.get('/notes/:id', (req, res) => { }); app.post('/notes', (req, res) => { const note = { text: req.body.body, title: req.body.title }; db.collection('notes').insert(note, (err, result) => { if (err) { res.send({ 'error': 'An error has occurred' }); } else { res.send(result.ops[0]); } }); });};Just like before, youre going to call a method on your database collection of notes. Here, its the aptly named findOne.
// note_routes.jsmodule.exports = function(app, db) { app.get('/notes/:id', (req, res) => { const details = { '_id': <ID GOES HERE> }; db.collection('notes').findOne(details, (err, item) => { if (err) { res.send({'error':'An error has occurred'}); } else { res.send(item); } }); });app.post('/notes', (req, res) => { const note = { text: req.body.body, title: req.body.title }; db.collection('notes').insert(note, (err, result) => { if (err) { res.send({ 'error': 'An error has occurred' }); } else { res.send(result.ops[0]); } }); });};You can grab the id from the URL parameters via req.params.id. However, if you try to just plop in the string into the <> above, it wont work.
MongoDB requires not just an ID as a string, but as an ID object or, as they call it, an ObjectID.
Dont worry, its an easy fix. Heres the full code:
// note_routes.jsvar ObjectID = require('mongodb').ObjectID;module.exports = function(app, db) { app.get('/notes/:id', (req, res) => { const id = req.params.id; const details = { '_id': new ObjectID(id) }; db.collection('notes').findOne(details, (err, item) => { if (err) { res.send({'error':'An error has occurred'}); } else { res.send(item); } }); });app.post('/notes', (req, res) => { const note = { text: req.body.body, title: req.body.title }; db.collection('notes').insert(note, (err, result) => { if (err) { res.send({ 'error': 'An error has occurred' }); } else { res.send(result.ops[0]); } }); });};Try it out with one of your note IDs, and it should look like this:
Your DELETE Route
Deleting an object is actually pretty much the same as finding an object. You just use the remove function instead of the findOne. Heres the full code. Ive highlighted whats different from your GET:
// note_routes.js// ... app.delete('/notes/:id', (req, res) => { const id = req.params.id; const details = { '_id': new ObjectID(id) }; db.collection('notes').remove(details, (err, item) => { if (err) { res.send({'error':'An error has occurred'}); } else { res.send('Note ' + id + ' deleted!'); } }); });// ...Your UPDATE Route
Last one! The PUT is basically a hybrid between READ and CREATE. You find the object, then update it accordingly. If you deleted your only note, time to make another one!
The code:
// note_routes.js// ... app.put('/notes/:id', (req, res) => { const id = req.params.id; const details = { '_id': new ObjectID(id) }; const note = { text: req.body.body, title: req.body.title }; db.collection('notes').update(details, note, (err, result) => { if (err) { res.send({'error':'An error has occurred'}); } else { res.send(note); } }); });// ...Now you can update any of your notes, like so:

Note the imperfection with this code- if you fail to supply a body or title, the PUT request will nullify those fields on the note in the database.
You could easily add some conditional logic to update the fields only if theyre present in the request- I left that out just to keep it simple.
API Complete
Thats it! You have a working Node API with each of the four major CRUD operations.
The goal of this tutorial was to give you a degree of familiarity with Express, Node, and MongoDB you can use your simple app as a launching pad for more complex projects.
In the future Ill be writing tutorials to create more simple APIs in different languages and frameworks. Hit the follow button if youre interested!
If this tutorial was any help to you, please hit the green heart below- it means a lot. Feel free to also leave me a comment with any feedback or questions.
Thanks for reading!
Original Link: https://dev.to/sagarbarapatre/build-a-node-js-api-in-under-30-minutes-57
Dev To
More About this Source Visit Dev To