
An Interest In:
Web News this Week
- April 19, 2024
- April 18, 2024
- April 17, 2024
- April 16, 2024
- April 15, 2024
- April 14, 2024
- April 13, 2024
Some of Our Sources
- Smashing Magazine
- Abduzeedo
- Fuel Your Creativity
- Inspiredology
- Web Designer Depot
- Naldz Graphics
- Noupe
- Stylized Web
- Design Modo
- Codrops
Help Webnuz
Referal links:
The Missing Docker Crash Course for Developers
Introduction to Docker
It is more likely than not that Docker and containers are going to be part of your IT career in one way or another.
In this blog post series I'll cover the following:
- What are Docker images, containers and Docker Hub
- Installing Docker on Ubuntu Linux on a DigitalOcean Droplet
- Working with Docker containers
- Working with Docker images
- Deploying a Dockerized app
I'll be using DigitalOcean for all of the demos, so I would strongly encourage you to create a DigitalOcean account follow along. You would learn more by doing!
To make things even better you can use my referral link to get a free $100 credit that you could use to deploy your virtual machines and test the guide yourself on a few DigitalOcean servers:
Once you have your account here's how to deploy your first Droplet/server:
https://www.digitalocean.com/docs/droplets/how-to/create/
I'll be using Ubuntu 18.04 so I would recommend that you stick to the same so you could follow along.
What is a container?
According to the official definition from the docker.com website, a container is a standard unit of software that packages up code and all its dependencies so the application runs quickly and reliably from one computing environment to another. A Docker container image is a lightweight, standalone, executable package of software that includes everything needed to run an application: code, runtime, system tools, system libraries, and settings.
Container images become containers at runtime and in the case of Docker containers - images become containers when they run on Docker Engine. Available for both Linux and Windows-based applications, containerized software will always run the same, regardless of the infrastructure. Containers isolate software from its environment and ensure that it works uniformly despite differences for instance between development and staging.

What is a Docker image?
A Docker Image is just a template used to build a running Docker Container, similar to the ISO files and Virtual Machines. The containers are essentially the running instance of an image. Images are used to share a containerized applications. Collections of images are stored in registries like DockerHub or private registries.

What is Docker Hub?
DockerHub is the default Docker image registry where we can store our Docker images. You can think of it as GitHub for Git projects.
Here's a link to the Docker Hub:
You can sign up for a free account. That way you could push your Docker images from your local machine to DockerHub.
Installing Docker
Nowadays you can run Docker on Windows, Mac and of course Linux. I will only be going through the Docker installation for Linux as this is my operating system of choice.
I'll deploy an Ubuntu VM on DigitalOcean so feel free to go ahead and do the same:
Once your server is up and running, SSH to the Droplet and follow along!
If you are not sure how to SSH, you can follow the steps here:
https://www.digitalocean.com/docs/droplets/how-to/connect-with-ssh/
The installation is really straight forward, you could just run the following command, it should work on all major Linux distros:
wget -qO- https://get.docker.com | shIt would do everything that's needed to install Docker on your Linux machine.
After that, set up Docker so that you could run it as a non-root user with the following command:
sudo usermod -aG docker ${USER}To test Docker run the following:
docker versionTo get some more information about your Docker Engine, you can run the following command:
docker infoWith the docker info command, we can see how many running containers that we've got and some server information.
The output that you would get from the docker version command should look something like this:

In case you would like to install Docker on your Windows PC or on your Mac, you could visit the official Docker documentation here:
https://docs.docker.com/docker-for-windows/install/
And:
https://docs.docker.com/docker-for-mac/install/
That is pretty much it! Now you have Docker running on your machine!
Now we are ready to start working with containers! We will pull a Docker image from the DockerHub, we will run a container, stop it, destroy it and more!
Working with Docker containers
Once you have your Ubuntu Droplet ready, ssh to the server and follow along!
So let's run our first Docker container! To do that you just need to run the following command:
docker run hello-worldYou will get the following output:

We just ran a container based on the hello-world Docker Image, as we did not have the image locally, docker pulled the image from the DockerHuband then used that image to run the container.
All that happened was: the container ran, printed some text on the screen and then exited.
Then to see some information about the running and the stopped containers run:
docker ps -aYou will see the following information for your hello-world container that you just ran:
root@docker:~# docker ps -aCONTAINER ID IMAGE COMMAND CREATED STATUS PORTS NAMES62d360207d08 hello-world "/hello" 5 minutes ago Exited (0) 5 minutes ago focused_cartwrightIn order to list the locally available Docker images on your host run the following command:
docker imagesPulling an image from Docker Hub
Let's run a more useful container likean Apache container for example.
First, we can pull the image from the docker hub with the docker pull command:
docker pull webdevops/php-apacheYou will see the following output:

Then we can get the image ID with the docker images command:
docker imagesThe output would look like this:

Note, you do not necessarily need to pull the image, this is just for demo pourpouses. When running the
docker runcommand, if the image is not available locally, it will automatically be pulled from Docker Hub.
After that we can use the docker run command to spin up a new container:
docker run -d -p 80:80 IMAGE_IDQuick rundown of the arguments that I've used:
-d: it specifies that I want to run the container in the background. That way when you close your terminal the container would remain running.-p 80:80: this means that the traffic from the host on port 80 would be forwarded to the container. That way you could access the Apache instance which is running inside your docker container directly via your browser.
The output of the above command would look like this:

With the docker info command now we can see that we have 1 running container.
And with the docker ps command we could see some useful information about the container like the container ID, when the container was started and etc.:
root@docker:~# docker psCONTAINER ID IMAGE COMMAND CREATED STATUS PORTS NAMES7dd1d512b50e fd4f7e58ef4b "/entrypoint supervi" About a minute ago Up About a minute 443/tcp, 0.0.0.0:80->80/tcp, 9000/tcp pedantic_murdockStopping and restarting a Docker Container
Then you can stop the running container with the docker stop command followed by the container ID:
docker stop CONTAINER_IDIf you need to you can start the container again:
docker start CONTAINER_IDIn order to restart the container you can use the following:
docker restart CONTAINER_IDAccessing a running container
If you need to attach to the container and run some commands inside the container use the docker exec command:
docker exec -it CONTAINER_ID /bin/bash That way you will get to a bash shell in the container and execute some commands inside the container itself.
Then to detach from the interactive shell press CTRL+PQ that way you will not stop the container but just detached from the interactive shell.

Deleting a container
To delete the container run first make sure that the container is not running and then run:
docker rm CONTAINER_IDIf you would like to delete the container and the image all together, just run:
docker rmi IMAGE_IDWith that you now know how to pull Docker images from the Docker Hub, run, stop, start and even attach to Docker containers!
We are ready to learn how to work with Docker images!
What are Docker Images
A Docker Image is just a template used to build a running Docker Container, similar to the ISO files and Virtual Machines. The containers are essentially the running instance of an image. Images are used to share a containerized applications. Collections of images are stored in registries like DockerHub or private registries.
Working with Docker images
The docker run command downloads and runs images at the same time. But we could also only download images if we wanted to wit the docker pull command. For example:
docker pull ubuntuOr if you want to get a specific version you could also do that with:
docker pull ubuntu:14.04Then to list all of your images use the docker images command:
docker imagesYou would get a similar output to:

The images are stored locally on your docker host machine.
To take a look a the docker hub, go to: https://hub.docker.com and you would be able to see where the images were just downloaded from.
For example, here's a link to the Ubuntu image that we've just downloaded:
https://hub.docker.com/_/ubuntu
There you could find some useful information.
As Ubuntu 14.04 is really outdated, to delete the image use the docker rmi command:
docker rmi ubuntu:14.04Modifying images ad-hoc
One of the ways of modifying images is with ad-hoc commands. For example just start your ubuntu container.
docker run -d -p 80:80 IMAGE_IDAfter that to attach to your running container you can run:
docker exec -it container_name /bin/bashInstall whatever packages needed then exit the container just press CTRL+P+Q.
To then save your changes run the following:
docker container commit ID_HEREThen list your images and note your image ID:
docker images lsThe process would look as follows:
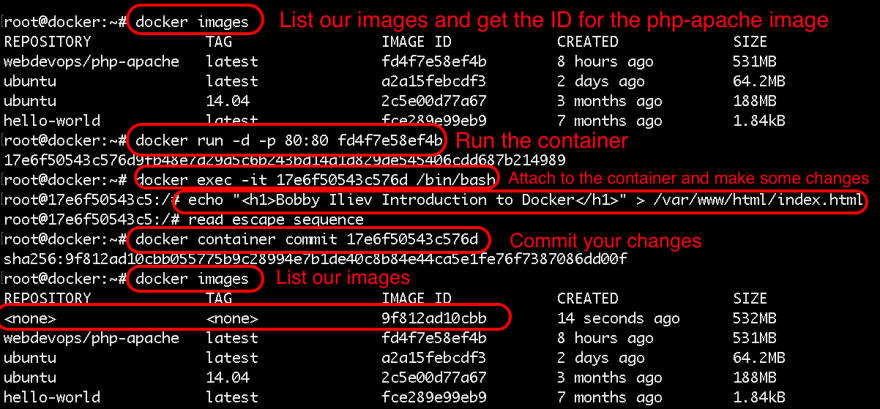
As you would notice your newly created image would not have a name nor a tag, so in order tag your image run:
docker tag IMAGE_ID YOUR_TAGNow if you list your images you would see the following output:

Pushing images to Docker Hub
Now that we have our new image locally, let's see how we could push that new image to DockerHub.
For that you would need a Docker Hub account first. Then once you have your account ready, in order to authenticate, run the following command:
docker loginThen push your image to the Docker Hub:
docker push your-docker-user/name-of-image-hereThe output would look like this:
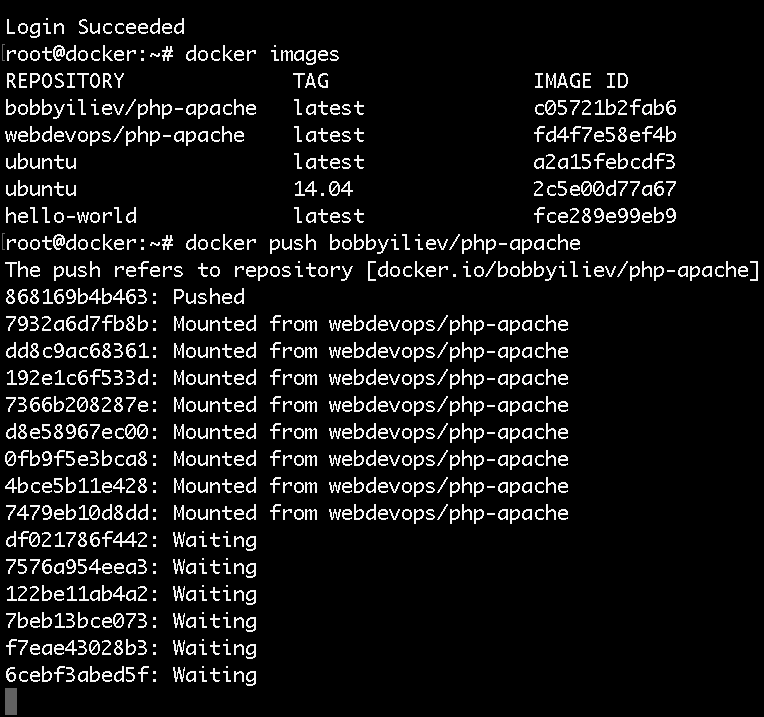
After that you should be able to see your docker image in your docker hub account, in my case it would be here:
https://cloud.docker.com/repository/docker/bobbyiliev/php-apache

Modifying images with Dockerfile
We will go the Dockerfile a bit more in depth in the next blog post, for this demo we will only use a simple Dockerfile just as an example:
Create a file called Dockerfile and add the following content:
FROM alpineRUN apk updateAll that this Dockerfile does is to update the base Alpine image.
To build the image run:
docker image build -t alpine-updated:v0.1 .Then you could again list your image and push the new image to the Docker Hub!
Docker images Knowledge Check
Once you've read this post, make sure to test your knowledge with this Docker Images Quiz:
https://quizapi.io/predefined-quizzes/common-docker-images-questions
Now that you know how to pull, modify, and push Docker images, we are ready to learn more about the Dockerfile and how to use it!
What is a Dockerfile
A Dockerfile is basically a text file that contains all of the required commands to build a certain Docker image.
The Dockerfile reference page:
https://docs.docker.com/engine/reference/builder/
It lists the various commands and format details for Dockerfiles.
Dockerfile example
Here's a really basic example of how to create a Dockerfile and add our source code to an image.
First, I have a simple Hello world index.html file in my current directory that I would add to the container with the following content:
<h1>Hello World - Bobby Iliev</h1>And I also have a Dockerfile with the following content:
FROM webdevops/php-apache-devMAINTAINER Bobby I.COPY . /var/www/htmlWORKDIR /var/www/htmlEXPOSE 8080Here is a screenshot of my current directory and the content of the files:
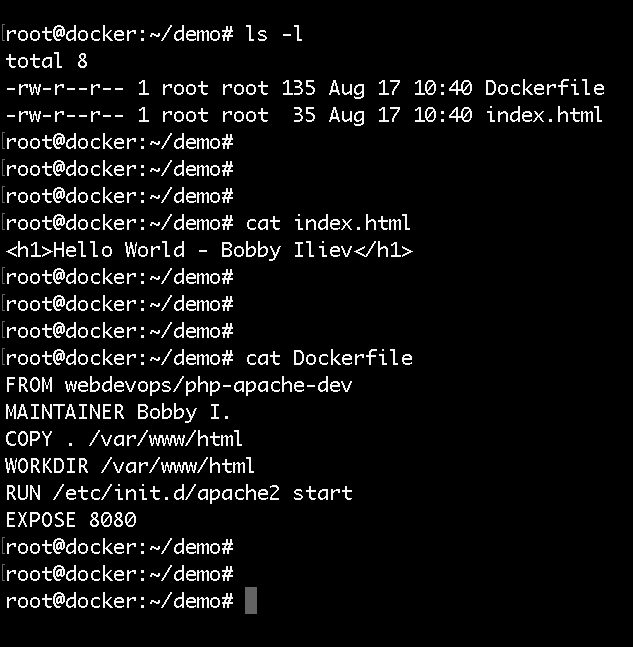
Here is a quick rundown of the Dockerfile:
FROM: The image that we would use as a groundMAINTAINER: The person who would be maintaining the imageCOPY: Copy some files in the imageWORKDIR: The directory where you want to run your commands on startEXPOSE: Specify a port that you would like to access the container on
Docker build
Now in order to build a new image from our Dockerfile, we need to use the docker build command. The syntax of the docker build command is the following:
docker build [OPTIONS] PATH | URL | -The exact command that we need to run is this one:
docker build -f Dockerfile -t your_user_name/php-apache-dev .After the built is complete you can list your images with the docker images command and also run it:
docker run -d -p 8080:80 your_user_name/php-apache-devAnd again just like we did in the last step, we can go ahead and publish our image:
docker logindocker push your-docker-user/name-of-image-hereThen you will be able to see your new image in your Docker Hub account (https://hub.docker.com) you can pull from the hub directly:
docker pull your-docker-user/name-of-image-hereFor more information on the docker build make sure to check out the official documentation here:
https://docs.docker.com/engine/reference/commandline/build/
Dockerfile Knowledge Check
Once you've read this post, make sure to test your knowledge with this Dockerfile quiz:
https://quizapi.io/predefined-quizzes/basic-dockerfile-quiz
This is a really basic example, you could go above and beyond with your Dockerfiles!
Now you know how to write a Dockerfile, how to build a new image from a Dockerfile using the docker build command!
In the next step we will learn how to set up and work with the Docker Swarm mode!
What is Docker Swarm mode
According to the official Docker docs, a swarm is a group of machines that are running Docker and joined into a cluster. If you are running a Docker swarm your commands would be executed on a cluster by a swarm manager. The machines in a swarm can be physical or virtual. After joining a swarm, they are referred to as nodes. I would do a quick demo shortly on myDigitalOcean account!
The Docker Swarm consists of manager nodes and worker nodes.
The manager nodes dispatch tasks to the worker nodes and on the other side Worker nodes just execute those tasks. For High Availability, it is recommended to have 3 or 5 manager nodes.
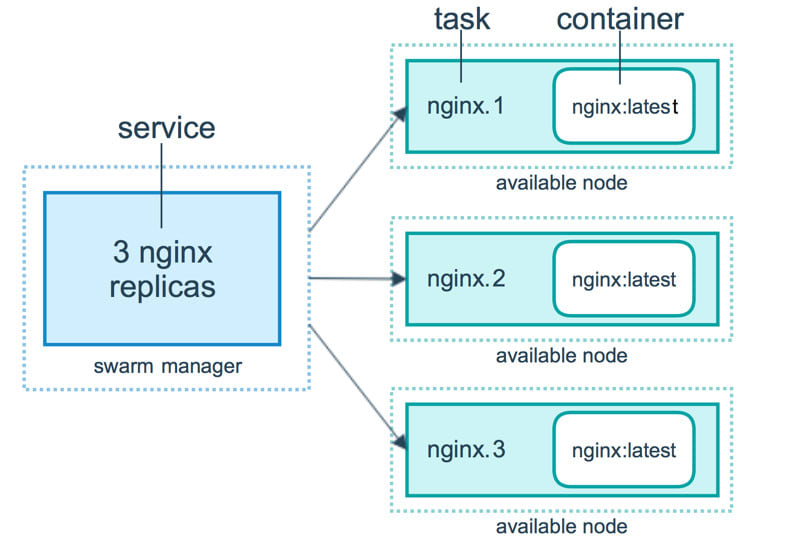
Docker Services
To deploy an application image when Docker Engine is in swarm mode, you have create a service. A service is a group of containers of the same image:tag. Services make it simple to scale your application.
In order to have Docker services, you must first have your Docker swarm and nodes ready.
Building a Swarm
I'll do a really quick demo on how to build a Docker swarm with 3 managers and 3 workers.
For that I'm going to deploy 6 droplets on DigitalOcean:

Then once you've got that ready, install docker just as we did in the Introduction to Docker Part 1 and then just follow the steps here:
Step 1
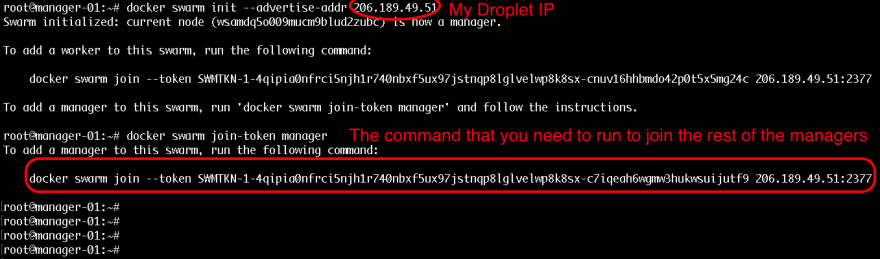
Initialize the docker swarm on your first manager node:
docker swarm init --advertise-addr your_dorplet_ip_hereStep 2
Then to get the command that you need to join the rest of the managers simply run this:
docker swarm join-token managerNote: This would provide you with the exact command that you need to run on the rest of the swarm manager nodes. Example:
Step 3
To get the command that you need for joining workers just run:
docker swarm join-token workerThe command for workers would be pretty similar to the command for join managers but the token would be a bit different.
The output that you would get when joining a manager would look like this:

Step 4
Then once you have your join commands, ssh to the rest of your nodes and join them as workers and managers accordingly.
Managing the cluster
After you've run the join commands on all of your workers and managers, in order to get some information for your cluster status you could use these commands:
- To list all of the available nodes run:
docker node lsNote: This command can only be run from a swarm manager!Output:

- To get information for the current state run:
docker infoOutput:

Promote a worker to manager
To promote a worker to a manager run the following from one of your manager nodes:
docker node promote node_id_hereAlso note that each manager also acts as a worker, so from your docker info output you should see 6 workers and 3 manager nodes.
Using Services
In order to create a service you need to use the following command:
docker service create --name bobby-web -p 80:80 --replicas 5 bobbyiliev/php-apacheNote that I already have my bobbyiliev/php-apache image pushed to the Docker hub as described in the previous blog posts.
To get a list of your services run:
docker service lsOutput:

Then in order to get a list of the running containers you need to use the following command:
docker services ps name_of_your_service_hereOutput:

Then you can visit the IP address of any of your nodes and you should be able to see the service! We can basically visit any node from the swarm and we will still get the to service.
Scaling a service
We could try shitting down one of the nodes and see how the swarm would automatically spin up a new process on another node so that it matches the desired state of 5 replicas.
To do that go to your DigitalOcean control panel and hit the power off button for one of your Droplets. Then head back to your terminal and run:
docker services ps name_of_your_service_hereOutput:

In the screenshot above, you can see how I've shutdown the droplet called worker-2 and how the replica bobby-web.2 was instantly started again on another node called worker-01 to match the desired state of 5 replicas.
To add more replicas run:
docker service scale name_of_your_service_here=7Output:

This would automatically spin up 2 more containers, you can check this with the docker service ps command:
docker service ps name_of_your_service_hereThen as a test try starting the node that we've shutdown and check if it picked up any tasks?
Tip: Bringing new nodes to the cluster does not automatically distribute running tasks.
Deleting a service
In order to delete a service, all you need to do is to run the following command:
docker service rm name_of_your_serviceOutput:

Now you know how to initialize and scale a docker swarm cluster! For more information make sure to go through the official Docker documentation here.
Docker Swarm Knowledge Check
Once you've read this post, make sure to test your knowledge with this Docker Swarm Quiz:
https://quizapi.io/predefined-quizzes/common-docker-swarm-interview-questions
Conclusion
Well done for going through this Docker introduction tutorial! I hope that it was helpful and you've managed to learn some cool new things about Docker!
As a next step make sure to spin up a few servers, install Docker and play around with all of the commands that you've learnt from this tutorial!
Let me know if you have any questions or suggestions!
Follow me on twitter at: @bobbyiliev_
Original Link: https://dev.to/bobbyiliev/the-missing-docker-crash-course-for-developers-2ccb
Dev To
More About this Source Visit Dev To