
An Interest In:
Web News this Week
- April 23, 2024
- April 22, 2024
- April 21, 2024
- April 20, 2024
- April 19, 2024
- April 18, 2024
- April 17, 2024
Some of Our Sources
- Technology Review
- Web Designer Wall
- Abduzeedo
- TutsPlus - Design
- Inspiredology
- FanExtra - PSD
- Crazy Leaf Design
- Line 25
- Specky Boy
- Willems Lab
Help Webnuz
Referal links:
Migrating from Vue 2 to Vue 3.1
Developers enjoy using the open-source Vue.js, a model-view-viewmodel (MVVM) JavaScript framework, to build user interfaces and single-page applications. Its incremental, adaptable, and monolithic framework has core libraries focused on the view layer and integrates with other libraries for other layers.
Vue version 2 does have its drawbacks, like limited typescript support, performance bottlenecks, challenging maintainability, and finite scalability. Vue version 3 aims to solve these issues with significant changes in architecture and function to ensure better performance, readability, maintainability, and security. Although Vue 3 is relatively new and still a work-in-progress, almost all projects will eventually need to convert or migrate to Vue 3.
Lets explore some changes in the new version of Vue.js and use a hands-on example to demonstrate how to migrate an application from Vue 2 to Vue 3. Youll need to be familiar with Vue 2 to follow along.
Vue 3 Changes
Vue 3 has many changes, including fundamental architectural changes such as a new Global API, a new Composition API, changes to the Template Directives, changes to the Render function API, and many more. Well go over these differences briefly, but you can explore Vues documentation for the most in-depth information about each development.
Global API or Create an Application
The Vue 2 method of creating applications kept the global state accessible so that global configurations like plugins and mixins could permanently mutate the state. This ability could potentially pollute the application.
The Vue version 2 app creation syntax is:
new Vue({ store, render: h => h(App) }).$mount('#app');In contrast, Vue version 3 uses the new .createApp method for creating a new application. Since this is the entry-point of all Vue applications, the new root API is a major breaking change.
import Vue, { createApp } from 'vue';createApp(App) .use(store) .mount("#app");Defining New Components
Vue 3 also changes the way Vue creates components.
The Vue 2 way is:
Vue.component('component-name', { // component code here}) Vue 3 replaces Vue.component with the root component as follows:
const app = Vue.createApp({})app.component(component-name){ ///Component code}Using Data Options
Vue 3 considers data as a function that returns whatever objects you need. Data isnt an object anymore.
Vue 2 handles data like this:
const app = new Vue({ // options object el: '#app' data: { object: <some object> }})Vue 3 uses data like this:
const app = Vue.createApp({ // options object data(){ return { object: <some object or string etc> } }})V-if and V-for Precedence
If we use both the v-if and v-for directives on the same element, the v-for takes precedence in Vue 2. This precedence reverses in Vue 3, so v-if takes precedence.
Vue Router Changes
The new version of Vue Router also introduces a few breaking changes of its own. The main change is the new createRouter function. Modes like history also have create functions.
The new way to use Router in Vue 3 is:
import { createRouter, createWebHistory } from 'vue-router'createRouter({ history: createWebHistory(), hash: createWebHashHistory(), abstract: createMemoryHistory() routes: [],})To use Router, we employ the app.use(router) option before mounting the application, where the app is the root component.
Vuex Changes
The new Vuex version, which is compatible with Vue 3, also has application-breaking changes similar to Vue Router. We first need to import createStore from Vuex, then use the createStore function to create a store for our application.
To use Vuex in Vue 2:
export default new Vuex.Store({ });Now, to use Vuex createStore in Vue 3:
import { createStore } from 'vuex'export const store = createStore({ state () { return { count: 1 } }})Vue 3 also introduces the useStore. Vuex 4 uses the useStore function to get the store from a setup hook in a Vue application. According to Vue 3s documentation, we operate useStore as follows:
import { useStore } from 'vuex'export default { setup () { const store = useStore() }}These new methods change the way we declare and use these components in a Vue application. For a list of all the other changes in Vue 3, refer to its documentation.
Migration Build
Because of Vue 3s many changes, when developers try to run their Vue 2 application after upgrading their Vue version from 2 to 3, it fails compilation with multiple errors. Considering the size of production applications, correcting all the compiler and runtime errors can be daunting.
To ease app migration from Vue 2 to Vue3, the Vue team introduced a migration build. According to its documentation, it helps developers configure Vue 2 behavior in Vue 3.
This build runs in Vue 2 mode by default, so most public APIs (with a few exceptions) behave precisely like Vue 2. When features change or are deprecated, the migration build produces runtime warnings. Developers can also enable or disable each components compatibility.
The migration build helps shift your application from version 2 to version 3 without rewriting the entire application. It works by running the Vue 2 application as-is, including breaking changes, in Vue 3. At the same time, it throws warnings to show what code you need to change. This build provides a smoother, easier way to make your Vue 2 app changes for Vue 3 compliance. The migration build doesnt handle the Vue 2 specific libraries and depreciated APIs.
The migration build is not an ideal, long-term solution, but you can use it as an intermediary to upgrading. That said, you can use it for production applications, if essential, according to its documentation: "If you do get your app running on the migration build, you can ship it to production before the migration is complete. Although there is a small performance/size overhead, it should not noticeably affect production UX."
Run a Vue 2 Application with a Migration Build
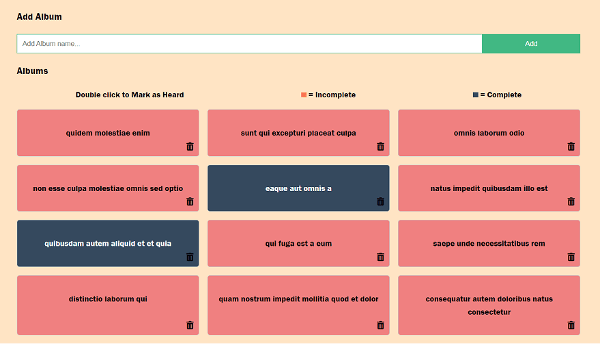
To understand how to migrate an application, we'll explore an example. We built a Vue 2 album manager similar to Brad Traversy's To-do Manager application. Album Manager can:
- Add an album
- Delete an album
- Mark an album as heard
The application looks like this in Vue 2:
Our app doesnt use any third-party libraries. However, if your application does rely on these libraries, its best to wait for their Vue 3-compatible versions before migrating the application.
According to the Vue documentation, dependencies relying on internal Vue 2 APIs or undocumented behavior commonly use private properties on VNodes. Although you can use the migration build for server-side rendering (SSR), migrating a custom setup is more involved: Vue 3 doesnt have a bundle renderer. Vues creators recommend using Vue 3 SSR with Vite.
If you use Nuxt.js, Vuetify, Quasar, or ElementUI, the Vue team recommends waiting for the next version. Although most significant libraries plan to release Vue 3 compatible versions soon, your application may use minor libraries that break.
It may be challenging to migrate large and complex libraries even when using the migration build. However, Vues creators say they plan to backport Composition API and other Vue 3 features to the 2.7 release.
Getting Ready for the Migration Build
To start the migration build, we first install the current Vue version globally on our system. To check for the Vue version, we trigger the command:
vue versionThis command should return the current version of Vue.
Next, to install the migration build, we run:
npm install -global vue@^3.1.0 @vue/compat@^3.1.0npm install -global --save-dev @vue/compiler-sfc@^3.1.0Now that we have installed the compatibility build, we can uninstall the template compiler:
npm uninstall vue-template-compilerThen, we run the Vue upgrade to check if any dependent libraries need upgrading.
Now that we have installed all our dependencies and Vue migration build, we can enable the build. To do this, we edit or create a vue.config.js file with the following code:
module.exports = { chainWebpack: config => { config.resolve.alias.set('vue', '@vue/compat') config.module .rule('vue') .use('vue-loader') .tap(options => { return { ...options, compilerOptions: { compatConfig: { MODE: 2 } } } }) }}When we have added the code and saved our file, we can run the application in compatibility mode by running the
npm run serve
command.
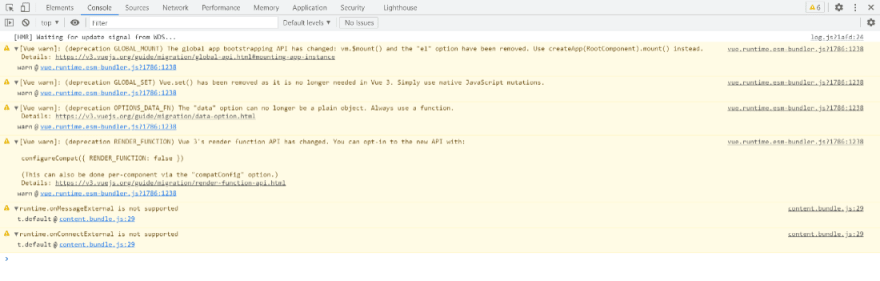
If weve resolved all the dependencies correctly, the application runs as-is. But, when we open the console window, we may see multiple warnings.
For example, the application runs when we run Album Manager in migration build mode, but we see the following error:

The running application looks like this:

The console errors may be warnings, but theyre breaking changes. The migration build lowers their intensity to warnings but simultaneously points out all the changes we need to make for our application to be Vue 3 compatible.
Making Changes
Now that we know the required changes, we can start making our application Vue 3 compatible.
First, we need to upgrade Vuex to the next version. To do so, we run:
npm install -global vuex@nextNext, we upgrade the Vue version using the command:
npm install -g @vue/cliIts always a good idea to
run npm install
as well.
After we take care of all the upgrades, we next need to change our code. Lets explore the code changes we need to make Album Manager run as a Vue 3 application.
Changing the Create API
As we discussed earlier, Vue 3 has a new way of creating the app. To incorporate this change, we change the main.js file. We keep the Vue 2 code commented in the file for comparison. So, we change the main.js to:
import Vue, { createApp } from 'vue';import App from './App.vue';import store from './store/index';Vue.config.productionTip = false;//Vue 3 codecreateApp(App) .use(store) .mount("#app");Changing the Store
Lets simplify the store folder and write all our code in index.js. To keep our application consistent, we create action-types.js, which contains our function names.
In the Vue 2 version, we create the store using the Veux.store function to enable the modules. In Vue 3, this code changes to the createStore function.
The Vue 2 version is:
Vue.use(Vuex) export default new Vuex.Store({ state: { }, mutations: { }, actions: ( }, modules: { }})We need to create actions and mutations for all the activities that we perform in the application, like fetching, updating, adding, and deleting albums. To fetch data, we use Typicode endpoints.
We set up the store similar to the Vue 2 syntax. The only difference is that we set it all inside the createStore function.
For example, to set up the first action (that is, fetch albums), we create the following index.js:
export default Vuex.createStore({ state: { albums: [], }, mutations: { [ACTION_TYPES.fetchAlbums]: (state, albums) => (state.albums = albums),}, actions: { onFetchAlbums: async ({ commit }) => { const response = await Axios.get( "https://jsonplaceholder.typicode.com/albums" ); const data = response.data; for (var k in data) { data[k].completed = false; console.log(data[k]); } //console.log(response.data); commit(ACTION_TYPES.fetchAlbums, data); }, },});We set up all the other actions similarly.
Vue Files
In the Vue files, we use the computed, onMounted, and setup functions. We write this code as follows:
import { useStore } from "vuex";import { computed, onMounted } from "vue";export default { name: "Fetch Albums", setup() { const store = useStore(); const albums = computed(() => store.state.albums); onMounted(() => { store.dispatch("onFetchAlbums"); });.}Lets look at these changes in a little more detail.
Computed
The computed function replaces the computed property in Vue 2. We pass a getter to the computed function and get an immutable object in return.
onMounted
The onMounted hook replaces the mounted property from Vue 2, which takes in a callback function.
For example, in Albums.vue:
onMounted(() => { store.dispatch("onFetchAlbums"); });Setup Function
Vue3 uses the composition API to handle components. The setup function is the starting point of all components.
The setup function takes properties and context. We directly return the data we want to expose in the application in the setup function.
ref
The AddAlbums.vue file uses the ref function to initialize a reactive variable.
import { ref } from "vue"; setup() { const store = useStore(); const title = ref(""); const addAlbum = e => { e.preventDefault(); store.dispatch("onAddAlbum", { title: title.value }); title.value = ""; };These cover the main changes we need to make our application Vue 3 compatible. When we now run our application in Vue 3, it looks like this:

Conclusion
Vue 3 has significant architectural changes, like the composition API and functions, new Vuex version, new Vue router, reactive variables, and many more. With these changes comes the possibility that your Vue 2 applications can break. Regardless of the size of an application, its daunting to migrate them. The Vue team introduced the migration build to mitigate this issue. The migration build runs the Vue 2 application in compatibility mode while warning about breaking changes and changes required to make your application Vue 3 compatible.
Although the migration build is beneficial, it cant cover all the possible problems. This tool also isnt a long-term solution: Its simply a springboard to start your migration. Migrating your application from Vue 2 to Vue 3 is still a significant task requiring thorough planning. But, its a must-do as developers gradually upgrade to the new version of Vue and take advantage of its improved features.
Whether you work with Vue 2 or switch over to Vue 3, you can save development time by including GrapeCitys Vue-compatible components in your application. SpreadJS and Wijmo quickly add spreadsheet components like charts and pivot tables, maps, and more than 100 user interface components to your application.
Original Link: https://dev.to/grapecity/migrating-from-vue-2-to-vue-3-1-1ng1
Dev To
More About this Source Visit Dev To