
An Interest In:
Web News this Week
- April 1, 2024
- March 31, 2024
- March 30, 2024
- March 29, 2024
- March 28, 2024
- March 27, 2024
- March 26, 2024
Some of Our Sources
- Slashdot
- Engadget
- Technology Review
- Spoon Graphics
- Fuel Your Creativity
- 24 Ways
- Web Resource Source
- Daily Now
- Hashedout
- TechPowerUp
Help Webnuz
Referal links:
React: How to create a reusable form using React Context
Forms are very common in web apps. We are going to be creating forms over and over again when working as a developer. What makes React fun is that we can take common patterns like this and turn them into reusable components, making our development life easier and our code shorter.
This is for those who already know:
and would like to learn about React Context which "provides a way to pass data through the component tree without having to pass props down manually at every level." If you think Redux sucks, then keep reading, because Context is an alternative to Redux.
If you're having trouble, you can see the finished code here or leave a comment below.
Let's start by creating a React app.
You can create your own React app but I suggest cloning this repository instead. I added some CSS, since I will not be explaining that.git clone https://github.com/trishalim/react-reusable-form-tutorial-boilerplate.git
Go into that directory and run npm install and npm start.
Creating a reusable component called FormInput
Create a new filed named FormInput.js with the following code:
import './FormInput.css';import { useState } from 'react';function FormInput(props) { const { label } = props; const [value, setValue] = useState(''); const onChange = (event) => { setValue(event.target.value); }; return ( <div className="FormInput"> <label>{label}</label> <input type="text" value={value} onChange={onChange} /> </div> )}export default FormInput;This component has a custom label prop, and handles changing of the input value through a state.
Use this new component in App.js by adding the following code:
<FormInput label="First Name" /><FormInput label="Last Name" />Don't forget to import:import FormInput from './FormInput';
You should end up with this:
It would be useful if our FormInput component can handle different types of fields. So let's add a type prop to allow for custom types.
function FormInput(props) { // Set default type to "text" const { label, type = 'text' } = props; const [value, setValue] = useState(''); const onChange = (event) => { setValue(event.target.value); }; return ( <div className="FormInput"> <label>{label}</label> <input type={type} value={value} onChange={onChange} /> </div> )}Let's add email and password fields to App.js.
<FormInput label="Email Address" type="email" /><FormInput label="Password" type="password" />Yay! Now our FormInput can do a tiny bit more.
Moving state to App.js.
We want to be able to retrieve the values of the form. Currently, App has no way of knowing the current state of the form. Let's fix that.
Add a form state in App.
import { useState } from 'react';const [form, setForm] = useState({ firstName: '', lastName: '', emailAddress: '', password: ''});Add some new props to FormInput. Remove the state and change handlers in FormInput. These will be moved to the parent component App. You should end up with only this:
function FormInput(props) { const { label, type = 'text', name, value, onChange } = props; return ( <div className="FormInput"> <label>{label}</label> <input type={type} name={name} value={value} onChange={onChange} /> </div> )}Since we just removed the value state and change handler from FormInput, we have to add these from App and pass them on as props instead.
<FormInput label="First Name" name="firstName" value={form.firstName} onChange={handleFormChange} />Do the same for Last Name, Email and Password fields.
<FormInput label="Last Name" name="lastName" value={form.lastName} onChange={handleFormChange} /><FormInput label="Email Address" type="email" name="emailAddress" value={form.emailAddress} onChange={handleFormChange} /><FormInput label="Password" type="password" name="password" value={form.password} onChange={handleFormChange} />Time to define our change handler handleFormChange. Here we are modifying form state, but only the field that changed. For example, if you type on the First Name field, form.firstName will be updated.
const handleFormChange = (event) => { // Clone form because we need to modify it const updatedForm = {...form}; // Get the name of the field that caused this change event // Get the new value of this field // Assign new value to the appropriate form field updatedForm[event.target.name] = event.target.value; console.log('Form changed: ', updatedForm); // Update state setForm(updatedForm); };Now go into your browser and play around with the form. You should be able to see the changes reflected on your console as you type on any of the fields. That means our state in App is working!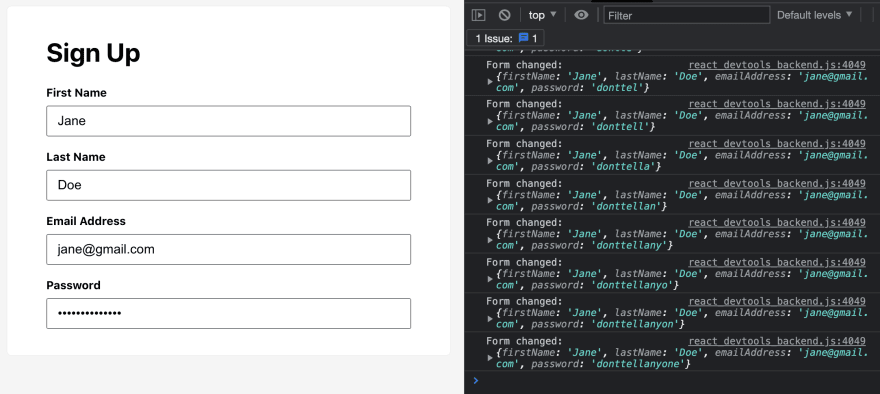
With some ES6 magic, we can shorten this to:
const handleFormChange = (event) => { // Get the name of the field that caused this change event // Get the new value of this field const { name, value } = event.target; // Assign new value to the appropriate form field const updatedForm = { ...form, [name]: value }; console.log('Form changed: ', updatedForm); // Update state setForm(updatedForm);};Now our code is still pretty long. Great news: all this logic inside App for handling the form state can be reused too!
Creating a reusable Form component
Remember all that code we just added in App? Let's move all that to a new Form component.
import { useState } from 'react';import './Form.css';function Form(props) { const { children } = props; const [form, setForm] = useState({ firstName: '', lastName: '', emailAddress: '', password: '' }); const handleFormChange = (event) => { // Get the name of the field that caused this change event // Get the new value of this field const { name, value } = event.target; // Assign new value to the appropriate form field const updatedForm = { ...form, [name]: value }; console.log('Form changed: ', updatedForm); // Update state setForm(updatedForm); }; return ( <form className="Form"> {children} </form> );}export default Form;We have the children props so that we can later on write something like:
<Form> <FormInput /> <FormInput /> <FormInput /></Form>which results to:
<form className="form"> <FormInput /> <FormInput /> <FormInput /></form>App should NOT have any fields anymore, only the return statement. Remove form, setForm and handleFormChange. This will result into an error:

form and handleFormChange are now undefined, since we moved them to Form. We need to be able to access these fields somehow. This is where React Context comes in.
Use React Context to have access to form state and handleFormChange
Context provides another way to pass props to children, grandchildren, great grandchildren and so on - without having to pass them at every single level.
First, let's declare and initialize a Context in Form.js. Make sure to export this since we'll be using it in other components.
import React from 'react';export const FormContext = React.createContext({ form: {}, handleFormChange: () => {}});These are the fields that we'd like to share to Form's children.
Pass them from Form to App by wrapping {children} in Form.js's return:
<FormContext.Provider value={{ form, handleFormChange}}> {children}</FormContext.Provider>With this, the children can access form and handleFormChange. In App, make to sure to import:import Form, { FormContext } from './Form';
Wrap all the FormInput components:
<Form> <FormContext.Consumer> {({form, handleFormChange}) => ( <> <FormInput label="First Name" name="firstName" value={form.firstName} onChange={handleFormChange} /> <FormInput label="Last Name" name="lastName" value={form.lastName} onChange={handleFormChange} /> <FormInput label="Email Address" type="email" name="emailAddress" value={form.emailAddress} onChange={handleFormChange} /> <FormInput label="Password" type="password" name="password" value={form.password} onChange={handleFormChange} /> </> )} </FormContext.Consumer></Form>Notice that here we are using FormContext.Consumer. This means that we are consuming some data from FormContext. In Form, we were passing data, thus FormContext.Provider.
Check your browser and play around with the form. The state should be reflecting. You'll see this in the console just like before.
The behavior didn't change, but now our code is more reusable. And you've learned how to use Context!
Let's make our code shorter. More reusability!
Our code is still pretty long and repetitive. For every FormInput, we've had to write value={form.xxx} and onChange={handleFormChange}.
We can move this logic to FormInput. Instead of consuming FormContext in App, we can actually do that in FormInput. This is the great thing about Context compared to props. The fields become accessible down several levels.
In FormInput, let's use FormContext. This is another way to use a Context:
const formContext = useContext(FormContext);const { form, handleFormChange } = formContext;Don't forget to import:import { useContext } from 'react';import { FormContext } from './Form';
Now that we have access to the form state, we can set the input value from that:value={form[name]}
And the change handler:onChange={handleFormChange}
We no longer need value and onChange props here.
Your FormInput.ts should look like this:
import './FormInput.css';import { useContext } from 'react';import { FormContext } from './Form';function FormInput(props) { const { label, type = 'text', name, } = props; const formContext = useContext(FormContext); const { form, handleFormChange } = formContext; return ( <div className="FormInput"> <label>{label}</label> <input type={type} name={name} value={form[name]} onChange={handleFormChange} /> </div> )}export default FormInput;Since FormInput now handles the use of FormContext, we can remove lots of code in App.js:
import './App.css';import Form from './Form';import FormInput from './FormInput';function App() { return ( <div className="App"> <h1>Sign Up</h1> <Form> <FormInput label="First Name" name="firstName" /> <FormInput label="Last Name" name="lastName" /> <FormInput label="Email Address" type="email" name="emailAddress" /> <FormInput label="Password" type="password" name="password" /> </Form> </div> );}export default App;Looking neat af! Make sure it's still working as expected.
One last thing!
Currently, Form always has the same fields firstName, lastName, emailAddress, password. We need to be able to customize this.
In Form, add a new prop called formInitialValues and use that as a default state:const [form, setForm] = useState(formInitialValues);
In App, make sure we're passing the new prop:
<Form formInitialValues={{ firstName: '', lastName: '', emailAddress: '', password: ''}}>Great! Is it still working as expected? If so, let's proceed with adding another form.
Create another form, and see how much easier it is now!
Here's a login form that I created:
<Form formInitialValues={{ username: '', password: ''}}> <FormInput label="Username" name="username" /> <FormInput label="password" name="Password" type="password" /></Form>
And there you have it!
You can also download the finished code here.
You can continue adding more code to improve this:
- Add a submit button.
- Add a
requiredboolean prop to FormInput. If there is no value, display an error message. - Custom validations and error messages.
- Other input fields like
<select>.
If you're having trouble in any of the steps, let me know below. I'd love to help you out!
Original Link: https://dev.to/trishathecookie/react-creating-a-reusable-form-using-react-context-5eof
Dev To
More About this Source Visit Dev To