
An Interest In:
Web News this Week
- April 1, 2024
- March 31, 2024
- March 30, 2024
- March 29, 2024
- March 28, 2024
- March 27, 2024
- March 26, 2024
Some of Our Sources
- Simplebits
- Web Designer Wall
- The Logo Smith
- Vandelay Design
- You The Designer
- FanExtra - PSD
- Crazy Leaf Design
- Reencoded
- CSS Tricks
- Spyre Studios
Help Webnuz
Referal links:
How to make an e-commerce website with HTML, CSS and JS - 02
Hello, hope you'll are good. Today we'll do the second part of our fullstack e-com website series. In this part, you'll make a node server to run website on localhost, then you'll learn to do form validations and storing user in firestore. In total, in this video we'll make signup page/ login page, logout feature and sellers dashboard.
If you haven't watched previous part. Watch now
To see demo or you want full coding tutorial video for better understanding. You can watch the tutorial below.
Video Tutorial
I appreciate if you can support me by subscribing my youtube channel.
Code
You can see below, our project's folder structure. We have some new files compare to what we had in the previous part.

Download Images, Get Source Code
So let's start coding.
NPM Init
Start with server, open the previous code folder in terminal or cmd prompt. And run npm init. This will initialize the NPM to the project. After that, install some packages by running this command.
npm i express.js nodemon firebase-admin bcrypt
express.js- is to create a servernodemon- is to run server continuously.firebase-admin- is to access firebase from backend.bcrypt- is to encrypt the user's password before storing it inside our database.
Once you are done with installation. You'll see package.json on your directory. Open the file and changes in scripts object.
"scripts": { "start": "nodemon server.js"}This will make a start command for use to use with NPM. Now if you haven't created a server.js file. Make one. And let's make the server.
Server
Open server.js file. And start by importing the packages we just installed.
// importing packagesconst express = require('express');const admin = require('firebase-admin');const bcrypt = require('bcrypt');const path = require('path');We didn't installed the
pathpackage/library as it is a default package come with nodeJS.pathallow to access the path or do path related stuffs.
// declare static pathlet staticPath = path.join(__dirname, "public");Make public folder's path a static path. What is static path ? Static path is just a path which tells server where it has to look for the files.
//intializing express.jsconst app = express();//middlewaresapp.use(express.static(staticPath));app.listen(3000, () => { console.log('listening on port 3000.......');})In above code, I am make a express server and listening for requests on port 3000.
Make / , /404 routes.
//routes//home routeapp.get("/", (req, res) => { res.sendFile(path.join(staticPath, "index.html"));})Start your server now by running npm start on terminal. Open localhost:3000 on your chrome to view the page. And if the server is working, you'll see the index.html page.
For 404 route. We'll use middle ware. Make sure to add this middle ware at the very bottom of the server. Otherwise you'll get 404 page even if you are on some defined route.
// 404 routeapp.get('/404', (req, res) => { res.sendFile(path.join(staticPath, "404.html"));})app.use((req, res) => { res.redirect('/404');})You can notice, I have made a separate 404 page and redirecting user on making request to any unknown route. Well why I did that? I did that because, if I deliver the 404 page through middle ware. I'll definitely get the page, but if we go the nested routes, I'll get page without styles. See the illustration below

So we are almost done with our server for now, just create a /signup route to deliver signup page.
//signup routeapp.get('/signup', (req, res) => { res.sendFile(path.join(staticPath, "signup.html"));})Add all the routes before
404route.
Sign Up Page
Open your signup.html file. Start with HTML5 template. Give a suitable title and link form.css file to it.
First make a loader for the page.
<img src="img/loader.gif" class="loader" alt="">form.css
*{ margin: 0; padding: 0; box-sizing: border-box;}body{ width: 100%; min-height: 100vh; display: flex; justify-content: center; align-items: center; background: #f5f5f5; font-family: 'roboto', sans-serif;}.loader{ position: absolute; top: 50%; left: 50%; transform: translate(-50%, -50%); width: 100px;}Output

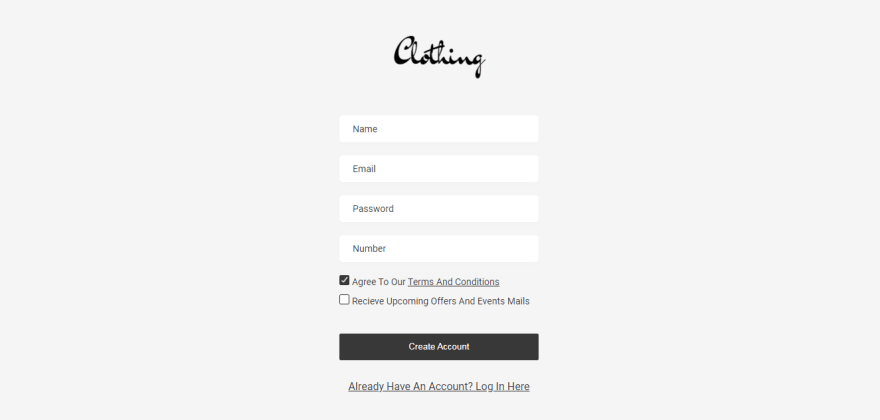
Now make the form.
<div class="container"> <img src="img/dark-logo.png" class="logo" alt=""> <div> <input type="text" autocomplete="off" id="name" placeholder="name"> <input type="email" autocomplete="off" id="email" placeholder="email"> <input type="password" autocomplete="off" id="password" placeholder="password"> <input type="text" autocomplete="off" id="number" placeholder="number"> <input type="checkbox" checked class="checkbox" id="terms-and-cond"> <label for="terms-and-cond">agree to our <a href="">terms and conditions</a></label> <br> <input type="checkbox" class="checkbox" id="notification"> <label for="notification">recieve upcoming offers and events mails</a></label> <button class="submit-btn">create account</button> </div> <a href="/login" class="link">already have an account? Log in here</a></div>If you notice the above code, I am using div for forms instead of form tag. Why? Because, with HTML form you can send POST request to server but can't catch the response and we want to catch the response from the server to validate the success.
Form.css
.logo{ height: 80px; display: block; margin: 0 auto 50px;}input[type="text"],input[type="password"],input[type="email"],textarea{ display: block; width: 300px; height: 40px; padding: 20px; border-radius: 5px; background: #fff; border: none; outline: none; margin: 20px 0; text-transform: capitalize; color: #383838; font-size: 14px; box-shadow: 0 4px 10px rgba(0, 0, 0, 0.01); font-family: 'roboto', sans-serif;}::placeholder{ color: #383838;}.submit-btn{ width: 300px; height: 40px; text-align: center; line-height: 40px; background: #383838; color: #fff; border-radius: 2px; text-transform: capitalize; border: none; cursor: pointer; display: block; margin: 30px 0;}/* checkbox styles */.checkbox{ -webkit-appearance: none; position: relative; width: 15px; height: 15px; border-radius: 2px; background: #fff; border: 1px solid #383838; cursor: pointer;}.checkbox:checked{ background: #383838;}.checkbox::after{ content: ''; position: absolute; top: 60%; left: 50%; transform: translate(-50%, -50%); width: 80%; height: 100%; pointer-events: none; background-image: url(../img/check.png); background-size: contain; background-repeat: no-repeat; display: none;}.checkbox:checked::after{ display: block;}label{ text-transform: capitalize; display: inline-block; margin-bottom: 10px; font-size: 14px; color: #383838;}label a{ color: #383838;}.link{ color: #383838; text-transform: capitalize; text-align: center; display: block;}Above is a lot of CSS, isn't it. Well if you don't know any of the above CSS properties, feel free to ask me in comments.
Output
Now, make an alert box.
<div class="alert-box"> <img src="img/error.png" class="alert-img" alt=""> <p class="alert-msg">Error message</p></div>/* alert */.alert-box{ width: 300px; min-height: 150px; background: #fff; border-radius: 10px; box-shadow: 0 5px 100px rgba(0, 0, 0, 0.05); position: absolute; top: 60%; left: 50%; transform: translate(-50%, -50%); padding: 20px; opacity: 0; pointer-events: none; transition: 1s;}.alert-box.show{ opacity: 1; pointer-events: all; top: 50%;}.alert-img{ display: block; margin: 10px auto 20px; height: 60px;}.alert-msg{ color: #e24c4b; font-size: 20px; text-transform: capitalize; text-align: center; line-height: 30px; font-weight: 500;}Output

When
alert-boxhasshowclass.
Great! we are done with signup page. Now let's make it functional. Add form.js to signup.html page.
<script src="js/form.js"></script>Form.js
Select all the elements we need.
const loader = document.querySelector('.loader');// select inputs const submitBtn = document.querySelector('.submit-btn');const name = document.querySelector('#name');const email = document.querySelector('#email');const password = document.querySelector('#password');const number = document.querySelector('#number');const tac = document.querySelector('#terms-and-cond');const notification = document.querySelector('#notification');After done selecting all the elements. Add click event to submitBtn and inside that validate form using if else.
submitBtn.addEventListener('click', () => { if(name.value.length < 3){ showAlert('name must be 3 letters long'); } else if(!email.value.length){ showAlert('enter your email'); } else if(password.value.length < 8){ showAlert('password should be 8 letters long'); } else if(!number.value.length){ showAlert('enter your phone number'); } else if(!Number(number.value) || number.value.length < 10){ showAlert('invalid number, please enter valid one'); } else if(!tac.checked){ showAlert('you must agree to our terms and conditions'); } else{ // submit form }})In above code, how are we doing the validations. Well, I am using if else which basically means, if this is true run the following code, and if this is not that run the else code.
Let's understand the name validation.
if(name.value.length < 3){ showAlert('name must be 3 letters long');}if is checking for the condition, which is written inside the ( condition ).name is our name element which we declared on the top the file.value - since, name is an input field. It must have a value. Of course it can be empty. So name.value is just returning the value of the input field.length is used to count how many letters are inside a string or how many elements are inside an array. So basically by using name.value.length we are checking for name's value length which is of course a whole number.
Once we got the length, which is a number, check for whether it is less than 3 or not.
So if the condition is true, then JS will run the code written inside the if block, which is
showAlert('name must be 3 letters long');That's how we are doing other fields validation also.
So we have to create showAlert(msg) function now.
// alert functionconst showAlert = (msg) => { let alertBox = document.querySelector('.alert-box'); let alertMsg = document.querySelector('.alert-msg'); alertMsg.innerHTML = msg; alertBox.classList.add('show'); setTimeout(() => { alertBox.classList.remove('show'); }, 3000);}Inside the above function, First I am just selecting the alert box related elements. After that, I am setting up the msg parameter as a innerHTML of alertMsg, which is of course the p element of alert-box. And then adding show class to alertBox. And using setTimeout to remove the show class after 3000 ms or 3 sec.
So, we are done with signup validation, so shall we submit the form now. To submit the form, make another function which will take path and data as an argument. Why make a separate function ? because we can then use the function for both signup page and login page.
// send data functionconst sendData = (path, data) => { fetch(path, { method: 'post', headers: new Headers({'Content-Type': 'application/json'}), body: JSON.stringify(data) }).then((res) => res.json()) .then(response => { processData(response); })}So in the above code, I am using simple fetch method to make request. It is basically the fetch template. We'll make processData function later.
Send the form data to the backend now.
else{ // submit form loader.style.display = 'block'; sendData('/signup', { name: name.value, email: email.value, password: password.value, number: number.value, tac: tac.checked, notification: notification.checked, seller: false })}This is after form validations
Make signup route inside server.js to handle form submission.
Sign Up - POST
Before making the route add this line at the top. This will enable form sharing. Otherwise you'll not able to receive form data.
app.use(express.json());app.post('/signup', (req, res) => { let { name, email, password, number, tac, notification } = req.body; // form validations if(name.length < 3){ return res.json({'alert': 'name must be 3 letters long'}); } else if(!email.length){ return res.json({'alert': 'enter your email'}); } else if(password.length < 8){ return res.json({'alert': 'password should be 8 letters long'}); } else if(!number.length){ return res.json({'alert': 'enter your phone number'}); } else if(!Number(number) || number.length < 10){ return res.json({'alert': 'invalid number, please enter valid one'}); } else if(!tac){ return res.json({'alert': 'you must agree to our terms and conditions'}); } })Here, first I am extracting the data from the request. So as we are sending form data from the front end. You can see I am using the same name in backend also.
let { name, email, password, number, tac, notification } = req.body;And after that, I am performing form validation, of course we have done it in front end, but it is good to have validation on back end also, because front end can be easily by pass.
if(name.length < 3){ return res.json({'alert': 'name must be 3 letters long'});} else if .....Notice I am not using value here, because the name here here is not input, its a string which we got from the front end. And in response I am sending JSON data. Which look like this.
JSON = { 'key': 'value'}It is similar to JS objects, but it is used to transfer data across the web.
Great. Now handle the JSON data, in front end.
const processData = (data) => { loader.style.display = null; if(data.alert){ showAlert(data.alert); }}Hide the loader first, Of course. After that check whether the received data contains alert key or not. If it contain, just use showAlert function to alert the user. Isn't it simple.
Ok so now let's store the user in database or firestore.
Storing user in firestore
Before writing more code, make sure you make firebase project and download the secret key file from the dashboard. You can refer this to download the key.
Once you the got key file. Move that into your project folder outside public folder.
Then init the firebase inside server.js.
// firebase admin setuplet serviceAccount = require("path of key file");admin.initializeApp({ credential: admin.credential.cert(serviceAccount)});let db = admin.firestore();After initializing the firebase. Inside signup POST route. Store the user in database after validations.
// store user in dbdb.collection('users').doc(email).get().then(user => { if(user.exists){ return res.json({'alert': 'email already exists'}); } else{ // encrypt the password before storing it. bcrypt.genSalt(10, (err, salt) => { bcrypt.hash(password, salt, (err, hash) => { req.body.password = hash; db.collection('users').doc(email).set(req.body) .then(data => { res.json({ name: req.body.name, email: req.body.email, seller: req.body.seller, }) }) }) }) }})In firebase we have collections, which store same group of data. In this case we have users collection in our firstore. db.collection is used to access the collection. And once you are in collection, you can get the document by calling doc(docname) and after you found the doc, you can get it by calling get() method. And after you got the doc you can access it using then. That is this whole line mean.
db.collection('users').doc(email).get().then(...)The above code we are running to check, the email is already exists in our database or not. If it is we are send an alert. And if not, storing the user in the database.
if(user.exists){ return res.json({'alert': 'email already exists'});} else{ // encrypt the password before storing it. bcrypt.genSalt(10, (err, salt) => { bcrypt.hash(password, salt, (err, hash) => { req.body.password = hash; db.collection('users').doc(email).set(req.body) .then(data => { res.json({ name: req.body.name, email: req.body.email, seller: req.body.seller, }) }) }) })}bycrypt is the encrypt package, you can read its documentation if you want. But to hash the password, you can just code it. genSalt is how much salting you want to perform on a text. And hash is to covert the text into hash. And after that again, everything is same till doc(), but this time we don;t have to get() we have to set() which is pretty much self explanatory. And at the last, in response, I am sending users name, email and seller status to front end.
Now let's store it in front end.
const processData = (data) => { loader.style.display = null; if(data.alert){ showAlert(data.alert); } else if(data.name){ // create authToken data.authToken = generateToken(data.email); sessionStorage.user = JSON.stringify(data); location.replace('/'); }}Use session storage to store the user data inside session. But we can;t simply use users email to validated its authenticity, we need something at least which we can validate. For that generate an auth token for the user. This will be not advance but yeah I thought to make it one.
First add token.js file to signup.html.
<script src="js/token.js"></script>after that create generateToken function.
Token.js
let char = `123abcde.fmnopqlABCDE@FJKLMNOPQRSTUVWXYZ456789stuvwxyz0!#$%&ijkrgh'*+-/=?^_${'`'}{|}~`;const generateToken = (key) => { let token = ''; for(let i = 0; i < key.length; i++){ let index = char.indexOf(key[i]) || char.length / 2; let randomIndex = Math.floor(Math.random() * index); token += char[randomIndex] + char[index - randomIndex]; } return token;}This above code, it will simply generate a text of whose sets of 2 letters index number add to give the original text index from the char string. It is simple but complex also. It okay, to copy it if you want.
Now we also want a function to validate the token.
const compareToken = (token, key) => { let string = ''; for(let i = 0; i < token.length; i=i+2){ let index1 = char.indexOf(token[i]); let index2 = char.indexOf(token[i+1]); string += char[index1 + index2]; } if(string === key){ return true; } return false;}Great! we are almost done with the page. Till now we have successfully stored the used in session, so let's validate it.
form.js
// redirect to home page if user logged inwindow.onload = () => { if(sessionStorage.user){ user = JSON.parse(sessionStorage.user); if(compareToken(user.authToken, user.email)){ location.replace('/'); } }}we are adding load event to window, which is checking is user in session or not. If it is in session, we are validating the auth token. And it its legit. I am redirecting user to home page. As he/she really don't need sign up.
Great! Our sign up page is done. Since the blog is being too much lengthy. I think that enough for today. But yes, in the second part, I have made login page and seller's dashboard. Which I made in the tutorial. So if you want to make all the features, of course you want. Watch the tutorial
I hope you understood each and everything. If you have doubt or I missed something let me know in the comments.
Articles you may find Useful
I really appreciate if you can subscribe my youtube channel. I create awesome web contents.

Source Code, Donate me on Paypal
Your donation really motivates me to do more amazing tutorials like this. Support me on patreon, Buy me a coffee, Donate me on paypal
Thanks For reading.
Original Link: https://dev.to/kunaal438/how-to-make-an-e-commerce-website-with-html-css-and-js-02-39bb
Dev To
More About this Source Visit Dev To