
An Interest In:
Web News this Week
- April 1, 2024
- March 31, 2024
- March 30, 2024
- March 29, 2024
- March 28, 2024
- March 27, 2024
- March 26, 2024
Some of Our Sources
- Engadget
- Pearsonified
- Smashing Apps
- Abduzeedo
- Vandelay Design
- Specky Boy
- Web Resource Source
- Android Dissected
- Willems Lab
- TechPowerUp
Help Webnuz
Referal links:
Automated social images: play it like GitHub
A few months ago, GitHub introduced customized social images. What does it mean? If I share React's GitHub repos homepage on Slack, I get:

You can see the URL, title, description... but what must get most of your attention is the gorgeous image featuring the project name, Facebook logo and project metrics.
This mechanism relies on Open Graph, a set of HTML markups supported by almost all social networks and messaging apps. In particular, Open Graph lets you declare an image, often called the "social image" of your page. This image is used to illustrate your page whenever it is shared in a LinkedIn post, WhatsApp message, etc.
Most social images are generic, mundane and meaningless. GitHub's are specific, cool and meaningful.
With the Resoc image template development kit, you can do just the same.
In this article, we see how we can replicate what GitHub did with Resoc.
Create the template
We start by creating a new template:
npx itdk init github-social-imageA few seconds later, our browser opens a new tab, showing our brand new template:

Let's take a moment to see what an image template is.
An image template can be turned into an image. More exactly, a template can be turned into a lot of different, yet similar, images. In one hand, a template defines the elements which remain identical from an image to another. In our initial template, the logo in the bottom left corner never change. In the other hand, some elements change from an image to another. Here, the title, main image, text color and background colors are parameters.
We can easily imagine this template used to illustrate blog posts. A post has a title and a featured image which could be injected to get a dedicated image. The background color could change depending on the post category.
This template is fine, but we are here to mimic GitHub.
Just like GitHub, step by step
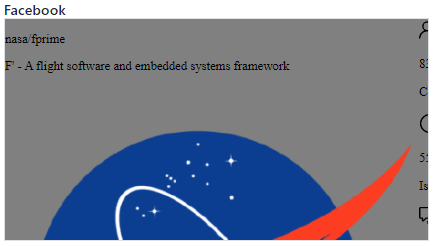
GitHub built great, content-rich images. Our goal is to imitate them:

Easy comparison
To track and facilitate our progress, let's configure the viewer to show both our template and a sample image from GitHub. Kill the process you started with npx itdk a minute ago and run:
npx itdk view github-social-image/resoc.manifest.json -fm https://github.blog/wp-content/uploads/2021/06/framework-open-graph-images_fig-3-nasa-fprime.pngThe Facebook preview now has a range input. Slide to see our template or reveal the image we want to reproduce:

For the moment, our template doesn't look quite like GitHub's.
Parameters
Before working on the appearance of the template, we first need to define what the template will expect as parameters.
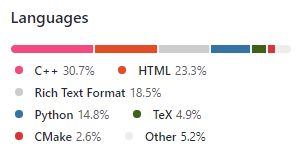
Let's review GitHub's sample image. It describes a project:
- Organization, name and description
- Profile image
- Metrics: number of contributors, issues, etc.
- Technologies (the colored bar at the bottom)
We now edit the template manifest to declare these parameters. Open github-social-image/resoc.manifest.json. Its content is straightforward:
{ "partials": { "content": "./content.html.mustache", "styles": "./styles.css.mustache" }, "parameters": [ { "name": "title", "type": "text", "demoValue": "A picture is worth a thousand words" }, { "label": "Main image", "name": "mainImageUrl", "type": "imageUrl", "demoValue": "https://resoc.io/assets/img/demo/photos/pexels-photo-371589.jpeg" }, { "name": "textColor", "type": "color", "demoValue": "#ffffff" }, { "name": "backgroundColor", "type": "color", "demoValue": "#20552a" } ]}Each parameter has a name, type, demonstration value and an optional label.
Let's modify it and declare the parameters we need:
{ "partials": { "content": "./content.html.mustache", "styles": "./styles.css.mustache" }, "parameters": [ { "name": "organization", "type": "text", "demoValue": "nasa" }, { "name": "project", "type": "text", "demoValue": "fprime" }, { "name": "description", "type": "text", "demoValue": "F' - A flight software and embedded systems framework" }, { "label": "Image", "name": "imageUrl", "type": "imageUrl", "demoValue": "https://avatars.githubusercontent.com/u/848102" }, { "name": "contributors", "type": "number", "demoValue": "83" }, { "name": "issues", "type": "number", "demoValue": "55" }, { "name": "discussions", "type": "number", "demoValue": "5" }, { "name": "stars", "type": "number", "demoValue": "8042" }, { "name": "forks", "type": "number", "demoValue": "948" }, { "name": "technologies", "type": "objectList", "demoValue": [ { "color": "#f34b7d", "proportion": "30.7" }, { "color": "#e34c26", "proportion": "23.3" }, { "color": "#cccccc", "proportion": "18.5" }, { "color": "#3572a5", "proportion": "14.8" }, { "color": "#3d6117", "proportion": "4.9" }, { "color": "#da3434", "proportion": "2.6" }, { "color": "#ededed", "proportion": "5.2" } ] } ]}That's a lot of text, but no big deal. Except for the last parameter, technologies, which we will discuss later.
In the template viewer, we can see our new parameters:

(Web)Design
Our most important task awaits us: design! Although it is going to take some time, there is nothing complicated about it: we are going to use HTML, CSS and a little bit of JavaScript.
The HTML is going to github-social-image/content.html.mustache. .mustache? Mustache is a template language used by Resoc to make parameters accessible from our HTML code. Thanks to this addition, we can write things like <h1>{{ title }}</h1>, where {{ title }} will later be replaced with the actual title.
Populate github-social-image/content.html.mustache with:
<link rel="preconnect" href="https://fonts.googleapis.com"><link rel="preconnect" href="https://fonts.gstatic.com" crossorigin><link href="https://fonts.googleapis.com/css2?family=Roboto:wght@400&display=swap" rel="stylesheet"><div class="wrapper"> <main> <div class="project"> <p class="title"> {{ organization }}/<span class="project-name">{{ project }}</span> </p> <p class="description"> {{ description }} </p> </div> <div class="pic"> <img src="{{ imageUrl }}" /> </div> </main> <div class="secondary"> <div class="metrics"> <div class="metric"> <img src="https://raw.githubusercontent.com/primer/octicons/main/icons/people-24.svg" /> <div> <p class="metric-data">{{ contributors }}</p> <p class="metric-label">Contributors</p> </div> </div> <div class="metric"> <img src="https://raw.githubusercontent.com/primer/octicons/main/icons/issue-opened-24.svg" /> <div> <p class="metric-data">{{ issues }}</p> <p class="metric-label">Issues</p> </div> </div> <div class="metric"> <img src="https://raw.githubusercontent.com/primer/octicons/main/icons/comment-discussion-24.svg" /> <div> <p class="metric-data">{{ discussions }}</p> <p class="metric-label">Discussions</p> </div> </div> <div class="metric"> <img src="https://raw.githubusercontent.com/primer/octicons/main/icons/star-24.svg" /> <div> <p class="metric-data">{{ stars }}</p> <p class="metric-label">Stars</p> </div> </div> <div class="metric"> <img src="https://raw.githubusercontent.com/primer/octicons/main/icons/repo-forked-24.svg" /> <div> <p class="metric-data">{{ forks }}</p> <p class="metric-label">Forks</p> </div> </div> </div> <div class="github-logo"> <img src="https://raw.githubusercontent.com/primer/octicons/main/icons/mark-github-16.svg" /> </div> </div> <div class="techs"> {{#technologies}} <div style="background-color: {{ color }}; flex: {{ proportion }}"></div> {{/technologies}} </div></div><script> var formatter = Intl.NumberFormat('en', { notation: 'compact' }); var data = document.querySelectorAll(".metric-data"); for (var i = 0; i < data.length; i++) { data[i].innerHTML = formatter.format(data[i].innerHTML); }</script>Again, that's quite verbose but nothing intimidating. The structure of the content is easy to read, with three main parts: the project data, the metrics and the technologies.
The metrics are a bit verbose because of repetition. We can certainly live with it.
Although short, the technologies are the most strange part. Remember the corresponding parameter from github-social-image/resoc.manifest.json? It says:
{ "name": "technologies", "type": "objectList", "demoValue": [ { "color": "#f34b7d", "proportion": "30.7" }, { "color": "#e34c26", "proportion": "23.3" }, { "color": "#cccccc", "proportion": "18.5" }, { "color": "#3572a5", "proportion": "14.8" }, { "color": "#3d6117", "proportion": "4.9" }, { "color": "#da3434", "proportion": "2.6" }, { "color": "#ededed", "proportion": "5.2" } ]}Its type is objectList and the demo value gives an overview of what is expected: a set of technologies made of color and proportion. The demo reflects the technologies used by nasa/fprime:
Back to github-social-image/content.html.mustache, we can use this parameter to iterate over the technologies:
<div class="techs"> {{#technologies}} <div style="background-color: {{ color }}; flex: {{ proportion }}"></div> {{/technologies}}</div>Inside the #technologies block, color and proportion are available.
That's our template at this point:
It's ugly, but most of the content looks okay.
Time for styles! Open github-social-image/styles.css.mustache and paste:
.wrapper { display: flex; flex-direction: column; align-items: stretch; font-family: Roboto; background-color: white;}main { flex: 10; display: flex; align-items: top; padding-top: 14vh; padding-left: 13vh; padding-right: 13vh;}.project { flex: 3;}.title { margin-top: 0; font-size: 13.5vh; margin-bottom: 0;}.project-name { font-weight: bold;}.description { margin-top: 4.1vh; font-size: 5.4vh; color: #666; line-height: 8.7vh;}.pic img { max-width: 32vh; width: 100%; height: auto;}.secondary { flex: 5.5; display: flex; padding-left: 13vh; padding-right: 13vh; justify-content: space-between; align-items: center;}.metrics { display: flex; flex-direction: row; gap: 8vh;}.metric { display: flex; align-items: start; gap: 2.5vh; color: #71747f;}.metric img { margin-top: 1vh; height: 4.5vh; /* https://codepen.io/sosuke/pen/Pjoqqp + #71747f */ filter: invert(46%) sepia(3%) saturate(1349%) hue-rotate(190deg) brightness(96%) contrast(85%);}.metric-data { margin: 0; font-size: 5vh; color: #2f363d;}.metric-label { margin: 0; margin-top: 1.5vh; font-size: 4vh;}.github-logo { test-align: right;}.github-logo img { height: 7.5vh; /* https://codepen.io/sosuke/pen/Pjoqqp + #8492af */ filter: invert(66%) sepia(6%) saturate(1691%) hue-rotate(185deg) brightness(88%) contrast(80%); }.techs { flex: 0.7; display: flex;}That's CSS as usual. And the result is quite good:

How similar is it to the orignal image?

GitHub is using font "Alliance", which is not free. We used the trusty Roboto instead. And most elements are not strictly identical. Well, that's good-enough for this exercise in my opinion.
From template to image
We have a great template. Now we want to turn it into images. How many?

A lot of, probably.
Command line
We can generate images from the command line. The template viewer provides us a sample command line.
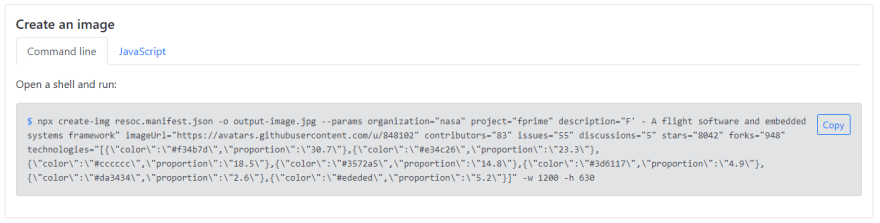
The example can be used as, just launch it where you run npx itdk. The rest is up to us. For example, we could tweak the command line to generate social images from a bash script.
JavaScript
If we want to create images from our code, we also have a working example to start from:

Again, this example should be adapted to fit our build process. For example, we could create social images for a NextJS app.
Conclusion
Automated, per-page social images are both cool and useful. All the components needed to build them have been around for years: HTML & CSS, Puppeteer and templating system. But so far, the developer experience has been quite poor. Too much setup, too much topic to experiment with, no tools...
Until now. The Resoc image template development kit fills this gap, from template creation to build process. What's next? Simplify the deployment even more.
Original Link: https://dev.to/philippe/automated-social-images-play-it-like-github-17m2
Dev To
More About this Source Visit Dev To