
An Interest In:
Web News this Week
- April 19, 2024
- April 18, 2024
- April 17, 2024
- April 16, 2024
- April 15, 2024
- April 14, 2024
- April 13, 2024
Some of Our Sources
- Web Designer Wall
- Team Treehouse
- Pearsonified
- The Logo Smith
- Smashing Magazine
- Smashing Apps
- Six Revisions
- TutsPlus - Design
- You The Designer
- FanExtra - PSD
Help Webnuz
Referal links:
The Complete Guide to Full Stack Solana Development with React, Anchor, Rust, and Phantom
Building Full Stack dapps with React, Solana, Anchor, and Phantom wallet.
In The Complete Guide to Full Stack Ethereum Development I did a deep dive into how to build a full stack dapp on Ethereum, which can also be applied to other EVM compatible chains like Polygon, Avalanche, and Ethereum Layer 2's.
In this guide, I want to dive into Solana to show you how to build a full stack dapp. I also want to introduce the the ecosystem and the developer tooling to you to hopefully help you get up and running building your own ideas and applications going forward.
The code for the project is located here
Solana developer overview
As someone who just started learning Solidity and its ecosystem about 6 months ago, I kind of assumed it couldn't be that much harder to get up and running with. I was wrong.
Parts of the developer tooling are really nice and polished (the Solana CLI and Anchor), while the rest of the ecosystem, and even the documentation for Anchor (which to be fair, is very new), leaves a decent amount to be desired.
That being said, once you (finally) get the hang of everything it quickly becomes much easier to understand how to start implementing your own ideas and begin experimenting.
One of the keys to finding answers is to be vigilant about searching across all of Google, Github, and especially the various Discord servers for Anchor (project Serum) and Solana. The developers in those channels have been extremely helpful, especially Armani Ferrante who created the Anchor framework. Get familiar with the search feature, you can often find answers to your questions in past discussions in Discord.
Project overview
The tooling we'll be using today includes:
Solana Tool Suite - This includes a really polished and well documented CLI for interacting with the Solana network.
Anchor Framework - Anchor is actually a life saver for me, and I'm almost certain I would not have been able to get over the hump of building anything without it. It is the Hardhat of Solana development and more, and I love it. It also offers a DSL on top of Rust so that you do not need a deep understanding of the language to get started, though I am still trying to learn Rust as it will probably be useful to build anything non-trivial, even with the DSL. A good free place to learn Rust is The Rust Book.
solana/web3.js - A Solana version of web3.js that seems to work pretty well, but the documentation was almost unusable for me
React - The client-side framework
I will leave off all of the in depth details around how Solana itself works, as other people can cover this better than me. Instead I'll try to just focus on building something and sharing the details that you need to be know to accomplish this, along with things I think are of utmost importance.
If you want to learn more about Solana and how it works, here are a few good pieces:
In this guide we'll focus mainly on project setup, testing, and front end client integration for building out a couple of types of applications, mainly focused on CRUD operations, which I found to be somewhat undocumented (integration with client applications).
We'll also learn how to airdrop tokens to our own development accounts using the Solana CLI, and deploy our apps to both a local network as well as a live test network.
We won't be focusing on NFTs in this guide, but maybe I will focus on doing that in a future guide. For now, if you're interested in building an NFT marketplace on Solana, I recommend checking out Metaplex.
Prerequisites
This tutorial covers how to build a full stack app on Solana, but does not go into how to install all of the individual dependencies.
Instead, I will list the dependencies and link to the documentation for how to install them, as each project will be able to explain and document these things better than I ever could, as well as keep them up to date.
Node.js - I recommend installing Node using either nvm or fnm
Solana Tool Suite - You can see the installation instructions here. note - I had a very hard time getting everything working on an M1 Mac, mainly
solana-test-validatorandcargo-build-bpf. I finally figured it out, and posted my solution here. I'm sure at some point this will be fixed and work out of the box.Anchor - Anchor installation was pretty straight-forward for me. You can find the installation instructions here.
Solana browser wallet - I recommend Phantom, which is what I have tested this app with.
Getting Started
Before we get started building, let's take a look at the Solana CLI.
Solana CLI
The main things we'll be doing with the Solana CLI will be configuring our network (between localhost and a developer testnet) as well as airdropping tokens into our wallets, pretty much everything else we'll be doing with the Anchor CLI.
For instance, we can check the current network (and other) configuration with this command:
solana config get# outputConfig File: /Users/user/.config/solana/cli/config.ymlRPC URL: https://api.devnet.solana.comWebSocket URL: wss://api.devnet.solana.com/ (computed)Keypair Path: /Users/user/.config/solana/id.jsonCommitment: confirmedIf you do not have a
Keypair path, set one up by following the instructions here
We can change the network like so:
# set to localhostsolana config set --url localhost# set to devnetsolana config set --url devnetThis is important as you will need to be aware of which network you are using as you're building, testing, and deploying your programs. You also need to be sure your wallet is using the same network that your local environment is using when testing, something I'll cover.
We'll be starting by developing on a localhost network, then switching to the devnet network.
We can also use the CLI to see our current local wallet address:
solana addressAnd then get the full details about an account:
solana account <address from above>Next let's airdrop some tokens. To do so, first switch to the local network, as this is where we will be working to start off with:
solana config set --url localhostNext, start the local network. This is going to be a local Solana node that we can deploy to for testing:
solana-test-validatorOnce the local network is running, you can airdrop tokens to your account. With the network running, open a separate window and run the following command:
solana airdrop 100You can the check the balance of your wallet:
solana balance# orsolana balance <address>You should now have a balance 100 SOL in your wallet. With that, we can get started building.
Let's start building
To get started, initialize a new anchor project and change into the new directory:
anchor init mysolanaappcd mysolanaappIn this project, you'll see four main folders (in addition to the node_modules):
app - Where our frontend code will go
programs - This is where the Rust code lives for the Solana program
test - Where the JavaScript tests for the program live
migrations - A basic deploy script
Let's take a look at the program that was created for us.
Anchor uses, and enables us to write, an eDSL (embedded DSL) that abstracts away many of the more complex low level operations you'd typically need to do if you were using Solana & Rust without it, making it more approachable for me.
// programs/src/lib.rsuse anchor_lang::prelude::*;declare_id!("Fg6PaFpoGXkYsidMpWTK6W2BeZ7FEfcYkg476zPFsLnS");#[program]pub mod mysolanaapp { use super::*; pub fn initialize(ctx: Context<Initialize>) -> ProgramResult { Ok(()) }}#[derive(Accounts)]pub struct Initialize {}This is probably the most basic program you can write. The only thing happening here is we are defining a function called initialize, which when invoked just exits the program successfully. There is no data manipulation at all.
The Initialize struct defines the context as being empty of any arguments. We'll learn more about the function context later.
To compile this program, we can run the Anchor build command:
anchor buildOnce a build is completed, you should see a new folder named target.
One of the artifacts created is an IDL located at target/idl/mysolanaapp.json.
IDLs are very similar to an ABI in Solidity (or a query definition in GraphQL), and we will be using them in a similar way in our JavaScript tests and frontends to communicate with our Solana program via RPC.
We can also test out our program. If you open tests/mysolanaapp.js, you will see that there is a test written in JavaScript that allows us to test out the program.
The test should look like this:
const anchor = require('@project-serum/anchor');describe('mysolanaapp', () => { // Configure the client to use the local cluster. anchor.setProvider(anchor.Provider.env()); it('Is initialized!', async () => { const program = anchor.workspace.Mysolanaapp; const tx = await program.rpc.initialize(); console.log("Your transaction signature", tx); });});There are a couple of things to learn from this test that are important and we'll be using in the future, both in our tests as well as in the front end JavaScript clients.
To call a Solana program using Anchor, we typically need two main things:
1. Provider - The Provider is an abstraction of a connection to the Solana network, typically consisting of a Connection, Wallet, and a preflight commitment.
In the test, the Anchor framework will create the provider for us based on the environment (anchor.Provider.env()), but on the client we will need to construct the Provider ourselves using the user's Solana wallet.
2. program - The program is an abstraction that combines the Provider, idl, and the programID (which is generated when the program is built) and allows us to call RPC methods against our program.
Again, like with the Provider, Anchor offers a convenient way to access the program, but when building out the front end we'll need to construct this provider ourselves.
Once we have these two things, we can start calling functions in our program. For example, in our program we have an initialize function. In our test, you'll see we can invoke that function directly using program.rpc.functionName:
const tx = await program.rpc.initialize();This is a very common pattern that you'll use a lot when working with Anchor, and once you get the hang of understanding how it works, makes it really easy to connect to and interact with a Solana program.
We can now test the program by running the test script:
anchor testBuilding Hello World
Now that we have our project setup, let's create something a little more interesting.
I know that, as a full stack developer, most of the time I'm wondering how to do CRUD types of operations, so that's what we'll look at next.
The first program we'll create will allow us to create a counter that increments every time we call it from a client application.
The first thing we need to do is open programs/mysolanaapp/src/lib.rs and update it with the following code:
use anchor_lang::prelude::*;declare_id!("Fg6PaFpoGXkYsidMpWTK6W2BeZ7FEfcYkg476zPFsLnS");#[program]mod mysolanaapp { use super::*; pub fn create(ctx: Context<Create>) -> ProgramResult { let base_account = &mut ctx.accounts.base_account; base_account.count = 0; Ok(()) } pub fn increment(ctx: Context<Increment>) -> ProgramResult { let base_account = &mut ctx.accounts.base_account; base_account.count += 1; Ok(()) }}// Transaction instructions#[derive(Accounts)]pub struct Create<'info> { #[account(init, payer = user, space = 16 + 16)] pub base_account: Account<'info, BaseAccount>, pub user: AccountInfo<'info>, pub system_program: AccountInfo<'info>,}// Transaction instructions#[derive(Accounts)]pub struct Increment<'info> { #[account(mut)] pub base_account: Account<'info, BaseAccount>,}// An account that goes inside a transaction instruction#[account]pub struct BaseAccount { pub count: u64,}In this program we have two functions - create and increment. These two functions are the RPC request handlers that we will be able to call from a client application to interact with the program.
The first parameter of an RPC handler is the Context struct, which describes the context that will be passed in when the function is called and how to handle it. In the case of Create, we are expecting three parameters: base_account, user, and system_program.
The #[account(...)] attributes define constraints and instructions that are related to the proceeding account where declared. If any of these constraints do not hold, then the instruction will never execute.
Any client calling this program with the proper base_account can call these RPC methods.
The way that Solana deals with data is much different than anything I've ever worked with. There is no persisted state within the program, everything is attached to what are known as accounts. An account essentially holds all of the state of a program. Because of this, all data is passed by reference from the outside.
There are also no read operations. This is because all you need to do to read the contents of a program is to request the account, from there you are able to view all of the program's state. To read more about how accounts work, check out this post.
To build the program:
anchor buildNext, let's write a test that uses this counter program. To do so, open tests/mysolanaapp.js and update with the following code:
const assert = require("assert");const anchor = require("@project-serum/anchor");const { SystemProgram } = anchor.web3;describe("mysolanaapp", () => { /* create and set a Provider */ const provider = anchor.Provider.env(); anchor.setProvider(provider); it("Creates a counter)", async () => { /* Call the create function via RPC */ const program = anchor.workspace.Mysolanaapp; const baseAccount = anchor.web3.Keypair.generate(); await program.rpc.create({ accounts: { baseAccount: baseAccount.publicKey, user: provider.wallet.publicKey, systemProgram: SystemProgram.programId, }, signers: [baseAccount], }); /* Fetch the account and check the value of count */ const account = await program.account.baseAccount.fetch(baseAccount.publicKey); console.log('Count 0: ', account.count.toString()) assert.ok(account.count.toString() == 0); _baseAccount = baseAccount; }); it("Increments the counter", async () => { const baseAccount = _baseAccount; const program = anchor.workspace.Mysolanaapp; await program.rpc.increment({ accounts: { baseAccount: baseAccount.publicKey, }, }); const account = await program.account.baseAccount.fetch(baseAccount.publicKey); console.log('Count 1: ', account.count.toString()) assert.ok(account.count.toString() == 1); });});Before we continue to test and deploy the program, we want to get the dynamically generated Program ID that was generated by the build. We need this ID to use in the Rust program to replace the placeholder ID we set up when we created the project. To get this ID, we can run the following command:
solana address -k target/deploy/mysolanaapp-keypair.jsonWe can now update the program IDs in lib.rs:
// mysolanaapp/src/lib.rsdeclare_id!("your-program-id");And in Anchor.toml:
# Anchor.toml[programs.localnet]mysolanaapp = "your-program-id"Next, run the test:
anchor testOnce the test passes, we can now deploy.
We can now deploy the program. Be sure that solana-test-validator is running:
anchor deployYou can also view the validator logging by opening a separate window and running
solana logs
Now we're ready to build out the front end.
Building the React app
In the root of the Anchor project, create a new react app to overwrite the existing app directory:
npx create-react-app appNext, install the dependencies we'll need for Anchor and Solana Web3:
cd appnpm install @project-serum/anchor @solana/web3.jsWe'll also be using Solana Wallet Adapter to handle connecting the user's Solana wallet. Let's install those dependencies as well:
npm install @solana/wallet-adapter-react \@solana/wallet-adapter-react-ui @solana/wallet-adapter-wallets \@solana/wallet-adapter-baseNext, in the src directory, create a new file named idl.json. Here, copy the IDL JSON that was created for you in the main project folder, located at target/idl/mysolanaapp.json.
It would be nice if we could copy this idl file dynamically create in our client application src folder, but as of now I have not found a way to do this natively. You can of course create your own script that does this if you'd like, or else you need to copy and paste over the IDL after every change to your main program.
If you want a script like this, you can do it in just a couple of lines of code:
// copyIdl.jsconst fs = require('fs');const idl = require('./target/idl/mysolanaapp.json');fs.writeFileSync('./app/src/idl.json', JSON.stringify(idl));Next, open app/src/App.js and update it with the following:
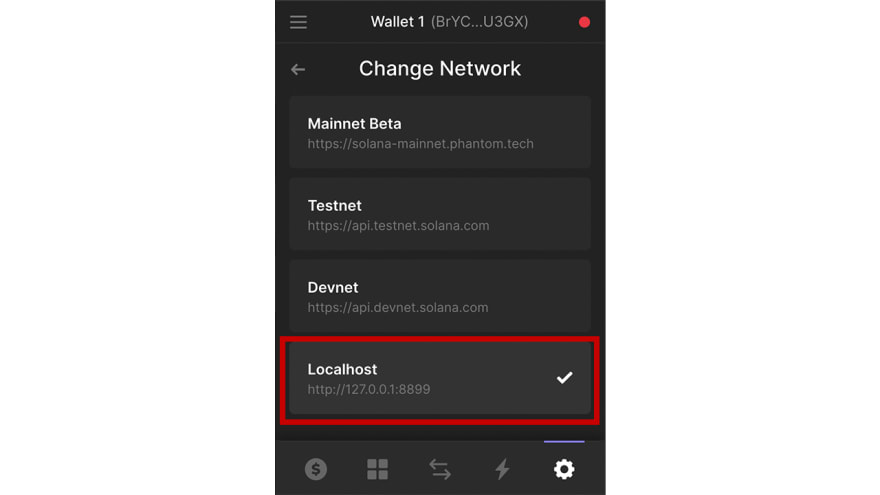
import './App.css';import { useEffect, useState } from 'react';import { Connection, PublicKey } from '@solana/web3.js';import { Program, Provider, web3} from '@project-serum/anchor';import idl from './idl.json';import { getPhantomWallet } from '@solana/wallet-adapter-wallets';import { useWallet, WalletProvider, ConnectionProvider } from '@solana/wallet-adapter-react';import { WalletModalProvider, WalletMultiButton } from '@solana/wallet-adapter-react-ui';const wallets = [ /* view list of available wallets at https://github.com/solana-labs/wallet-adapter#wallets */ getPhantomWallet()]const { SystemProgram, Keypair } = web3;/* create an account */const baseAccount = Keypair.generate();const opts = { preflightCommitment: "processed"}const programID = new PublicKey(idl.metadata.address);function App() { const [value, setValue] = useState(null); const [connected, setConnected] = useState(false); const wallet = useWallet(); useEffect(() => { window.solana.on("connect", () => setConnected(true)); return () => window.solana.disconnect(); }, []) async function getProvider() { /* create the provider and return it to the caller */ /* network set to local network for now */ const network = "http://127.0.0.1:8899"; const connection = new Connection(network, opts.preflightCommitment); const provider = new Provider( connection, wallet, opts.preflightCommitment, ); return provider; } async function createCounter() { const provider = await getProvider() /* create the program interface combining the idl, program ID, and provider */ const program = new Program(idl, programID, provider); try { /* interact with the program via rpc */ await program.rpc.create({ accounts: { baseAccount: baseAccount.publicKey, user: provider.wallet.publicKey, systemProgram: SystemProgram.programId, }, signers: [baseAccount] }); const account = await program.account.baseAccount.fetch(baseAccount.publicKey); console.log('account: ', account); setValue(account.count.toString()); } catch (err) { console.log("Transaction error: ", err); } } async function increment() { const provider = await getProvider(); const program = new Program(idl, programID, provider); await program.rpc.increment({ accounts: { baseAccount: baseAccount.publicKey } }); const account = await program.account.baseAccount.fetch(baseAccount.publicKey); console.log('account: ', account); setValue(account.count.toString()); } if (!connected) { /* If the user's wallet is not connected, display connect wallet button. */ return ( <div style={{ display: 'flex', justifyContent: 'center', marginTop:'100px' }}> <WalletMultiButton /> </div> ) } else { return ( <div className="App"> <div> { !value && (<button onClick={createCounter}>Create counter</button>) } { value && <button onClick={increment}>Increment counter</button> } { value && value >= Number(0) ? ( <h2>{value}</h2> ) : ( <h3>Please create the counter.</h3> ) } </div> </div> ); }}/* wallet configuration as specified here: https://github.com/solana-labs/wallet-adapter#setup */const AppWithProvider = () => ( <ConnectionProvider endpoint="http://127.0.0.1:8899"> <WalletProvider wallets={wallets} autoConnect> <WalletModalProvider> <App /> </WalletModalProvider> </WalletProvider> </ConnectionProvider>)export default AppWithProvider;Switching your wallet network
Before we can interact with a program on the localhost network, we must switch our Phantom wallet to the proper network.
To do so, open your Phantom wallet and click the settings button. Then scroll down to Change Network:

Next, choose Localhost:
Now we need to airdrop tokens to this wallet. At the top of the wallet interface, click on your address to copy it to your clipboard.

Next, open your terminal and run this command (be sure solana-test-validator is running):
solana airdrop 10 <address>You should now have 10 tokens in your wallet. Now, we can run and test the app!
Change into the app directory and run the following command:
npm startYou should be able to connect your wallet, create a counter, and increment it.
You'll notice that when you refresh, you lose the state of the program. This is because we are dynamically generating the base account when the program loads. If you wanted to read and interact with the program data across various clients, you would need to create and store the Keypair somewhere in your project. I've put together a gist of a naive approach of how this might look.
Hello World part 2
Let's create a variation of this program that, instead of dealing with a counter, allows us to create a message and keep track of all of the previously created messages.
To do so, let's update our Rust program to look like this:
/* programs/mysolanaapp/src/lib.rs */use anchor_lang::prelude::*;declare_id!("your-program-id");#[program]mod mysolanaapp { use super::*; pub fn initialize(ctx: Context<Initialize>, data: String) -> ProgramResult { let base_account = &mut ctx.accounts.base_account; let copy = data.clone(); base_account.data = data; base_account.data_list.push(copy); Ok(()) } pub fn update(ctx: Context<Update>, data: String) -> ProgramResult { let base_account = &mut ctx.accounts.base_account; let copy = data.clone(); base_account.data = data; base_account.data_list.push(copy); Ok(()) }}#[derive(Accounts)]pub struct Initialize<'info> { #[account(init, payer = user, space = 64 + 64)] pub base_account: Account<'info, BaseAccount>, pub user: AccountInfo<'info>, pub system_program: AccountInfo<'info>,}#[derive(Accounts)]pub struct Update<'info> { #[account(mut)] pub base_account: Account<'info, BaseAccount>,}#[account]pub struct BaseAccount { pub data: String, pub data_list: Vec<String>,}In this program we have two main pieces of data we're keeping track of, a String named data and a Vector that holds a list of all data ever added to the program named data_list.
You'll notice that the memory allocation here is higher (128 + 128) than the previous program in order to account for the Vector. I don't know how many updates you'd be able to store in this program as is, but may be something to investigate more or experiment with, as this example in and of itself is experimental and just to give you an understanding of how things work.
Next, we can update the test for this new program:
const assert = require("assert");const anchor = require("@project-serum/anchor");const { SystemProgram } = anchor.web3;describe("Mysolanaapp", () => { const provider = anchor.Provider.env(); anchor.setProvider(provider); it("It initializes the account", async () => { const program = anchor.workspace.Mysolanaapp; const baseAccount = anchor.web3.Keypair.generate(); await program.rpc.initialize("Hello World", { accounts: { baseAccount: baseAccount.publicKey, user: provider.wallet.publicKey, systemProgram: SystemProgram.programId, }, signers: [baseAccount], }); const account = await program.account.baseAccount.fetch(baseAccount.publicKey); console.log('Data: ', account.data); assert.ok(account.data === "Hello World"); _baseAccount = baseAccount; }); it("Updates a previously created account", async () => { const baseAccount = _baseAccount; const program = anchor.workspace.Mysolanaapp; await program.rpc.update("Some new data", { accounts: { baseAccount: baseAccount.publicKey, }, }); const account = await program.account.baseAccount.fetch(baseAccount.publicKey); console.log('Updated data: ', account.data) assert.ok(account.data === "Some new data"); console.log('all account data:', account) console.log('All data: ', account.dataList); assert.ok(account.dataList.length === 2); });});To test it out:
anchor testIf the test fails, try turning off the validator and then running again.
Next, let's update the client.
import './App.css';import { useEffect, useState } from 'react';import { Connection, PublicKey } from '@solana/web3.js';import { Program, Provider, web3 } from '@project-serum/anchor';import idl from './idl.json';import { getPhantomWallet } from '@solana/wallet-adapter-wallets';import { useWallet, WalletProvider, ConnectionProvider } from '@solana/wallet-adapter-react';import { WalletModalProvider, WalletMultiButton } from '@solana/wallet-adapter-react-ui';const wallets = [ getPhantomWallet() ]const { SystemProgram, Keypair } = web3;const baseAccount = Keypair.generate();const opts = { preflightCommitment: "processed"}const programID = new PublicKey(idl.metadata.address);function App() { const [value, setValue] = useState(''); const [dataList, setDataList] = useState([]); const [input, setInput] = useState(''); const [connected, setConnected] = useState(false); const wallet = useWallet() useEffect(() => { window.solana.on("connect", () => setConnected(true)); return () => window.solana.disconnect(); }, []) async function getProvider() { /* create the provider and return it to the caller */ /* network set to local network for now */ const network = "http://127.0.0.1:8899"; const connection = new Connection(network, opts.preflightCommitment); const provider = new Provider( connection, wallet, opts.preflightCommitment, ); return provider; } async function initialize() { const provider = await getProvider(); /* create the program interface combining the idl, program ID, and provider */ const program = new Program(idl, programID, provider); try { /* interact with the program via rpc */ await program.rpc.initialize("Hello World", { accounts: { baseAccount: baseAccount.publicKey, user: provider.wallet.publicKey, systemProgram: SystemProgram.programId, }, signers: [baseAccount] }); const account = await program.account.baseAccount.fetch(baseAccount.publicKey); console.log('account: ', account); setValue(account.data.toString()); setDataList(account.dataList); } catch (err) { console.log("Transaction error: ", err); } } async function update() { if (!input) return const provider = await getProvider(); const program = new Program(idl, programID, provider); await program.rpc.update(input, { accounts: { baseAccount: baseAccount.publicKey } }); const account = await program.account.baseAccount.fetch(baseAccount.publicKey); console.log('account: ', account); setValue(account.data.toString()); setDataList(account.dataList); setInput(''); } if (!connected) { return ( <div style={{ display: 'flex', justifyContent: 'center', marginTop:'100px' }}> <WalletMultiButton /> </div> ) } else { return ( <div className="App"> <div> { !value && (<button onClick={initialize}>Initialize</button>) } { value ? ( <div> <h2>Current value: {value}</h2> <input placeholder="Add new data" onChange={e => setInput(e.target.value)} value={input} /> <button onClick={update}>Add data</button> </div> ) : ( <h3>Please Inialize.</h3> ) } { dataList.map((d, i) => <h4 key={i}>{d}</h4>) } </div> </div> ); }}const AppWithProvider = () => ( <ConnectionProvider endpoint="http://127.0.0.1:8899"> <WalletProvider wallets={wallets} autoConnect> <WalletModalProvider> <App /> </WalletModalProvider> </WalletProvider> </ConnectionProvider>)export default AppWithProvider; Next, build and deploy the program (be sure that solana-test-validator is running):
anchor buildanchor deployWith the new build you'll have a new IDL that you'll need to update for your client. Either copy over the new IDL to app/src/idl.json or run your copyIdl.js script.
Testing it out
When testing out the new program, be sure to update the idl.json file that was created by the build.
Change into the app directory and run the start command:
npm startDeploying to Devnet
Deploying to a live network is pretty straightforward from here. The main things we need to do are:
- Update the Solana CLI to use
devnet:
solana config set --url devnetUpdate Phantom wallet to use
devnetOpen Anchor.toml and update the cluster from
localnettodevnet.Rebuild the program
Be sure the program ID in Anchor.toml matches the current program ID
Deploy the program again, this time it will be deployed to
devnetIn app/src/App.js, we need to also update the network, this time using the
clusterApiUrlfrom@solana/web3, like this:
/* before */<ConnectionProvider endpoint="http://127.0.0.1:8899">/* after */import { ..., clusterApiUrl} from '@solana/web3';const network = clusterApiUrl('devnet');<ConnectionProvider endpoint={network}>From here, you should be able to deploy and test as we have done the the previous steps.
The code for this project is located here
Original Link: https://dev.to/dabit3/the-complete-guide-to-full-stack-solana-development-with-react-anchor-rust-and-phantom-3291
Dev To
More About this Source Visit Dev To