
An Interest In:
Web News this Week
- March 21, 2024
- March 20, 2024
- March 19, 2024
- March 18, 2024
- March 17, 2024
- March 16, 2024
- March 15, 2024
Some of Our Sources
- Simplebits
- Just Creative
- Spoon Graphics
- Abduzeedo
- You The Designer
- Naldz Graphics
- Design Modo
- Web Resource Source
- Hashedout
- TechPowerUp
Help Webnuz
Referal links:
September 15, 2021 05:55 am GMT
Original Link: https://dev.to/chetan_atrawalkar/3-javascript-project-series-3gfj
3 JavaScript Project Series.
Hello Coders!
Welcome back to the Javascript project series. Today i'm share another amazing project.
Save This Series For Upcoming Projects.

- Let's get started....
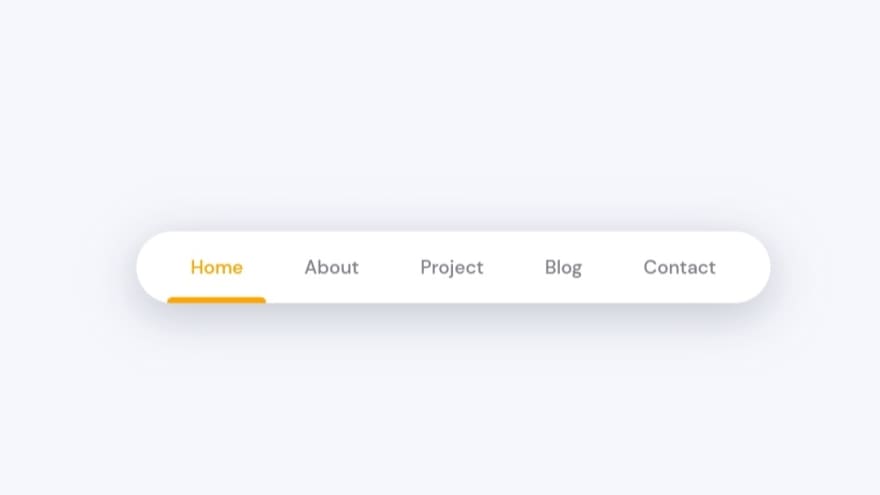
3. Animated Menu Indicator using JavaScript.
- In this, we're going to see how you can create an animated Menu Navbar using JavaScript. Navbar is an essential part of any website. It gives the user a functionality to navigate through the website efficiently and easily. It guides the user accordingly so the user will not get lost or loose interest.
Here's a preview:-
CodePen Link For Result
That being said, let us get started.
Step - 1:- Like always, create 3 files - Index.html, Style.css and Script.js.
Step - 2:- Copy the below HTML code and paste it into your code editor.
Index.html
<!DOCTYPE html><html lang="en" ><head> <meta charset="UTF-8"> <title>Animated menu indicator</title><link rel="stylesheet" href="style.css"></head><body><nav class="nav"> <a href="#" class="nav-item is-active" active-color="orange">Home</a> <a href="#" class="nav-item" active-color="green">About</a> <a href="#" class="nav-item" active-color="blue">Project</a> <a href="#" class="nav-item" active-color="red">Blog</a> <a href="#" class="nav-item" active-color="rebeccapurple">Contact</a> <span class="nav-indicator"></span></nav><script src="script.js"></script></body></html>- Step - 3:- Below is the CSS code for styling.
Style.css
@import url("https://fonts.googleapis.com/css?family=DM+Sans:500,700&display=swap");* { box-sizing: border-box;}body { text-align: center; display: flex; height: 100vh; width: 100%; justify-content: center; align-items: center; padding: 0 20px; background-color: #f6f7fc;}.nav { display: inline-flex; position: relative; overflow: hidden; max-width: 100%; background-color: #fff; padding: 0 20px; border-radius: 40px; box-shadow: 0 10px 40px rgba(159, 162, 177, 0.6);}.nav-item { color: #83818c; padding: 20px; text-decoration: none; transition: 0.3s; margin: 0 6px; z-index: 1; font-family: "DM Sans", sans-serif; font-weight: 500; position: relative;}.nav-item:before { content: ""; position: absolute; bottom: -6px; left: 0; width: 100%; height: 5px; background-color: #dfe2ea; border-radius: 8px 8px 0 0; opacity: 0; transition: 0.3s;}.nav-item:not(.is-active):hover:before { opacity: 1; bottom: 0;}.nav-item:not(.is-active):hover { color: #333;}.nav-indicator { position: absolute; left: 0; bottom: 0; height: 4px; transition: 0.4s; height: 5px; z-index: 1; border-radius: 8px 8px 0 0;}- Step - 4:- Below is the JavaScript code which is the most important part in this Animation. Here, we're creating two constants - indicator and items.
"indicator"will store the information of the class".nav-indicator", that is the line below. And"items"will store the information of the class".nav-items", that is the menu-items. - Next define function
handleIndicatorthat's check the which item is clicked by used as per click perform particular task. - In this function used
forEachloop is an Array method that executes a custom callback function on each item in an array. - Read the code and you will understand how things really works.
Script.js
const indicator = document.querySelector('.nav-indicator');const items = document.querySelectorAll('.nav-item');function handleIndicator(el) { items.forEach(item => { item.classList.remove('is-active'); item.removeAttribute('style'); }); indicator.style.width = `${el.offsetWidth}px`; indicator.style.left = `${el.offsetLeft}px`; indicator.style.backgroundColor = el.getAttribute('active-color'); el.classList.add('is-active'); el.style.color = el.getAttribute('active-color');}items.forEach((item, index) => { item.addEventListener('click', e => {handleIndicator(e.target);}); item.classList.contains('is-active') && handleIndicator(item);});And that's it. You're done.
Save This Series For Upcoming Projects.
And If you need more content like this follow @codev_land on instagram.
Keep Claim And Just Code It
Original Link: https://dev.to/chetan_atrawalkar/3-javascript-project-series-3gfj
Share this article:
Tweet

View Full Article
Dev To
More About this Source Visit Dev To