
An Interest In:
Web News this Week
- April 23, 2024
- April 22, 2024
- April 21, 2024
- April 20, 2024
- April 19, 2024
- April 18, 2024
- April 17, 2024
Some of Our Sources
- Technology Review
- Simplebits
- Spoon Graphics
- Smashing Apps
- Six Revisions
- Vandelay Design
- Web Designer Depot
- Reencoded
- Stylized Web
- Android Headlines
Help Webnuz
Referal links:
MERN Stack for Experience Developers
In this article, I am going to cover below points
- What is MERN Stack?
- Setting up development environment
- Todo app development
- Database setup - creating database
- Backend setup - creating APIs with Node & Express
- Frontend setup - creating React app
- Making application interactive - consuming APIs.
Before we start, Let me clarify, I am not going to do any comparison of MERN stack with other stacks here.
What is MERN Stack?
MERN (MongoDB, Express, React, Node) stack is a JavaScript stack used for developing web application. Each of these technology play an important role while developing web apps which are as follows:
NodeJs is an open-source and cross-platform runtime environment for executing JavaScript code outside a browser. In this case on server.
Note: NodeJs is not a framework or a programming language. It's just an environment.
Express is a NodeJs web application framework which provides a set of features for web & mobile application development. Using Express, we will create the backend APIs.
MongoDB
MongoDB, the most popular NoSQL database, is an open-source document based database. The term NoSQL mean non-relational. It means that MongoDB isn't based on table like relation database structure but provides an altogether different mechanism to store and retrieve data. This form of storage is called BSON (similar to JSON format). Read more here
React
React is a JavaScript library for creating user-interfaces (UI). But it's not limited to creating UI elements, we can develop standalone applications (SAPs) as well using other libraries like react-router-dom, axios and so on.
Let's start building our todo_app.
Problem Statement:
We want to track our daily tasks in a way that, it is always available at our fingertips. We can easily create and update a task. And whenever the task is completed, we can mark it as done.
Solution:
Let's break the problem statement into multiple parts
- To make the data persistent we are going to store it in database i.e. MongoDB in our case.
- Create few APIs to retrieve, update (this includes marking as complete) and create these tasks. For that we will use NodeJS & Express.
- In order make our service available to end user, we are creating a browser based user-interface. For that we will use React.

Environment Configuration
- Download and install MongoDB, follow official documentation. You can also install MongoDB Compass which is GUI for MongoDB.
- Download and install NodeJS, follow official documentation. After installation you can cross verify by
npm -vandnode -v. - Download and install Postman, follow official documentation. We need postman to test our APIs.
Database setup with MongoDB
Once you have installed MongoDB, you can go to your installation location, in my case C:\Program Files\MongoDB\Server\5.0\bin>, and type mongo to cross verify.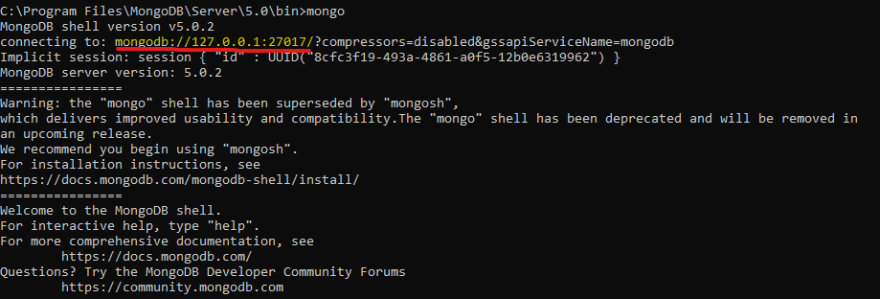
Let's create database
// From the installation foldermongo // it will start mongo terminaluse mern_todo // Creating new database mern_todoBackend setup with Node & Express
// Setting up backend servermkdir backend // creating backend foldercd backend npm init y // creating package.json filenpm i express body-parser cors mongooseExpress: We have seen it ealier.
body-parser: Node.js body parsing middleware. Using body parser, we parse the request body in required format.
app.use(bodyParser.urlencoded({extended: true})); // Supports URL encoded bodiesapp.use(bodyParser.json()); // Supports JSON encoded bodiesCORS is a node.js package for providing an Express middleware that can be used to enable CORS with various options. Cross-origin resource sharing (CORS) is a mechanism that allows restricted resources on a web page to be requested from another domain outside the domain from which the first resource was served. In simple words, Using CORS we can ensure that the request is coming from authorized source or not.
mongoose: A Node.js framework which lets us access MongoDB in an object-oriented way. Don't forget to checkout the schema part below in this article for clear understanding.
Moving ahead, Let's install Nodemon globally.
Nodemon is a utility that will monitor for any changes in your source and automatically restart your server.
npm i -g nodemonlet's create server.js using which we will be configuring our backend service.
// importing required packagesconst express = require("express");const app = express();const bodyParser = require("body-parser");const cors = require("cors");const mongoose = require("mongoose");const PORT = 4000;// configuring the middlewareapp.use(cors());app.use(bodyParser.urlencoded({extended: true})); // Supports URL encoded bodiesapp.use(bodyParser.json()); // Supports JSON encoded bodies// connecting to databasemongoose.connect("mongodb://127.0.0.1:27017/mern_todo", { useNewUrlParser: true,});const connection = mongoose.connection;connection.once('open', function(){ console.log('MongoDB database connection established successfully');});// listening the request at port 4000app.listen(PORT, function () { console.log("Server is running on Port: " + PORT);});Please note, at this point if you will head to http://localhost:4000/, you will see nothing. But in Terminal, you can see the output successfully.
To see the output in browser add below lines before app.linsten section
app.get('/',(_, response) => { response.send("Hey, You can see me now!!!");});
By using Mongoose we are able to use MongoDB database in an object oriented way.
This means that we need to add a Mongoose schema for Todo entity in our project.
Create a folder called models in root directory and add a todo.js file.
// importing required packagesconst mongoose = require("mongoose");const Schema = mongoose.Schema;// declaring Todo schemalet Todo = new Schema ({ title: { type: String }, description: { type: String }, priority: { type: String }, completed: { type: Boolean },});// exporting to make it consumablemodule.exports = mongoose.model('Todo', Todo);Using Todo schema, we can access the mern_todo database.
Let's create our Todo API:
We are going to follow the REST API architectural style.
REST API Architectural style means, using same URL with different Http verbs (GET, POST, PUT, DELETE) we can perform different-different actions.
Create a folder called routes in root directory and add a todo_routes.js file.
// importing packagesconst express = require("express");const todoRoutes = express.Router();// importing model to access todo collection in mern_todo databaselet Todo = require('../models/todo');// get - returns list of todostodoRoutes.route("/").get(function (req, res) { Todo.find(function (error, todos) { if (error) { console.log(error); } else { res.json(todos); } });});// get by id - returns single todotodoRoutes.route("/:id").get(function (req, res) { let id = req.params.id; Todo.findById(id, function (error, todo) { if (!todo) { res.status(404).send("Todo not found"); } res.json(todo); });});// update - updates a todo at provided idtodoRoutes.route("/:id").put(function (req, res) { let id = req.params.id; Todo.findById(id, function (error, todo) { if (!todo) { res.status(404).send("Todo not found"); } else { todo.title = req.body.title; todo.description = req.body.description; todo.priority = req.body.priority; todo.completed = req.body.completed; todo .save() .then((todo) => { res.json("Todo updated"); }) .catch((error) => { req.status(400).send("Update not possible"); }); } });});// post - adds a todotodoRoutes.route('/').post(function(req,res){ let todo = new Todo(req.body); todo .save() .then((todo) => { res.status(200).json({'todo': 'todo created successfully'}); }) .catch((error) => { req.status(400).send("failed to create todo"); });});// delete - removes a todotodoRoutes.route('/:id').delete(function(req,res){ let id = req.params.id; Todo.findById(id, function (error, todo) { if (!todo) { res.status(404).send("Todo not found"); } else { todo .delete() .then((todo) => { res.status(200).json({'todo': 'todo deleted successfully'}); }) .catch((error) => { req.status(500).send("failed to delete"); }); } });});// exporting the todo routesmodule.exports = todoRoutes;Now add these routes to server.js file
......app.use('/todos', todoRoutes);app.listen(PORT, function () { console.log("Server is running on Port: " + PORT);});Let's test the the APIs now
POST
GET
GET by Id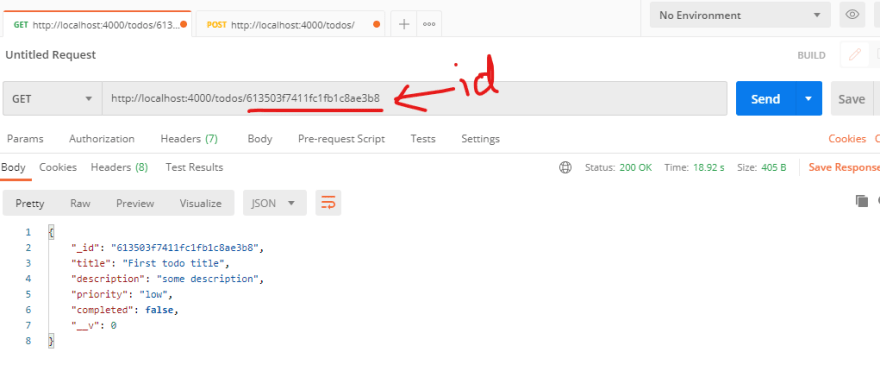
PUT
DELETE
Phew, that was to much work. But finally our backend is ready and tested.
In next article we are going to create our react-app.
Note: Once React-app article will be live, I will update it here.
Original Link: https://dev.to/jitangupta/mern-stack-for-experience-developers-2nlj
Dev To
More About this Source Visit Dev To