
An Interest In:
Web News this Week
- April 19, 2024
- April 18, 2024
- April 17, 2024
- April 16, 2024
- April 15, 2024
- April 14, 2024
- April 13, 2024
Some of Our Sources
- BoingBoing
- Technology Review
- Just Creative
- Joshua Blankenship
- TutsPlus - Design
- FanExtra - PSD
- Crazy Leaf Design
- Web Design Ledger
- 24 Ways
- The Verge
Help Webnuz
Referal links:
How to build a personalized image social sharing app with Cloudinary and Next.js
Have you seen Contentfuls event website that generates customized and shareable ticket images that we released for our annual conference Fast Forward?

As events continue to evolve in the digital landscape, you might have seen some fun and engaging personalized event tickets shared on social media for GraphQL Conf and Next.js Conf in 2021. I love this idea not only for the fun factor. It also showcases just how many great low-cost services and capabilities exist in web development.
In this post, were going to build a front-end application with Next.js and Cloudinary that creates a personalized image of a ticket based on URL parameters to share on Twitter and LinkedIn.

Well also configure the app to behave differently for the ticket holder and anyone else who views the ticket. The beauty of this approach is that the possibilities for dynamic image sharing are endless. Previously, I wrote about Three ways to use Puppeteer and Node.js to screenshot web pages and generate dynamic Open Graph images for social sharing. However, building this functionality with Cloudinary was so much simpler that Im thinking of switching to this method for the Open Graph images on my blog!


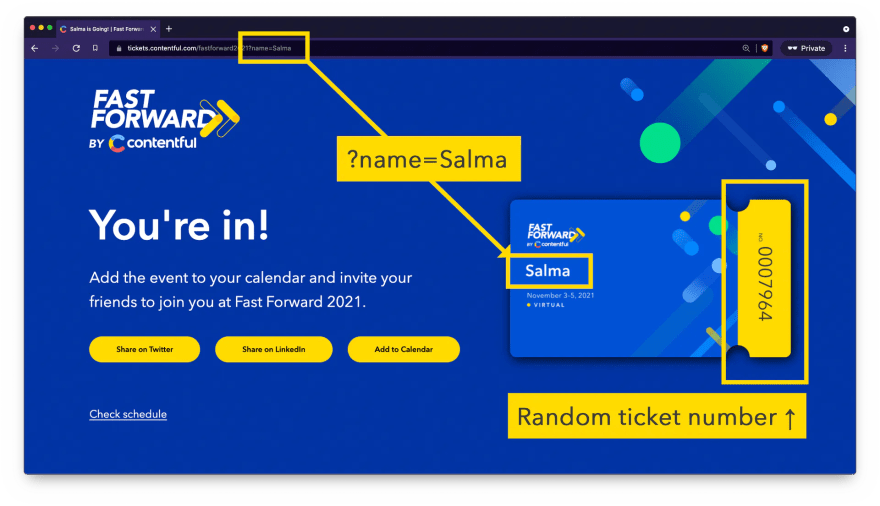
Heres a sneak preview of what well build. The name parameter in the URL provides a name to embed on the image itself via the Cloudinary API rather than being overlaid via HTML and CSS. Well also generate a random ticket number and configure the app to behave differently for viewers who arent ticket holders.
The only thing youll need for this tutorial is an image youd like to personalize. Lets get started!
Sign up for Cloudinary
Cloudinary is an image and video asset management service that provides an API for customizing your media on the fly. Add text to your images, style it with colors and custom fonts, crop, rotate, resize, recolour, detect faces it's pretty powerful!
Head on over to Cloudinary and click sign up for free.

After youve confirmed your email address, log in to Cloudinary and youll be greeted with a welcome screen.

Upload your assets to Cloudinary
Click on the Media Library navigation item and click Upload in the top right corner. Select your template image and after a second or two, youll see the new image asset in your dashboard.
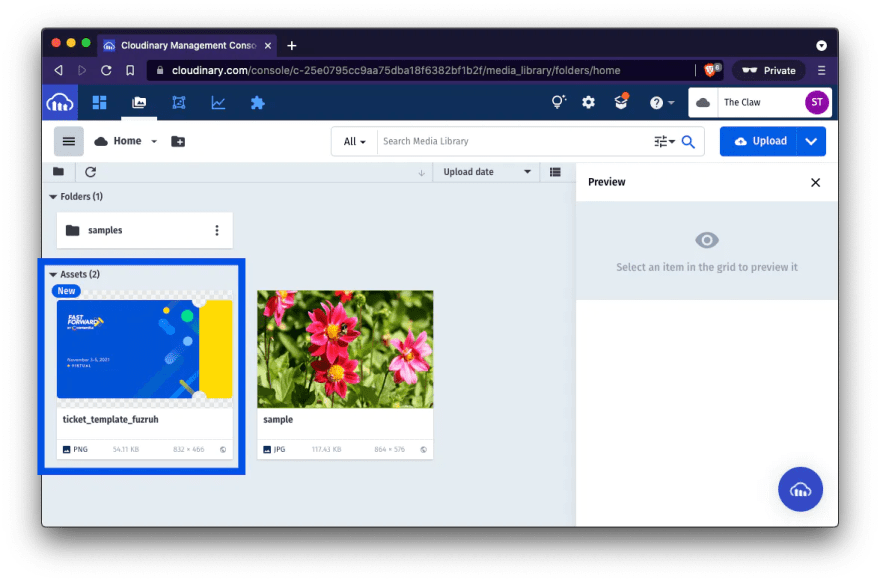
Your asset will be uploaded with an auto-generated suffix. Click on the asset to open it in the preview pane to change the file name so that its easier for you to recognize the image name in the code later on.

I also uploaded some custom fonts to Cloudinary to ensure the image personalizations were on brand for Contentful. Given that you can use a variety of Google fonts with the Cloudinary API, I wont cover fonts in this post, but you can learn how to upload custom fonts via the Cloudinary media library from this post by Jason Lengstorf.
Now our image asset is stored safely in Cloudinary. Lets get coding!
Create a new Next.js app
I chose Next.js for this application to harness the power of server-side rendering using URL parameters, which will power the image personalization.
To spin up a new Next.js application, run the following command in your terminal:
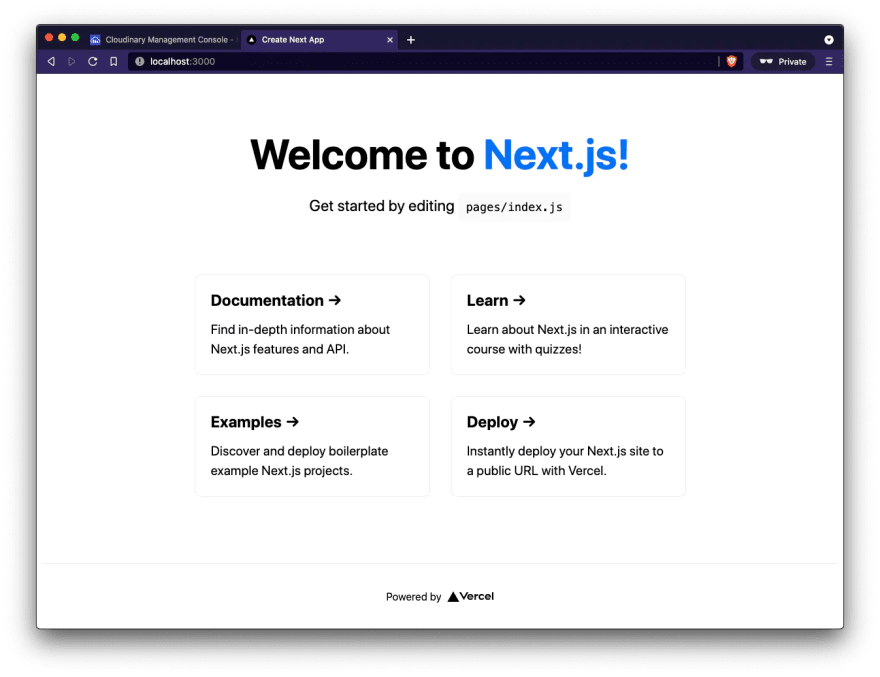
npx create-next-app ticket-appThis command creates a new directory that includes all code to get started. The output below is what you should see after you run the command in your terminal. (Ive truncated the output a little with /* more things happen here */ but what youre looking for is Done!)

Navigate to the root of your project directory and start the development server:
cd ticket-appnpm run devNavigate to https://localhost:3000 in your browser and youll see your fresh Next.js app in action.
Lets build our page for the ticket!
Build your page
In a Next.js application, any JavaScript file you add to the pages directory becomes a route on the front end. You can choose to work on index.js or create a new file in the pages directory. In the final implementation, I created fast-forward.js inside the pages directory to allow for the fact that the app will be used for future events. To account for this, I made sure all requests for the index were redirected to the current event page. For the purpose of this tutorial, well work on index.js and serve the generated tickets under the root URL /.

Start with a blank slate
Delete most of the boilerplate code from index.js until youre left with a nice blank canvas to work with:
// pages/index.jsimport Head from "next/head";/* We'll write some functions here! */export default function Index() { /* We'll configure the event data here! */ return ( <main> <Head> <title>My awesome event</title> </Head> {/* We'll build our page here! */} </main> );}Configure the server-side props
The image stored in Cloudinary will be personalized with the name of the ticket holder, grabbed from a URL parameter. Heres the URL well be working with in development.
http://localhost:3000?name=whitep4nth3rIn a pure JavaScript application, you can process the URL parameter on the client-side to build the page content but with Next.js we can use getServerSideProps() to render the page on the server using the value of the URL parameter. This prevents visitors to your page from seeing a flash of undefined content or having to show a loading state as the parameter is read by the browser. Read more about getServerSideProps() on the Next.js documentation.
Add the following getServersideProps() function to the bottom of your index.js file. This function will be called with a context object, from which we can destructure the query parameters. Well display the name query parameter on the ticket, and well use the isShared parameter to configure how the page looks depending on whether the page has been visited by the ticket holder, or shared and visited via social media.
Next, configure the Index component to take in the name and isShared props.
// pages/index.jsimport Head from "next/head";/* We'll write some functions here! */export default function Index({ name, isShared }) { /* We'll configure the event data here! */ return ( /* */ );}export async function getServerSideProps(context) { const { name, shared } = context.query; const isShared = shared !== undefined; // return the properties so they are available in the `Index` component return { props: { name: decodeURI(name), isShared, }, };}Next, lets set up a few event variables to reuse in a few places to avoid lots of copying and pasting.
Configure your event details
Set up the following variables inside your Index component: eventName, ticketAppUrl, title and description. Well use these values later.
// pages/index.jsimport Head from "next/head";/* We'll write some functions here! */export default function Index({ name, isShared }) { /* Event info config */ const eventName = "My awesome event"; const ticketAppUrl = "https://my-awesome-ticket-app.dev"; const title = `${decodeURIComponent(name)} is Going! | ${eventName}`; const description = `Join ${name} at ${eventName}. Grab your free ticket on ${ticketAppUrl}.`; return ( /* ... */ );}export async function getServerSideProps(context) { /* ... */}Optional: generate a ticket number (if you dont have one)
I didnt have access to legitimate ticket numbers for the Fast Forward 2021 event, but I still wanted to include a unique-ish ticket number in the design to make the personalized tickets look more official. The code in the final implementation generates a number from any given string, and the return value is prefixed with 000. Each unique string produces a unique number the only caveat to this method being that if more than one person named whitep4nth3r receives a ticket to Fast Forward, then their ticket numbers will be the same. You get the gist.
For the purposes of this tutorial, we can use Math.random() to generate a ticket number.
// pages/index.jsimport Head from "next/head";export default function Index({ name, isShared }) { /* Event info config... */ /* Generate a fake ticket number */ const ticketNo = `000${Math.random().toString().substr(2, 4)}`; return ( /* ... */ );}export async function getServerSideProps(context) { /* ... */}Now that weve configured the data, we need to personalize the image using Cloudinary. Lets get to the fun stuff!
Personalize your Cloudinary image
The Cloudinary API lets you make all sorts of image customizations via URL parameters. As an example, heres the URL generated for my own Fast Forward ticket. Cloudinary accepts an image URL (fastforward2021.png) with prepended parameters separated by commas.
https://res.cloudinary.com/devrelcontentful/image/upload/w_831,h_466,c_fill,q_auto,f_auto,r_20/w_760,c_fit,co_rgb:ffffff,g_south_west,x_46,y_239,l_text:avenirdemi.otf_48:whitep4nth3r/w_760,c_fit,co_rgb:2a3039,a_90,g_north_east,x_84,y_100,l_text:avenirreg.otf_16:NO./w_760,c_fit,co_rgb:2a3039,a_90,g_north_east,x_55,y_140,l_text:avenirreg.otf_56:0007964/fastforward2021.pngThe URL is built up of the following:
- Cloudinary base URL https://res.cloudinary.com
- Cloudinary cloud name devrelcontentful
- Asset type image/upload
- Width w_831
- Height h_466
- Crop mode c_fill
- Automatic asset format selection for best browser experience f_auto
- Rounded corners of 20px r_20
- Text area width of 760px w_760
- Name text area crop mode c_fit
- Name text color (as a hex code without the #) ffffff
- Name text gravity g_south_west
- Name text position coordinates x_46,y_239
- Name font and size l_text:avenirdemi.otf_48
- Name text value :whitep4nth3r
- The same is repeated for the ticket number text
- Finally, the URL ends with the name of the image as stored in Cloudinary fastforward2021.png
Lets take a look at some JavaScript code used to generate a URL like this. At first glance, it might look overwhelming. But, once you understand how it all pieces together, youll want to personalize images at every opportunity! Big thanks to Jason Lengstorf for this repository, which provided some inspiration and insight to some common gotchas when working with Cloudinary URLs.
The function generateImageUrl() below takes a number of required and optional parameters to build up a Cloudinary image URL like we explored above, to generate a personalized image. Depending on your image and how you want it personalized, youll want to play around with the default input parameters of generateImageUrl(), most notably the offset values, colors, font sizes and gravity values. Note that Ive used the font Arial instead of the custom font used in the URL above.
For more information on how to configure these values, refer to the Cloudinary image transformations documentation.
Finally, add an <img /> tag to your Index component and add the src and alt attributes to render your personalized image.
// pages/index.jsimport Head from "next/head";/* Encode characters for Cloudinary URL */function cleanText(text) { return encodeURIComponent(text).replace(/%(23|2C|2F|3F|5C)/g, "%25$1");}/* CONFIG vars */const CLOUD_NAME = "the-claw";const IMG_WIDTH = 831;const IMG_HEIGHT = 466;/* Build the Cloudinary Image URL */function generateImageUrl({ name, ticketNo, imagePublicID, cloudinaryUrlBase = "https://res.cloudinary.com", imageWidth = IMG_WIDTH, imageHeight = IMG_HEIGHT, textAreaWidth = 760, ticketNoFont = "Arial", ticketNoGravity = "north_east", ticketNoLeftOffset = 55, ticketNoTopOffset = 140, ticketNoColor = "2a3039", ticketNoFontSize = 56, noFont = "Arial", noGravity = "north_east", noLeftOffset = 84, noTopOffset = 100, noColor = "2a3039", noFontSize = 16, nameFont = "Arial", nameGravity = "south_west", nameBottomOffset = 239, nameLeftOffset = 46, nameColor = "ffffff", nameFontSize = 48, version = null,}) { // configure social media image dimensions, quality, and format const imageConfig = [ `w_${imageWidth}`, `h_${imageHeight}`, "c_fill", "q_auto", "f_auto", "r_20", ].join(","); // configure the name text const nameConfig = [ `w_${textAreaWidth}`, "c_fit", `co_rgb:${nameColor || textColor}`, `g_${nameGravity}`, `x_${nameLeftOffset}`, `y_${nameBottomOffset}`, `l_text:${nameFont}_${nameFontSize}:${cleanText(name)}`, ].join(","); //configure the "NO." text const noConfig = [ [ `w_${textAreaWidth}`, "c_fit", `co_rgb:${noColor}`, `a_90`, `g_${noGravity}`, `x_${noLeftOffset}`, `y_${noTopOffset}`, `l_text:${noFont}_${noFontSize}:NO.`, ].join(","), ]; // configure the ticketNo text const ticketNoConfig = ticketNo ? [ `w_${textAreaWidth}`, "c_fit", `co_rgb:${ticketNoColor}`, `a_90`, `g_${ticketNoGravity}`, `x_${ticketNoLeftOffset}`, `y_${ticketNoTopOffset}`, `l_text:${ticketNoFont}_${ticketNoFontSize}:${cleanText(ticketNo)}`, ].join(",") : undefined; // combine all the pieces required to generate a Cloudinary URL const urlParts = [ cloudinaryUrlBase, CLOUD_NAME, "image", "upload", imageConfig, nameConfig, noConfig, ticketNoConfig, version, imagePublicID, ]; // remove any falsy sections of the URL (e.g. an undefined version) const validParts = urlParts.filter(Boolean); // join all the parts into a valid URL to the generated image return validParts.join("/");}export default function Index({ name, isShared }) { /* Event info config... */ /* Generate a fake ticket number... */ /* Build the Cloudinary image URL */ const imageUrl = generateImageUrl({ name: name, ticketNo: ticketNo, imagePublicID: "ticket_template.png", }); return ( <main> <Head> {/* */} </Head> <img alt="My ticket" src={imageUrl} /> </main> );}export async function getServerSideProps(context) { /* ... */}Woo! Weve got a personalized image via the Cloudinary API as a URL! Next, lets use this to show a preview of the ticket when attendees share your event on social media.
Configure Open Graph meta for social sharing
The power behind those ticket previews you see on Twitter and LinkedIn is all down to the magic of the Open Graph protocol.
I just got my ticket to #fastforward2021!
Grab your free ticket and join me and other builders creating the next generation of digital experiences.
tickets.contentful.com/fastforward20210:34 AM - 04 Aug 2021


Click on the Tweet above to show the Open Graph preview in action!
The Open Graph (OG) protocol was created at Facebook in 2010 to enable web page links to become rich objects with similar functionality and appearance to other content posted on Facebook.
Open Graph meta tags are used in the <head> of an HTML page to expose information about web pages to social media platforms and other applications that unfurl URL metadata. OG meta tags are identified in the HTML by an attribute prefixed with og.
<meta property="og:image" content="https://example.com/image.png" />OG meta tags can also be used to customize the appearance of your web pages according to the platform its shared on. For example, Twitter rolled out their own custom implementation of this, built on the OG protocol, and the following code tells Twitter to show the large image web page previews.
<meta name="twitter:card" content="summary_large_image" /><meta name="twitter:image" content="https://example.com/image.png"/>The Next Head component imported at the top of the file and rendered inside the Index component will add the meta tags we define inside it to the head of the resulting HTML page.
Define an ogUrl variable above the return statement of the Index component as ${ticketAppUrl}?name=${name}&shared=true. Notice that were adding a second URL parameter onto the end of the URL shared which we configured in getSeverSideProps() earlier. This will become important in the next couple of steps.
Add the relevant OG meta tags inside the Next Head component tags to enable a fancy image preview with a title and description to show on Twitter and LinkedIn. Youll notice were making good use of those event configuration variables we defined earlier.
// pages/index.jsimport Head from "next/head";/* ... */export default function Index({ name, isShared }) { /* Event info config... */ /* Generate a fake ticket number... */ /* Build the Cloudinary image URL... */ /* Configure Open Graph URL */ const ogUrl = `${ticketAppUrl}?name=${name}&shared=true`; return ( <main> <Head> <title>{title}</title> <meta name="description" content={description} /> <meta name="twitter:card" content="summary_large_image" /> <meta name="twitter:site" content={ticketAppUrl} /> <meta name="twitter:creator" content="@your_twitter_username" /> <meta property="og:url" content={ogUrl} /> <meta property="og:type" content="website" /> <meta property="og:title" content={title} /> <meta property="og:description" content={description} /> <meta property="og:locale" content="en_US" /> <meta property="og:image" content={imageUrl} /> <meta property="og:image:alt" content={eventName} /> <meta property="og:image:width" content={IMG_WIDTH} /> <meta property="og:image:height" content={IMG_HEIGHT} /> <meta property="og:site_name" content={eventName} /> </Head> /* ... */ </main> );}export async function getServerSideProps(context) { /* ... */}Now, lets create those social share links for your attendees to generate some excitement for your event!
Add Twitter and LinkedIn social sharing links
This is where all of the magic we conjured above comes together. Were going to build a Twitter Web Intent URL and LinkedIn share URL that, when your website is live (and this is the important part!), will pull in the image you personalized via Cloudinary via the Open Graph og:image meta tag in your HTML <head>.
The code below shows examples of how to create Twitter and LinkedIn share URLs. Things to bear in mind:
- If you want to use line breaks (
/n) in your tweet, make sure you wrap your tweet text inencodeURIComponent() - Ensure you include
&shared=trueon your share URLs youll see why in the next step! - Make sure to convert all equals (=) symbols in the LinkedIn share URL to the HTML character code
%3Dotherwise the link wont work correctly
Finally, add anchor links to the Index component below the image tag, with your configured Twitter and LinkedIn share URLs.
// pages/index.jsimport Head from "next/head";/* ... */export default function Index({ name, isShared }) {  /* Event info config... */  /* Generate a fake ticket number... */  /* Build the Cloudinary image URL... */  /* Configure Open Graph URL... */  /* Twitter Config */  const tweetText = encodeURIComponent("I just got my ticket to an awesome event!

Grab your free ticket and join me!

",  );  const twitterShareUrl = encodeURIComponent(`${ticketAppUrl}?name=${name}&shared=true`);  const twitterShareHref = `https://twitter.com/intent/tweet?url=${twitterShareUrl}&text=${tweetText}`; /* LinkedIn Config */ const linkedInShareUrl = `${ticketAppUrl}?name%3D${name}&shared%3Dtrue`; const linkedInShareHref = `https://www.linkedin.com/sharing/share-offsite/?url=${linkedInShareUrl}`;  return (    <main>      <Head>      {/* ... */}      </Head>      <img alt="My ticket" src={imageUrl} />      <a href={twitterShareHref} target="_blank" rel="noreferrer">        Share on Twitter      </a>      <a href={linkedInShareHref} target="_blank" rel="noreferrer">        Share on LinkedIn      </a>    </main>  );}export async function getServerSideProps(context) {  /* ... */}
Theres just one more step. Finally, lets configure the web page for visitors to your site who clicked on a link from social media.
Configure your web page for social clicks
Remember the isShared prop we captured in getServerSideProps()? Heres where it comes into play.
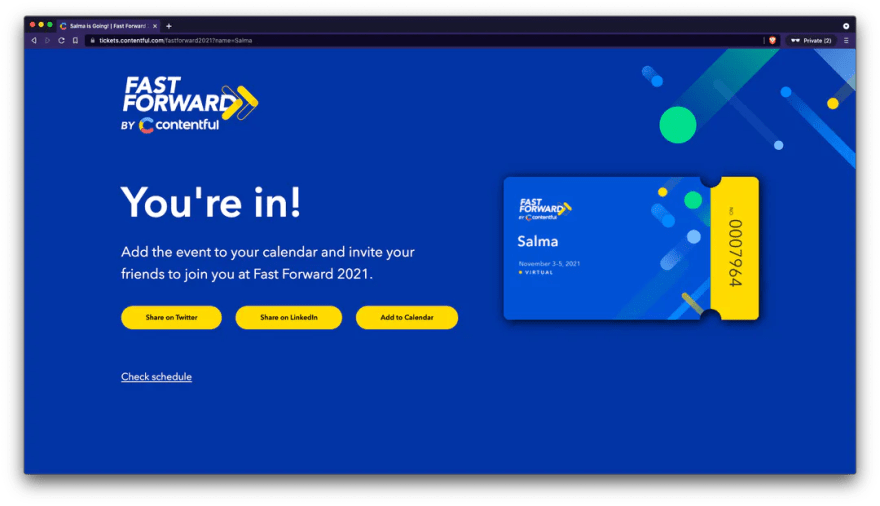
Compare my Fast Forward ticket confirmation URL with the link shared on Twitter below.
My ticket confirmation
This is the full URL with a name parameter only: https://tickets.contentful.com/fastforward2021?name=Salma
What people see when they click on the link in my tweet
This is the full URL with a name parameter and shared parameter: https://tickets.contentful.com/fastforward2021?name=Salma&shared=true

Use the code below to configure a different headline and subtitle depending on the value of the isShared parameter received by the Index component. Furthermore, non-attendees of the event see a call to action to sign up for the event, rather than sharing it on social media.
// pages/index.jsimport Head from "next/head";/* ... */export default function Index({ name, isShared }) { /* ... */ /* Page text config */ const headline = isShared ? `${name} is going!` : "You're in!"; const subtitle = isShared ? `Don't miss out! Sign up to register and join ${name} at ${eventName}.` : `Add the event to your calendar and invite your friends to join you at ${eventName}.`; return ( <main> <Head> {/* ... */} </Head> <h1>{headline}</h1> <p>{subtitle}</p> {isShared && <a href="https://my-awesome-ticket-app.dev/sign-up">Sign up!</a>} {!isShared && ( <> <a href={twitterShareHref} target="_blank" rel="noreferrer"> Share on Twitter </a> <a href={linkedInShareHref} target="_blank" rel="noreferrer"> Share on LinkedIn </a> </> )} {/* ... */} </main> );}export async function getServerSideProps(context) { /* ... */}Thats a wrap!
Dont forget if you want to make sure your Open Graph images work as expected youll need to deploy your application to a live URL. Vercel makes it really easy to go live with your Next.js application in just a few seconds. Sign up to Vercel and connect your project via GitHub and youre away!
Cloudinary is pretty magical, and I cant wait to explore its possibilities even further. Whats more, Im excited to build similar apps in the future for different events I might run for my Discord and streaming community. If youd like to explore the code demonstrated in this post, check out the GitHub repository here (it contains zero CSS so go wild with your designs!).
And lastly, make sure to sign up to Fast Forward 2021 to receive your free ticket! Weve got three days of events dedicated to those building the next generation of digital experiences, from developers to architects, engineers, creatives and technology enthusiasts alike. Dont forget to share your ticket on social media itll be even more fun now you know how it works!
Original Link: https://dev.to/whitep4nth3r/how-to-build-a-personalized-image-social-sharing-app-with-cloudinary-and-next-js-2640
Dev To
More About this Source Visit Dev To