
An Interest In:
Web News this Week
- April 19, 2024
- April 18, 2024
- April 17, 2024
- April 16, 2024
- April 15, 2024
- April 14, 2024
- April 13, 2024
Some of Our Sources
- Web Designer Wall
- Pearsonified
- Spoon Graphics
- Smashing Apps
- My Ink Blog
- Stylized Web
- Willems Lab
- Daily Now
- Dev To
- The Verge
Help Webnuz
Referal links:
A New Way To Use Apple Mail For Email Sanity
This article is intended for apple users--as the primary email application that will be used is the Apple Mail app. In this article, you'll learn about a workflow I use to follow the Inbox Zero approach without having to navigate between different apps.
TL;DR
Apple Mail can be used as an "email aggregator" that works as a holistic app for you to handle all your incoming emails from Gmail, Outlook, [insert other email service providers], etc. In a nutshell, the "magic sauce" is a mixture of the email forwarding feature all email service providers have and the Apple ecosystem with Apple Mail. The workflow requires all emails to be forwarded to your iCloud email address. After that, the only job to do is to follow an Inbox Zero approach (keeping your inbox empty or almost empty) for your iCloud Inbox. Yes, it's really that simple . In this article, I'll go into further details about why using Apple Mail and basic email forwarding can significantly improve the way you handle your emails.
Before diving in, keep in mind some of these pros and cons I've experienced using this workflow:
Pros:
- Takes advantage of the Apple ecosystem
- Reduces the number of apps you need to manage your emails with
- Doesn't rely on a 3rd-party service (often a paid service) to aggregate your emails
- Keeps a "backup" of your original emails
- Easier to follow the Inbox Zero approach
- On macOS, Apple Mail automatically sets the correct email address to reply from
Cons:
- Tedious initial setup--depends on how many email accounts you need to add to your device(s) (personally, I had 8 email accounts I had to set up on 4 devices--iPhone, iPad, Mac Pro, MacBook Pro)
- iCloud Mail service downtime (I haven't experienced this, but thought I should include this based on some google results talking about this issue)
- On iOS and iPadOS, Apple Mail doesn't automatically set the correct email address to reply from (other email apps don't as well)
Let's GetStarted!
1. Create iCloud Email Address &Enable
If you haven't already done so, you'll need to create your iCloud email address and enable iCloud Mail in your iCloud account. If you're on macOS, you can set up your iCloud email address by going to Internet Accounts from System Preferences and enabling Mail from your iCloud account. If you're on iOS or iPadOS, enabling iCloud Mail in your iCloud account will prompt you to create an email.
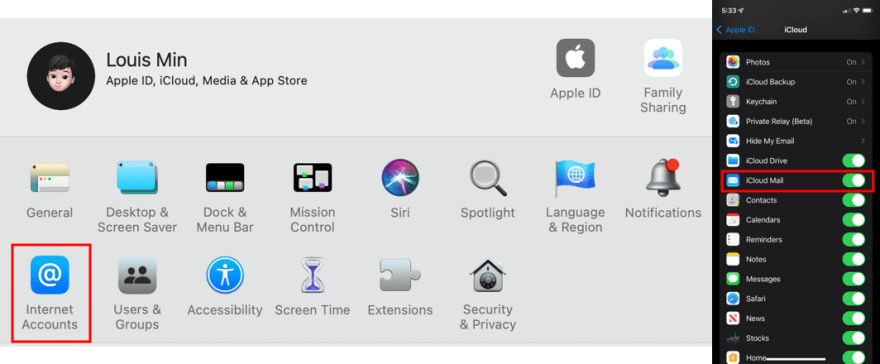
On macOS, go to Systems Preferences to access Internet Accounts (left). On iOS & iPadOS, go to Settings then iCloud to access iCloud Mail (right).
2. Add All Email Addresses To Your Device(s)
For each device, you'll have to add all your Gmail, Outlook, etc. email accounts. For macOS, you can do so by going to Internet Accounts (make sure these accounts are enabled by going to the Mail app preferences). For iOS and iPadOS, navigate to Apple Mail under settings and tap Accounts.
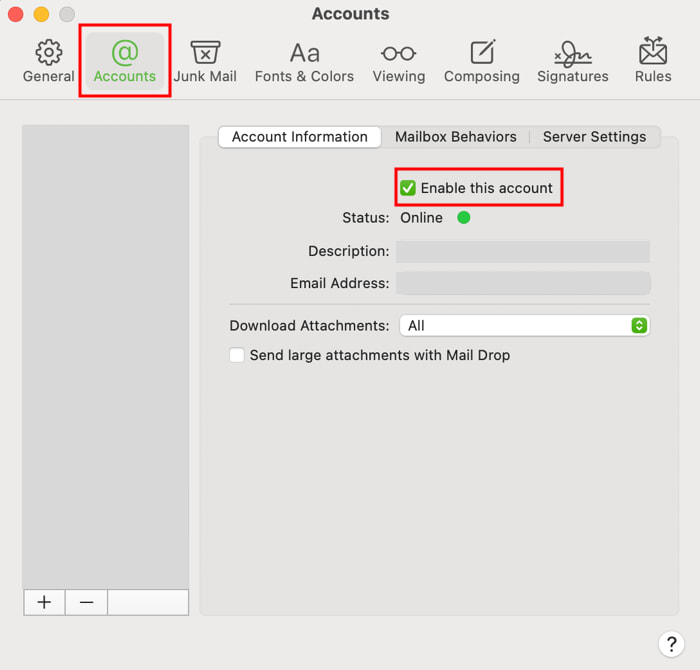
On macOS Apple Mail, navigate to accounts and make sure "enable this account" checkbox is selected for all email addresses.
3. Forward All Email Addresses To iCloudEmail
With your iCloud email address created and email accounts added to your device(s), it's time to start forwarding all your other email address to iCloud. For brevity, I've only included images of the steps to take for Gmail. The steps should be similar for other email service providers.
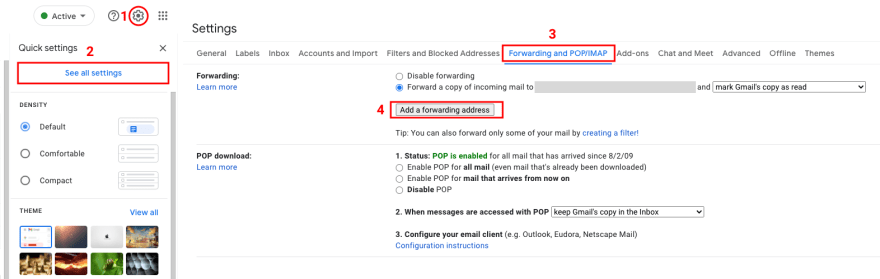
Click the gear icon to access all settings (left). From the Settings page, navigate to "Forwarding and POP/IMAP" to add a forwarding email address (right).
Once you've added a forwarding email address, click Forward a copy of incoming mail to and select the iCloud email address. After doing so, you'll have the option to:
- Keep Gmail's copy in the Inbox
- Mark Gmail's copy as read
- Archive Gmail's copy
- Delete Gmail's copy
If you want to keep a "backup" of your emails, don't select Delete Gmail's copy. This is just personal preference. Any other option, when enabled, will keep the original email even if you delete the forwarded email from your iCloud Inbox.
4. Organize AppleMail
After forwarding all your emails, it's time to start organizing Apple Mail to your liking. The placement and settings for each inbox in Apple Mail is device-dependent, so you'll have to repeat this process for each device. For reference, I've included an image below of my sidebar configuration:
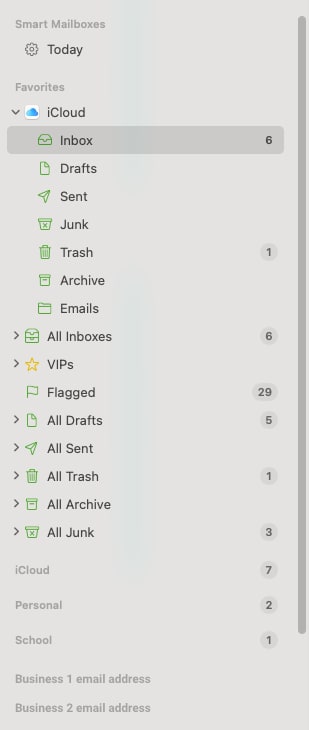
My macOS Apple Mail sidebar
For this workflow, the main objective is to reach Inbox Zero from your iCloud Inbox. So, I moved the iCloud email account towards the top and minimized all other email accounts. It's important to note that for consistency, all email actions from replying to deleting should be done only in the iCloud Inbox.
5. Delete Old Email Apps
Finally! It's time to delete your old email apps and be on your way to reaching Inbox Zero!
FAQs
Why forward emails to an iCloud email instead of just adding email accounts to AppleMail?
One of the major issues of using email services providers with Apple Mail, specifically for iOS and iPadOS, is how data is received (i.e. how you get a new email notification). Because push notification is no longer supported, the only methods available are fetch and manual. This means that notifications won't show up in real-time. You can set the data to be fetched manually at a 15 minute interval but this would lead to battery drain and more data usage. The benefits of push are real-time notifications, less battery drain, and less data usage. So, you need an iCloud email for Apple Mail to have push notifications.
Why not use the Gmail/Outlook app to manage multipleemails?
You can! But there's one caveat for Gmail--no Gmail app on the Mac App Store. This means that for macOS, you'll have to stick to juggling between different windows and tabs to access all your Gmail accounts.
Does this workflow trap you in the Apple ecosystem?
No. Rather than replacing your email accounts to a single iCloud email address, this email workflow describes a method of "email aggregation" to easily follow the Inbox Zero approach. Also, when you're on a non-Apple device, you can always manage your iCloud email from Apple's iCloud home page.
Bonus Tip: Custom Email Signatures
A cool feature of Apple Mail on macOS is Apple Mail's ability to automatically set the correct email address to respond from (this also means a custom signature you set for your email address will be used!). To set your custom signatures on iOS and iPadOS, head over to Apple Mail under settings and select Signatures. After doing so, select Per Account--if you have different signatures for different email addresses. For macOS, go to Apple Mail's preferences page and select the Signatures tab. If you're using a styled signature, make sure to uncheck Always match my default message font before pasting your signature to retain your custom layout and font styles.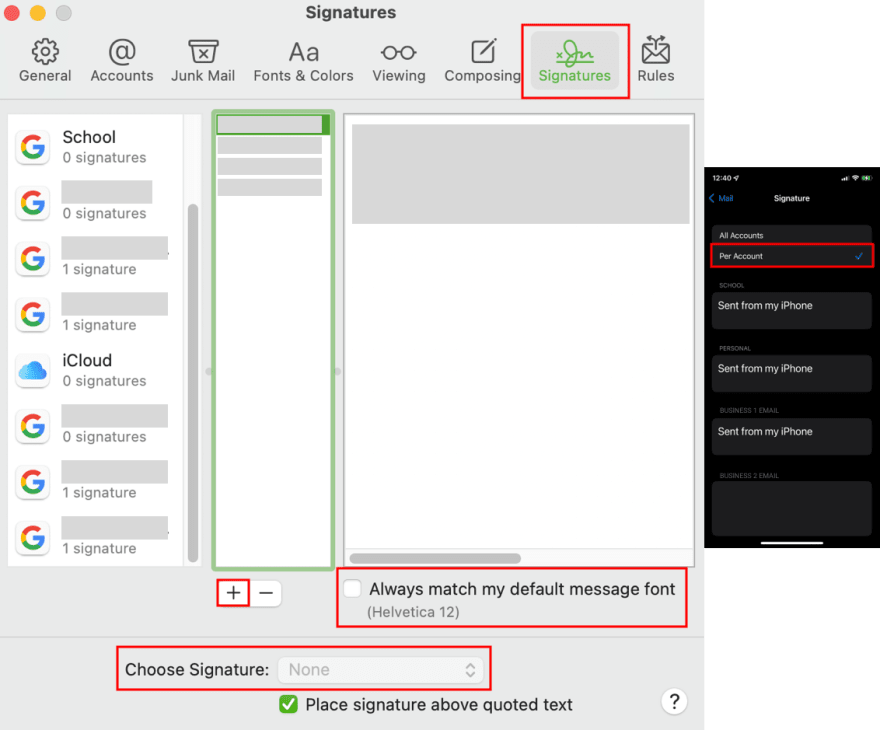
On macOS, go to Signatures tab under Apple Mail preferences (left). On iOS & iPadOS, go to Apple Mail under settings and tap "Per Account" for email-specific signatures (right).
Author's Note
Thank you for taking the time to read about an email workflow that I've been using to manage my personal and work email addresses. Personally, I've disciplined myself to keep my iCloud Inbox empty by the end of the day. In doing so, this has made a huge impact on my overall productivity. I'm excited to share my email workflow and I would love to hear about your email workflow in the Discussion below!
-Be Positive. Stay Productive.-
Original Link: https://dev.to/louismin/a-new-way-to-use-apple-mail-for-email-sanity-92d
Dev To
More About this Source Visit Dev To