
An Interest In:
Web News this Week
- April 25, 2024
- April 24, 2024
- April 23, 2024
- April 22, 2024
- April 21, 2024
- April 20, 2024
- April 19, 2024
Some of Our Sources
- BoingBoing
- TutsPlus - Code
- Spoon Graphics
- Smashing Magazine
- Abduzeedo
- Web Design Ledger
- Reencoded
- Codrops
- Dev To
- Hashedout
Help Webnuz
Referal links:
How To Install Debian 11 Bullseye Expert Mode Minimal Install
Introduction
In this article I will show you how to do a minimal installation of Debian 11 Bullseye in "Expert Install" mode. The Debian installer is very flexible. You can easily use the installation media to install Debian as a server or a desktop/laptop. I will go over a minimal installation step by step and include an option to install a desktop environment of your choice. Doing an "Expert Install" will provide you with a few advanced options which allow for better customization of the operating system.
Why Debian?
These are some of the reasons why people install Debian.
- Very stable and secure
- Has wide hardware support
- Is a community project of volunteers around the world
- Has a flexible installer that allows for customization
- Upgrades smoothly from one release to the next release
Here are the requirements for Debian 11 Bullseye.
| Requirements | Minimum | Recommended |
|---|---|---|
| RAM: | 512MB | 2GB |
| Processor (CPU): | 1GHz | |
| Hard Drive: | 10GB |
A minimal installation is great for a server set up. The benefit of setting up a server with a command line interface you will not use a lot of resources.
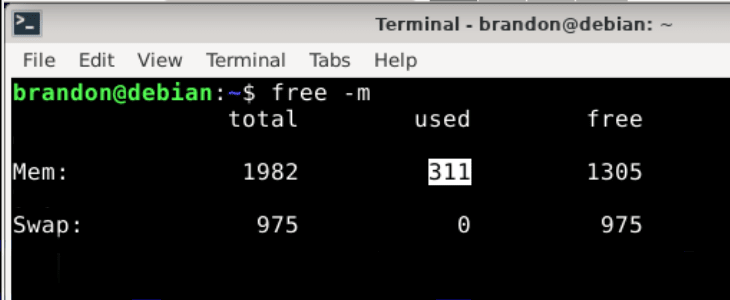
Here is a server without a graphical user interface with 2GB of RAM.
As you see this server is using is only using 61MB of RAM!
brandon@debian $ free -m total used freeMem: 1982 61 1920Swap: 975 0 975After installing the full Xfce desktop the RAM usage increased to 311MB.
You can use almost any computer for this. If you have some old hardware laying around such as a
- Desktop
- Laptop
- A Mac computer
- Used server hardware
What can you do with a Linux server? Here are some examples.
- Private Git server
- Web server
- File server with NFS or Samba
- Media server
- Database server
- DNS server
- NTP server
- Email server
- Ad blocker
- Set up RAID (Redundant Array of Independent Disks)
- Explore the GNU/Linux operating system
Installation
Download the amd64 Debian 11 Bullseye ISO file from the Debian.org website. If your computer is really old it might not support 64-bit. In that case, you will need the 32-bit ISO file.
debian-11.0.0-amd64-netinst.iso
Install the ISO file to a USB flash drive using one of these tools.
Rufus
Etcher
Unetbootin
Pendrive Linux
If have Linux installed already you can run the dd command to install the ISO to the USB flash drive.
WARNING!! Make sure you write to the correct /dev/sdX drive.
I list my drives in the computer like this.
$ sudo fdisk -l 2> /dev/null | egrep 'Disk /dev/'# OutputDisk /dev/sdb: 254.8 GiBDisk /dev/sda: 120.9 GiB Disk /dev/sdc: 15.9 GiB <== My USB flash driveOn my computer the flash drive is /dev/sdc so I run this command.
$ sudo dd if=debian-11.0.0-amd64-netinst.iso of=/dev/sdc bs=4M status=progress; syncFind out how to boot off of the USB flash drive. Every manufacture has a different key to press to get to the boot menu. On my computer I press the F12 key to select the boot menu.
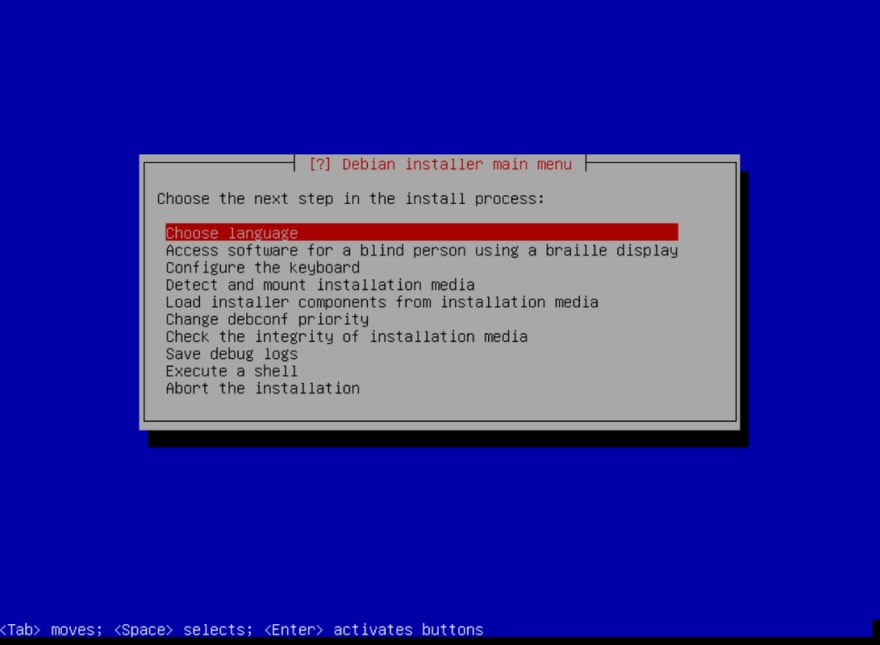
Once you boot off of the USB flash drive the installation menu will come up.
Select "Advanced options".

Select "Expert Install".

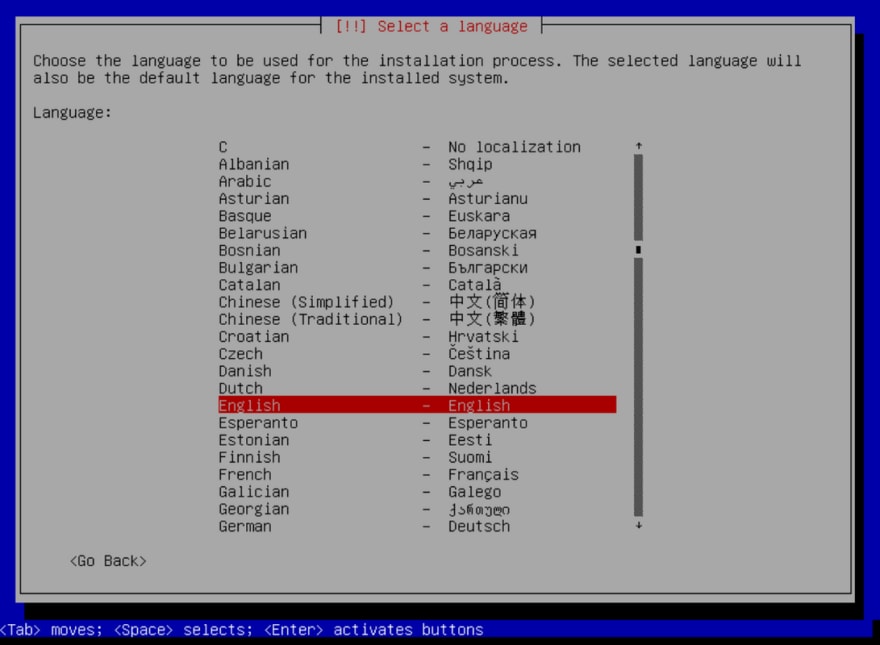
Choose a language.
Select your location to set the correct time zone.

The locale sets character encoding, date and time formatting, currency, default paper size, etc. The default setting should be fine. For US English the default is "en_US.UTF-8". No need to change this setting.

You have the option to add additional locales here if you need them. I will use the default "en_US.UTF-8" set on the previous page. Press "Continue".

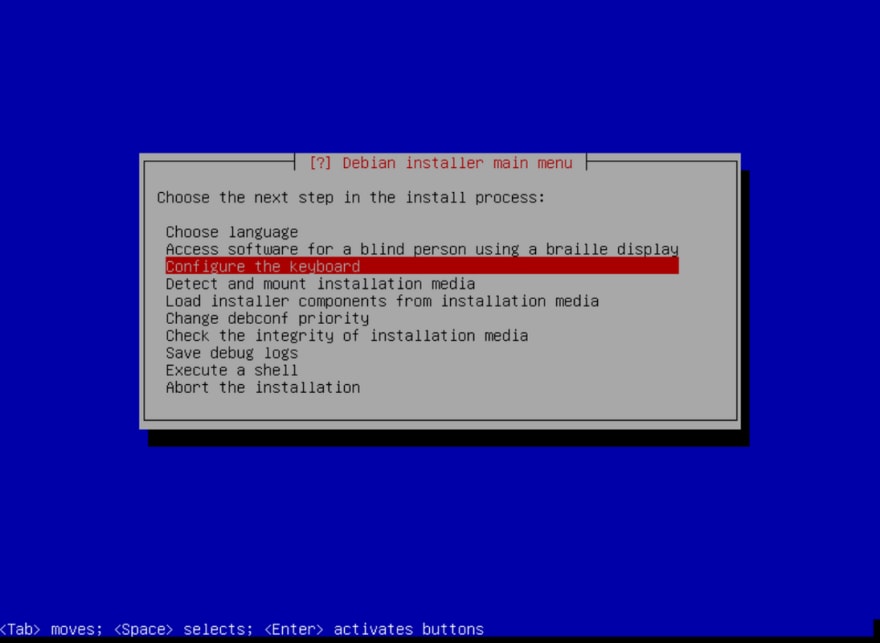
Here you can select the keyboard layout of your preference such as Dvorak. I will stick with the default "American English" here.

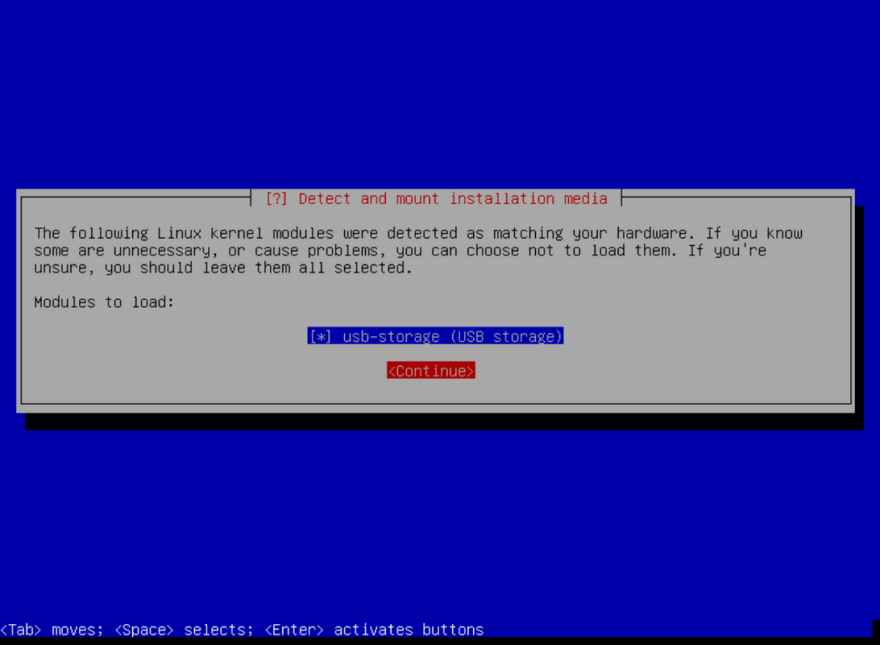
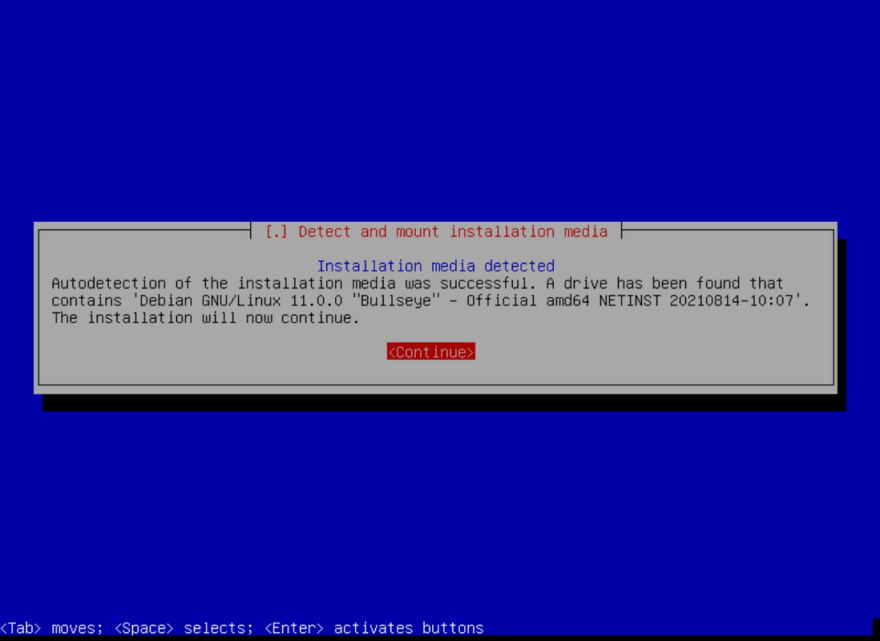
Time to detect the installation media which is the USB flash drive that you booted off earlier.

Press "Continue".
Press "Continue".
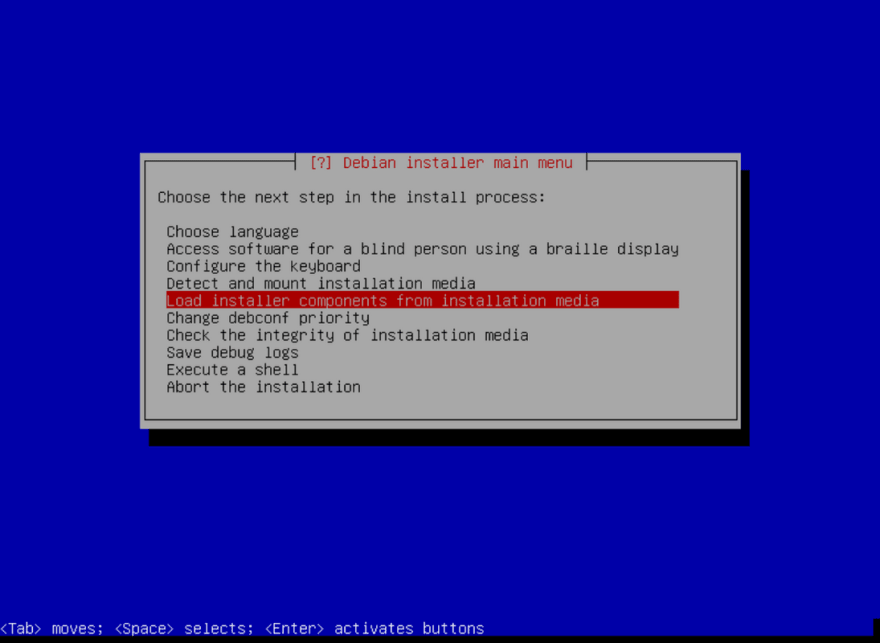
Installer components get loaded from the USB installation media.
Optional specialized components can be selected here if you need them. By default nothing is selected. Press "Continue".

Network hardware will be detected here.

Configure the network connection.

Select "Yes" to set the IP address using DHCP (Dynamic Host Control Protocol). This is recommended for a desktop/laptop. If you select "Yes", skip the "For a static IP" section. The IP address will be configured via DHCP and you will move on to setting the hostname.
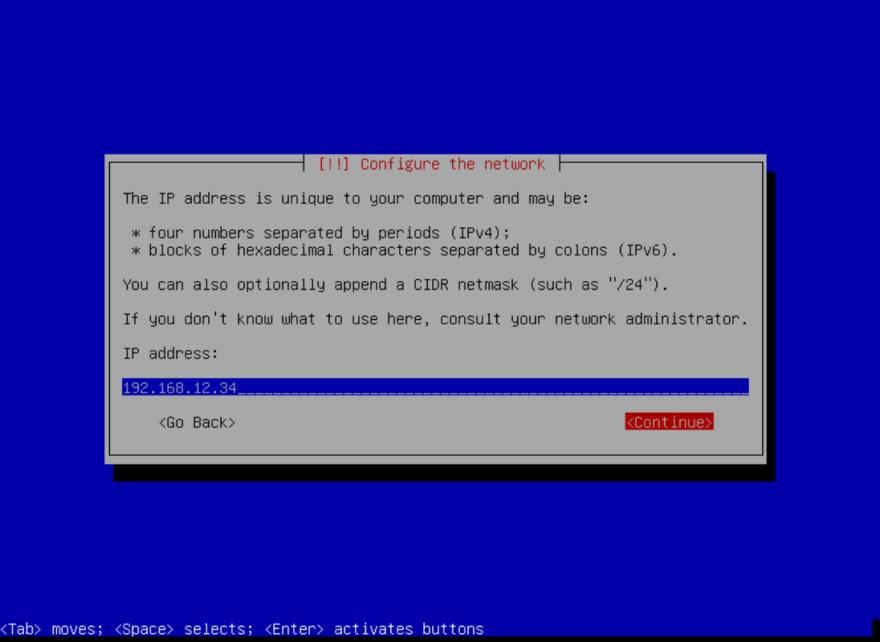
Select "No" to set a static IP address. A static IP address is recommended for a server.

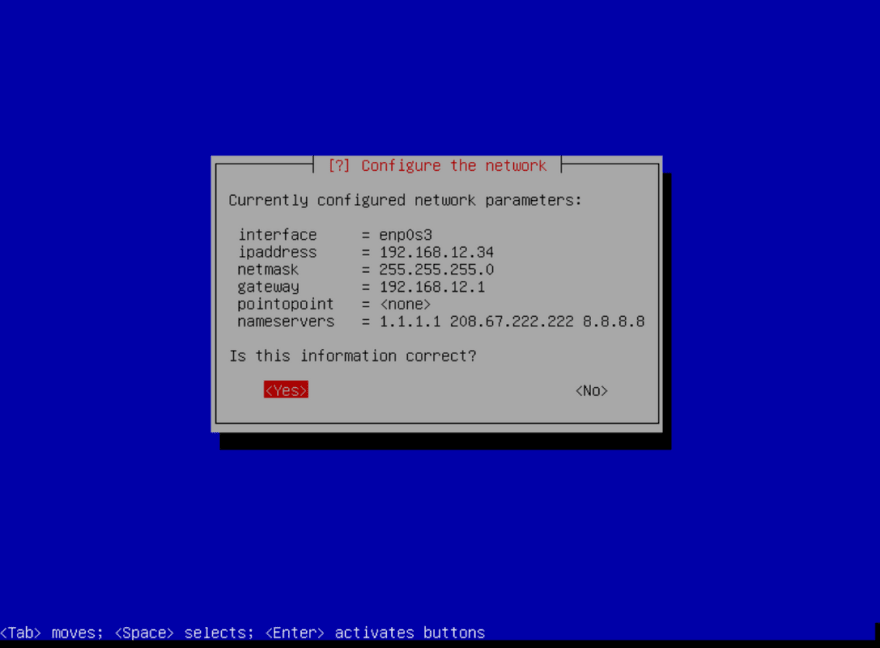
For a static IP I set my IP address to 192.168.12.34 since I know that will work on my network.
For a static IP I set the netmask to /24 which is 255.255.255.0.

For a static IP I set the gateway to 192.168.12.1 because that is the gateway of my network.

For a static IP I set three public DNS (Domain name servers) using a space as a delimiter.
1.1.1.1 <== Cloudflare DNS208.67.222.222 <== OpenDNS8.8.8.8 <== Google DNS

For a static IP Verify the networking information is correct. Click "Yes" to accept the changes.
Wait 3 seconds for the network link to be detected. Press "Continue".

Set the hostname for the computer.

Set a domain name for the system. It is better to make something up here. For more information see RFC6762

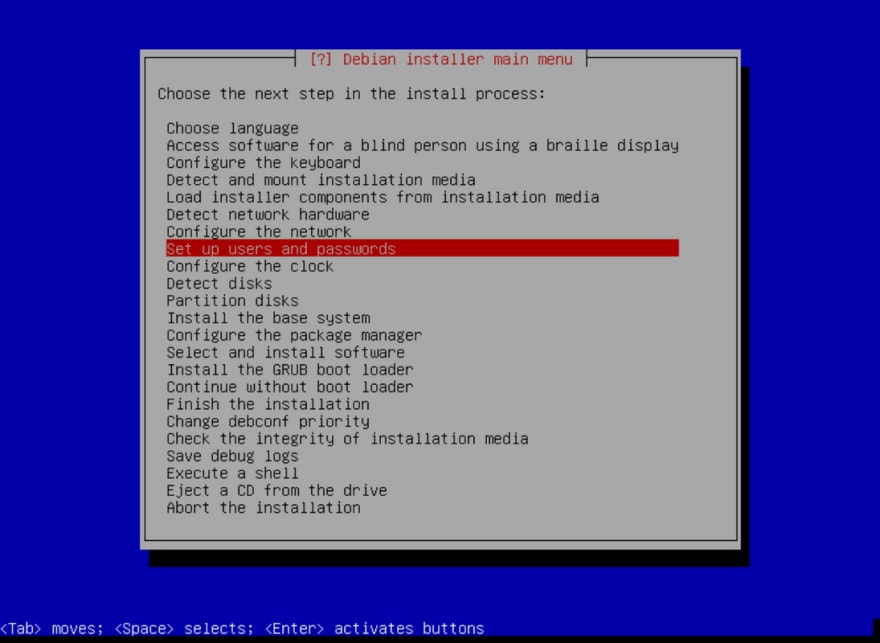
Set up users and passwords for the system.
Enable shadow passwords. Select "Yes" here. This is for security. Shadow passwords will allow the hashed password to be stored in /etc/shadow, which is only readable by root.

For added security, select "No" for "Allow login as root". Users will be able to type sudo to run root commands.

Type your full name here. Applications that display your full name will use this.

Type the user name which you will use to log into the computer.

Set a strong password here.

Re-type the password you selected to make sure it is correct.

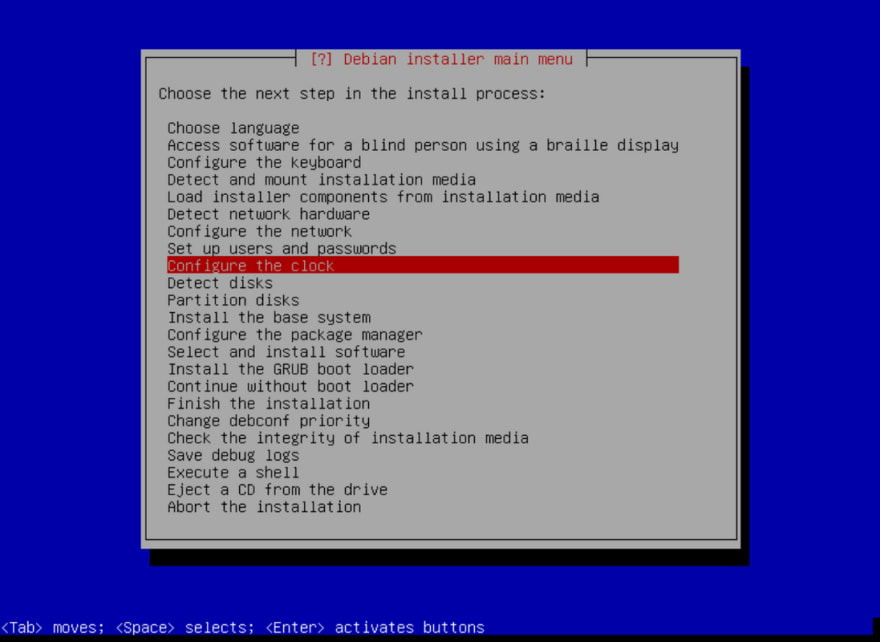
Set the system clock.
If you wish to use NTP (Network Time Protocol) select "Yes".

Select a public NTP server close to where you live for the best outcome. I live in the United States so I set my NTP server to "0.us.pool.ntp.org".

Set the time zone you live in. I selected "Eastern" since I live in the Eastern time zone.

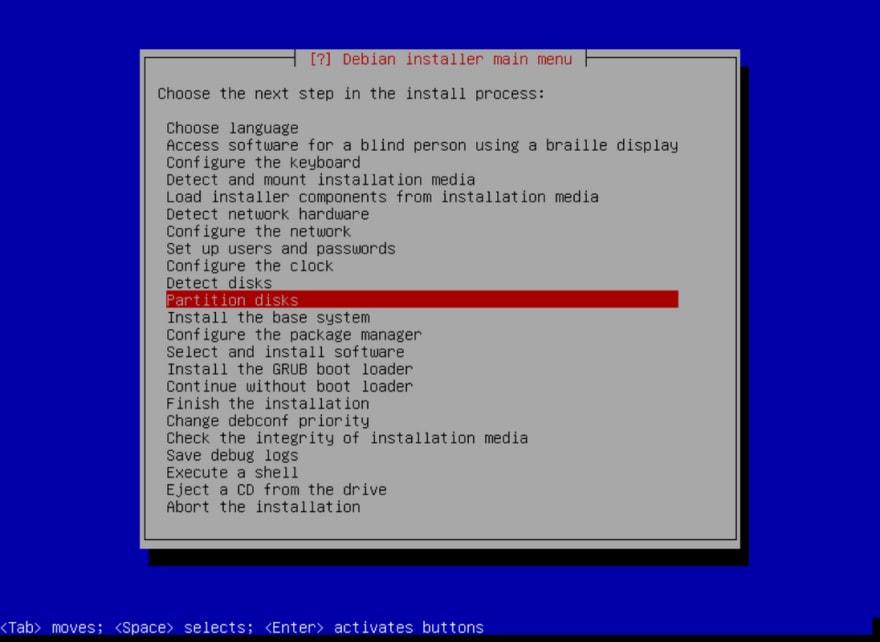
The installer will detect the disks connected to the system.

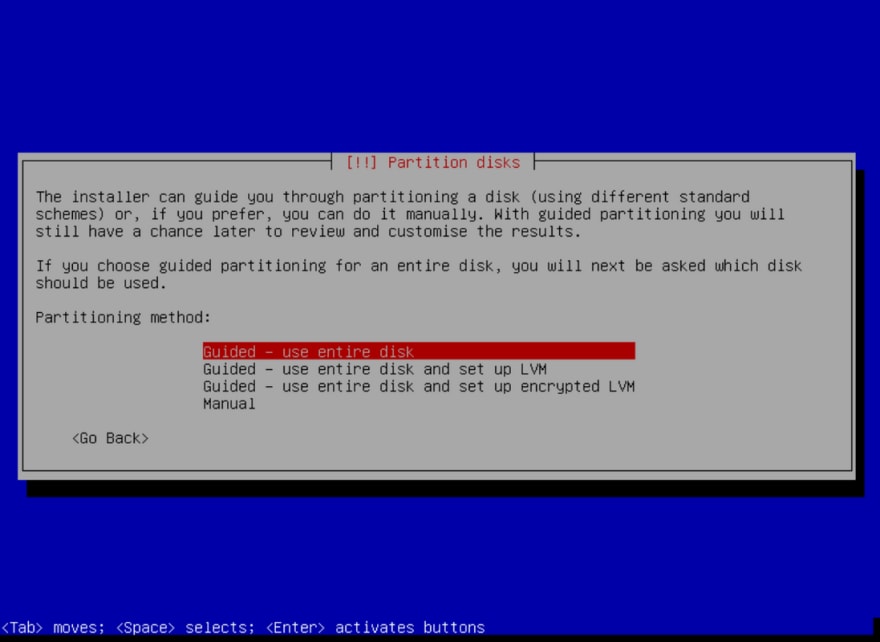
Partitioning the disks will allow us to divide the hard disk into sections. I select "Guided - use entire disk" here to install on my empty 500GB hard drive.
It displays I have one 500GB drive installed in the system.

Select the partitioning scheme you wish to use here. I recommend separating /home, /var, and /tmp partitions to for the following reasons.
- Separate data that needs backing up such as /home to make things easier.
- Isolate parts of the file system to increase security.
- Restrict the growth of a file system. If /var is filled it will not fill the whole disk.

After the guided partitions are created select "Finish partitioning and write changes to disk".

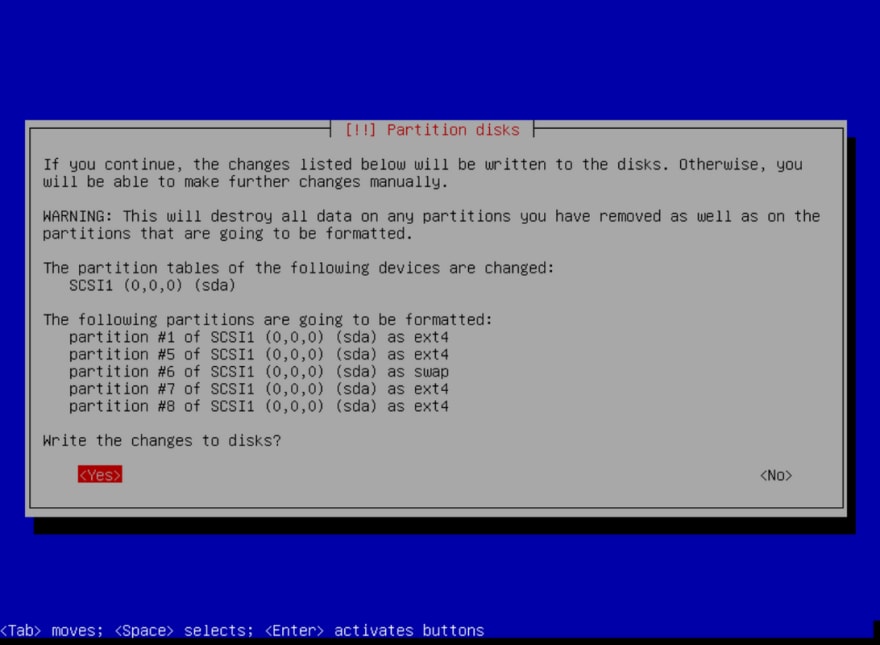
The changes will be displayed to make sure that is how you want it. Select "Yes" to write the changes to disk.
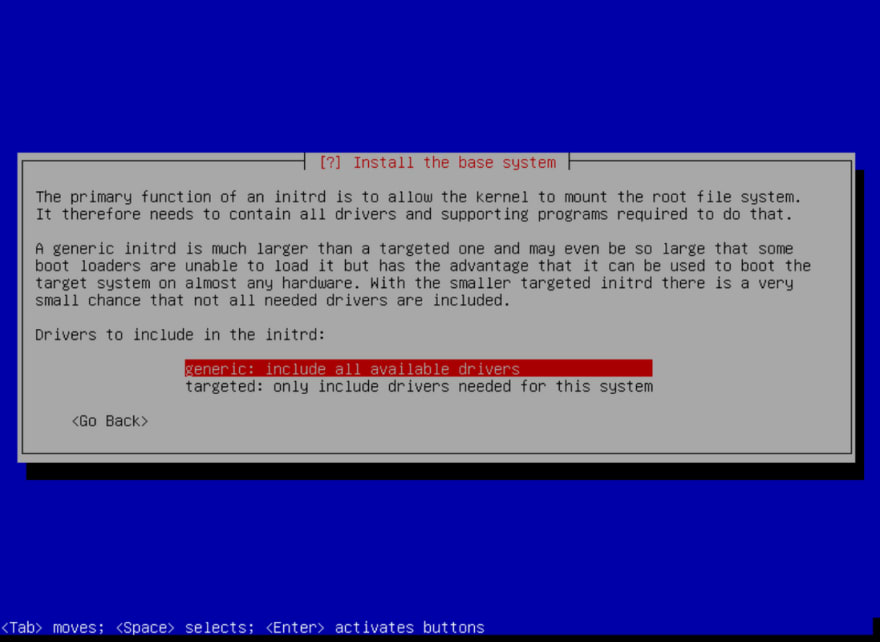
Install the packages for the base system.

Select a kernel to install in the system. linux-image-amd64 is the kernel generic package.linux-image-5.10.0-8-amd64 will just specify the exact version.

Select "generic: include all available drivers" to make sure you install the drivers you need.
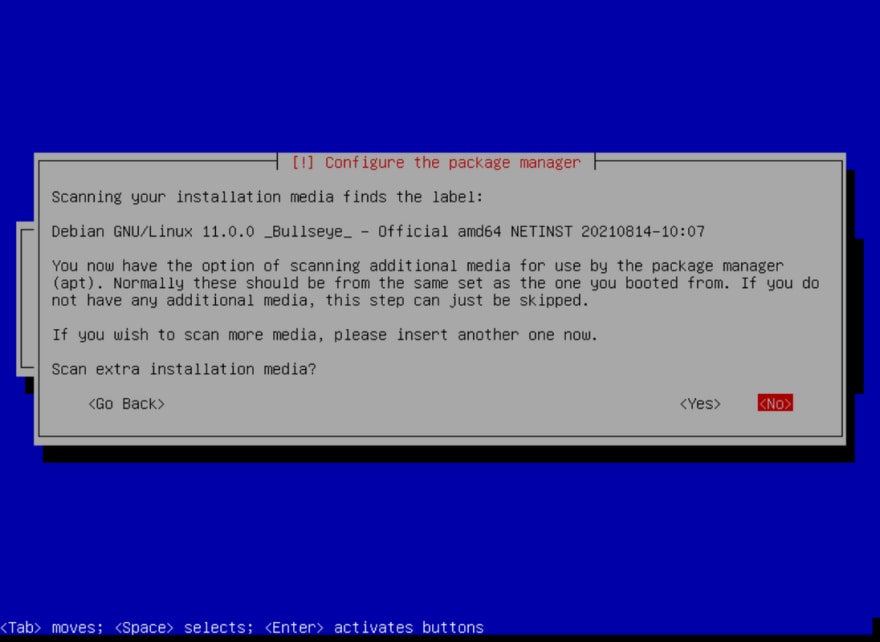
Configure the package manager.

This option allows you to scan for extra installation media such as a DVD. We only have the USB we are using to install the operating system. Select "No" to scan extra installation media. Extra programs can be installed from a network mirror.
Select "Yes" to use a network mirror. This will connect us to a online repository to access more software than what is on the installation USB.

Select "http".

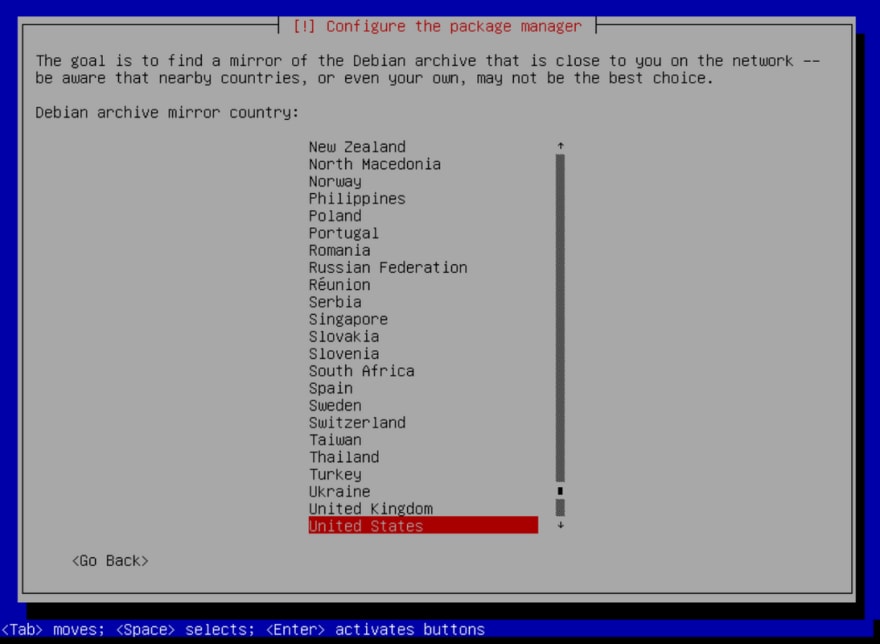
Pick a network mirror that is closest to you for the fastest download.

Leave HTTP proxy information blank and select "Continue" unless you know you are using a proxy.

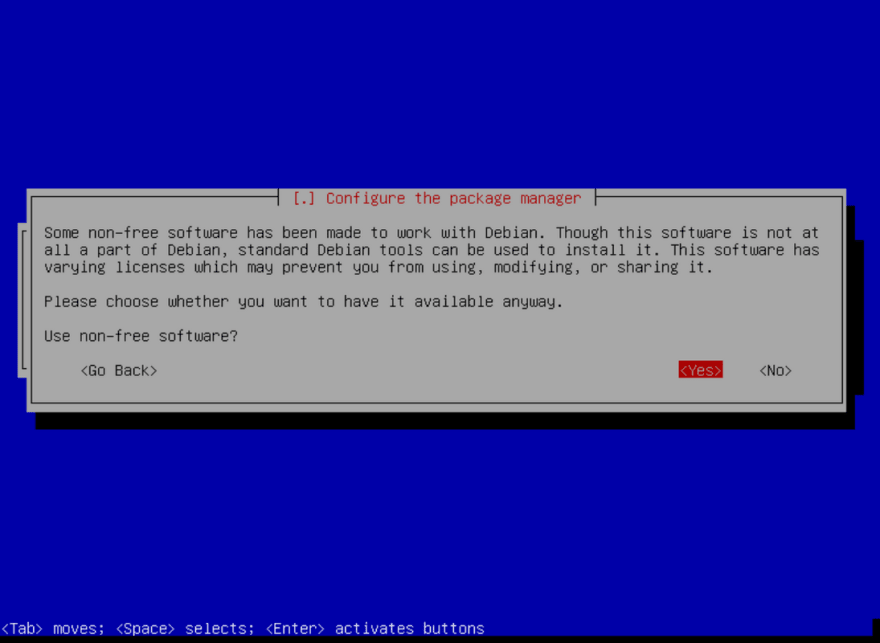
Select use "non-free" software. Recommended for a desktop/laptop.
Source repositiories in APT will allow you to download the source code for packages. You can select "No" here. This can be enabled easily in /etc/apt/sources.list later if you want.

It is recommended to install security updates. Click "Continue".

Select and install software.

It is your choice to have security updates installed automatically using the unattended-upgrades package. The default setting is to not run automatic security updates.

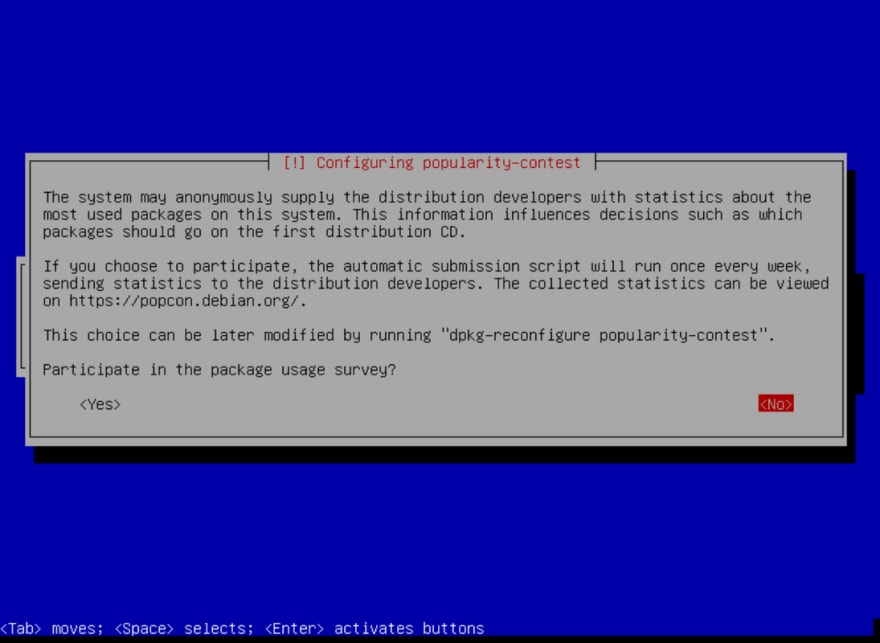
You can join the package survey if you wish here.
For a minimal Debian install I have deselected everything here except for "standard system utilities". This will provide you with a lean system that is not resource hungry. Remember other packages can be installed later.

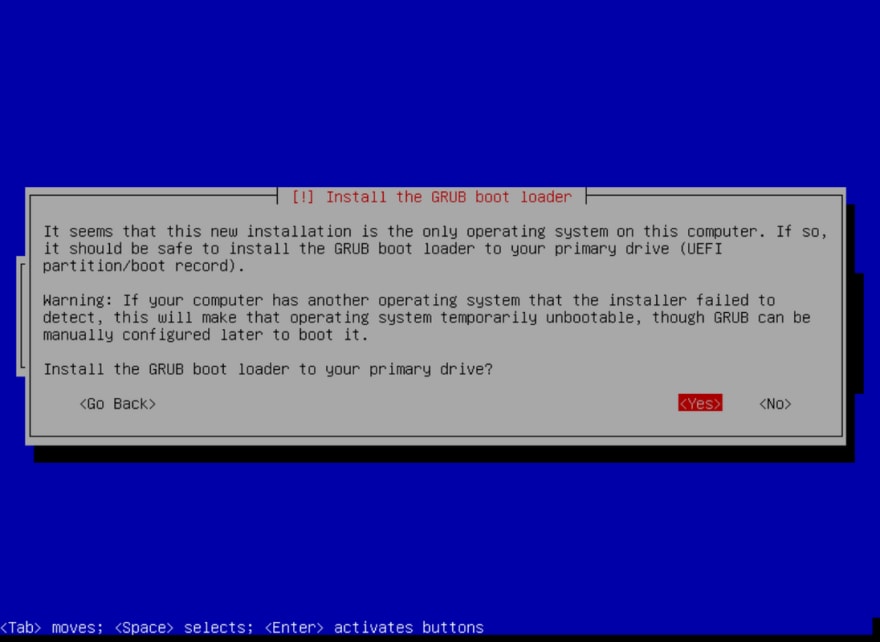
Install GRUB to the boot loader of the hard disk.

Select "Yes" to install GRUB to the primary drive.
I have one drive in the computer, /dev/sda. I will select that option instead of entering it manually.

Select "Yes" to force GRUB installation to the EFI removable media path to a fallback location just in case the EFI firmware does not meet the EFI specification.

Click "Enter" to finish the installation.
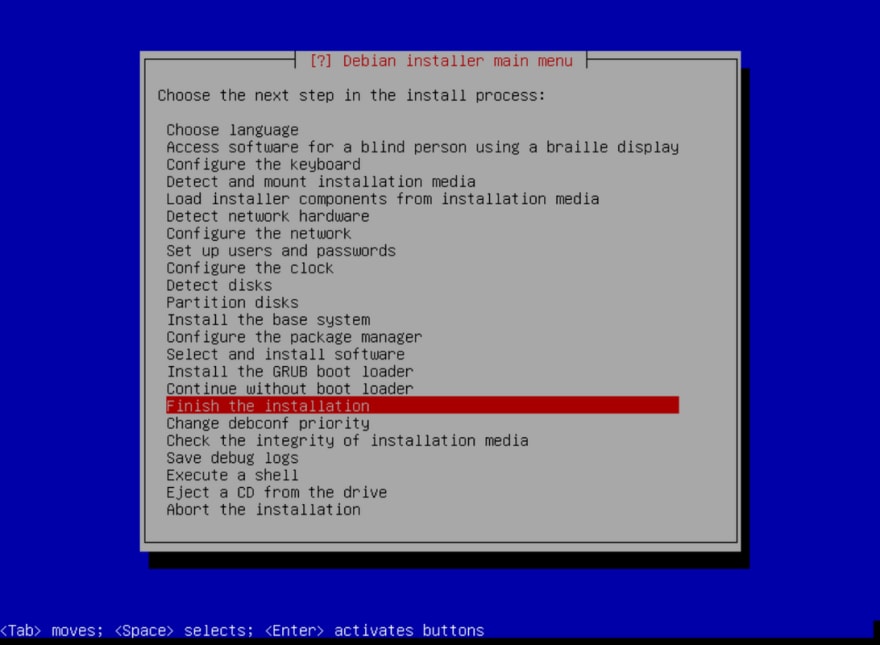
Click "Yes" to set the system clock to UTC.

If you wanted to set up a server, once you get to this point reboot the computer and your Debian installation is finished.

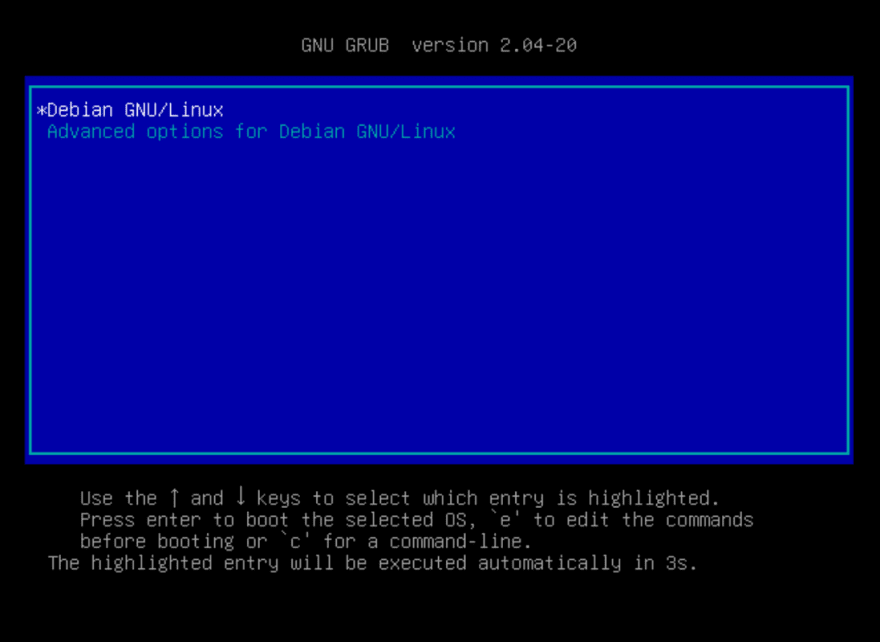
If you only wanted a minimal server you are done with the installation process. Click "Continue" to reboot. Remember to remove the USB flash drive installation media. Upon reboot you will be presented with this splash screen.
How to add a desktop environment
If you wanted a graphical user interface sign in and install the desktop of your choice. You have many desktop options such as Xfce, Gnome, KDE, Mate, LXDE. See task-xfce-desktop task-gnome-desktop task-kde-desktop etc.
To install the Xfce desktop run these commands.
$ sudo apt update$ sudo apt upgrade$ sudo apt install task-xfce-desktop $ sudo systemctl rebootAfter logging in you will be presented with the Xfce desktop.

Conclusion
I have shown you how to expert install of Debian 11 Bullseye step by step.
You will be now able to use Debian's flexible installer to install a minimal server or a desktop/laptop.
Follow me on Dev.to and Github.
Please feel free to leave comments, questions, and suggestions.
Original Link: https://dev.to/brandonwallace/how-to-install-debian-11-bullseye-expert-mode-minimal-install-10pd
Dev To
More About this Source Visit Dev To