
An Interest In:
Web News this Week
- April 19, 2024
- April 18, 2024
- April 17, 2024
- April 16, 2024
- April 15, 2024
- April 14, 2024
- April 13, 2024
Some of Our Sources
- Techcrunch
- TutsPlus - Code
- The Logo Smith
- Spoon Graphics
- Smashing Apps
- Vandelay Design
- My Ink Blog
- CSS Globe
- Line 25
- Hashedout
Help Webnuz
Referal links:
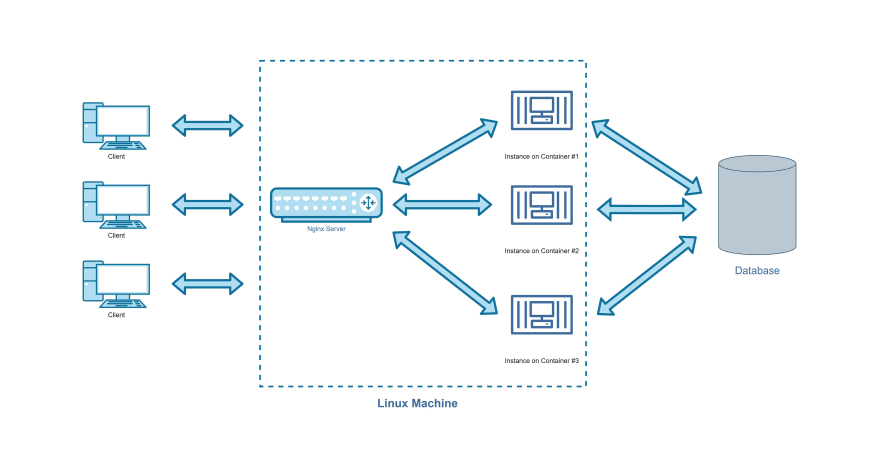
One-Tap Deployments with Nginx and Docker: Configuring for Load Balancing
Welcome back, in the previous article, we briefly introduced reverse proxies, and how we could use some of them, namely Nginx, to load balance our app, for an easier scale-out and serving. We also concluded the final architecture we'll be after as our final result:
Today, we'll jump right into the basics of Nginx, so first up, make sure you have it installed on your machine.
Once you have it installed, we can navigate to the configuration folder where all the magic really happens. Start off by navigating to this path /etc/nginx/ (if you're on Linux), you should be able to see an nginx.conf file, launch it using your favorite text editor, and let's have a look in there.
The file is not empty, and it has some default configurations already set, lets delete everything and start from scratch.
We will learn today 3 basic setups:
- Serving local files
- Serving a hosted URL
- Accessing multiple instances through Load Balancing
Serving Local Files
The basic skeleton of a nginx.conf file should (in most scenarios) contain these two directives.
http {}events {}We'll leave events empty for now and focus on the other directive, http which is where we'll be configuring Nginx as an HTTP server.
Before we continue, note that we'll be stopping and starting Nginx multiple times whenever we apply changes to the
conffile, so if Nginx is not already running, run it usingnginxcommand.
If it is already running and we need to restart it, we'll have to stop it usingnginx -s stopcommand, and then start it once again usingnginx.
If you're on Linux make sure that you are running these commands in an elevated grant usingsudo.
Let's add an HTTP server, which listens on port 8080:
http { server { listen 8080; }}events { }Save the file, restart Nginx and navigate to localhost:8080, you should be able to see the following welcome screen:

Nginx has pulled this static HTML file from a default path because we've not yet set any. We'll be setting one now, I created a simple HTML file called index.html in a folder called Nginx_Article on the Desktop:
<html> <body> CUSTOM NGINX PAGE, YAY! </body></html>Its full path should be /home/{myusername}/Desktop/Nginx_Article/, remember I'm using Linux, so this path might be a little bit different in your case, also don't forget to replace {myusername} with your account's username (without the curly braces of course).
Now let's configure Nginx to point to this web page when we hit port number 8080:
http { server { listen 8080; root /home/{myusername}/Desktop/Nginx_Article/; }}events { }Restart Nginx and reload localhost:8080, and you should be able to see our index.html nicely served.
Now, let's go a level higher, what if we've got multiple directories that need to be served, not just a single root?
Easy,
http { server { listen 8080; location /images { root /home/{myusername}/Desktop/Nginx_Article_Another_Directory/; } location /videos { root /path/to/another/root/; } }}events { }Here we used the root directive inside a location directive, this setup will ask Nginx to serve this directory: /home/{myusername}/Desktop/Nginx_Article_Another_Directory/images in case localhost:8080/images was requested.
Don't forget to create the directory on your machine, and maybe add some images to test requesting them.
Important Note: The directory /images should have an index.html file to be served by default OR you'll have to ask for a specific file, for example: localhost:8080/images/cat.jpg, and if no files are saved in /images, the previous request will return forbidden status.
Another way of path mapping is using the alias directive as below:
http { server { listen 8080; location /documents { alias /home/{myusername}/Desktop/Nginx_Article_Another_Directory/top_secret; } }}events { }The alias directive will ask Nginx to serve this directory: home/{myusername}/Desktop/Nginx_Article_Another_Directory/top_secret in case localhost:8080/documents was requested.
Let's Summarize
- In case of
aliasdirectory, we have to provide the full path to which Nginx was supposed to navigate, on the other hand, therootdirectory just had the root path of the directory, and the location value is to be appended to that path. - There is no actual directory named
/documentsinsideNginx_Article_Another_Directory, we are just creating an "alias" for the directory/top_secret.
Serving a hosted URL
Let's say we're building a reverse proxy to www.example.com, we want users to view the site from our own domain, this could be done easily through the following configuration:
http { server { listen 8080; location / { proxy_pass http://www.example.com/; } }}events { }Try navigating to localhost:8080 after restarting Nginx, you should be able to see the exact same page as that of example.com.
This could be used the same way when serving a locally hosted application (in our case, the backend application) that's accessible through port 5000,
http { server { listen 8080; location / { proxy_pass http://127.0.0.1:5000/; } }}events { }Accessing multiple instances through load balancing
For this use case, we are going to deploy a simple Hello World app, with minimal setup, all you'll need is a working Docker setup on your machine.
Head down to your favorite terminal app, and spin up 3 instances of the same app, each on its own container, we'll be using the "helloworld" Docker Image, which is exposed internally on port 80, when requested, it will print the Id of the container for the response:
foo@bar:~$ docker run -p 1111:80 -d strm/helloworld-http478405720f2106d718edb1602812528ae53011cb196dc3731447c64d0bd8f2fffoo@bar:~$ docker run -p 1112:80 -d strm/helloworld-httpa374ce45bf07b9747573e7feb1ae9742e72d2a31d74c2da3caa43abd5586a108foo@bar:~$ docker run -p 1113:80 -d strm/helloworld-http422efc18f418772cb96ea6088f2f801854ad4da21436da2c485f3ef80cca20ecNotice that docker prints the ID of each container after each run command, also notice that we deployed 3 instances of the app, each accessible from outside its housing container through ports :1111, :1112, :1113. So for example, to navigate to the first instance of the app, you'll need to head to localhost:1111, and so on.
Now let's play with the conf file to set it up to balance an incoming load over our 3 instances.
http { upstream allinstances{ server 127.0.0.1:1111; server 127.0.0.1:1112; server 127.0.0.1:1113; } server { listen 8080; location / { proxy_pass http://allinstances/; } }}events { }Looks like we've added a new directive to our deck, upstream, where our proxy_pass now points at.
upstreamdefines a cluster that you can proxy requests to. It's commonly used for defining a web server cluster for load balancing.
Basically, this tells Nginx to Round-Robin each incoming request so that each server serves an equal number of requests. Each time you hit the refresh button, you are going to be greeted with a different server.
You could get creative with the location directive, maybe you'd want to split users down to two proxy_passes, so /odd would navigate to 1111 or 1113, and /even would navigate to port 1112.
What if your application is saving user data in memory? You'd then need to make a user's session "sticky" by hashing IP addresses of the users so that a given user is guaranteed to hit the same server as long as his IP address did not change:
upstream allinstances{ ip_hash; # << Will hash the user's IP address and resolve to a single server server 127.0.0.1:1111; server 127.0.0.1:1112; server 127.0.0.1:1113;}After adding the ip_hash command, no matter how much you refresh the page, you'll always be served by the same server.
I think you now have the basics that can get you up and going. In our next article we will be packaging the whole setup into containers (including Nginx) and deploying it through a single docker-compose command.
I'd like to end this one with a small but powerful quote by Oscar Wilde, Experience is the name everyone gives to their mistakes.
Keep up the good work .
Original Link: https://dev.to/paulafahmy/one-tap-deployments-with-nginx-and-docker-configuring-for-load-balancing-56b
Dev To
More About this Source Visit Dev To