
An Interest In:
Web News this Week
- April 24, 2024
- April 23, 2024
- April 22, 2024
- April 21, 2024
- April 20, 2024
- April 19, 2024
- April 18, 2024
Some of Our Sources
- Slashdot
- Mashable
- Web Designer Wall
- The Logo Smith
- Smashing Apps
- Web Designer Depot
- Noupe
- Spyre Studios
- Dev To
- Hashedout
Help Webnuz
Referal links:
How to setup a headless Raspberry Pi - clearly explained (beginner's friendly)
In this beginner's friendly tutorial we will be setting up a Raspberry Pi (aka Pi) without an external monitor and keyboard (some of us just have a laptop ) in 4 simple steps:
- 1-getting an OS into the microSD card;
- 2-allowing remote access in a local network;
- 3-discovering the address and connecting in terminal;
- 4-viewing the desktop.
Also, a small discussion on how to choose an Operating System (OS) for a headless setup is also given, so you can later play around if you wish too .
What we will be using:
- Laptop
- Raspberry Pi 4
- MicroSD card (whatever size you want, bigger is better)
- Power supply
- Ethernet cable (optional but recommended)
Step 1: Getting an OS in the microSD card
Install an imaging utility that will get an OS into our microSD card. The easiest, and thanks to the Raspberry Pi Foundation team, is to use the official Raspberry Pi Imager (get it here: https://www.raspberrypi.org/blog/raspberry-pi-imager-imaging-utility/).
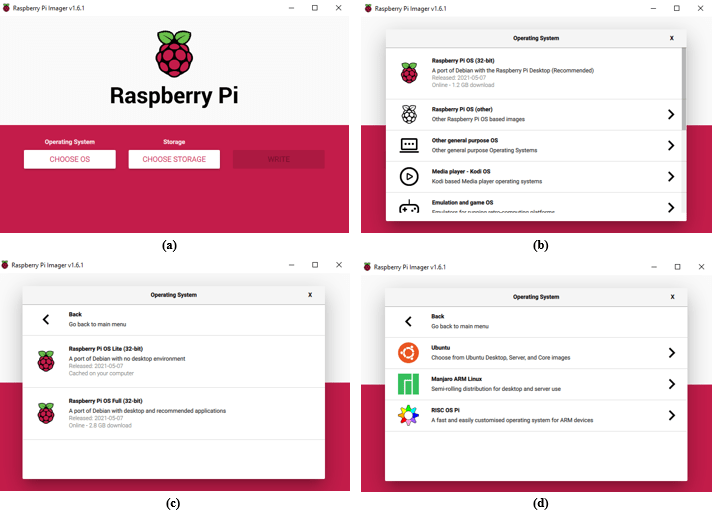
After installing, insert your microSD card into your laptop and open the Raspberry Pi Imager, you will be greeted by the screen in Figure 1 (a).
To see the given OS options click the "choose OS" button (Figure 1 (b)), the most straightforward option is to go with the recommended Raspberry Pi OS (32-bit). That's us!
Choose the microSD as storage, click the write button and wait till a pop-up message appears stating to remove the card.
Note that the Imager has a whole lot of options including: two more versions of the Raspberry OS (Figure 1 (c)); other general OS (Figure 1 (d)) and several focused OS that we will skip (for now at least).
 |
|---|
| Figure 1. Raspberry Pi Imager interface: (a) main window; (b) choose OS options; (c) Raspberry Pi OS options; (d) other general OS options. |
If you are feeling adventurous you can go ahead and Pick other OS, the steps will be identical, you just need to pay attention to some details:
You can jump to step 2 if you don't want details about OS choices
Headless friendly - Since we are doing a headless setup (no monitor), we need to make sure the OS supports it or you won't be able to access your Pi, in the first boot up, using your laptop. I learned this the hard way after some experimentation (and a lot of headaches) . The only OS option you need to be careful with is the Manjaro-ARM Linux. If you want to try it make sure to choose the minimal version since all others will require a monitor to do the initial setup. (To check if an OS has headless setup you can check the documentation of the release);
Different distributions - All OS available in the Imager are Debian except Manjaro, which is Arch based. The commands used with Debian won't work when using Manjaro;
Storage - If you are running low on resources (4GB microSD card) or you are "The Scrooge McDuck" of storage, you may have noticed that there are options that take roughly half the space of others! The Raspberry Pi OS has three versions: Lite, that doesn't include a Graphical User Interface (GUI) so you can only use the terminal (hacker style!); the recommended includes a GUI; Full includes a GUI and some pre-installed software. If you are a beginner and want to try a no-GUI version but are not sure if you will regret it, don't worry, you can always install a GUI using the terminal (coming soon);
Usage - Are you a beginner that wants to discover Linux or have a specific project in mind? If you want to use you Raspberry Pi to host a Git server, a cloud storage or something similar, you won't be needing a GUI, and doing so will just waste resources, so you can choose a version without a desktop environment (like Raspberry Pi OS Lite or Manjaro ARM Minimal).
Step 2: Allowing remote access in a local network
Insert the microSD card into your laptop so we can modify it to tell our Pi we are going to access remotely, using what is called SSH.
Open the file explorer, you will see a bunch of folders and files, create a new file without extension called "ssh", you should see something like Figure 2.
 |
|---|
| Figure 2. The created SSH file should look like this. |
This file will make the Pi enable SSH when it turns on, and thus making it possible for us to access it using our laptop's terminal when both are on the same network.
To connect the Pi to the same network as your laptop you can use:
Ethernet cable: Plug the cable onto the Pi and your internet router and you're ready to go!
Wifi: Just like the ssh file, create a file named "wpa_supplicant.conf". This will store your wifi's name and password so the Pi will read this file when starting and connect to your wifi. Open the created file and copy/paste the following and substitute the "WIFI_NAME" and "WIFI_PASSWORD" fields with the login details:
ctrl_interface=DIR=/var/run/wpa_supplicant GROUP=netdev update_config=1country=USnetwork={ ssid="WIFI_NAME" psk="WIFI_PASSWORD" scan_ssid=1}Step 3: Discovering the address and connecting in terminal
Remove the microSD card from your laptop, plug it into your Raspberry Pi and connect a power supply. You will see a green light turning on, this means our Pi is now alive!
Now, go to your laptop and open the terminal (in Windows it's called Command Prompt).
Now we are going to check if the Pi was able to connect to our network, use the command ping raspberrypi and you should see something like this:
Pinging raspberrypi.local [192.168.50.166] with 32 bytes of data:Reply from 192.168.50.166: bytes=32 time<1ms TTL=64Reply from 192.168.50.166: bytes=32 time<1ms TTL=64Reply from 192.168.50.166: bytes=32 time<1ms TTL=64Reply from 192.168.50.166: bytes=32 time<1ms TTL=64Ping statistics for 192.168.50.166: Packets: Sent = 4, Received = 4, Lost = 0 (0% loss),Approximate round trip times in milli-seconds: Minimum = 0ms, Maximum = 0ms, Average = 0msThis is like the Pi shouting "I'm alive!" and it tells where its home is in case we want to go over and say hi (don't forget the ), mine lives at 192.168.50.166.
You now know your Pi's address so let's access it using ssh [email protected]. It will ask you for a password, since it's the first login then it has to be the default one, use raspberry (the prompt won't move, it's normal). If you were successful the location on your terminal should have changed to pi@raspberrypi:~ $, this means we are now working in the Raspberry Pi!
Note that if you choose an OS other than Raspberry Pi OS (also referred as Raspbian), the default user (pi) and password (raspberry) may be different, you know who to ask .
Step 4: Viewing the desktop
The terminal is great but we want to see the Graphical User Interface to play around with Linux in a more friendly way. To do this we need a software that allows to control a remote desktop, we are going to use VNC Server.
First let's make sure our Pi has the latest updates, on the terminal do,pi@raspberrypi:~ $ sudo apt-get updatepi@raspberrypi:~ $ sudo apt-get upgrade
and wait (quick, run and grab some coffee ).
Now we need to install the VNC Server using sudo aptget install realvncvncserver realvncvncviewer (if it gives an error and you copy/paste the command try rewriting the dashes, sometimes it pastes a double dash ).
When the installation finishes we need to enable it, do,sudo raspi-config
a pop-up window will appear, Figure 3. Use the arrows and return button to go to "3: Interface Options" -> "P3 VNC" and select "Yes".
 |
|---|
| Figure 3. Configuration options pop-up window. |
Almost done! Now we have to install the VNC Viewer in our laptop, I use RealVNC (find it here: https://www.realvnc.com/en/connect/download/viewer/).
After installing, launch the software and write your Pi address on the top bar and hit enter, Figure 4. A pop-up window will ask for your credentials to access, after that you will be able to see your Raspberry Pi's desktop!
 |
|---|
| Figure 4. Accessing the Raspberry Pi desktop with VNC Viewer by entering its address. After doing this the first time, an icon will appear to ease future accesses. |
If all you can see is a black screen go back to the Pi's terminal and do sudo raspi-config. Navigate to "Display Options" -> "Resolution" and choose an option other than "default". Reboot you Pi sudo reboot and try accessing again on the VNC Viewer. It should work now!
That's it! Now it's play time!
Don't worry, if you mess up something you can always redo all this steps and you'll have a fresh OS to destroy again!
Original Link: https://dev.to/ceciliacoelho/how-to-setup-a-headless-raspberry-pi-clearly-explained-beginner-s-friendly-4aph
Dev To
More About this Source Visit Dev To